
Upgrading your computer’s Random Access Memory (RAM) is often one of the most impactful and straightforward ways to boost its performance. Whether you’re a gamer seeking smoother frame rates, a creative professional working with large files, or simply a power user frustrated by sluggish multitasking, more RAM can make a noticeable difference. However, the process doesn’t end with physically installing the new modules. To ensure a seamless integration and to fully capitalize on your hardware upgrade, a few crucial steps should be taken. This guide will walk you through everything you need to do after installing new RAM, from initial verification to optimizing your system for maximum efficiency.
The allure of a faster, more responsive computer is strong, and RAM is often the bottleneck that holds back even the most powerful CPUs and GPUs. When you decide to add more RAM, you’re essentially giving your computer’s processor more breathing room. Instead of constantly swapping data between the fast but limited RAM and the much slower storage (like your SSD or HDD), the system can keep more frequently accessed information readily available. This translates to quicker application loading times, smoother transitions between programs, and the ability to handle more demanding tasks without stuttering or freezing.
But, like any hardware upgrade, simply slotting in new components isn’t always enough. The operating system needs to recognize the new memory, and sometimes, subtle configuration adjustments can unlock its full potential. Moreover, it’s wise to confirm that the installation was successful and that the new RAM is functioning correctly. Ignoring these post-installation steps can lead to performance issues, instability, or even prevent your system from booting properly. This article aims to equip you with the knowledge to navigate these essential follow-up actions, ensuring your RAM upgrade delivers on its promise of enhanced computing power.
Verifying Your RAM Installation
The most immediate and critical step after physically installing new RAM is to confirm that your system recognizes and is utilizing it correctly. This involves a combination of checking within your operating system and potentially using specialized software. A successful recognition is the foundational step before you can even begin to enjoy the benefits of your upgrade.
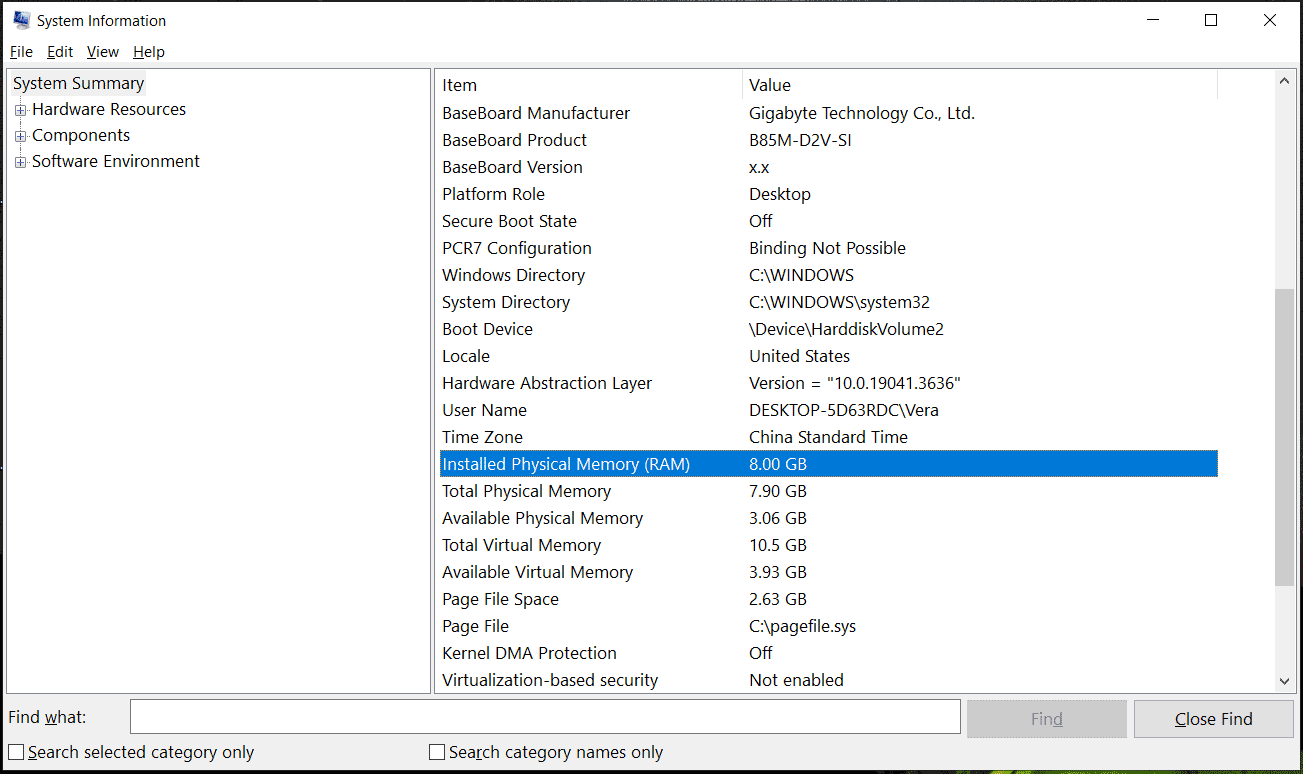
Checking System Information
The quickest way to verify your RAM is to access your operating system’s system information. The method varies slightly depending on your operating system.
For Windows Users:
- Right-click on the Start button and select “System.” Alternatively, you can press
Windows Key + Ito open Settings, then navigate to “System” > “About.” - Under the “Device specifications” section, you’ll find a line item for “Installed RAM.” This should display the total amount of RAM now installed in your system, which should be the sum of your old RAM and the newly added modules. For instance, if you had 8GB and added another 8GB, this should now read 16GB.
- For a more detailed look, you can open Task Manager. Press
Ctrl + Shift + Escto launch it. Navigate to the “Performance” tab, and then click on “Memory.” Here, you’ll see a graphical representation of your RAM usage, along with the total amount of RAM installed, its speed, and how many slots are being used. This is a great place to visually confirm the total capacity.
For macOS Users:
- Click on the Apple menu in the top-left corner of your screen.
- Select “About This Mac.”
- In the overview window, you’ll see a summary of your Mac’s hardware. Look for the “Memory” section. This will display the total amount of RAM and its configuration (e.g., how many slots are occupied and by what type of modules).
For Linux Users:
The command-line approach is often the most precise for Linux users.
- Open your Terminal.
- Type the following command and press Enter:
free -h. This will display your system’s memory usage, including the total RAM available. - Another useful command is
sudo lshw -class memory. This command provides a more detailed hardware listing, including information about your RAM modules.
If the reported RAM amount matches what you installed, then your system has successfully recognized the new memory. If the amount is lower than expected, or if it shows an error, it might indicate a faulty module, an incorrectly seated module, or a compatibility issue.
Running Memory Diagnostic Tools
While system information is a good initial check, it doesn’t guarantee that the RAM is functioning flawlessly. Errors in RAM can manifest as random crashes, blue screens of death (BSODs) on Windows, or general system instability. Therefore, it’s highly recommended to run a memory diagnostic tool.
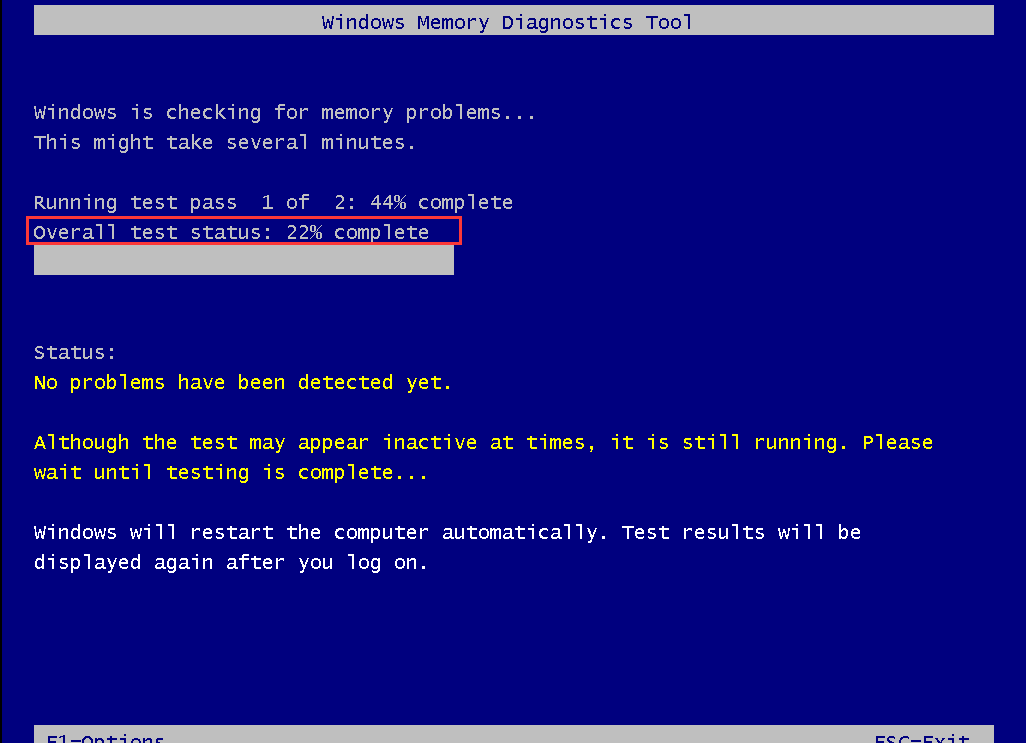
Windows Memory Diagnostic Tool:
Windows comes with a built-in tool to check for memory errors.
- Search for “Windows Memory Diagnostic” in the Start menu and open it.
- You’ll be prompted to either “Restart now and check for problems (recommended)” or “Check for problems the next time I start my computer.” Choose the former.
- Your computer will restart and run the memory test before booting into Windows. This process can take some time, depending on the amount of RAM you have.
- Once Windows boots up, it will display the results of the test. If any errors are found, it will indicate that your new RAM (or potentially an existing module) might be faulty.
Third-Party Memory Testing Tools:
For a more thorough or if you’re not running Windows, consider using robust third-party tools.
- MemTest86+: This is a highly respected open-source memory testing utility that runs independently of your operating system. You typically create a bootable USB drive with MemTest86+, boot your computer from it, and let it run through multiple passes of rigorous memory tests. It’s considered one of the most comprehensive tools for detecting RAM issues.
- AIDA64 Extreme: This is a paid system information and diagnostic tool that offers extensive hardware testing capabilities, including advanced memory diagnostics. It’s often used by enthusiasts and professionals for in-depth hardware analysis.
If any of these diagnostic tools report errors, it’s a strong indication that one or more of your RAM modules are defective. In such cases, you should consider returning the RAM for a replacement.
Ensuring Compatibility and Performance
Beyond simply recognizing the RAM, ensuring it’s functioning at its intended speed and is compatible with your motherboard and CPU is crucial for optimal performance. This involves understanding the specifications of your new RAM and how they interact with your existing hardware.
Understanding RAM Specifications and Motherboard Compatibility
When you purchase new RAM, it’s essential to consider its specifications and whether they align with your motherboard’s capabilities. Key specifications include:
- DDR Generation (DDR3, DDR4, DDR5): These generations are not backward or forward compatible. You cannot install DDR4 RAM into a DDR3 slot, for example. Always ensure the new RAM matches the DDR generation supported by your motherboard.
- Speed (MHz): RAM speed, measured in megahertz (MHz), indicates how quickly the memory can transfer data. Your motherboard will have a maximum supported RAM speed. While installing faster RAM than your motherboard supports might work, it will likely run at the motherboard’s maximum speed, negating the benefit of the faster modules.
- Capacity (GB): Ensure your motherboard supports the total capacity of RAM you’re installing. Modern motherboards generally support ample RAM, but older ones might have limits per slot or in total.
- Timings (CL – CAS Latency): These are a series of numbers (e.g., 16-18-18-38) that represent the delay between the memory controller requesting data and the RAM module providing it. Lower timings generally mean faster performance, but compatibility and overall system stability are prioritized.
- Voltage: Most DDR4 and DDR5 RAM operate at standard voltages, but some high-performance kits might require higher voltages, which your motherboard must also support.
You can find your motherboard’s RAM compatibility specifications in its user manual or by visiting the manufacturer’s website. Many motherboard manufacturers also provide a “Qualified Vendor List” (QVL) which lists RAM kits that have been tested and confirmed to work with their boards.
Enabling XMP/DOCP Profiles for Maximum Speed
Out of the box, your new RAM modules might be running at a slower, standard speed (often referred to as JEDEC speeds) to ensure broad compatibility. To unlock their advertised speeds (e.g., 3200MHz, 3600MHz), you often need to enable an XMP (Extreme Memory Profile) on Intel systems or DOCP (Direct Overclock Profile) on AMD systems within your motherboard’s BIOS/UEFI.
Accessing BIOS/UEFI:
- Restart your computer.
- As your computer starts to boot, you’ll see a prompt on the screen to press a specific key to enter Setup or BIOS/UEFI. Common keys include
Del,F2,F10, orF12. Press this key repeatedly as soon as you see the manufacturer’s logo. - Once inside the BIOS/UEFI interface, navigate to the memory settings. The exact location can vary by motherboard manufacturer, but it’s often found under sections like “Overclocking,” “Advanced,” or “AI Tweaker.”
Enabling XMP/DOCP:
- Look for an option labeled “XMP Profile,” “DOCP,” or similar.
- Select the profile that corresponds to the advertised speed of your RAM. Often, there are multiple profiles, with Profile 1 usually being the primary and highest-performing setting.
- Save your changes and exit the BIOS/UEFI. Your computer will restart.
After restarting, you can go back to your system information (as described in the previous section) or Task Manager to confirm that your RAM is now running at the intended higher speed.
Caution: While enabling XMP/DOCP is generally safe, it’s important to ensure your RAM is stable at these speeds. If you experience any instability after enabling it, you might need to manually adjust timings or voltage, or revert to a lower profile if available. Running memory diagnostics again after enabling XMP/DOCP is a good practice.
Optimizing Your System for Enhanced Performance
With your new RAM recognized and running at its intended speed, you can now take steps to ensure your entire system benefits from this upgrade. This involves leveraging the increased memory for better multitasking, faster application performance, and even some advanced techniques for specific use cases.
Improved Multitasking and Application Responsiveness
The most immediate benefit of more RAM is enhanced multitasking. With more memory available, your operating system can keep more applications and their data loaded and ready, rather than having to constantly fetch them from slower storage.
- Simultaneous Applications: You’ll notice a significant difference when running multiple demanding applications simultaneously. For example, a graphic designer can have Photoshop, Illustrator, and a web browser with numerous tabs open without the system bogging down.
- Virtual Machines and Containers: For developers or IT professionals, more RAM is critical for running virtual machines or containers efficiently. Each VM or container requires its own allocation of memory, and a substantial amount of RAM allows you to run more of them concurrently with better performance.
- Large File Handling: Applications that work with large datasets, such as video editing software, CAD programs, or scientific simulation tools, benefit immensely. More RAM means these applications can load and manipulate larger files directly in memory, reducing the reliance on slower disk I/O.
To truly experience this, try opening more applications than you normally would, or work with larger files. You should find your system remains responsive and fluid. Monitor your Task Manager (or equivalent) to see how your RAM usage increases, but crucially, observe how the system’s overall performance remains high.
Configuring Page File/Swap Space (Advanced)
The page file (on Windows) or swap space (on Linux/macOS) is a portion of your hard drive or SSD that the operating system uses as virtual memory when your physical RAM is full. While having more RAM reduces the need for this, it’s still an integral part of memory management.
For Windows:
- Search for “View advanced system settings” in the Start menu and open it.
- In the “System Properties” window, under the “Advanced” tab, click on “Settings…” within the “Performance” section.
- In the “Performance Options” window, go to the “Advanced” tab and click “Change…” under the “Virtual memory” section.
- By default, Windows manages this automatically. You can choose to “Automatically manage paging file size for all drives.”
- If you have multiple drives, especially a fast NVMe SSD, and a slower HDD, you might consider moving the page file to the faster drive or disabling it on the slower drive to free up space. However, for most users, letting Windows manage it is optimal, especially with ample RAM.
- Important Note: With a significant amount of RAM (e.g., 32GB or more), some users choose to set a custom page file size or even disable it entirely. However, disabling it can lead to instability and application crashes if you do unexpectedly exceed your physical RAM. It’s generally recommended to keep it enabled and managed by the system, or at least set to a reasonable custom size.
For Linux:
Swap space is typically configured during installation. You can check its status using free -h or swapon --show. If you need to adjust it, you would typically create a swap file or partition and then activate it using swapon.
The benefit of a well-configured page file/swap space, even with more RAM, is to provide a safety net against memory exhaustion. While your goal is to keep as much active data in RAM as possible, the virtual memory system ensures that your computer doesn’t crash if it momentarily exceeds physical capacity.
Re-testing and Monitoring Stability
After making any BIOS/UEFI changes (like enabling XMP/DOCP) or system configuration adjustments, it’s prudent to re-test your system’s stability.
- Stress Testing: Run a CPU and RAM stress test simultaneously. Software like Prime95 (with its Blend test for RAM and CPU) or AIDA64’s system stability test can push your components to their limits. Monitor your system for any crashes, freezes, or unexpected reboots.
- Real-World Usage: Beyond synthetic tests, use your computer for your typical demanding tasks for an extended period. Play games, render videos, run complex simulations, or open dozens of browser tabs. The goal is to expose any latent instability that might not appear in shorter, more focused tests.
- Monitoring Temperatures: While not directly related to RAM, increased component usage during stress testing can lead to higher temperatures. Ensure your CPU and GPU cooling solutions are adequate. Overheating can cause throttling and instability.
If you encounter any issues during these tests, it’s important to backtrack. Revert any BIOS settings, check module seating, or consider testing each RAM module individually to identify a potentially faulty stick.

Conclusion
Installing new RAM is a rewarding upgrade that can breathe new life into your computer. However, the journey to optimal performance doesn’t conclude with the physical installation. By diligently verifying your system recognizes the new memory, ensuring compatibility and speed settings are correctly configured through BIOS/UEFI, and then optimizing your system’s virtual memory and testing for stability, you ensure that your investment yields the maximum possible benefit.
The steps outlined – from checking system information and running diagnostics to enabling XMP/DOCP profiles and configuring virtual memory – are crucial for a smooth transition. A successful RAM upgrade means a more responsive system, smoother multitasking, and the ability to tackle more demanding applications with confidence. Treat these post-installation steps as an integral part of the upgrade process, and you’ll enjoy a noticeably faster and more reliable computing experience for years to come. Remember that with more RAM, your computer has more resources at its disposal, allowing it to perform a wider array of tasks more efficiently. Enjoy the enhanced speed and capability!
aViewFromTheCave is a participant in the Amazon Services LLC Associates Program, an affiliate advertising program designed to provide a means for sites to earn advertising fees by advertising and linking to Amazon.com. Amazon, the Amazon logo, AmazonSupply, and the AmazonSupply logo are trademarks of Amazon.com, Inc. or its affiliates. As an Amazon Associate we earn affiliate commissions from qualifying purchases.