
Understanding Tapcon Technology: The Science of Concrete Anchoring
The seemingly simple act of anchoring into concrete or masonry involves a sophisticated interplay of material science, engineering principles, and precise execution. Tapcon screws, renowned for their ability to securely fasten directly into these challenging substrates without pre-setting an anchor, represent a significant advancement in fastening technology. Understanding the core mechanics behind their effectiveness is paramount to achieving reliable, long-lasting connections, and this understanding begins with the pilot hole.
What Makes Tapcons Unique?
Tapcon screws are self-tapping concrete anchors. Unlike traditional expansion anchors that exert outward pressure to create friction and grip, Tapcons cut their own threads directly into the base material as they are driven in. This action creates a mechanical interlock that is incredibly strong and resistant to pull-out and shear forces. The screw’s unique thread design, often featuring a Hi-Lo thread pattern or specialized carbide-tipped points, is engineered to efficiently displace and compact the concrete or masonry, forming a tight, secure engagement. This direct threading capability minimizes the risk of cracking in brittle materials and allows for close-to-edge fastening, expanding their utility across numerous applications in construction and DIY projects.

The Critical Role of the Pilot Hole
For Tapcon technology to function optimally, the base material must be prepared precisely. This is where the pilot hole becomes the most critical factor. An incorrectly sized pilot hole directly compromises the screw’s ability to create a proper thread, leading to a drastically reduced holding strength, potential screw breakage, or even damage to the base material.
If the pilot hole is too small, the Tapcon screw will encounter excessive resistance. This can cause the screw to strip its head, snap, or fail to fully seat, leaving an insecure connection. The immense stress can also cause micro-fractures in the concrete around the hole, weakening the anchor point. Conversely, if the pilot hole is too large, the screw will not be able to cut adequate threads into the material. It will essentially spin freely, resulting in a loose, ineffective connection with virtually no holding power. The goal is to create a hole that is just slightly smaller than the core diameter of the screw, allowing the threads to bite firmly into the surrounding material, compacting it for maximum grip. This precision is a cornerstone of the Tapcon system’s technical effectiveness.
Precision Drilling: Selecting the Right Bit and Technique
Achieving the correct pilot hole size for a 3/16″ Tapcon screw is not merely about picking up any drill bit; it demands specific tooling and an understanding of the material being drilled. The manufacturer’s specifications are the undisputed authority, and adhering to them is a non-negotiable aspect of successful technical application.
The Manufacturer’s Specification: The Golden Rule
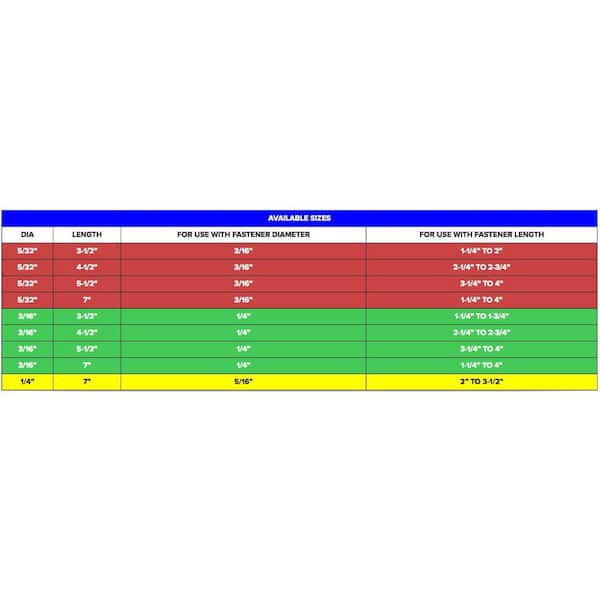
For a 3/16″ diameter Tapcon screw, the industry standard, and manufacturer-recommended pilot hole size is 5/32″. This is a precise measurement engineered to optimize the thread-forming action of the 3/16″ Tapcon. It allows for sufficient material engagement without excessive friction or the risk of stripping. Always double-check the specific Tapcon packaging, as slight variations might exist for specialized versions or different material applications, though 5/32″ is overwhelmingly the correct size for standard 3/16″ Tapcons. Using a fractional bit that is “close enough,” like a 1/8″ or 3/16″, will inevitably lead to suboptimal performance. A 1/8″ bit will be too small, causing immense resistance and potential screw breakage, while a 3/16″ bit will be too large, leading to insufficient thread engagement and a loose anchor.
Hammer Drill vs. Rotary Drill: Choosing Your Weapon
When drilling into concrete, brick, or block, a hammer drill is almost always the superior and often essential tool. Unlike a standard rotary drill that only spins, a hammer drill combines rotational motion with a rapid, percussive hammering action. This hammering breaks up the brittle concrete, making it significantly faster and easier to drill clean, precise holes. Attempting to drill into concrete with a standard rotary drill is generally inefficient, can damage the drill, dull bits quickly, and often results in an irregular hole that compromises the Tapcon’s performance.
For optimal performance, particularly in harder concrete or when drilling many holes, an SDS (Slotted Drive System) hammer drill is preferred. SDS bits are designed to freely slide within the chuck, allowing the hammer mechanism to impact the bit directly, maximizing energy transfer. For lighter duty or occasional use, a standard chuck hammer drill (often called an impact drill or rotary hammer drill, though the latter can also refer to SDS type) can suffice.
Essential Drill Bits: SDS vs. Standard Masonry
The choice of drill bit is as crucial as the drill itself. For drilling into concrete, you need a carbide-tipped masonry bit. The carbide tip is extremely hard and durable, designed to withstand the abrasive nature of concrete and masonry.
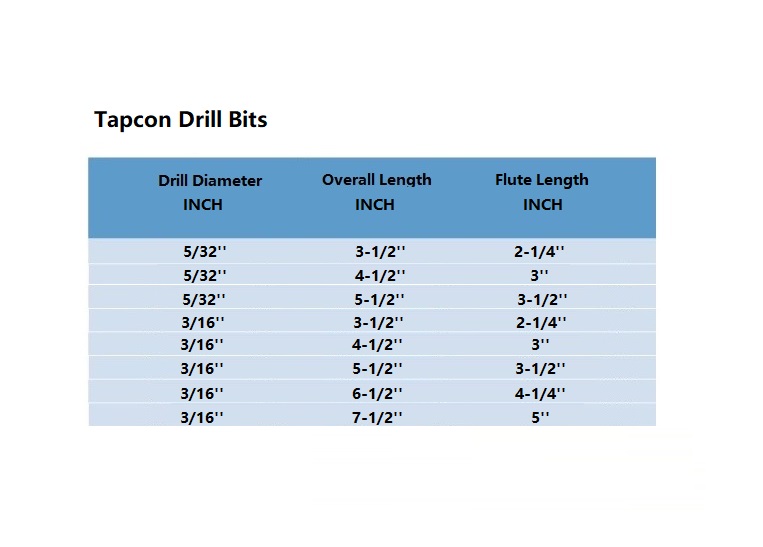
- SDS Masonry Bits: If you are using an SDS hammer drill, you must use an SDS bit. These bits have specific flutes and recesses on their shank that lock into the SDS chuck, allowing the bit to hammer while rotating. SDS bits are highly efficient, generate less heat, and tend to last longer due to their superior design for percussive drilling. They are available in SDS-plus (most common for small to medium holes) and SDS-max (for larger, heavy-duty applications). For 3/16″ Tapcons, an SDS-plus 5/32″ carbide-tipped masonry bit is the ideal choice.
- Standard Masonry Bits: For standard chuck hammer drills, you will use standard straight-shank carbide-tipped masonry bits. While effective, they may not drill as quickly or last as long as SDS bits due to the less efficient transfer of hammering energy. Ensure the bit is sharp and specifically designed for masonry.
Regardless of the type, always ensure your 5/32″ bit is in good condition, sharp, and free from excessive wear or damage, as a dull bit can lead to an irregular hole, excessive heat, and decreased drilling efficiency.
Step-by-Step Pilot Hole Execution for 3/16″ Tapcons
The technical execution of drilling a pilot hole for a 3/16″ Tapcon requires more than just knowing the size; it demands a systematic approach to ensure accuracy, safety, and optimal fastener performance. Each step contributes to the integrity of the final anchor.
Marking and Depth Control
Before drilling, accurately mark the desired location for each Tapcon screw. Use a pencil or marker for visibility. Precision in placement ensures the fastener serves its intended structural or functional purpose.
Equally critical is setting the correct drilling depth. The pilot hole must be drilled approximately 1/2″ to 1″ deeper than the intended embedment length of the Tapcon screw. For example, if you are using a 1-3/4″ long Tapcon, the hole should be drilled to a depth of roughly 2-1/4″ to 2-3/4″. This extra depth provides space for concrete dust and debris to accumulate without bottoming out the screw before it’s fully seated, preventing premature resistance and potential stripping or snapping. Most hammer drills come with a depth gauge that can be adjusted. If not, a piece of tape wrapped around the drill bit at the correct depth serves as an excellent visual guide.
Drilling Technique: Pressure, Speed, and Dust Management
- Start Slowly and Steady: Begin drilling at a slow speed with moderate, consistent pressure to create an initial indentation and prevent the bit from “walking” across the surface. Once the bit has engaged, increase the drill speed.
- Maintain Consistent Pressure: Apply steady, firm pressure to the drill, allowing the hammer action to do its work. Avoid excessive force, which can cause the drill to bind or overheat. Let the tool and the bit perform the cutting; don’t try to force it.
- Keep it Straight: Maintain the drill perpendicular to the surface. Angled holes will result in misaligned screws and compromised holding power. Use both hands if necessary to stabilize the drill.
- Clear Debris: Concrete dust is an enemy of a good pilot hole. It can pack tightly into the hole, effectively reducing its diameter and making it difficult for the Tapcon to properly thread. Periodically withdraw the drill bit from the hole while it’s still spinning to clear dust. For deeper holes or critical applications, use a small shop-vac, compressed air (with eye protection), or a hand pump to thoroughly clean the hole before inserting the Tapcon. A clean hole ensures the screw can fully engage the material.
Testing and Cleanup
Once the hole is drilled and thoroughly cleaned, you are ready to drive the Tapcon. Ensure the screw is driven straight and fully seated, using a properly sized driver bit (typically a Phillips head or hex head, depending on the screw type).
After installation, inspect the connection. There should be no visible gap between the fastened material and the concrete, and the screw should feel firmly anchored with no wobble. Clean up any remaining concrete dust to maintain a safe and professional work environment.
Common Pitfalls and Troubleshooting
Even with the correct tools and knowledge, challenges can arise when anchoring into concrete. Understanding common pitfalls and how to troubleshoot them is a crucial aspect of mastering this technical skill.
Oversized vs. Undersized Holes
The most common issue stems from an incorrectly sized pilot hole:
- Oversized Hole: If the 3/16″ Tapcon spins freely or doesn’t feel secure, the 5/32″ pilot hole was likely too large or became enlarged during drilling. This can happen if the drill bit was worn, or if the concrete is exceptionally soft or brittle. The primary solution is to relocate the anchor slightly, drill a new, correctly sized pilot hole, and try again. For minor looseness, sometimes a larger diameter Tapcon (e.g., 1/4″) might work in the oversized hole, but this is a makeshift solution and not ideal for critical applications.
- Undersized Hole: If the Tapcon is extremely difficult to drive, strips its head, or breaks before fully seating, the 5/32″ pilot hole was likely too small. This might occur if the drill bit was worn down, or if the concrete is exceptionally hard or dense. The solution is to remove the partial screw, re-drill the existing hole with a fresh, sharp 5/32″ bit, clearing all debris, and then attempt to drive a new screw. Never try to force a screw into an undersized hole, as this risks breaking the fastener and damaging the base material.
Drill Bit Wear and Tear
Carbide-tipped masonry bits are durable but not indestructible. Over time, the carbide tip can become dull, chipped, or rounded, especially when drilling into hard aggregate or rebar. A worn bit will drill slowly, generate excessive heat, and create an irregular, potentially undersized hole. Always inspect your 5/32″ drill bit before use. If the carbide tip appears damaged or significantly rounded, replace it. Using a sharp bit not only ensures accurate hole sizing but also extends the life of your drill and improves overall efficiency.
Material Considerations: Concrete Age and Density
Not all concrete is created equal.
- Newer Concrete: Freshly poured or relatively new concrete tends to be softer and more abrasive. This can cause drill bits to wear faster.
- Older/Harder Concrete: Aged concrete, especially high-strength mixes, can be exceptionally hard, requiring more powerful hammer drills and potentially slower drilling speeds to avoid overheating the bit.
- Lightweight/Aerated Concrete: Softer concrete types may be more prone to breakout or over-drilling. Adjust drilling pressure accordingly.
- Rebar Encounters: Hitting rebar (reinforcing bar) during drilling is a common challenge. Standard masonry bits are not designed to cut through steel. If you encounter rebar, you’ll feel an abrupt halt to drilling progress and a distinct change in sound. The safest and most effective solution is to stop drilling, move the anchor location slightly, and drill a new pilot hole. Attempting to force through rebar can damage the drill bit, drill, or even the rebar itself, compromising structural integrity. Specialized rebar-cutting bits exist but are typically used for specific applications and larger diameter holes.
Beyond the Basics: Optimizing Your Fastening Technology
While selecting the correct pilot hole is fundamental, integrating other advanced techniques and tools can further optimize the performance and longevity of your Tapcon installations, treating the entire process as a technical system.
Impact Drivers and Torque Settings
After the pilot hole is meticulously drilled and cleaned, the final step is driving the Tapcon screw. While a standard drill can be used, an impact driver is highly recommended, especially for larger jobs or harder materials. Impact drivers deliver rotational force combined with powerful, short bursts of tangential impact. This percussive action is exceptionally effective at driving Tapcon screws without cam-out (the driver bit slipping out of the screw head) or stripping the screw head, particularly when encountering resistance.
When using an impact driver, select the appropriate driver bit (e.g., #2 or #3 Phillips, or a specific hex driver). Start driving the screw at a moderate speed, ensuring it starts straight. The impact action will then efficiently cut threads into the concrete. For critical applications, understanding the torque settings of your impact driver or using a torque-limiting clutch can prevent over-tightening, which could strip the threads in the concrete or snap the screw. While Tapcons are designed to be driven until snug, overtightening offers no additional holding power and only risks fastener failure.
Environmental Factors and Longevity
The long-term performance of a Tapcon anchor can be influenced by environmental factors.
- Corrosion Resistance: Standard Tapcons are typically blue-coated (Blue Climaseal) for corrosion resistance in outdoor and damp environments. However, for highly corrosive environments (e.g., coastal areas, chemical exposure), consider using stainless steel Tapcons or other specialized anchors that offer superior corrosion protection. Selecting the right fastener material is a key engineering decision based on the application’s environment.
- Material Compatibility: Ensure the material being fastened is compatible with the Tapcon and the concrete. Different materials expand and contract at different rates with temperature changes, which could put stress on the anchor.
- Dynamic Loads: For applications involving dynamic loads, vibration, or seismic activity, Tapcons might not always be the optimal choice. Specialized anchors designed for these conditions, such as undercut anchors or epoxy anchors, might be required, as they offer different load distribution and resistance characteristics. Always refer to local building codes and engineering specifications for such critical applications.
By meticulously adhering to pilot hole specifications, employing the right tools and techniques, and considering broader environmental and load factors, technicians and DIY enthusiasts can maximize the efficiency and reliability of Tapcon fastening technology, ensuring secure and durable connections in concrete and masonry.
aViewFromTheCave is a participant in the Amazon Services LLC Associates Program, an affiliate advertising program designed to provide a means for sites to earn advertising fees by advertising and linking to Amazon.com. Amazon, the Amazon logo, AmazonSupply, and the AmazonSupply logo are trademarks of Amazon.com, Inc. or its affiliates. As an Amazon Associate we earn affiliate commissions from qualifying purchases.