
Precision Threading: A Foundation of Technical Assembly
In the vast landscape of technical assembly and mechanical engineering, the ability to create robust and precise internal threads is an indispensable skill. From the intricate components of a robotics system to the secure enclosures of sensitive electronics, threaded fasteners are the silent workhorses that ensure structural integrity and operational reliability. Tapping, the process of cutting an internal thread into a pre-drilled hole, is a fundamental technique that underpins countless engineering applications. The quality and strength of these threads directly impact the performance and longevity of the final product. An incorrectly sized pilot hole—the initial bore before tapping—can lead to a cascade of issues, ranging from compromised thread strength and increased risk of stripping to premature tap wear and breakage. Understanding the nuances of drill bit selection for a given tap size is therefore not merely a practical consideration but a critical aspect of precision engineering that directly influences product integrity and operational performance in any technical domain.
Deciphering the 1/4-20 Standard: Unified National Coarse Threads
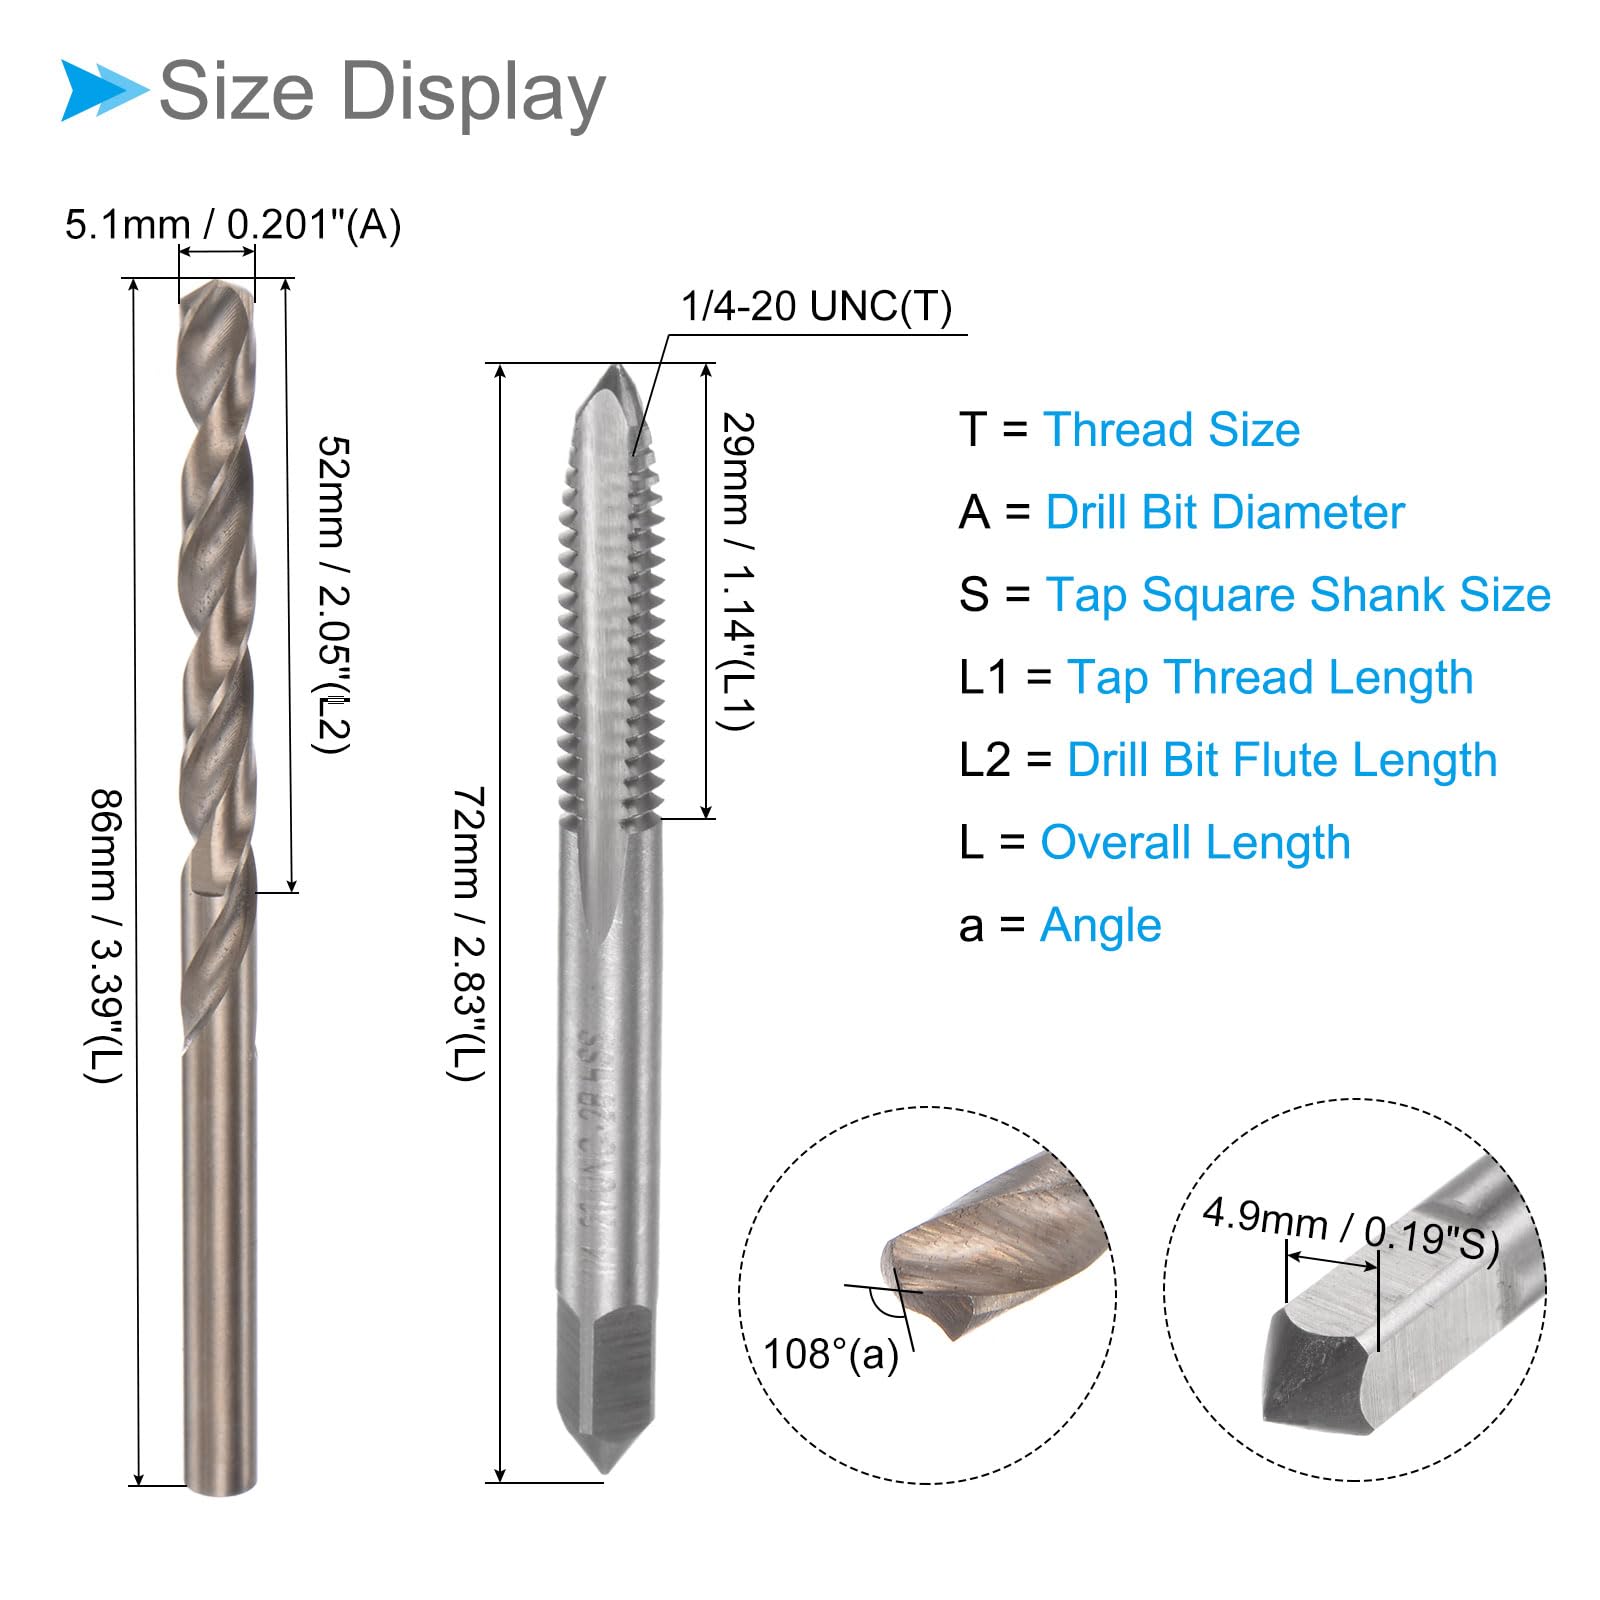
Before delving into drill bit selection, it’s crucial to understand the specifications of the 1/4-20 tap itself. This nomenclature is an industry standard, part of the Unified Thread Standard (UTS), which defines common thread forms for screws and nuts used in the United States and Canada. Breaking down “1/4-20” reveals key technical dimensions:
- 1/4: This denotes the nominal diameter of the tap, which is one-quarter of an inch (0.25 inches). This is the major diameter, or the largest diameter of the thread.
- 20: This number specifies the threads per inch (TPI). In this case, there are 20 threads within one linear inch along the tap’s axis. A lower TPI indicates a coarser thread, while a higher TPI indicates a finer thread.
The “1/4-20” designation specifically refers to a Unified National Coarse (UNC) thread. UNC threads are characterized by their larger pitch (fewer threads per inch) compared to Unified National Fine (UNF) threads of the same diameter. UNC threads are widely favored in general-purpose applications due to their inherent strength, resistance to stripping, and ease of assembly, especially when working with softer materials or when quick fastening and unfastening are required. They offer good tolerance for minor misalignment and debris.
These threads adhere to specifications outlined by standards bodies such as ANSI/ASME B1.1, ensuring interchangeability and consistency across different manufacturers. A key concept here is the minor diameter of the thread, which is the smallest diameter of the thread profile and the diameter that the pilot hole must approximate to allow for thread formation.
Selecting the Optimal Drill Bit: The Science of the Pilot Hole
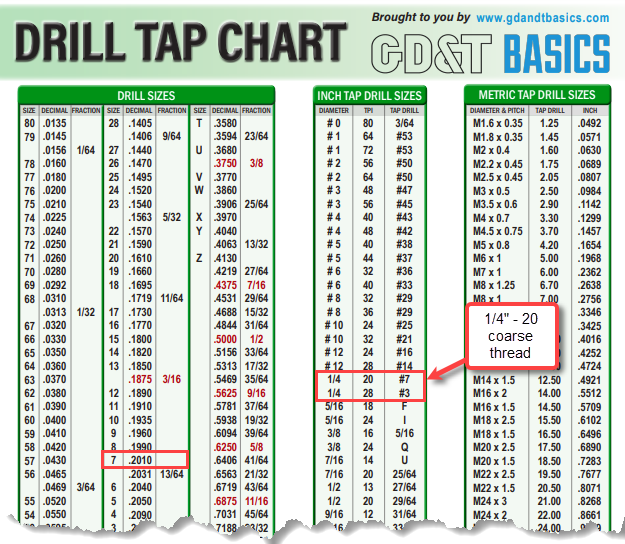
The selection of the correct drill bit for a tap is paramount to achieving strong, accurately formed threads and preventing tap failure. For a 1/4-20 tap, the universally accepted standard drill bit size for creating the pilot hole is a #7 drill bit.
A #7 drill bit has a diameter of 0.201 inches (or 5.1mm when considering metric equivalents, though #7 is the precise imperial standard). This specific size is not arbitrary; it’s meticulously calculated to achieve an ideal balance between thread strength and the ease of the tapping process.
The “science” behind this choice revolves around achieving approximately 75% thread engagement. This means that when the tap cuts the threads, roughly 75% of the theoretical maximum possible thread material from the drilled hole is engaged.
- Why 75% Engagement?
If a drill bit were selected to achieve 100% thread engagement (i.e., drilling to the minor diameter of the tap), the amount of material to be cut would be excessive. This would lead to significantly increased torque requirements, making hand tapping exceedingly difficult, greatly increasing the risk of tap breakage, and shortening the tap’s lifespan. Furthermore, the additional thread engagement beyond 75% typically yields diminishing returns in terms of ultimate tensile strength of the fastener in ductile materials.
Conversely, if the pilot hole is too large, thread engagement will be insufficient, resulting in weak, easily stripped threads that cannot reliably withstand the intended loads.
Therefore, the #7 drill bit for a 1/4-20 tap represents the optimal compromise, providing ample thread strength for most applications while ensuring a manageable tapping process. While some may occasionally use a 13/64″ drill bit (0.2031 inches), which offers slightly less thread engagement, the #7 remains the industry benchmark for its proven reliability. It is also important to consider that harder materials may benefit from a slightly larger pilot hole to reduce tapping torque, but this is a nuance typically explored in advanced machining scenarios.
Understanding Thread Engagement
Thread engagement quantifies how much of the tapped material makes contact with the mating fastener. While 100% engagement sounds ideal, it’s rarely practical or necessary for conventional applications. For a given fastener and material combination, once thread engagement reaches approximately 75%, subsequent increases offer only marginal gains in static strength, often less than an additional 10%. Yet, the force required to tap a 100% engaged thread can be more than double that required for 75% engagement, leading to exponential increases in tap stress and potential for failure. This trade-off between maximizing thread strength and ensuring a feasible, safe tapping operation is why the 75% engagement, facilitated by the #7 drill bit for a 1/4-20 tap, is the widely accepted best practice.
Mastering the Tapping Process: Tools, Techniques, and Digital Aids
Achieving a perfectly tapped hole requires more than just the correct drill bit; it demands a systematic approach encompassing proper tooling, precise technique, and, increasingly, leverage of digital resources for enhanced accuracy.
Essential Tools for Precision Tapping
- Tap Wrench: Critical for holding and turning the tap. Options include T-handle wrenches for smaller taps (offering better control) and straight-handle wrenches for larger taps or when more leverage is needed.
- Quality Tap: Invest in taps made from High-Speed Steel (HSS) or Cobalt. HSS taps are common for general use, while Cobalt taps offer superior heat resistance and wear life, especially in harder materials. For high-volume production or challenging materials, specialized taps such as thread-forming (roll-form) taps are often preferred (which require a different pilot hole size, as discussed later).
- Cutting Fluid/Lubricant: Absolutely indispensable. The correct cutting fluid reduces friction, dissipates heat, and helps evacuate chips, preventing tap breakage and improving thread quality. The specific fluid depends on the workpiece material (e.g., sulfurized oil for steel, kerosene for aluminum, specialized fluids for plastics).
- Drill Press or Vertical Milling Machine: While hand-drilling is possible, using a drill press or mill ensures the pilot hole is perfectly perpendicular to the workpiece surface. This perpendicularity is crucial for straight threads and prevents tap binding.
- Measuring Tools: Calipers or micrometers are essential for verifying drill bit diameters and checking workpiece dimensions. Thread gages (Go/No-Go) are invaluable for quality control in critical applications.
Step-by-Step Tapping Technique
- Secure Workpiece: Firmly clamp the material to a workbench or drill press table. Any movement during drilling or tapping can lead to misalignment or breakage.
- Drill Pilot Hole: Using the #7 drill bit (0.201″), drill the pilot hole. Maintain the correct drill speed for the material, and ensure consistent chip evacuation. For precision, use a drill press.
- Chamfer the Hole (Recommended): A slight chamfer at the entrance of the hole helps the tap start squarely and prevents burrs.
- Apply Cutting Fluid: Generously coat the tap and the pilot hole with the appropriate cutting fluid.
- Start the Tap Straight: Insert the tap into the pilot hole. Using a tap wrench, apply light, even downward pressure while rotating the tap clockwise (for right-hand threads). Ensure the tap starts perfectly straight; misalignment is a primary cause of tap breakage.
- “Two Steps Forward, One Step Back”: This technique is critical, especially for cutting (as opposed to forming) taps. Rotate the tap clockwise about half to two-thirds of a turn, then reverse it about a quarter turn. This action breaks off the chips, preventing them from binding in the flutes and causing excessive torque or tap breakage.
- Clear Chips: Periodically remove accumulated chips from the hole and tap.
- Through Holes vs. Blind Holes: For through holes, continue tapping until the tap emerges from the other side. For blind holes (holes that don’t go all the way through), monitor the depth carefully to avoid hitting the bottom, which can also cause tap breakage.
Digital Aids for Precision Enhancement
Modern technical environments increasingly integrate digital tools to enhance precision and efficiency:
- CAD Software: Computer-Aided Design programs allow engineers to design threaded holes with precise specifications, ensuring correct clearances and integration within complex assemblies.
- CNC Machines: Computer Numerical Control machines automate drilling and tapping processes with unparalleled accuracy, eliminating human error in perpendicularity, depth control, and chip evacuation, especially in high-volume manufacturing.
- Digital Readouts (DROs): Equipping drill presses or milling machines with DROs provides real-time, highly accurate feedback on drilling depth, critical for blind holes.
- Online Tap & Drill Charts/Calculators: Numerous online resources provide instant lookup for tap and drill sizes, cutting speeds, and lubrication recommendations for various materials, serving as invaluable references for technicians.
Troubleshooting and Advanced Considerations in Thread Production
Even with the correct drill bit and technique, challenges can arise in thread production. Understanding common issues and advanced methods ensures high-quality, reliable threads in diverse technical applications.
Common Issues in Tapping
- Tap Breakage: This is perhaps the most frustrating and common problem. Causes include using an incorrect (too small) pilot drill, a dull or low-quality tap, insufficient lubrication, accumulated chips in the flutes, excessive downward force, or improper alignment (tap not started straight).
- Stripped Threads: Often a result of an oversized pilot hole, which leads to insufficient thread engagement. It can also occur if the tapping technique is poor, such as forcing the tap or failing to clear chips, which can damage the delicate newly formed threads.
- Poor Thread Quality: Characterized by rough, incomplete, or uneven threads. Causes include a dull tap, incorrect cutting speed, inappropriate or insufficient cutting fluid, or material issues.
- Chatter Marks: Irregular surface finish on the threads, usually due to excessive vibration, loose tooling, or incorrect cutting parameters.
Material Considerations
The type of material being tapped significantly influences the entire process:
- Ductile Materials (e.g., mild steel, aluminum, brass): These are generally easier to tap. They require good lubrication and proper chip evacuation. Aluminum, for instance, often requires specific lubricants like kerosene or specialized cutting oils to prevent galling.
- Harder Materials (e.g., stainless steel, tool steel, titanium): These materials generate more heat and are abrasive. They necessitate high-quality, often cobalt-blend taps, aggressive cutting fluids, and sometimes a slightly larger pilot hole (to reduce tapping torque) or slower cutting speeds.
- Plastics and Composites: These materials vary widely. Some plastics tap easily, while others can chip or crack. Specific tap geometries (e.g., zero-flute taps for plastics) and slow speeds are often required. Composites can be highly abrasive and often require specialized carbide taps.
Thread Gaging
For critical applications in aerospace, automotive, or medical devices, simply looking at the thread is insufficient. Thread gages (Go/No-Go gages) are essential quality control tools. A “Go” gage should freely enter the tapped hole, while a “No-Go” gage should not. This verifies that the internal threads meet the specified tolerances for diameter, pitch, and form, ensuring interchangeability and proper fit with mating fasteners.

Form Taps (Roll Taps or Chipless Taps)
While cutting taps are the most common, form taps represent an advanced alternative. Instead of cutting material, form taps displace and cold-form the material to create threads.
- Advantages:
- Stronger Threads: Cold-forming compacts the material, resulting in threads that are often stronger in tension and shear than cut threads.
- No Chips: Eliminates the issue of chip removal, making them ideal for blind holes and automated processes.
- Faster: Can often be run at higher speeds.
- Longer Tap Life: Generally more robust as they don’t have cutting edges to dull.
- Disadvantages:
- Higher Torque Requirements: Forming material requires significantly more torque than cutting it.
- Material Specific: Only suitable for ductile materials with good elongation properties (e.g., aluminum, brass, some steels).
- Larger Pilot Hole: Because material is displaced, not removed, form taps require a larger pilot hole than cutting taps. For a 1/4-20 form tap, the pilot drill might be a Letter ‘D’ drill bit (0.2285″) or similar, a substantial difference from the #7 (0.201″) drill for a cutting tap.
Understanding the principles of thread formation, meticulous tool selection, and refined technique, augmented by modern digital aids and knowledge of advanced tapping methods, ensures the production of robust, reliable threads vital for any sophisticated technical assembly.
aViewFromTheCave is a participant in the Amazon Services LLC Associates Program, an affiliate advertising program designed to provide a means for sites to earn advertising fees by advertising and linking to Amazon.com. Amazon, the Amazon logo, AmazonSupply, and the AmazonSupply logo are trademarks of Amazon.com, Inc. or its affiliates. As an Amazon Associate we earn affiliate commissions from qualifying purchases.