In the vast and intricate ecosystem of the internet, the Domain Name System (DNS) acts as an indispensable translator, converting human-readable domain names (like google.com) into machine-readable IP addresses (like 172.217.160.142). This process, while seemingly seamless, involves a series of caching mechanisms designed to speed up access to websites and online resources. However, like any cache, the DNS cache can sometimes become outdated or corrupted, leading to connectivity issues or the inability to access the latest versions of websites. This is where the concept of flushing the DNS cache, or DNS flush, comes into play.

A DNS flush is essentially a command that clears the locally stored DNS records on your computer or network device. Think of it as clearing the temporary memory where your system keeps track of website addresses it has recently visited. By clearing this cache, your device is forced to query a DNS server for fresh, up-to-date information the next time you attempt to access a website. This simple yet powerful action can resolve a surprising number of common internet connectivity problems and ensure you’re always seeing the most current version of online content.
Understanding what a DNS flush does requires a deeper dive into how DNS resolution works and the role of caching. While the core concept is straightforward, its practical implications and troubleshooting applications are significant for anyone who uses the internet regularly, from casual users to IT professionals.
Understanding the Mechanics of DNS Caching
The process of accessing a website involves multiple steps, and DNS caching is strategically placed to optimize this journey. Without caching, every single request to access a website would necessitate a full DNS lookup, which involves querying a chain of DNS servers – starting from your local device, moving to a recursive resolver (often provided by your ISP), and potentially reaching authoritative name servers for the domain. This would be incredibly inefficient and slow.
The DNS Resolution Journey
When you type a domain name into your web browser or an application needs to connect to a remote server, a DNS resolution process is initiated. This process typically unfolds as follows:
-
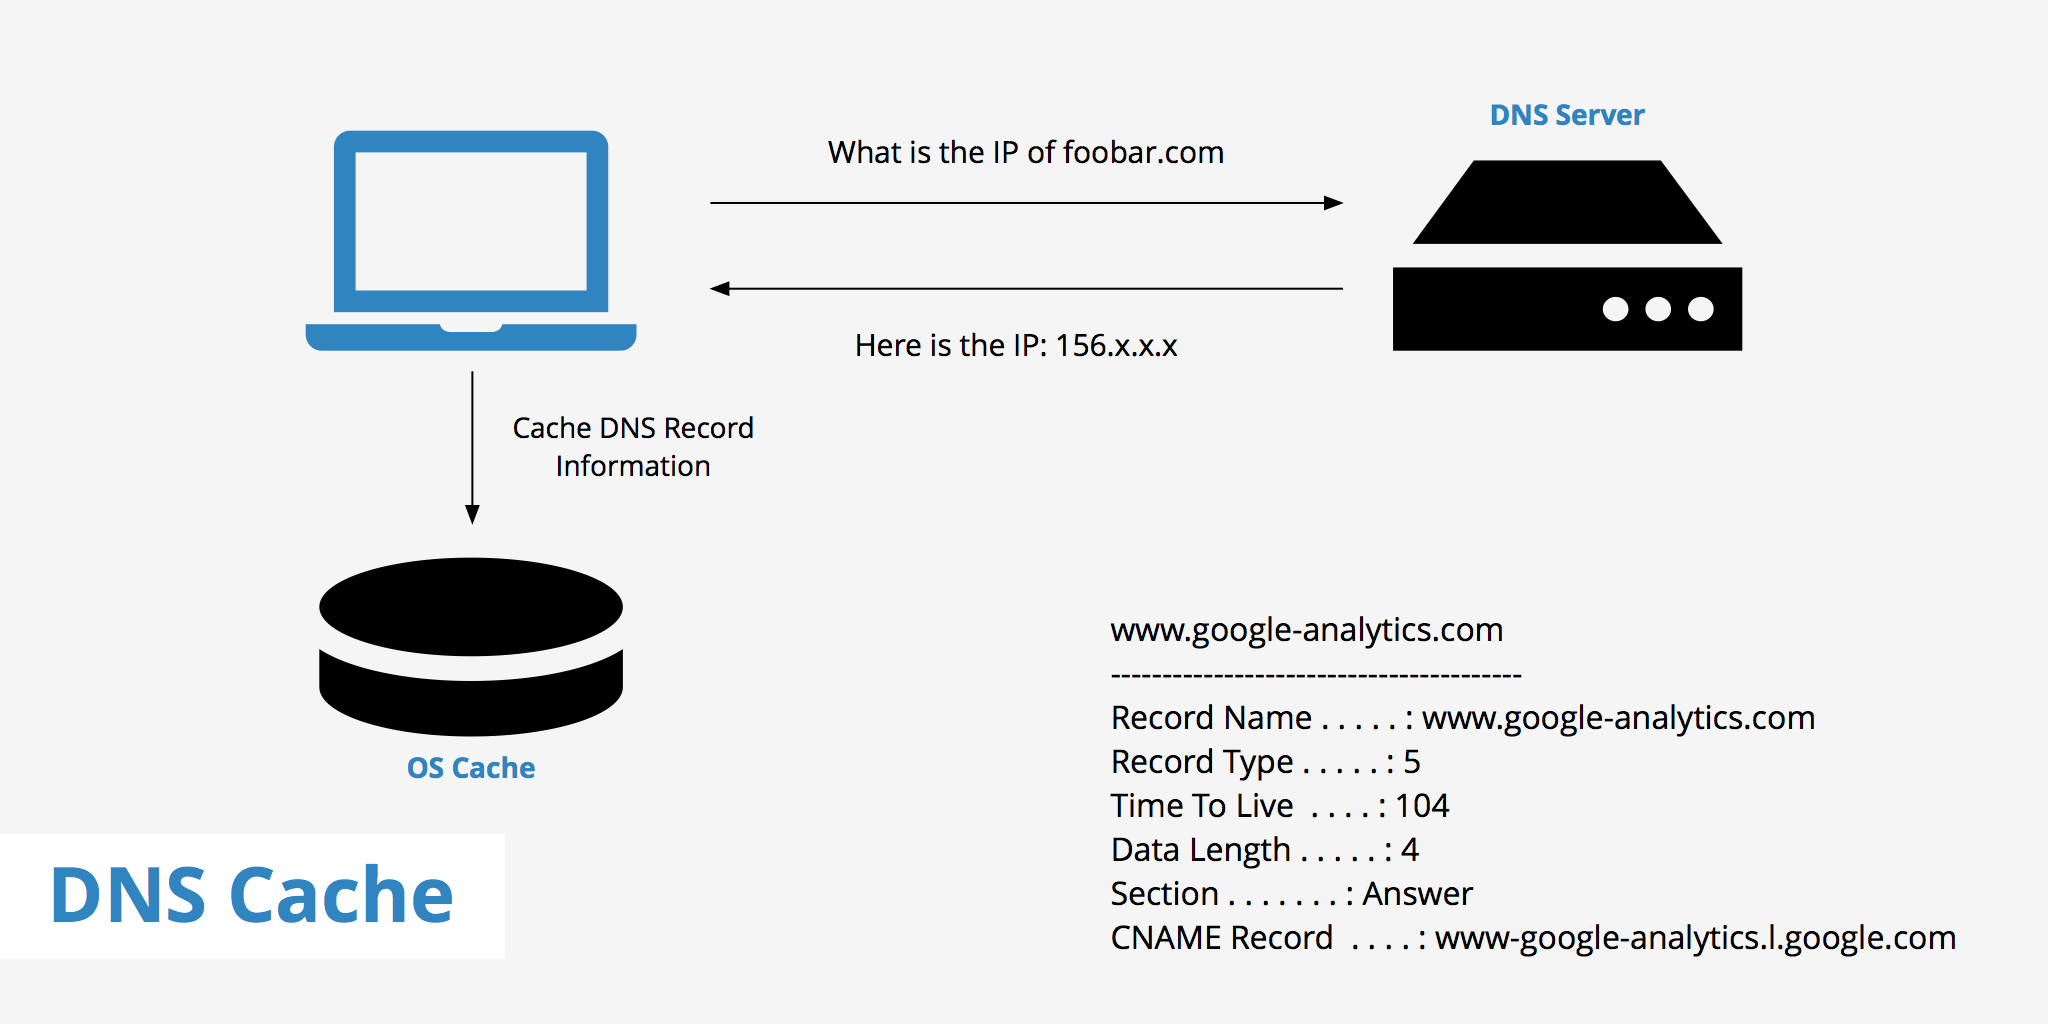
Local DNS Cache Check: Your operating system maintains a local DNS cache. It first checks this cache to see if it already has the IP address associated with the requested domain name. If a valid record is found, the IP address is retrieved instantly, and the process stops here. This is the fastest scenario.
-
Recursive Resolver Query: If the domain name is not found in the local cache, your device sends a query to a recursive DNS resolver. This resolver, typically provided by your Internet Service Provider (ISP) or a third-party DNS service (like Google DNS or Cloudflare DNS), is responsible for finding the IP address on your behalf.
-
Iterative Queries (if necessary): The recursive resolver then begins a series of iterative queries to find the authoritative name server for the requested domain. This involves:
- Querying the root name servers to find the Top-Level Domain (TLD) name servers (e.g., for .com, .org).
- Querying the TLD name servers to find the authoritative name servers for the specific domain (e.g., for google.com).
- Querying the authoritative name servers to get the final IP address.
-
Response and Caching: Once the recursive resolver obtains the IP address, it sends this information back to your device. Crucially, the recursive resolver also caches this information for a specified duration, known as the Time-To-Live (TTL). This means that subsequent requests for the same domain within the TTL period will be answered directly by the recursive resolver without needing to go through the entire iterative query process again.
The Role of Time-To-Live (TTL)
The Time-To-Live (TTL) is a critical component of DNS caching. It’s a setting configured by the domain owner on the authoritative DNS server that dictates how long DNS records should be cached by intermediate DNS servers and local resolvers. TTL values can range from a few seconds to several days.
- Short TTLs: Are useful when you anticipate frequent changes to IP addresses, such as during website migrations or updates. They ensure that changes propagate quickly across the internet.
- Long TTLs: Are beneficial for domains with stable IP addresses, as they reduce the load on DNS servers and speed up resolution times for users who have recently accessed the domain.
The interaction between local caching and recursive resolver caching, governed by TTLs, is what makes DNS so efficient. However, it’s precisely this caching that can lead to issues when DNS records change.
Why and When to Perform a DNS Flush
Despite the efficiency gains, DNS caching is not without its drawbacks. Situations arise where the cached DNS information becomes obsolete, leading to frustrating connectivity problems. Performing a DNS flush is a troubleshooting step that addresses these specific scenarios by forcing your system to re-fetch current DNS data.
Common Scenarios Requiring a DNS Flush:
-
Website Not Loading or Incorrectly Loading: If you’re trying to access a website, and it’s either not loading at all, displaying an error page, or showing an old version of the content, it’s possible that your local DNS cache is pointing to an outdated IP address. This is particularly common after website migrations, server changes, or updates to domain records.
-
Problems Accessing Newly Created or Moved Websites: When a new website is launched or an existing one is moved to a new server, the DNS records need to be updated globally. Until these changes propagate through the DNS hierarchy and are reflected in your local cache, you might not be able to access the new site or might be directed to the old location.
-
Network Configuration Changes: If your network configuration changes – for example, if you switch ISPs, change your router’s IP address, or connect to a different Wi-Fi network – your device’s DNS settings might become outdated. Flushing the DNS cache can help your device re-establish correct DNS resolution for the new network environment.
-
Security Issues and Malware: In rare cases, malicious actors might try to manipulate DNS records to redirect users to fake or harmful websites (e.g., through DNS poisoning or hijacking). While a DNS flush alone is not a complete security solution, it can sometimes help clear out any compromised cached entries, forcing a fresh look-up from legitimate DNS servers.
-
Troubleshooting General Connectivity Issues: When you’re experiencing intermittent internet problems or can’t access certain online services, a DNS flush is often one of the first troubleshooting steps recommended. It’s a simple way to rule out DNS-related issues before delving into more complex network diagnostics.
-
Developing and Testing Websites: For web developers, a DNS flush is a routine part of the development and testing cycle. When making changes to a website’s DNS records (like A records, CNAME records, or MX records), flushing the cache ensures that they can immediately see the effects of their changes without waiting for TTLs to expire.
Performing a DNS flush is a proactive measure that ensures your system is always working with the most accurate and up-to-date DNS information available, leading to a smoother and more reliable internet experience.
How to Perform a DNS Flush Across Different Operating Systems
The process of flushing the DNS cache varies slightly depending on the operating system you are using. Fortunately, it’s generally a straightforward procedure that can be accomplished through the command line or system settings. Here’s a breakdown for the most common operating systems:
Windows
On Windows, flushing the DNS cache is done using the Command Prompt.
-
Open Command Prompt as Administrator:
- Click the Start button.
- Type “cmd” in the search bar.
- Right-click on “Command Prompt” in the search results.
- Select “Run as administrator.”
-
Execute the Flush Command:
- In the Administrator Command Prompt window, type the following command and press Enter:
bash

ipconfig /flushdns
- You should see a confirmation message stating, “Successfully flushed the DNS Resolver Cache.”
- In the Administrator Command Prompt window, type the following command and press Enter:
-
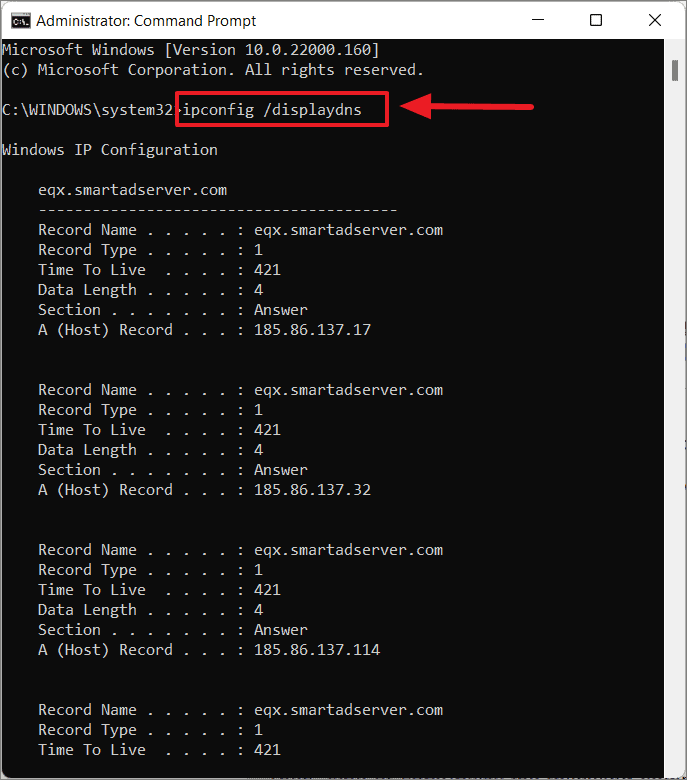
Optional: Display DNS Cache (for verification):
- To see the current contents of your DNS cache before flushing, you can use the command
ipconfig /displaydns. This is useful for debugging.
- To see the current contents of your DNS cache before flushing, you can use the command
macOS
On macOS, the process is also performed via the Terminal application, and the specific command can differ slightly based on the macOS version.
-
Open Terminal:
- Go to Applications > Utilities > Terminal.
- Alternatively, press
Command + Spacebarto open Spotlight Search, type “Terminal,” and press Enter.
-
Execute the Flush Command (Modern macOS versions):
- For macOS Sierra and later (including Big Sur, Monterey, Ventura, Sonoma), the command is typically:
bash

sudo dscacheutil -flushcache; sudo killall -HUP mDNSResponder
- You will be prompted to enter your administrator password. Type it in (you won’t see characters appear on screen) and press Enter.
- For macOS Sierra and later (including Big Sur, Monterey, Ventura, Sonoma), the command is typically:
-
Execute the Flush Command (Older macOS versions):
- For older versions of macOS (e.g., Yosemite, El Capitan), the command might be:
bash

sudo killall -HUP mDNSResponder
- Again, you’ll need to enter your administrator password.
- For older versions of macOS (e.g., Yosemite, El Capitan), the command might be:
Linux
Linux distributions have various DNS caching services, with systemd-resolved and dnsmasq being common. The method for flushing depends on which service is active.
-
Using
systemd-resolved(common in modern distributions like Ubuntu 18.04+, Fedora 28+):- Open a Terminal.
- Execute the following command:
bash

sudo systemd-resolve --flush-caches
- You may be prompted for your administrator password.
-
Using
dnsmasq(often used in routers and for local DNS caching):- Open a Terminal.
- Execute the following command:
bash

sudo /etc/init.d/dnsmasq restart
or
bash

sudo service dnsmasq restart
- The exact command might vary slightly based on your distribution.
-
General DNS Resolver Cache (if unsure):
- Some distributions might use a simpler cache. You can often try restarting the network manager or related services.
Routers and Network Devices
It’s important to note that many routers also have their own DNS cache. If you’re experiencing network-wide issues or if multiple devices on your network are affected, you might need to flush your router’s DNS cache. The process for this varies significantly by router model and manufacturer. Typically, you would:
- Access your router’s administration interface via a web browser (usually by typing its IP address, like
192.168.1.1or192.168.0.1, into the address bar). - Log in with your router’s username and password.
- Navigate through the router’s settings menus. Look for sections related to “DNS,” “DHCP,” or “Advanced Settings.”
- You may find an option to “Clear DNS Cache” or a similar function.
- Alternatively, a power cycle (unplugging the router, waiting 30 seconds, and plugging it back in) will often clear its internal cache.
After performing a DNS flush on your computer or router, it’s a good practice to restart your web browser or the application that was experiencing issues to ensure the changes take full effect.
The Impact and Limitations of DNS Flushing
A DNS flush is a powerful troubleshooting tool, but it’s not a magic bullet. Understanding its impact and its limitations is crucial for effective problem-solving. When you flush your DNS cache, you’re essentially telling your system, “Forget what you think you know about website addresses, and go get the latest information.” This action has several key effects and some inherent constraints.
Positive Impacts of a DNS Flush:
- Resolves Connectivity Issues: As discussed, the primary benefit is resolving problems where websites don’t load or load incorrectly due to outdated DNS records. This includes issues arising from website migrations, server changes, or new domain registrations.
- Ensures Access to Latest Content: When a website’s content or structure changes, DNS updates are necessary. Flushing ensures you can access the most current version of a site rather than an older, cached iteration.
- Facilitates Network Transitions: Moving between different networks or having your ISP change their DNS servers can cause temporary glitches. A flush helps your device quickly adapt to new network configurations.
- Aids Development and Testing: Developers rely on DNS flushing to confirm that DNS changes they’ve made are propagating correctly and are visible to users without delay.
- Basic Security Step: While not a primary security measure, clearing potentially compromised DNS entries can be a minor part of a broader security troubleshooting effort.
Limitations of DNS Flushing:
- Not a Solution for All Internet Problems: A DNS flush only addresses issues related to DNS resolution and caching. It cannot fix problems caused by:
- Internet Service Provider (ISP) outages: If your ISP is experiencing an outage, flushing DNS won’t restore your connection.
- Website server downtime: If the website’s server itself is offline, you won’t be able to access it, regardless of your DNS cache.
- Firewall or security software blocking: Overly aggressive firewalls or antivirus software can block access to websites.
- Malware on your device: Malware can cause a variety of internet issues that a DNS flush won’t resolve.
- Browser-specific issues: Sometimes, browser cache or cookies can cause website display problems.
- Router hardware failures: A malfunctioning router will prevent internet access.
- Temporary Fix: The DNS cache will begin to rebuild immediately after a flush as you access websites. If the underlying issue is a recurring problem with a DNS server or a frequently changing DNS record, the problem might reappear until the root cause is addressed.
- Global Propagation Time: While flushing your local cache forces an immediate re-lookup, the DNS system’s global propagation can still take time, especially if TTLs on authoritative servers are set high. So, even after a flush, it might take a little while for everyone on the internet to see the absolute latest DNS records.
- No Effect on Server-Side Caching: This process only affects the caching on your local machine or your router. Websites themselves often have their own caching mechanisms (e.g., CDN caching, server-side caching), and a DNS flush does not impact those.
In conclusion, a DNS flush is an essential diagnostic and troubleshooting command that clears your device’s local DNS cache. It forces your computer to query DNS servers for fresh information, which can resolve a wide range of website access and connectivity issues. While it’s a simple and effective tool, it’s important to remember its specific purpose and limitations within the broader landscape of network troubleshooting.
aViewFromTheCave is a participant in the Amazon Services LLC Associates Program, an affiliate advertising program designed to provide a means for sites to earn advertising fees by advertising and linking to Amazon.com. Amazon, the Amazon logo, AmazonSupply, and the AmazonSupply logo are trademarks of Amazon.com, Inc. or its affiliates. As an Amazon Associate we earn affiliate commissions from qualifying purchases.