
In today’s digitally driven world, our web browsers are more than just gateways to the internet; they are central to our productivity, entertainment, and communication. Google Chrome, with its vast ecosystem of extensions, often plays a pivotal role. While extensions can significantly enhance our browsing experience, a unique challenge arises when they are installed not by the user, but by an administrator. Whether it’s a workplace, an educational institution, or even a malicious piece of software masquerading as an IT policy, finding your Chrome extensions greyed out and unremovable can be a source of frustration and a potential security concern.

This comprehensive guide delves deep into the mechanisms behind administrator-installed Chrome extensions, exploring the “why” and, more importantly, the “how” of regaining control. From understanding the underlying policies to navigating complex system settings and troubleshooting potential malware, we will equip you with the knowledge and steps necessary to manage your browser more effectively. This article aligns perfectly with our focus on Tech, offering detailed tutorials, insights into digital security, and practical advice for optimizing your software and enhancing your productivity.
Understanding Administrator-Installed Extensions: The Digital Leash
Before attempting to remove an extension, it’s crucial to understand why it was installed by an administrator in the first place. This knowledge often dictates the appropriate method for removal and can prevent unintended consequences, especially in professional or academic settings.
Why Are Extensions Admin-Installed?
Administrator-installed extensions typically fall into a few categories, each with distinct motivations:
- Corporate or Educational Policies: In organizational environments, IT departments often deploy specific extensions to ensure security, compliance, and productivity. These might include VPN clients, ad-blockers for safe browsing, internal communication tools, or monitoring software. The goal is to standardize the user experience, protect sensitive data, and maintain network integrity. These policies are usually enforced through Group Policy (on Windows domains), Mobile Device Management (MDM) solutions, or other enterprise management tools.
- Parental Controls or Public Kiosks: In family settings or public computers, administrators (parents or system managers) might install extensions to restrict access to certain content, enforce safe browsing, or provide specific functionality.
- Potentially Unwanted Programs (PUPs) and Malware: This is arguably the most concerning scenario. Malicious software or adware can quietly install extensions to inject ads, track browsing activity, redirect searches, or even compromise sensitive information. These extensions are often disguised and can be particularly persistent, using administrator privileges to prevent easy removal. They might modify system policies or registry entries without your explicit consent, making them appear “admin-installed.”
The Implications for Users: Privacy, Performance, and Productivity
When extensions are beyond your control, several issues can arise:
- Privacy Concerns: If a malicious extension is tracking your online activity, collecting data, or displaying unwanted ads, your personal privacy is severely compromised. Even legitimate organizational extensions might collect data that you, as an individual, might prefer to keep private.
- Performance Degradation: Multiple extensions, especially poorly coded or resource-intensive ones, can significantly slow down your browser and overall computer performance. This impacts your productivity and user experience.
- Security Vulnerabilities: Malicious extensions can open backdoors for further malware infections, expose you to phishing attempts, or even capture credentials. Even legitimate but outdated extensions can become security risks.
- Lack of Control: Fundamentally, not being able to manage your own browser features detracts from your autonomy and can be frustrating, especially if the extension interferes with your workflow.
Understanding these implications underscores the importance of being able to identify and, where appropriate, remove unwanted or harmful administrator-installed extensions.
Initial Steps and Basic Troubleshooting: Identifying the Unmovable
Before diving into complex system modifications, it’s essential to confirm that an extension is indeed administrator-installed and to rule out simpler solutions. This diagnostic phase helps pinpoint the nature of the problem.
Checking Extension Details
The first place to start is Chrome’s own extension management page.
- Open Chrome Extensions: Type
chrome://extensionsinto your Chrome address bar and press Enter, or navigate via the Chrome menu (three dots) > More tools > Extensions. - Identify the Extension: Locate the extension you wish to remove.
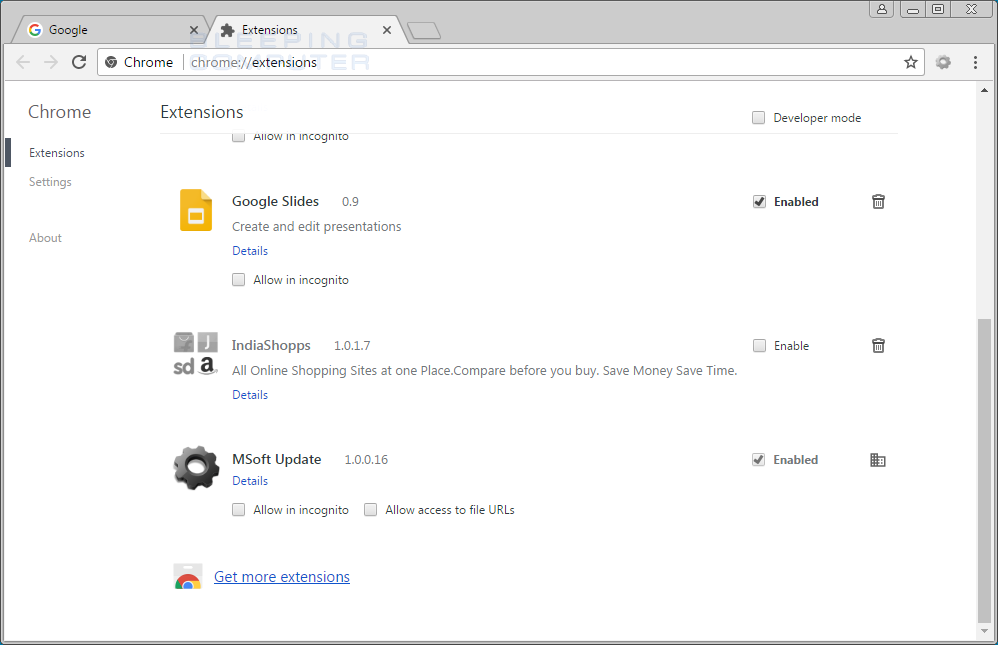
- Look for the ‘Remove’ Button: If the extension was installed by you, you’ll see a prominent “Remove” button. If the button is greyed out, disabled, or missing, and you see a message like “Installed by enterprise policy,” “Installed by your administrator,” or “Managed by your organization,” then it confirms that it’s administrator-controlled.
You might also see a small “management” icon (often a building or shield) next to the extension, or a message stating “This extension is managed and cannot be removed or disabled.” This is a definitive sign of administrative control. In some cases, clicking the “Details” button for such an extension might reveal more information about the managing policy or source.
Standard Removal Attempts: Why They Fail
If the “Remove” button is disabled, standard methods like clicking the trash can icon or attempting to disable the extension will not work. This is because the administrative policy overrides user-level controls. The policy essentially reinstalls or re-enables the extension every time Chrome launches or even periodically while it’s running. This persistence is what necessitates deeper system-level intervention.
At this point, if you are in a corporate or educational environment, your next step should ideally be to consult your IT administrator. They might have a legitimate reason for the extension, or they might be able to provide an authorized method for removal if it’s truly problematic for your specific workflow. However, if you suspect malware, are on a personal device, or IT support isn’t an option, then the advanced methods outlined below become necessary.
Advanced Methods for Removal: Reclaiming Control
When standard methods fail, you’ll need to delve into your operating system’s configuration. These methods require a degree of technical comfort and, in some cases, administrator privileges on your computer. Always back up your system or create a restore point before making significant changes to the Registry or Group Policy.
Utilizing Group Policy Editor (Windows Pro/Enterprise)
Group Policy is a feature of Microsoft Windows that controls the working environment of user accounts and computer accounts. It’s often used by network administrators to manage operating system, application, and user settings.
-
Access Group Policy Editor:
- Press
Windows Key + Rto open the Run dialog. - Type
gpedit.mscand press Enter. (This is only available on Windows Pro, Enterprise, and Education editions. Home users will need to use Registry Editor.)
- Press
-
Navigate to Chrome Extension Policies:
- In the Group Policy Editor, navigate to:
Computer Configuration>Administrative Templates>Google>Google Chrome>Extensions. - If you don’t see the “Google” or “Google Chrome” folders, you might need to import the Chrome Administrative Templates (ADMX files). This is typically done by IT administrators, but if it’s your personal machine, you might have installed them previously.
- In the Group Policy Editor, navigate to:
-
Identify and Disable/Delete Relevant Policies:
- Look for policies related to extensions. Common ones include:
Configure the list of force-installed apps and extensions(ExtensionInstallForcelist)Configure extension installation blacklist(ExtensionInstallBlocklist)Configure extension installation whitelist(ExtensionInstallAllowlist)
- Double-click on the policy you suspect is forcing the extension.
- Change the setting to “Not Configured” or “Disabled.” Applying “Not Configured” is generally safer as it removes the policy without explicitly blocking anything.
- Click “Apply” and then “OK.”
- Look for policies related to extensions. Common ones include:
-
Update Group Policy:
- Open Command Prompt as administrator (search for
cmd, right-click, “Run as administrator”). - Type
gpupdate /forceand press Enter. This ensures the policy changes are immediately applied.
- Open Command Prompt as administrator (search for
-
Restart Chrome: Close all Chrome windows and reopen them. The extension should now be removable or gone.
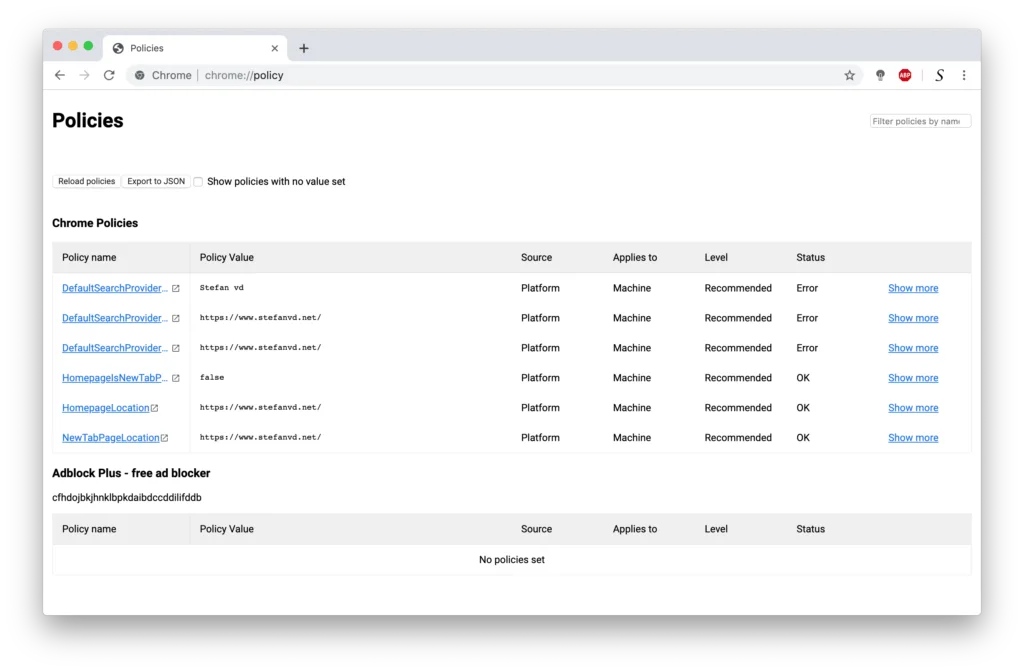
Registry Editor Alternative for GPO (Windows Home or when GPO is unavailable):
If you have Windows Home, or if the GPO settings aren’t clearly visible, the same policies are reflected in the Windows Registry.
Modifying the Windows Registry (Caution Advised!)
The Registry is a hierarchical database that stores low-level settings for the Microsoft Windows operating system and for applications that opt to use the Registry. Modifying it incorrectly can lead to system instability. Proceed with extreme caution.
-
Open Registry Editor:
- Press
Windows Key + Rto open the Run dialog. - Type
regeditand press Enter. - Grant administrator permission if prompted.
- Press
-
Navigate to Relevant Chrome Policy Keys:
- Policies forcing extensions are typically found under:
HKEY_LOCAL_MACHINESOFTWAREPoliciesGoogleChromeHKEY_CURRENT_USERSOFTWAREPoliciesGoogleChrome
- Within these
Chromekeys, look for subkeys likeExtensionInstallForcelist,ExtensionInstallSources, orExtensionInstallBlocklist. - Pro Tip: You can paste the path directly into the address bar of the Registry Editor.
- Policies forcing extensions are typically found under:
-
Identify and Delete Specific Entries:
- When you click on
ExtensionInstallForcelist(or similar), you’ll see numbered values (e.g., “1”, “2”, “3”) in the right pane. - Each value’s “Data” field will contain the extension ID, often followed by a semicolon and a URL (e.g.,
abcdefg12345:https://clients2.google.com/service/update2/crx). - To find an extension’s ID: Go back to
chrome://extensionsin Chrome, enable “Developer mode” (toggle switch in the top right), and the ID will be displayed below the extension name. - Carefully identify the value (e.g., “1”) corresponding to the unwanted extension.
- Right-click on that specific value and select “Delete.”
- Crucially, do NOT delete the entire
ExtensionInstallForcelistkey unless you are absolutely sure you want to remove all force-installed extensions. If you delete the key, it will remove all related force-installed extensions. If there are other legitimate ones, they will also be removed.
- When you click on
-
Check for Other Related Keys:
- Also look in
HKEY_LOCAL_MACHINESOFTWAREWOW6432NodePoliciesGoogleChromeon 64-bit systems, as some policies might be stored there. - Be aware that some malware might create similar keys under different paths or even in scheduled tasks to re-create these entries.
- Also look in
-
Restart Chrome and Your Computer: After deleting the relevant registry entries, close Chrome and restart it. A full system reboot might also be necessary to ensure the changes take effect.
Examining Program Files and Configuration Files
Sometimes, extensions are force-installed by companion software or configuration files left behind by uninstalled programs.
-
Check Chrome’s Application Data Folders:
- Navigate to Chrome’s user data directory. This is typically:
- Windows:
C:Users<YourUsername>AppDataLocalGoogleChromeUser DataDefaultExtensions - Within this folder, you’ll see subfolders named after extension IDs. You can cross-reference these IDs with
chrome://extensions. - Also, check
C:Program Files (x86)GoogleChromeApplicationorC:Program FilesGoogleChromeApplicationfor any suspicious.jsonor.crxfiles that might be used to force-install extensions. These often define enterprise policies.
- Windows:
- Look for
.jsonfiles in particular, such asC:Program Files (x86)GoogleChromeApplicationmaster_preferencesor in aPolicyfolder within the Chrome installation directory. These files can dictate extension installations.
- Navigate to Chrome’s user data directory. This is typically:
-
Identify Associated Software:
- If you recently installed any freeware, toolbars, or suspicious applications, they might be responsible.
- Go to
Control Panel>Programs and Features(Windows) orSystem Settings>Applications(macOS/Linux) and uninstall any unfamiliar or recently installed programs. Pay close attention to any software that seems related to the unwanted extension.
Dealing with Potentially Unwanted Programs (PUPs) and Malware
If the extension removal persists, or you suspect malware, a more aggressive approach is needed.
-
Run Antivirus/Anti-Malware Scans:
- Perform a full system scan with reputable antivirus software (e.g., Windows Defender, Avast, Malwarebytes, AVG).
- Consider a specialized anti-malware tool like Malwarebytes, AdwCleaner, or Spybot Search & Destroy, as they are often better at detecting PUPs and browser hijackers.
- Run scans in Safe Mode for deeper cleaning if necessary.
-
Check Task Scheduler:
- Malware sometimes creates scheduled tasks to re-install extensions or modify settings.
- Search for “Task Scheduler” in Windows. Look for any suspicious tasks that run at startup or regularly, particularly those that execute scripts or EXEs that you don’t recognize. Disable or delete them.
-
Reset Chrome:
- As a last resort, resetting Chrome can often resolve persistent issues, though it will also remove all your installed extensions, themes, and temporary data.
- Go to
chrome://settings/resetin your browser. - Click “Restore settings to their original defaults” and confirm. This will not delete your bookmarks, history, or saved passwords but will reset many other browser settings.
When to Seek Assistance and Best Practices
While the methods above offer powerful solutions, it’s crucial to know when to seek help and how to prevent future issues. This section touches upon digital security and responsible tech usage.
Consulting Your Administrator
If you are on a work or school computer, the most responsible first step is to communicate with your IT administrator.
- Explain the Issue: Clearly articulate why the extension is problematic for you (e.g., performance impact, privacy concern, interference with specific tasks).
- Understand Policies: Your administrator can explain the purpose of the extension and potentially provide an approved workaround or removal method. Attempting to bypass corporate policies without permission can have disciplinary consequences.
- Ethical Considerations: Respect the IT policies of your organization. Unauthorized modifications can compromise network security.
Reinstalling Chrome (Last Resort)
If all else fails, and you’ve backed up important data (like bookmarks and passwords synced to your Google account), a complete reinstallation of Chrome can be an effective, albeit drastic, solution.
- Uninstall Chrome: Go to
Control Panel>Programs and Features(Windows) and uninstall Google Chrome. - Delete Remaining Files: Manually delete any remaining Chrome folders in
C:Users<YourUsername>AppDataLocalGoogleandC:Program Files (x86)Google(orC:Program FilesGoogle). - Restart Your Computer.
- Download and Reinstall: Download the latest version of Chrome from the official Google website and reinstall it.
Proactive Extension Management and Security Habits
Preventing unwanted extensions is always better than removing them. This highlights aspects of digital security and productivity.
- Regular Audits: Periodically review
chrome://extensionson all your Chrome profiles. Remove any extensions you don’t recognize or no longer use. - Scrutinize Permissions: When installing a new extension, carefully read the permissions it requests. Does a simple “to-do list” app really need access to “all your data on all websites”? If it seems excessive, find an alternative.
- Reputable Sources Only: Download extensions only from the official Chrome Web Store. Avoid third-party websites offering free extensions, as these are often bundled with malware.
- Keep Software Updated: Ensure your Chrome browser, operating system, and antivirus software are always up-to-date. Updates often include security patches that protect against new threats.
- Be Wary of Freeware Bundles: When installing free software, always choose “Custom” or “Advanced” installation options and deselect any bundled applications or browser extensions you don’t want.
- Multiple Profiles: Use separate Chrome profiles for work and personal use. This isolates extensions and data, improving both security and organization.
By adopting these proactive habits, you can significantly enhance your digital security, improve your browser’s performance, and maintain control over your online experience, ultimately boosting your productivity.
Conclusion
Regaining control over your Google Chrome extensions, especially those installed by an administrator, can seem like a daunting task. However, by systematically approaching the problem – from understanding the root cause to implementing advanced troubleshooting techniques – you can effectively manage your browser environment. Whether it’s through careful navigation of the Group Policy Editor, precise modifications in the Windows Registry, or robust anti-malware measures, the power to customize and secure your browsing experience is within reach.
Remember the critical balance between user autonomy and organizational policies. When in doubt, especially on a company-owned device, always communicate with your IT department. For personal machines, empowering yourself with knowledge and employing sound digital security practices ensures a faster, safer, and more productive online journey. In an era where technology constantly evolves, mastering these skills is not just about troubleshooting; it’s about safeguarding your digital footprint and optimizing your interaction with the web.
aViewFromTheCave is a participant in the Amazon Services LLC Associates Program, an affiliate advertising program designed to provide a means for sites to earn advertising fees by advertising and linking to Amazon.com. Amazon, the Amazon logo, AmazonSupply, and the AmazonSupply logo are trademarks of Amazon.com, Inc. or its affiliates. As an Amazon Associate we earn affiliate commissions from qualifying purchases.