
In the ever-evolving landscape of technology, keeping your hardware running optimally often hinges on the software that bridges the gap between your operating system and your devices: drivers. While Windows and other operating systems are adept at automatically detecting and installing many drivers, there are times when a manual intervention becomes not only necessary but also beneficial. Whether you’re troubleshooting a stubborn hardware issue, upgrading to the latest performance-enhancing software, or ensuring compatibility with a new piece of equipment, understanding how to manually install drivers is a fundamental skill for any tech-savvy individual.
This guide will walk you through the process of manually installing drivers, covering why you might need to do so, where to find them, and the step-by-step procedures for different scenarios. We’ll delve into the nuances of driver installation, ensuring you have the knowledge to confidently manage your system’s hardware components.

Why Manual Driver Installation?
While automatic driver installation is convenient, it’s not always foolproof or the best solution. There are several compelling reasons why you might choose or need to manually install drivers:
1. Troubleshooting Hardware Issues
One of the most common reasons for manual driver installation is to resolve hardware problems. If a device isn’t functioning correctly – perhaps it’s not recognized, exhibiting erratic behavior, or causing system instability – a faulty or outdated driver is often the culprit. Manually installing the latest stable driver from the manufacturer can often resolve these issues by providing the correct instructions for your operating system to communicate with the hardware. This is particularly true for older hardware that may no longer be supported by automatic updates or for devices that require specific configurations.
2. Accessing the Latest Features and Performance Enhancements
Hardware manufacturers frequently release new driver versions that offer performance improvements, bug fixes, and even new features. While automatic updates might eventually deliver these, waiting can mean missing out on optimizations that could enhance gaming performance, improve media playback, or boost the efficiency of your devices. For example, a new graphics card driver might unlock significant performance gains in the latest games, or a network driver update could improve Wi-Fi speeds and stability. Manual installation ensures you have immediate access to these benefits.
3. Ensuring Compatibility with New Software or Operating System Updates
Occasionally, a new software application or a major operating system update can introduce compatibility conflicts with existing drivers. In such cases, the automatically installed driver might not be fully optimized for the new environment, leading to performance issues or even system crashes. Manually installing a driver specifically designed or updated to be compatible with the new software or OS version is crucial for a seamless experience. This is especially relevant when upgrading to a new version of Windows or installing demanding new applications.
4. Installing Drivers for Older or Specialized Hardware
Some older or highly specialized hardware components might not be automatically recognized or supported by modern operating systems’ default driver packages. For these devices, you’ll almost certainly need to locate and manually install the appropriate drivers directly from the manufacturer’s website. This ensures that these legacy devices can function as intended within your current system.
5. Clean Installation for Stability
In some troubleshooting scenarios, a “clean installation” of a driver can resolve persistent problems. This involves completely removing the existing driver and then installing a fresh copy. This process can eliminate corrupted driver files or conflicting settings that might be causing issues. Manual installation provides the control needed to perform this precise operation.
Finding the Right Drivers
The first and most critical step in manual driver installation is locating the correct driver for your specific hardware. Using the wrong driver can lead to system instability, hardware malfunctions, or prevent the device from working at all.
1. Identifying Your Hardware
Before you can download a driver, you need to know precisely what hardware you’re dealing with. The most reliable way to do this is by using your operating system’s Device Manager.
Using Device Manager
-
Windows:
- Press
Windows key + Xand select “Device Manager” from the menu. - Alternatively, search for “Device Manager” in the Windows search bar.
- In the Device Manager window, you’ll see a list of hardware categories (e.g., “Display adapters,” “Network adapters,” “Sound, video and game controllers”).
- Expand the relevant category to find your device.
- Right-click on the device you need the driver for and select “Properties.”
- In the Properties window, navigate to the “Details” tab.
- Under the “Property” dropdown, select “Hardware Ids.”
- You’ll see a series of values. The most important ones are the
VEN(Vendor) andDEV(Device) IDs. These are unique identifiers for the hardware. You can often use these IDs to search for drivers online if the manufacturer name isn’t immediately obvious. - You can also find the “Manufacturer” and “Device name” under the “General” tab, which are usually sufficient for driver searches.
- Press
-
macOS: macOS generally handles driver management through system updates, and manual driver installation is less common and often more complex, involving kernel extensions. However, for specific external peripherals, you might need to consult the manufacturer’s website.
-
Linux: Linux distributions often have a vast array of open-source drivers built into the kernel. For proprietary hardware or specific optimizations, you might need to download drivers from the manufacturer or use package managers to install them. Commands like
lspciandlsusbcan help identify hardware.
2. Downloading Drivers from the Manufacturer’s Website
Once you’ve identified your hardware, the safest and most reliable place to download drivers is directly from the manufacturer’s official website. Avoid third-party driver download sites, as these can sometimes bundle malware or provide outdated or incorrect drivers.
- Locate the Support/Download Section: Most hardware manufacturers have a dedicated “Support,” “Downloads,” or “Drivers” section on their website.
- Enter Product Information: You’ll typically need to enter your product name, model number, or serial number. Sometimes, you can browse by category.
- Select Your Operating System: Crucially, ensure you select the correct operating system version (e.g., Windows 11, Windows 10 64-bit, macOS Ventura) and architecture (32-bit or 64-bit).
- Download the Latest Stable Version: Look for the most recent stable release. Beta or “driver-only” packages might be for advanced users or specific troubleshooting. Read any accompanying release notes for important information.
Common Hardware Manufacturers and Their Support Sections:
- Graphics Cards: NVIDIA, AMD, Intel
- Motherboards: ASUS, Gigabyte, MSI, ASRock
- Audio: Realtek, Creative Labs
- Network Adapters (Wi-Fi/Ethernet): Intel, Realtek, Broadcom, Killer Networking
- Printers/Scanners: HP, Canon, Epson, Brother
- Webcams: Logitech, Microsoft
How to Manually Install Drivers in Windows
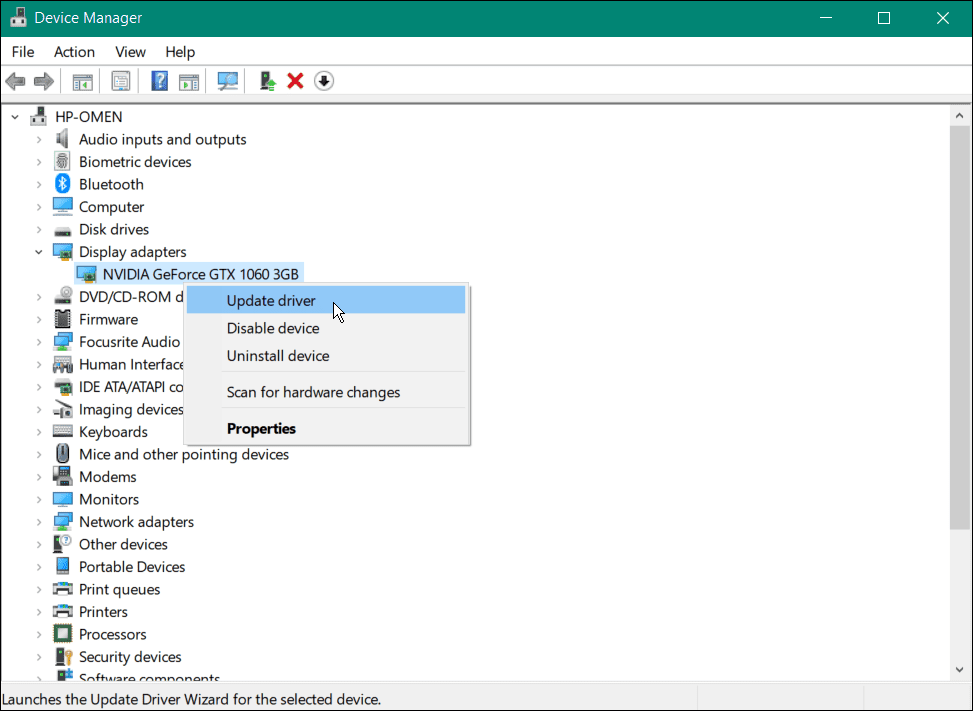
Windows offers a robust built-in tool called “Device Manager” that allows you to manually install, update, or roll back drivers. The process involves pointing Windows to the location of the driver files you’ve downloaded.
Method 1: Using Device Manager’s “Update driver” Option
This is the most common method for manually installing drivers.
Step 1: Prepare the Driver Files
- Extract Downloaded Files: Most driver downloads come as executable (.exe) files or compressed archives (.zip, .rar). If it’s an archive, extract its contents to a dedicated folder on your computer. Look for a subfolder named “Drivers” or similar, which often contains the actual
.inf,.sys, and.catfiles. These are the core driver components. - Locate the .inf File: The
.inf(information) file is crucial. It tells Windows how to install the driver.
Step 2: Access Device Manager
- Press
Windows key + Xand select “Device Manager.” - Locate the device for which you want to install the driver. If the device is not recognized, it might appear under “Other devices” with a yellow exclamation mark.
Step 3: Initiate Driver Installation
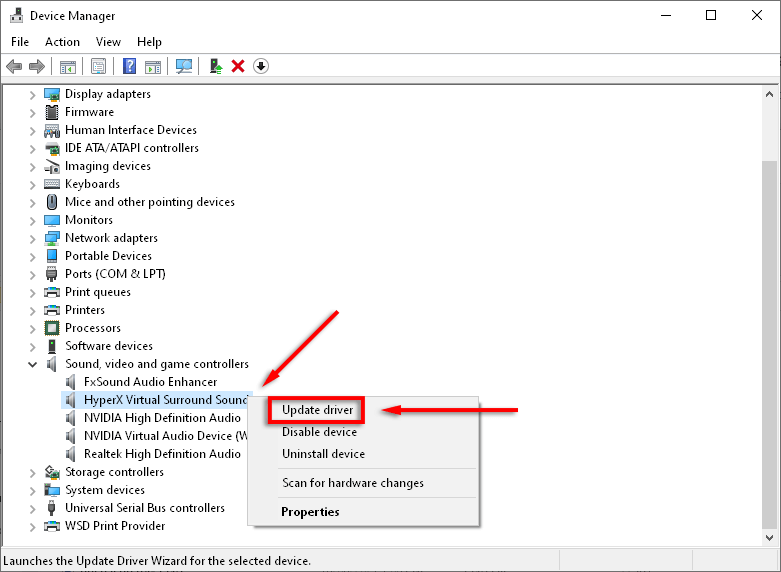
- Right-click on the device.
- Select “Update driver.”
- You will be presented with two options:
- “Search automatically for drivers”: This option will let Windows try to find drivers online or on your system.
- “Browse my computer for drivers”: This is the option you’ll use for manual installation. Select this.
Step 4: Point Windows to Your Driver Files
- Click on “Browse my computer for drivers.”
- Click the “Browse…” button.
- Navigate to the folder where you extracted the driver files and select it. Crucially, ensure you select the folder containing the
.inffile, not just the.inffile itself. Windows will scan this folder and its subfolders for compatible drivers. - You can choose to check or uncheck “Include subfolders” based on where you placed the files. Generally, leaving it checked is fine.
- Click “Next.”
Step 5: Installation Process
- Windows will now attempt to find and install the driver. If it finds a compatible driver, it will proceed with the installation.
- You might see a “Windows Security” or “Driver Software Installation” prompt asking if you trust the software. Click “Install” if you downloaded from a reputable source.
- Once the installation is complete, you should see a confirmation message.
- It’s often a good idea to restart your computer after installing new drivers, especially for graphics cards or network adapters.
Method 2: Installing Drivers via .exe Installer
Many manufacturers provide a setup executable (.exe) file for their drivers. This is the simplest method if available.
- Download the .exe driver file from the manufacturer’s website.
- Run the installer: Double-click the downloaded
.exefile. - Follow the on-screen prompts: The installer will guide you through the process, which usually involves accepting license agreements, choosing installation locations, and completing the installation.
- Restart your computer: As with any driver installation, a restart is often recommended.
Method 3: Clean Driver Installation (Advanced)
Sometimes, a simple update isn’t enough. To perform a clean installation, you need to uninstall the existing driver first.
Step 1: Uninstall the Existing Driver
- Open “Device Manager.”
- Locate the device.
- Right-click on the device and select “Uninstall device.”
- Crucially, check the box that says “Delete the driver software for this device” if available. This ensures the old driver files are removed.
- Click “Uninstall.”
Step 2: Restart Your Computer
After uninstalling, restart your computer. Windows might attempt to install a generic driver upon reboot, or the device might appear with a yellow exclamation mark.
Step 3: Install the New Driver Manually
- Once Windows has rebooted, follow Method 1 (“Using Device Manager’s ‘Update driver’ Option”) or Method 2 (“.exe Installer”) to install the new driver you downloaded. This ensures a fresh installation without any potential conflicts from the previous driver.
Advanced Considerations and Tips
- Driver Signatures: Windows enforces driver signing to ensure that drivers are from trusted sources and haven’t been tampered with. If you’re installing a driver without a valid signature, you might need to disable driver signature enforcement. This is generally not recommended for everyday users as it reduces system security. It’s a process that requires booting into advanced startup options.
- Roll Back Driver: If a newly installed driver causes problems, you can often roll it back. In Device Manager, right-click the device, go to “Properties,” then the “Driver” tab, and click “Roll Back Driver.”
- System Restore: If a driver installation leads to severe system instability, using System Restore to revert your system to a point before the driver was installed can be a lifesaver.
- Manufacturer Utilities: Some manufacturers, like NVIDIA and AMD for graphics cards, provide their own driver update utilities that can simplify the process and offer additional settings.
- Check Device Status: After installation, always check Device Manager to ensure the device is listed without any error symbols. Test the device to confirm it’s functioning correctly.
Manually installing drivers might seem daunting at first, but with a clear understanding of the process and careful attention to detail, it’s a straightforward task that empowers you to maintain the health and performance of your computer’s hardware. By following these steps, you can ensure your devices are running on the most appropriate and up-to-date software, leading to a smoother, more efficient, and more enjoyable computing experience.
aViewFromTheCave is a participant in the Amazon Services LLC Associates Program, an affiliate advertising program designed to provide a means for sites to earn advertising fees by advertising and linking to Amazon.com. Amazon, the Amazon logo, AmazonSupply, and the AmazonSupply logo are trademarks of Amazon.com, Inc. or its affiliates. As an Amazon Associate we earn affiliate commissions from qualifying purchases.