Embarking on the journey with a brand-new computer is an exciting prospect, promising enhanced performance, cutting-edge features, and a fresh start. However, this excitement often comes with the crucial first step: installing an operating system. For many, Windows 10 remains a powerful, reliable, and user-friendly choice, offering a familiar interface alongside robust features suitable for both work and play. Whether you’ve just built a custom PC, replaced a faulty drive, or simply want to perform a clean installation to optimize performance, this comprehensive guide will walk you through every step of installing Windows 10 on your new machine.
A clean installation is more than just loading software; it’s an opportunity to set up your system efficiently, ensuring peak performance and a stable foundation for all your digital endeavors. From preparing your installation media to configuring initial settings and fine-tuning your system post-installation, we’ll cover everything you need to know to achieve a seamless and successful Windows 10 setup.
Preparing for a Seamless Windows 10 Installation
Before you dive into the installation process, proper preparation is key. Taking the time to gather the necessary tools and configure your system beforehand will save you considerable time and potential frustration down the line. This foundational stage ensures that the rest of the installation proceeds smoothly, setting you up for success.
Essential Prerequisites
To begin, ensure you have the following items ready:
- A Reliable Internet Connection: Required for downloading the Windows 10 installation media and for subsequent updates and driver downloads.
- A USB Flash Drive (8GB or Larger): This will serve as your bootable installation media. Ensure it’s empty or contains no important data, as it will be formatted during the process.
- Your Windows 10 Product Key (Optional but Recommended): While you can often skip entering the product key during installation and activate Windows later, having it on hand simplifies the process. If you’re reinstalling Windows 10 on a PC that previously had it activated, your license might be linked to your Microsoft account or the device’s hardware, allowing for automatic activation post-installation.
- Your New PC: Naturally, you’ll need the computer on which you intend to install Windows 10. Ensure all components are correctly assembled and connected.
Creating Your Bootable Windows 10 Installation Media
The most straightforward and recommended method for creating Windows 10 installation media is by using Microsoft’s official Media Creation Tool. This utility simplifies the process of downloading the Windows 10 ISO file and transforming your USB drive into a bootable installer.
- Download the Media Creation Tool: Visit the official Microsoft Windows 10 download page on another working computer. Look for the section titled “Create Windows 10 installation media” and click “Download tool now.”
- Run the Tool: Once downloaded, run the
MediaCreationTool.exefile. Accept the license terms. - Choose “Create installation media (USB flash drive, DVD, or ISO file) for another PC”: Select this option and click “Next.”
- Select Language, Architecture, and Edition: The tool will usually recommend options based on your current PC. For a new installation, ensure these settings are correct for your target PC (e.g., English, Windows 10, 64-bit). You can uncheck “Use recommended options for this PC” if you need to change them. Click “Next.”
- Choose USB Flash Drive: Select the “USB flash drive” option and click “Next.”
- Select Your USB Drive: From the list of available drives, select your prepared USB flash drive. Be absolutely certain you pick the correct drive, as all data on it will be erased. Click “Next.”
- Download and Creation: The tool will now download the Windows 10 files and create the bootable media. This process can take some time, depending on your internet speed and the speed of your USB drive. Once complete, you’ll see a message confirming that your USB flash drive is ready. Safely remove the USB drive.
Configuring Your PC’s BIOS/UEFI Settings
Before your new PC can start the Windows 10 installation, you need to instruct it to boot from your newly created USB drive, rather than trying to boot from an empty hard drive. This is done through the computer’s BIOS (Basic Input/Output System) or the more modern UEFI (Unified Extensible Firmware Interface) firmware settings.
- Insert the USB Drive: With your PC powered off, insert the bootable Windows 10 USB flash drive into an available USB port.
- Access BIOS/UEFI: Power on your PC and immediately start pressing the designated key to enter the BIOS/UEFI setup. Common keys include
Delete,F2,F10,F12, orEsc. The specific key often varies by motherboard manufacturer (e.g., Asus, Gigabyte, MSI, Dell, HP, Lenovo). You might see a quick splash screen indicating which key to press. If you miss it, consult your motherboard or PC manual. - Navigate to Boot Options: Once in the BIOS/UEFI utility, navigate through the menus to find the “Boot Options,” “Boot Priority,” or “Boot Order” section. The interface can vary significantly, but these terms are common.
- Set USB as First Boot Device: Change the boot order to prioritize the USB flash drive (it might be listed by its brand name, or as “USB HDD,” “Removable Device,” etc.) as the primary boot device.
- Disable Secure Boot (If Necessary): In some cases, especially with older Windows 10 versions or certain hardware configurations, you might need to temporarily disable “Secure Boot” in the BIOS/UEFI settings if you encounter issues booting from the USB drive. This is typically found in the “Security” or “Boot” section. Remember to re-enable it after installation if desired for enhanced security.
- Save and Exit: Save your changes (usually by pressing
F10or selecting “Save and Exit” from the menu) and allow the computer to restart. Your PC should now boot from the USB drive, initiating the Windows 10 setup.
The Step-by-Step Windows 10 Installation Process
With your preparations complete, you are now ready to begin the core installation of Windows 10. This phase involves a series of guided steps, from initial language selection to partitioning your hard drive and allowing Windows to install its core files. Pay close attention to each prompt to ensure a smooth setup.
Initiating the Setup
- Boot from USB: After saving your BIOS/UEFI settings, your computer will restart and boot from the USB drive. You might see a message like “Press any key to boot from USB…” If so, press a key quickly.
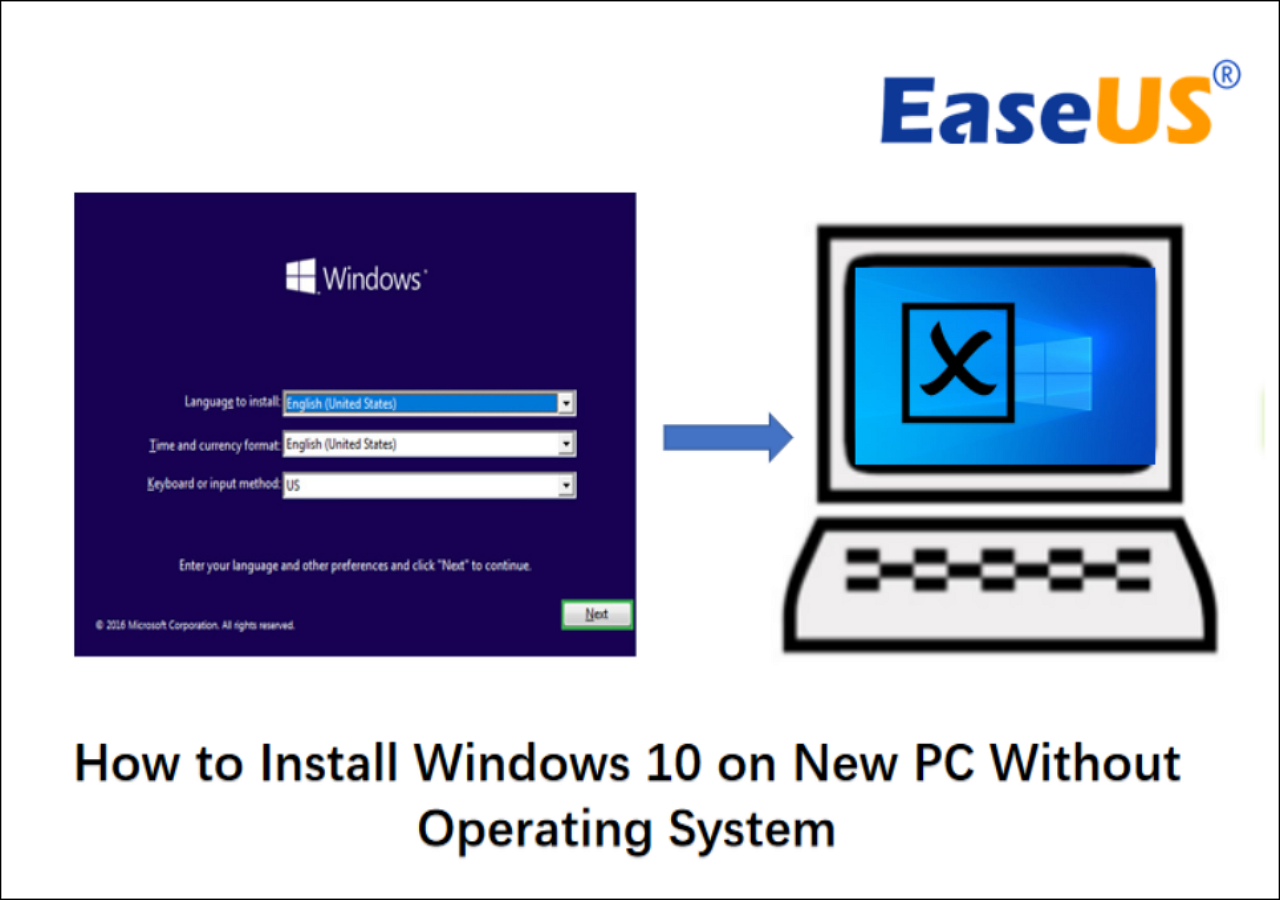
- Windows Setup Screen: The Windows Setup screen will appear, prompting you to select your language, time and currency format, and keyboard or input method. Make your selections and click “Next.”
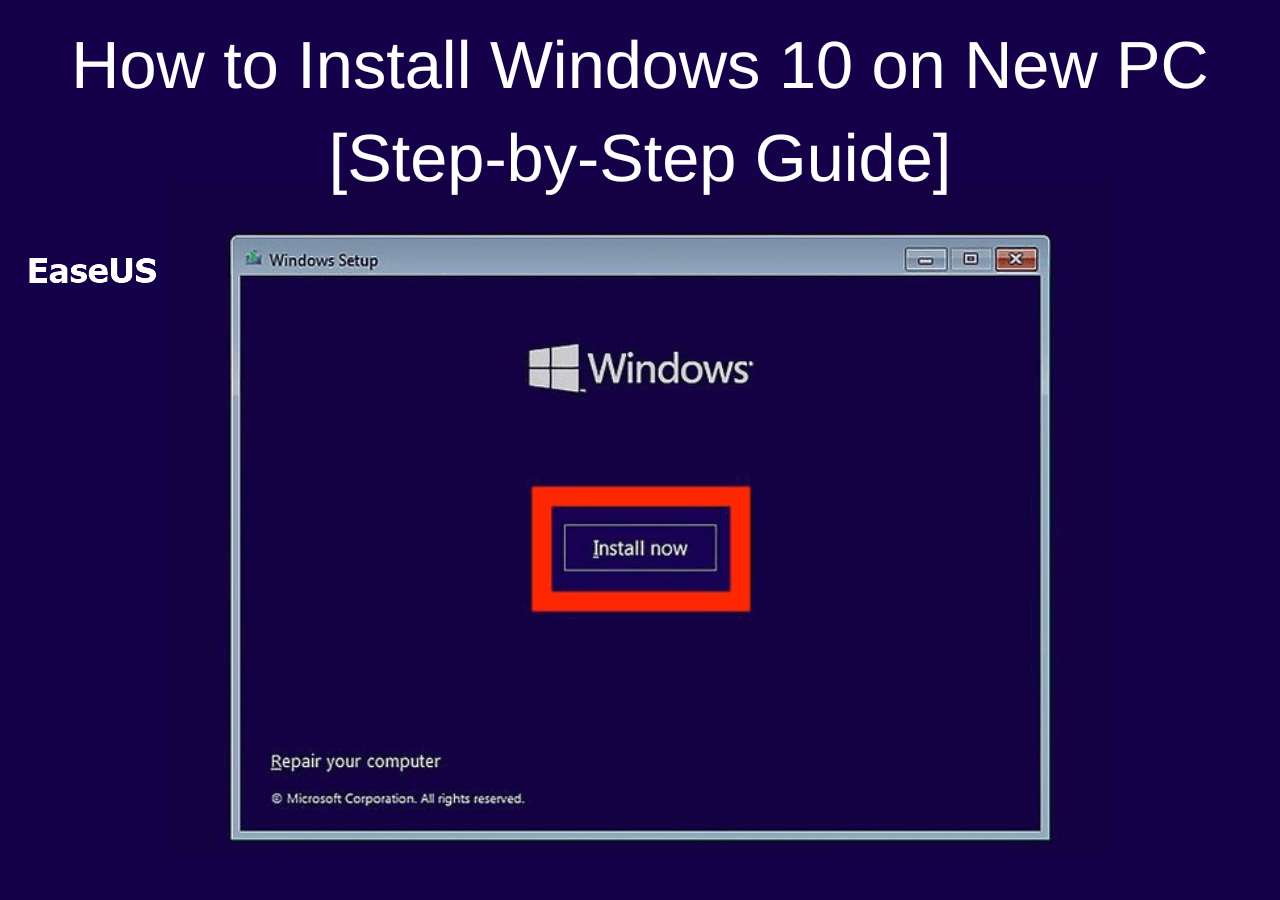
- Install Now: On the next screen, click “Install now.”
- Enter Product Key: A prompt will ask for your Windows 10 product key.
- If you have it, enter it now and click “Next.”
- If you don’t have it or prefer to activate later, click “I don’t have a product key.” Windows will still install, and you can activate it once the installation is complete and you’re connected to the internet. If your PC previously had an activated Windows 10 (e.g., from an upgrade), it will often reactivate automatically.
- Select Operating System (if applicable): If the installation media contains multiple editions of Windows 10 (e.g., Home, Pro), you’ll be asked to choose which one to install. Select the edition corresponding to your product key or preference, then click “Next.”
- Accept License Terms: Read the Microsoft Software License Terms. If you agree, check the “I accept the license terms” box and click “Next.”
Customizing Installation Options
This is a critical juncture where you decide the type of installation. For a new PC, a “Custom” installation is almost always the correct choice, as it allows you to manage disk partitions.
- Choose Installation Type: You will be presented with two options:
- Upgrade: Install Windows and keep files, settings, and applications. (This option is grayed out or not applicable for a new PC without an existing OS).
- Custom: Install Windows only (advanced). This is the option you want to select for a clean installation on a new PC or an empty drive. Click “Custom.”
Partitioning Your Drive for Optimal Performance
This step allows you to manage your storage drives. Since you’re installing on a new PC, your hard drive or SSD will likely be “unallocated space.”
- Drive Selection Screen: You’ll see a list of drives and their partitions. On a new PC, you’ll probably see “Drive 0 Unallocated Space.”
- Create New Partition(s):
- Select “Drive 0 Unallocated Space.”
- Click “New.” You can choose to use the entire available space for Windows (recommended for most users) or create smaller partitions. For example, some users create one smaller partition for Windows and programs (e.g., 250GB-500GB) and another larger partition for personal data.
- If you use the entire space, simply click “Apply” when prompted with the default size. Windows will then inform you that it needs to create additional partitions for system files (e.g., Recovery, System, MSR). Click “OK.”
- You will now see several small system partitions and your main “Primary” partition (e.g., “Drive 0 Partition 4: Primary”).
- Select the Primary Partition: Crucially, select the largest “Primary” partition (the one you intend to install Windows on) and click “Next.” Do not select any of the small system partitions.
The Core Installation Phase
Once you’ve selected the primary partition, Windows will begin the actual installation process.
- Copying Files: Windows will start copying its necessary files to your selected drive.
- Installing Features and Updates: The installer will then proceed to install Windows features and any necessary updates included in the installation media.
- Multiple Restarts: Your PC will restart several times during this phase. Do not remove the USB drive until Windows confirms the installation is complete and asks you to remove it or boots into the initial setup screens. If your PC restarts and attempts to boot from the USB drive again, you may need to quickly remove the USB drive or adjust your BIOS/UEFI boot order back to your hard drive/SSD to ensure it continues booting into the Windows installation.
Post-Installation Setup and Optimization
Once the core installation files are copied, and your PC has gone through its final reboots, you’ll be greeted by a series of setup screens. This phase is about personalizing your Windows 10 experience and ensuring your system is fully functional and secure.
Initial Configuration: Personalizing Your Experience
- Region and Keyboard Layout: You’ll be asked to confirm your region and keyboard layout. Select your preferences and click “Yes.” You can also add a second keyboard layout if needed.
- Connect to a Network: Windows will prompt you to connect to a network. Connecting to the internet now will allow Windows to check for updates during the final setup and link your Microsoft account. Choose your Wi-Fi network and enter the password, or connect via Ethernet.
- Sign in with Microsoft Account: You’ll be asked to sign in with your Microsoft account.
- Recommended: Signing in with a Microsoft account (Outlook.com, Hotmail, Live.com) offers benefits like cloud synchronization for settings, OneDrive storage, access to the Microsoft Store, and easier license activation.
- Local Account: If you prefer not to use a Microsoft account, you might see an option like “Offline account” or “Domain join instead” depending on the Windows 10 version. Choosing this will create a traditional local user account. If these options aren’t immediately visible, disconnect from the internet and the “Offline account” option usually appears.
- Create a PIN: For faster and more secure sign-ins, Windows will suggest creating a PIN. This is generally recommended.
- Privacy Settings: You’ll be presented with several privacy settings regarding location, diagnostic data, tailored experiences, and advertising ID. Review these carefully and make your choices based on your comfort level. You can always adjust these later in Windows Settings.
- Cortana Setup: You might be asked if you want to enable Cortana. You can choose to accept or decline.
After these steps, Windows will finalize your settings, and you’ll eventually arrive at your new Windows 10 desktop. Congratulations, your operating system is now installed!
Ensuring System Stability: Drivers and Updates
While Windows 10 often includes generic drivers, installing the latest, manufacturer-specific drivers is crucial for optimal performance, stability, and access to all hardware features.
- Windows Update: The first thing to do is run Windows Update.
- Go to
Settings > Update & Security > Windows Update. - Click “Check for updates.” Let Windows download and install all available updates. This may take some time and require multiple restarts. Windows Update is often good at providing basic drivers for your hardware.
- Go to
- Install Manufacturer Drivers: For critical components like your graphics card, motherboard chipset, and network adapters, it’s best to download the latest drivers directly from the component manufacturers’ websites (e.g., NVIDIA, AMD, Intel, Realtek, or your motherboard manufacturer like Asus, Gigabyte, MSI).
- Visit the support section of your component manufacturer’s website.
- Locate your specific model (e.g., GPU model, motherboard model).
- Download the latest Windows 10 (64-bit) drivers for essential components.
- Install them one by one, typically starting with the chipset drivers, then graphics, audio, and network drivers. Restart your PC as prompted.
- Check Device Manager: To ensure all devices have drivers, open Device Manager (right-click the Start button and select “Device Manager”). Look for any devices with a yellow exclamation mark, which indicates a missing or problematic driver.
Activating Windows 10
If you skipped entering your product key during installation, now is the time to activate Windows 10.
- Check Activation Status: Go to
Settings > Update & Security > Activation. - Activate: If Windows is not activated, you’ll see options to enter your product key or troubleshoot activation.
- If your license is tied to a Microsoft account from a previous digital license, simply logging in with that account and ensuring you’re connected to the internet should activate it. You might need to run the “Troubleshoot” option and select “I changed hardware on this device recently.”
- If you have a retail product key, enter it in the provided field.
Essential Next Steps and Troubleshooting Tips
A successful Windows 10 installation is just the beginning. To truly make your new PC productive and secure, a few more steps are recommended. It’s also wise to be prepared for common hurdles that might arise during or after installation.
Installing Core Applications
Once your system is updated and drivers are in place, start installing your essential software:
- Web Browser: Download your preferred browser (Chrome, Firefox, Edge, Brave, etc.).
- Antivirus Software: While Windows Defender provides robust protection, you might opt for a third-party antivirus solution for additional features. Ensure it’s reputable.
- Productivity Suite: Install office software like Microsoft Office, LibreOffice, or Google Workspace desktop apps.
- Communication Tools: Zoom, Microsoft Teams, Discord, etc.
- Utilities: Cloud storage clients (OneDrive, Google Drive, Dropbox), PDF reader, media player (VLC), file archiver (7-Zip, WinRAR).
- Gaming Platforms: Steam, Epic Games Launcher, etc., if applicable.
Prioritize software you use daily to get your PC ready for action.
Common Installation Hurdles and Solutions
Even with careful preparation, you might encounter issues. Here are some common problems and their solutions:
- “No Boot Device Found” or “Operating System Not Found”:
- Solution: Recheck your BIOS/UEFI boot order. Ensure your SSD/HDD is recognized and set as the primary boot device after removing the USB installer.
- Setup Fails or Freezes:
- Solution: Try recreating your bootable USB using the Media Creation Tool again. Ensure your RAM and other components are properly seated. Temporarily disable Secure Boot or Fast Boot in BIOS/UEFI. Test your RAM with a tool like MemTest86 if problems persist.
- Driver Issues (e.g., No Wi-Fi, Poor Graphics):
- Solution: As mentioned, download specific drivers from the manufacturer’s website. For network issues, you might need to use an Ethernet connection initially to download Wi-Fi drivers.
- Windows Won’t Activate:
- Solution: Double-check your product key. Ensure you have an active internet connection. If you have a digital license, ensure you’re logged in with the correct Microsoft account and use the Activation Troubleshooter.
- Slow Performance Post-Installation:
- Solution: Ensure all Windows Updates are installed. Verify all device drivers are up-to-date. Check for background processes in Task Manager. If it’s a new PC, this is less likely, but worth checking.

Upgrading to Windows 11 (Optional Consideration)
While this guide focuses on Windows 10, it’s worth noting that Windows 11 is Microsoft’s latest operating system. If your new PC meets the minimum system requirements for Windows 11 (including a TPM 2.0 module and Secure Boot enabled), you’ll have the option to upgrade to Windows 11 for free through Windows Update at a later stage. Many users choose to install Windows 10 first for its stability and familiar interface, then upgrade to Windows 11 once they are comfortable and specific application compatibility is confirmed.
Installing Windows 10 on a new PC is a foundational step in building your digital workspace. By meticulously following these instructions, you’ll establish a robust, efficient, and personalized computing environment ready to tackle any task. Welcome to the world of Windows 10!
aViewFromTheCave is a participant in the Amazon Services LLC Associates Program, an affiliate advertising program designed to provide a means for sites to earn advertising fees by advertising and linking to Amazon.com. Amazon, the Amazon logo, AmazonSupply, and the AmazonSupply logo are trademarks of Amazon.com, Inc. or its affiliates. As an Amazon Associate we earn affiliate commissions from qualifying purchases.