
In the modern computing landscape, the ability to perform a clean installation of an operating system is a foundational skill for tech enthusiasts, IT professionals, and general users alike. Whether you are building a new PC, recovering from a catastrophic system failure, or simply looking to purge your current machine of “bloatware” and accumulated digital clutter, knowing how to install Windows 10 from a USB drive via the BIOS (Basic Input/Output System) or UEFI (Unified Extensible Firmware Interface) is essential.
A clean installation ensures that your hardware operates at its peak potential by providing a fresh registry and optimized system files. This guide provides a professional-grade walkthrough of the entire process, from the initial preparation of installation media to the final configuration of the Windows environment.
1. Preparing the Installation Media and System Prerequisites
Before interacting with the BIOS, the most critical step is the creation of a reliable, bootable USB flash drive. Modern Windows installations no longer rely on optical media; the speed and portability of USB 3.0 or 3.1 drives make them the preferred medium.
Hardware and Software Requirements
To ensure a smooth installation, you must verify that your hardware meets the minimum requirements for Windows 10. This includes a 1 GHz or faster processor, at least 2GB of RAM for the 64-bit version, and 32GB of storage space. However, for a professional experience, 8GB of RAM and an SSD (Solid State Drive) are highly recommended.
Regarding the USB drive itself, you will need a drive with at least 8GB of capacity. It is important to note that the preparation process will completely format the USB drive, erasing all existing data.
Using the Microsoft Media Creation Tool
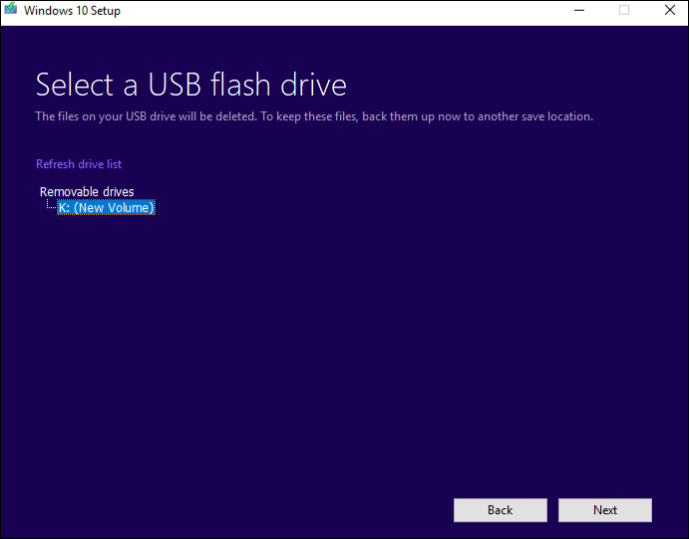
The most reliable method for creating bootable media is using the official Microsoft Media Creation Tool. This utility downloads the latest version of the Windows 10 ISO and configures the USB drive to be bootable on both legacy BIOS and modern UEFI systems.
- Download the tool from the official Microsoft website.
- Run the executable and accept the license terms.
- Select “Create installation media (USB flash drive, DVD, or ISO file) for another PC.”
- Choose your preferred language, edition, and architecture (typically 64-bit).
- Select “USB flash drive” and follow the prompts to finish the process.
Backing Up Data and Driver Preparation
A clean install involves formatting your primary storage drive, which deletes all data. Before proceeding, ensure that your personal files, browser bookmarks, and application data are backed up to an external drive or cloud storage. Additionally, it is a wise technical practice to download the Network (LAN/Wi-Fi) drivers for your specific motherboard or laptop model beforehand and save them to a separate folder on your USB drive. This ensures you can access the internet immediately after the installation to download remaining updates.
2. Navigating the BIOS/UEFI for USB Booting
The BIOS/UEFI is the firmware that initializes your hardware before the operating system takes over. To install Windows from a USB, you must instruct the BIOS to prioritize the USB drive over the internal hard drive or SSD.
Accessing the BIOS/UEFI Menu
Accessing the BIOS requires pressing a specific key during the initial “POST” (Power-On Self-Test) phase, immediately after turning on the computer. This key varies by manufacturer. Common keys include:
- ASUS: F2 or Delete
- MSI: Delete
- Gigabyte / Dell: F12 or F2
- HP: F10 or ESC
- Lenovo: F1, F2, or the “Novo” button
Once the manufacturer logo appears, tap the designated key repeatedly until the firmware interface loads.
Adjusting the Boot Priority
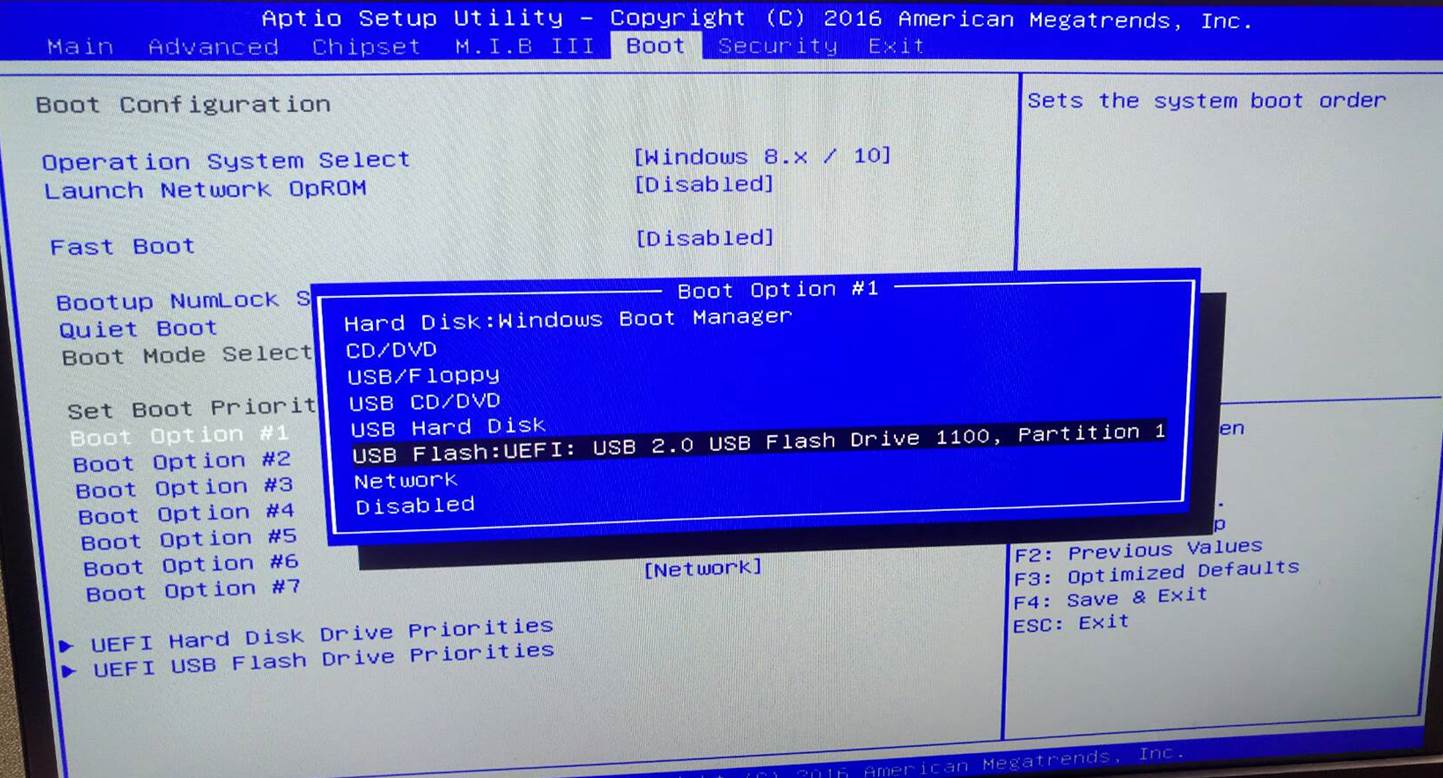
Inside the BIOS, navigate to the “Boot” or “Advanced” tab using the keyboard or mouse (if supported). Look for a setting labeled “Boot Priority,” “Boot Order,” or “Boot Option #1.”
You must move your USB flash drive to the top of this list. In many modern UEFI interfaces, you can simply drag the USB icon to the first position. For older BIOS systems, you might use the ‘+’ or ‘-‘ keys or the F5/F6 keys to shift the order. By setting the USB as the primary boot device, the system will look for the Windows installation files on the drive instead of attempting to boot from the currently empty or corrupted internal drive.
Secure Boot and Compatibility Support Module (CSM)
Technical variables such as “Secure Boot” and “CSM” can sometimes interfere with the installation process. Secure Boot is a security standard developed to ensure that a device boots using only software that is trusted by the Original Equipment Manufacturer (OEM). While Windows 10 supports Secure Boot, some older USB creation methods might require you to temporarily disable it.
Conversely, if you are installing on older hardware, you may need to enable “CSM” or “Legacy Boot” to recognize the USB. For most modern systems (post-2015), keeping the BIOS in UEFI mode with Secure Boot enabled is the optimal configuration for security and performance.
3. The Windows 10 Installation Process
Once the BIOS is configured and the system restarts, you should see the prompt “Press any key to boot from USB.” Pressing a key initiates the Windows Setup environment.
Initial Setup and Activation
The first screen will ask you to select your language, time and currency format, and keyboard layout. After clicking “Next” and “Install Now,” you will be prompted to enter a product key.
- If you are reinstalling: Click “I don’t have a product key.” Windows will automatically reactivate once you sign in and connect to the internet, as your hardware ID is likely already registered with Microsoft’s servers.
- If you have a new license: Enter the 25-character key provided with your purchase.
Choosing the Installation Type: Custom vs. Upgrade
This is a critical juncture. You will be presented with two options: “Upgrade” and “Custom: Install Windows only (advanced).”
For a true clean install from the BIOS, always select Custom. The “Upgrade” option is intended for use within an existing Windows environment and will not work when booting from a USB drive in this manner. The Custom path allows you to manage partitions and ensure no remnants of the old OS remain.
Partition Management and Disk Formatting
The “Where do you want to install Windows?” screen displays your connected storage drives and their current partitions.
- For a clean slate: Select each partition on your primary drive (usually “Drive 0”) and click “Delete.” Do this until you are left with “Drive 0 Unallocated Space.”
- Caution: Deleting partitions wipes all data on that specific physical disk. Ensure you are deleting partitions on the correct drive if you have multiple disks installed.
Once you have unallocated space, simply click “Next.” Windows Setup will automatically create the necessary system partitions (EFI, MSR, and Primary) and begin copying files.
4. Finalizing the “Out of Box Experience” (OOBE)
After the files are copied, the computer will restart. You can safely remove the USB drive at this point to prevent the system from accidentally looping back into the installer. The system will then enter the “Out of Box Experience,” where you personalize your settings.
Account Creation and Privacy Settings
Windows will ask you to select your region and keyboard layout once more. You will then be prompted to connect to a network. If you prefer to create a “Local Account” rather than signing in with a Microsoft Account, you may need to disconnect from the internet or select “I don’t have internet” followed by “Continue with limited setup.”
During the privacy settings phase, it is recommended to read through the toggles. You can disable features like “Tailored experiences,” “Diagnostic data,” and “Advertising ID” if you prefer a more private and streamlined environment.
Driver Integration and Windows Update
Once you reach the desktop, your first priority is system stability. While Windows 10 is excellent at automatically detecting hardware, it often installs generic drivers.
- Windows Update: Go to Settings > Update & Security > Windows Update and click “Check for updates.” This will pull the latest security patches and many essential drivers.
- Manufacturer Drivers: Visit the website of your motherboard or laptop manufacturer to download specific chipset, audio, and GPU drivers. This ensures that features like high-refresh-rate monitors or specialized audio hardware function correctly.
System Optimization and Security
To complete the technical setup, ensure that Windows Defender is active and updated. In the modern Windows ecosystem, Defender provides robust protection that rivals many third-party paid solutions. Furthermore, check the “Device Manager” (right-click the Start button) to ensure there are no yellow exclamation marks, which indicate missing drivers.
Conclusion
Installing Windows 10 from a USB via the BIOS is a definitive way to ensure your computer operates with maximum efficiency. By bypassing the limitations of an in-place upgrade, you eliminate software conflicts and legacy baggage that can slow down your system.
The process requires a methodical approach—properly preparing the bootable media, understanding the nuances of your system’s firmware, and carefully managing disk partitions. Once mastered, this process becomes a powerful tool in your technical repertoire, allowing you to maintain your hardware’s health and security for years to come. Whether you are optimizing a gaming rig or setting up a professional workstation, the fresh start provided by a clean USB installation is the gold standard for operating system deployment.
aViewFromTheCave is a participant in the Amazon Services LLC Associates Program, an affiliate advertising program designed to provide a means for sites to earn advertising fees by advertising and linking to Amazon.com. Amazon, the Amazon logo, AmazonSupply, and the AmazonSupply logo are trademarks of Amazon.com, Inc. or its affiliates. As an Amazon Associate we earn affiliate commissions from qualifying purchases.