
In the ever-evolving landscape of personal computing, the graphics processing unit (GPU) stands as a cornerstone of performance, particularly for tasks ranging from high-fidelity gaming to demanding professional applications. While integrated graphics have certainly improved, offering sufficient power for everyday use, the desire for a more robust visual experience often leads users to consider installing a dedicated GPU. This guide will walk you through the essential steps, considerations, and best practices for successfully integrating a powerful dedicated graphics card into your system’s motherboard, unlocking its full potential.
For anyone navigating the exciting world of PC building or upgrading, understanding the intricacies of hardware installation is paramount. A dedicated GPU, often referred to as a discrete graphics card, brings its own memory and processing power, significantly offloading visual computation from your CPU and dramatically enhancing graphical output. Whether you’re a seasoned gamer seeking higher frame rates, a content creator needing faster render times, or simply someone looking for a smoother desktop experience across multiple monitors, upgrading your GPU is one of the most impactful improvements you can make. This tutorial, rooted in the principles of solid tech education, aims to demystify the process, ensuring a smooth and confident installation for every enthusiast.

Why Upgrade to a Dedicated GPU? Unlocking Enhanced Performance and Productivity
Before diving into the physical installation, it’s crucial to understand the profound impact a dedicated GPU can have on your computing experience. This isn’t merely about higher numbers on a benchmark; it’s about transforming how you interact with your digital world, boosting everything from immersive gaming to professional productivity.
The Performance Advantage: Gaming and Beyond
The most immediate and apparent benefit of a dedicated GPU is its prowess in rendering complex 3D graphics. For gamers, this translates directly into higher frame rates, sharper resolutions, and the ability to enjoy the latest titles with all their visual settings cranked up. Integrated graphics, built directly into the CPU, share system memory and processing power with the rest of your computer, leading to significant bottlenecks when faced with graphically intensive games. A dedicated GPU, with its own independent processing cores (CUDA cores for NVIDIA, Stream Processors for AMD) and dedicated high-speed video memory (VRAM), is engineered specifically for parallel processing tasks, making it supremely efficient at crunching graphical data.
Beyond gaming, this raw graphical horsepower benefits a wide array of applications. Video editors can experience drastically reduced render times, as many modern editing suites leverage GPU acceleration for effects and exports. 3D modelers and animators will find their viewport performance vastly improved, allowing for real-time manipulation of complex scenes. Even tasks like running multiple high-resolution monitors or engaging in live streaming can see a noticeable boost in smoothness and responsiveness. In the context of technological trends, as software and applications become increasingly visually rich and demanding, a dedicated GPU becomes less of a luxury and more of a necessity for an optimal experience.
Enhancing Productivity and Digital Creativity
While often associated with entertainment, a powerful GPU is an invaluable tool for productivity. Designers using CAD software, architects rendering complex blueprints, or data scientists working with machine learning models that leverage GPU compute, will find their workflows dramatically accelerated. The ability to process large datasets or simulate intricate models quickly can save hours, translating directly into increased efficiency and output. For creative professionals, this means more time spent iterating on ideas and less time waiting for software to catch up.
Moreover, the advancements in AI tools are increasingly relying on GPU capabilities. From advanced image upscaling to real-time content generation, the parallel processing architecture of modern GPUs is perfectly suited for machine learning algorithms. Investing in a capable GPU is, therefore, not just an upgrade for today’s tasks but an investment in future readiness, positioning your system to take advantage of upcoming AI-powered applications and workflows. For those interested in digital security, powerful GPUs can also be utilized for specialized tasks like password cracking (though often for ethical penetration testing) or accelerating cryptographic operations, showcasing their versatility beyond standard visual output.
Essential Preparations: Ensuring a Seamless Installation
The success of your GPU installation hinges significantly on thorough preparation. Rushing this stage can lead to compatibility issues, power problems, or even damage to your components. Taking the time to perform these checks will save you headaches down the line.
Compatibility Checks: Motherboard, Case, and BIOS
The first and most critical step is to verify compatibility between your chosen GPU and your existing system.
- Motherboard Slot: All modern dedicated GPUs connect to a motherboard via a PCI Express (PCIe) x16 slot. While newer GPUs and motherboards typically use PCIe 4.0 or even 5.0, older cards and boards might be on PCIe 3.0. A PCIe 4.0 card will work in a PCIe 3.0 slot (and vice-versa), but it will operate at the speed of the slowest component. Ensure your motherboard has at least one available PCIe x16 slot. Most motherboards have multiple PCIe slots, but the top-most, reinforced x16 slot is usually the primary one, offering the best performance. Consult your motherboard manual to confirm.
- Physical Size: Graphics cards vary significantly in length, height, and thickness (number of expansion slots they occupy). Measure the available space inside your PC case before purchasing. Pay attention to drive cages, front-mounted radiators, and any other obstructions. A common mistake is buying a GPU that’s too long or too wide to fit comfortably within the case. Modern GPUs can also be quite heavy, so some cases and GPUs include a support bracket to prevent sag.
- BIOS/UEFI Settings: While not always necessary, it’s good practice to understand your motherboard’s BIOS/UEFI settings. In some rare instances, you might need to manually set the primary display output to “PCIe” or “Discrete Graphics” if it defaults to integrated graphics, especially when adding a GPU to a system that previously relied solely on an iGPU. Familiarizing yourself with how to enter your BIOS (usually by pressing DEL or F2 during boot) can be helpful for troubleshooting later.
Power Supply Unit (PSU) Requirements: Don’t Skimp on Power
A dedicated GPU is a power-hungry component, and an underpowered or inadequate PSU is a common cause of instability, crashes, or even system failure.
- Wattage: Every GPU has a recommended minimum PSU wattage. This information is typically found on the GPU manufacturer’s website, product packaging, or in reviews. Factor in the power draw of your CPU, motherboard, storage drives, and other peripherals. It’s always better to have a PSU with a bit of headroom (e.g., a 750W PSU for a system that nominally requires 600W) rather than running it at its absolute maximum capacity. This also allows for future upgrades and ensures stable power delivery.
- PCIe Power Connectors: Most mid-range to high-end GPUs require dedicated PCIe power connectors from the PSU. These typically come in 6-pin, 8-pin, or a combination (e.g., 8-pin + 6-pin). Ensure your PSU has the correct number and type of connectors. Modern PSUs are modular or semi-modular, allowing you to connect only the cables you need. If your PSU lacks the necessary connectors, you might need to upgrade it or use adapters (though adapters are generally discouraged for high-power cards due to potential instability or fire hazards).
- PSU Age and Quality: An old or low-quality PSU, even if it has sufficient wattage, might not deliver stable power. Over time, capacitors can degrade. Investing in a reputable brand’s PSU with a good efficiency rating (e.g., 80 Plus Bronze, Gold, Platinum) is a smart decision for the longevity and stability of your entire system. This links to the “Money” aspect of smart financial planning for your tech investments.
Gathering Your Tools and Safety Precautions
Having the right tools at hand makes the installation process smoother and safer.
- Screwdriver Set: A good Philips head screwdriver is usually all you need, but a set with various sizes can be helpful for different screws inside your PC. Magnetic tips are a bonus for preventing dropped screws.
- Anti-Static Wrist Strap: This is highly recommended to prevent electrostatic discharge (ESD) damage to sensitive components. ESD can permanently damage microelectronics without you even feeling a shock. If you don’t have a strap, frequently touch a grounded metal object (like an unpainted part of your PC case while it’s still plugged into the wall but powered off) to discharge static electricity from your body.
- Flashlight or Headlamp: PC cases can be dark, and a light source will help you see screw holes, connectors, and tiny clips.
- Zip Ties or Velcro Straps: For cable management, which improves airflow and aesthetics.
- Optional: Small Bowl or Magnetic Mat: To keep track of small screws.
- Work Area: Choose a clean, well-lit, and spacious area, preferably on a non-carpeted surface to minimize static electricity.
Safety First: Always power off your PC completely and unplug it from the wall socket before opening the case or touching any internal components. Ground yourself regularly using an anti-static wrist strap.
The Physical Installation Process: Step-by-Step Guide
With preparations complete, you’re ready to physically install your new dedicated GPU. Take your time, follow each step carefully, and don’t force anything.
Opening the PC Case and Accessing the Motherboard
- Power Down and Unplug: Ensure your PC is completely shut down and disconnected from the power outlet.
- Position the Case: Lay your PC case on its side on a stable surface, with the motherboard facing upwards.
- Remove Side Panel: Unscrew and remove the side panel that provides access to your motherboard (usually the left panel when looking from the front). Store it safely.
- Identify Components: Take a moment to familiarize yourself with the internal layout. Locate your motherboard, CPU cooler, RAM sticks, and the PCIe slots.
Removing an Old GPU (If Applicable) and Preparing the Slot
If you’re replacing an existing GPU:
- Disconnect Cables: Unplug any display cables (HDMI, DisplayPort, DVI) and PCIe power cables connected to the old GPU.
- Unscrew: Locate and remove the screw(s) securing the GPU to the PC case’s expansion slot bracket.
- Release Retention Clip: Most PCIe slots have a small plastic or metal retention clip at the end. Gently push or pull this clip to release the GPU from the slot. Be careful not to break it.
- Gently Pull Out: With the clip released and screws removed, carefully pull the old GPU straight out of the PCIe slot. Place it in its anti-static bag if you plan to keep or sell it.
If you’re installing into an empty slot:
- Remove Expansion Slot Covers: You’ll need to remove the metal cover(s) on the back of your PC case corresponding to the PCIe slot your GPU will occupy. GPUs typically take up two or three slots. Unscrew or snap off the required number of covers. Be careful of sharp edges.
Installing the New Dedicated GPU
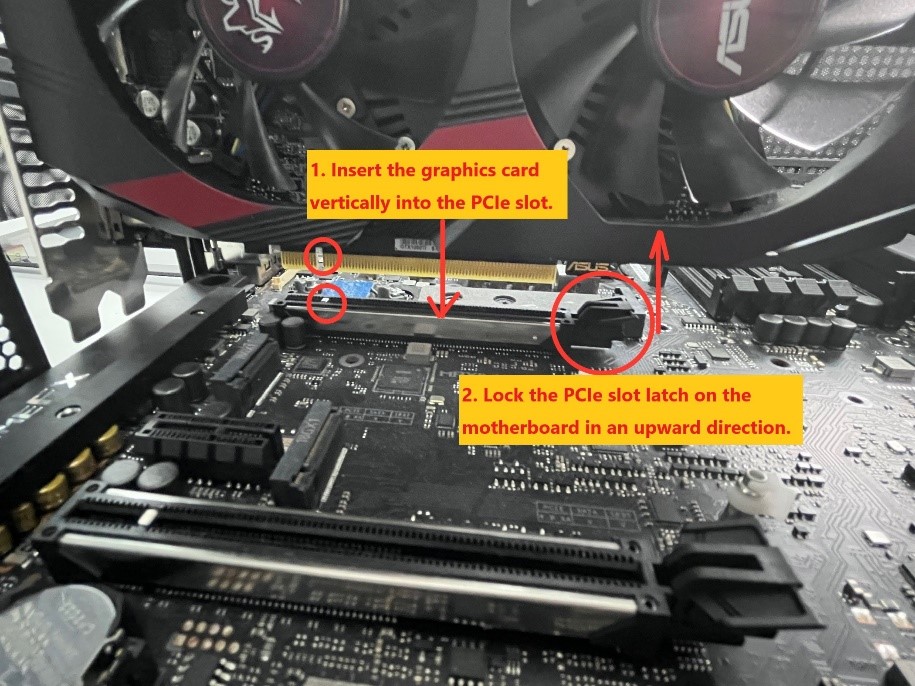
- Orient the GPU: Hold the new GPU by its edges, aligning the gold-plated PCIe connector with the primary PCIe x16 slot on your motherboard. The display outputs should face towards the back of the case.
- Insert Gently: Carefully lower the GPU into the slot. Apply even, firm pressure to both ends of the card until it clicks securely into place. You should hear the retention clip snap shut. Do not force it. If it doesn’t go in easily, double-check the alignment.
- Secure the GPU: Screw the GPU’s mounting bracket(s) to the PC case’s expansion slot. This prevents sag and ensures stability. Some cases have tool-less retention mechanisms.
Connecting PCIe Power Cables
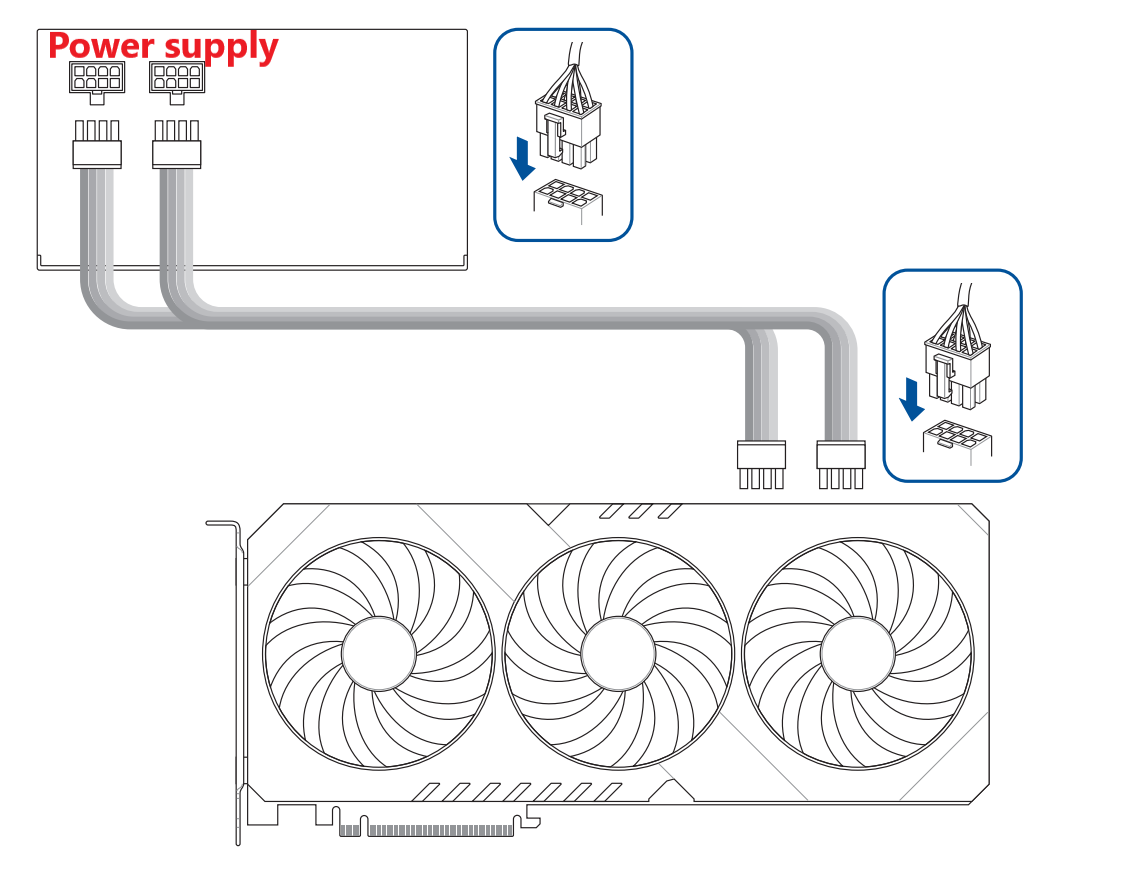
- Identify Connectors: Locate the required PCIe power connectors on your GPU (e.g., one 8-pin, two 6+2-pin).
- Connect from PSU: Take the corresponding PCIe power cable(s) from your PSU. Ensure they are the correct type (PCIe, not CPU EPS).
- Plug In: Firmly plug the PCIe power cable(s) into the GPU’s power ports. Make sure they click into place. Do not leave any power connectors unconnected if the GPU requires them, as this can lead to instability or prevent the card from working.
Initial Cable Management and Closing the Case
- Route Cables: Gently route any excess power cables or other internal cables away from fans and critical components to improve airflow and aesthetics. Use zip ties or Velcro straps if desired.
- Reattach Side Panel: Once all connections are secure, reattach the side panel of your PC case.
Post-Installation Setup and Optimization
The physical installation is just one part of the journey. Once your GPU is seated, a few more crucial steps are required to get it running optimally.
Connecting Display Cables and Initial Boot-Up
- Connect Monitor: Plug your monitor’s display cable (HDMI, DisplayPort, DVI) directly into one of the display outputs on your new GPU, not the motherboard’s integrated graphics ports.
- Power On: Plug your PC back into the wall outlet and power it on.
- Monitor Display: Your monitor should display the system’s boot screen. If it does, great! If not, ensure the monitor is on the correct input, check all connections, and consider troubleshooting steps below.
Installing Graphics Drivers: The Brains Behind the Brawn
A GPU without its dedicated drivers is like a powerful engine without fuel – it won’t perform. Drivers are software programs that allow your operating system to communicate effectively with the hardware.
- Remove Old Drivers (If Applicable): If you’re upgrading from an NVIDIA to AMD card (or vice-versa), or even significantly between generations of the same brand, it’s highly recommended to use a tool like Display Driver Uninstaller (DDU) in Safe Mode to completely remove old drivers. This prevents conflicts.
- Download New Drivers: Visit the official website of your GPU manufacturer (NVIDIA or AMD). Navigate to their “Drivers” or “Support” section. Enter your specific GPU model and operating system to download the latest recommended drivers. Avoid third-party driver sites to ensure digital security.
- Install Drivers: Run the downloaded installer. Follow the on-screen prompts. This process may involve screen flickering or temporary blackouts, which is normal. Restart your PC after the installation is complete.
- Manufacturer Software: NVIDIA offers GeForce Experience, and AMD provides Radeon Software Adrenalin Edition. These utilities offer features like game optimization, driver updates, monitoring tools, and recording capabilities. Install these after the core drivers for enhanced control and features.
Testing and Optimization: Ensuring Peak Performance
Once drivers are installed, it’s time to put your GPU through its paces.
- Basic Testing: Open a few graphically intensive applications or games. Monitor performance, looking for smooth frame rates and stable operation.
- Benchmarking: Run a benchmarking tool (e.g., 3DMark, Unigine Heaven/Superposition) to compare your GPU’s performance against others. This can confirm your installation is working as expected.
- Monitoring Tools: Use tools like HWMonitor, MSI Afterburner, or the manufacturer’s software to keep an eye on GPU temperature, clock speeds, and usage. Ensure temperatures remain within safe limits, especially under load.
- Game Settings: In games, adjust settings to find the optimal balance between visual quality and frame rate for your specific GPU and display.
- Driver Updates: Regularly check for new driver updates from the manufacturer. These often bring performance improvements, bug fixes, and support for new games.
Common Issues and Troubleshooting
Even with careful preparation, issues can sometimes arise. Here are some common problems and their solutions:
- No Display/Black Screen:
- Ensure the monitor is plugged into the new GPU, not the motherboard.
- Check all power cables (PCIe and monitor) are securely connected.
- Reseat the GPU in its PCIe slot.
- If you have integrated graphics, temporarily remove the dedicated GPU, boot using iGPU, and check BIOS settings (look for “Primary Display” or “Graphics Configuration” and set to PCIe).
- Test with a different display cable or monitor if possible.
- System Not Booting or Crashing:
- Ensure your PSU meets the minimum wattage requirements and all PCIe power connectors are plugged in.
- Check for any loose cables or components inside the case.
- Revert to integrated graphics (if available) to diagnose if the GPU is the sole cause.
- Poor Performance/Stuttering:
- Ensure the latest drivers are installed correctly. Use DDU to clean old drivers if necessary.
- Check GPU temperatures. Overheating can cause throttling.
- Verify the GPU is running at the correct PCIe speed (e.g., x16) using tools like GPU-Z.
- Ensure your monitor is connected via the highest bandwidth cable it supports (e.g., DisplayPort for high refresh rates).
- Artifacting (Garbled Graphics): This often indicates a faulty GPU, driver corruption, or VRAM issues. Try reinstalling drivers, and if the issue persists, the card may be defective.
Conclusion: Empowering Your PC
Installing a dedicated GPU into your motherboard is a transformative upgrade for any PC, significantly boosting performance across gaming, professional applications, and general system responsiveness. By carefully following the steps outlined in this guide – from meticulous compatibility checks and power considerations to the precise physical installation and critical driver setup – you can confidently integrate this powerful component into your system.
Embracing this hands-on approach not only enhances your computer’s capabilities but also deepens your understanding of its inner workings. As technology trends continue to push the boundaries of visual fidelity and computational demands, a robust dedicated GPU ensures your system remains at the forefront, ready for the challenges of today and the innovations of tomorrow. Remember, patience and attention to detail are your best allies in this process. With your new GPU humming along, you’re now ready to experience a richer, more immersive, and significantly more productive computing journey.
aViewFromTheCave is a participant in the Amazon Services LLC Associates Program, an affiliate advertising program designed to provide a means for sites to earn advertising fees by advertising and linking to Amazon.com. Amazon, the Amazon logo, AmazonSupply, and the AmazonSupply logo are trademarks of Amazon.com, Inc. or its affiliates. As an Amazon Associate we earn affiliate commissions from qualifying purchases.