
In today’s interconnected world, a reliable internet connection is no longer a luxury but a fundamental necessity. From streaming high-definition content and engaging in video conferences to managing smart home devices and leveraging advanced AI tools for productivity, every aspect of our digital lives hinges on a robust and secure WiFi network. At the heart of this network lies your WiFi router – the unsung hero that broadcasts the internet signal throughout your home or office.
While the prospect of setting up a new piece of technology can sometimes feel daunting, installing a WiFi router is a straightforward process that empowers you to take control of your internet experience. This comprehensive guide will walk you through every step, from unboxing your new device to securing your network, ensuring you achieve optimal performance and connectivity. We’ll also explore how a well-installed and configured router contributes not just to smooth browsing, but also to your digital security, productivity, and even your financial well-being in the age of online endeavors.
Preparing for Installation: Setting the Stage for Optimal Performance
Before you even plug in your new router, a little preparation goes a long way in ensuring a smooth setup and maximizing your network’s potential. This initial phase is crucial for establishing a stable foundation for your home or office network, impacting everything from signal strength to overall network security.
Gathering Your Essentials: What You’ll Need
Having all your tools and components ready before you begin will streamline the installation process. Think of it as preparing your digital workbench.
- Your New WiFi Router: Of course, this is the star of the show. Ensure it’s out of its packaging and ready to be connected.
- Your Internet Modem: This device is provided by your Internet Service Provider (ISP) and brings the internet signal into your home. It might be a separate box or integrated into a modem-router combo unit (though for this guide, we’re assuming a separate router).
- Ethernet Cables:
- One short Ethernet cable (usually yellow or blue): This typically comes with your new router and is used to connect the router to your modem.
- An optional longer Ethernet cable: If you plan to connect a computer directly to the router for the initial setup, or for a more stable connection to a stationary device like a desktop PC or gaming console, you’ll need one.
- A Computer, Tablet, or Smartphone: You’ll need one of these devices with a web browser to access the router’s configuration interface. A wired connection (computer to router via Ethernet) is often recommended for initial setup due to its stability.
- Your Internet Service Provider (ISP) Account Information: Sometimes, you might need your account number or login details during the setup process, especially if your ISP requires specific authentication.
- Pen and Paper (or a Digital Note-Taking App): Essential for jotting down your new network name (SSID), password, and any router login credentials you create. This simple step prevents future headaches.
- Power Outlets: Ensure you have enough accessible power outlets for both your modem and your new router.
Strategic Placement: Where to Position Your Router
The physical location of your WiFi router is one of the most critical factors influencing network performance. Poor placement can lead to dead zones, slow speeds, and unreliable connections, directly impacting your productivity and the seamless operation of your smart devices. Consider these points:
- Central Location: The ideal spot is as close to the center of your home or office as possible. This allows the signal to radiate outwards, minimizing the distance it needs to travel to reach your devices. Avoid placing it in corners or against exterior walls, as this wastes signal outside your property.
- High and Unobstructed: WiFi signals travel best when unobstructed. Place your router on a high shelf, desk, or mount it on a wall, away from large obstacles like furniture, aquariums, and thick concrete walls. The higher it is, the fewer objects it has to contend with at floor level.
- Away from Interference: Electronic devices can interfere with WiFi signals. Keep your router away from common culprits such as:
- Microwave ovens (which operate on a similar 2.4 GHz frequency).
- Cordless phones.
- Bluetooth devices (though modern routers are often better at coexisting).
- Large metal objects, which can reflect and block signals.
- Consider Future Expansion: If you anticipate needing mesh WiFi systems or range extenders in the future, planning your initial router placement thoughtfully can simplify the expansion process. A strong central node makes adding satellites more effective.
By carefully considering these placement tips, you’re not just installing a device; you’re engineering an optimal wireless environment that directly contributes to the efficiency of your AI tools, the responsiveness of your software, and the overall reliability of your digital workflow.
The Core Connections: Getting Your Router Online
With your essentials gathered and the perfect spot chosen, it’s time to make the physical connections that bring your internet service to your new router and then to your devices. This stage is about establishing the fundamental links that allow data to flow.
Powering Up and Connecting to Your Modem
This is where your internet service begins its journey into your local network.
- Disconnect Old Equipment (if applicable): If you’re replacing an old router, unplug its power cable and disconnect any Ethernet cables. This prevents conflicts and ensures a clean slate.
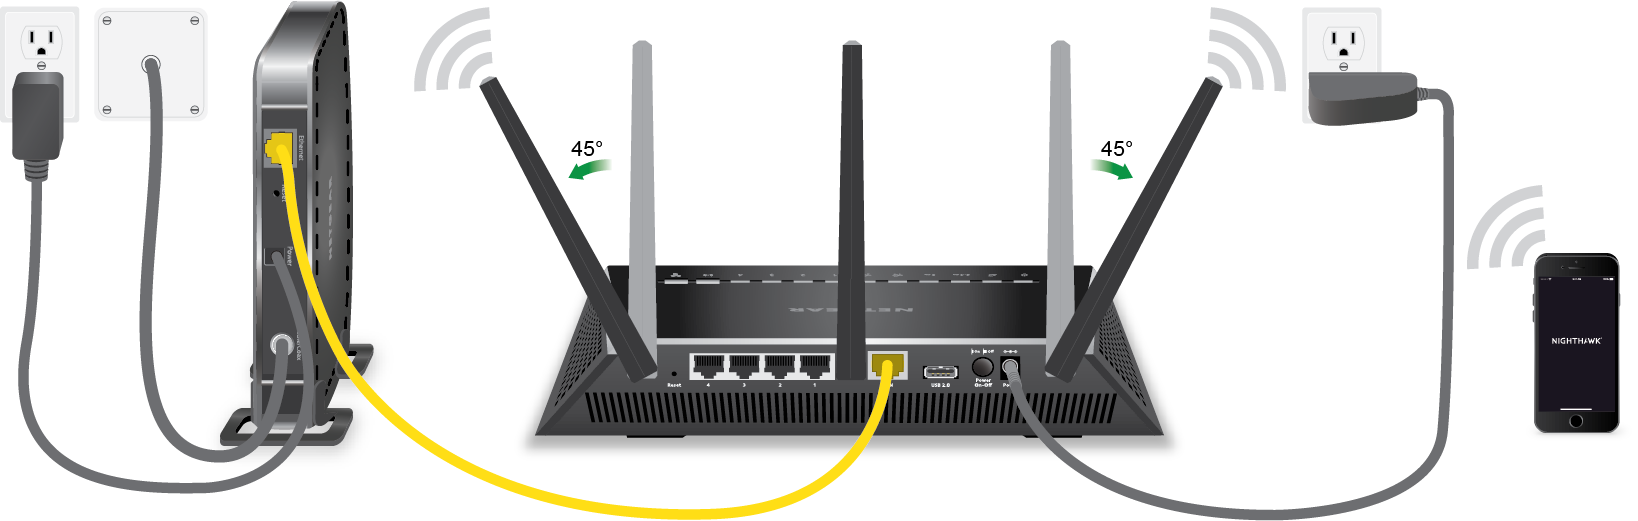
- Power Cycle Your Modem: Unplug your internet modem’s power cable for at least 30 seconds, then plug it back in. This step is crucial as it clears any old network settings and allows the modem to properly recognize your new router. Wait for the modem to fully boot up and its indicator lights (e.g., Internet, Online, or Data) to stabilize, indicating it has re-established a connection with your ISP. This can take a few minutes.
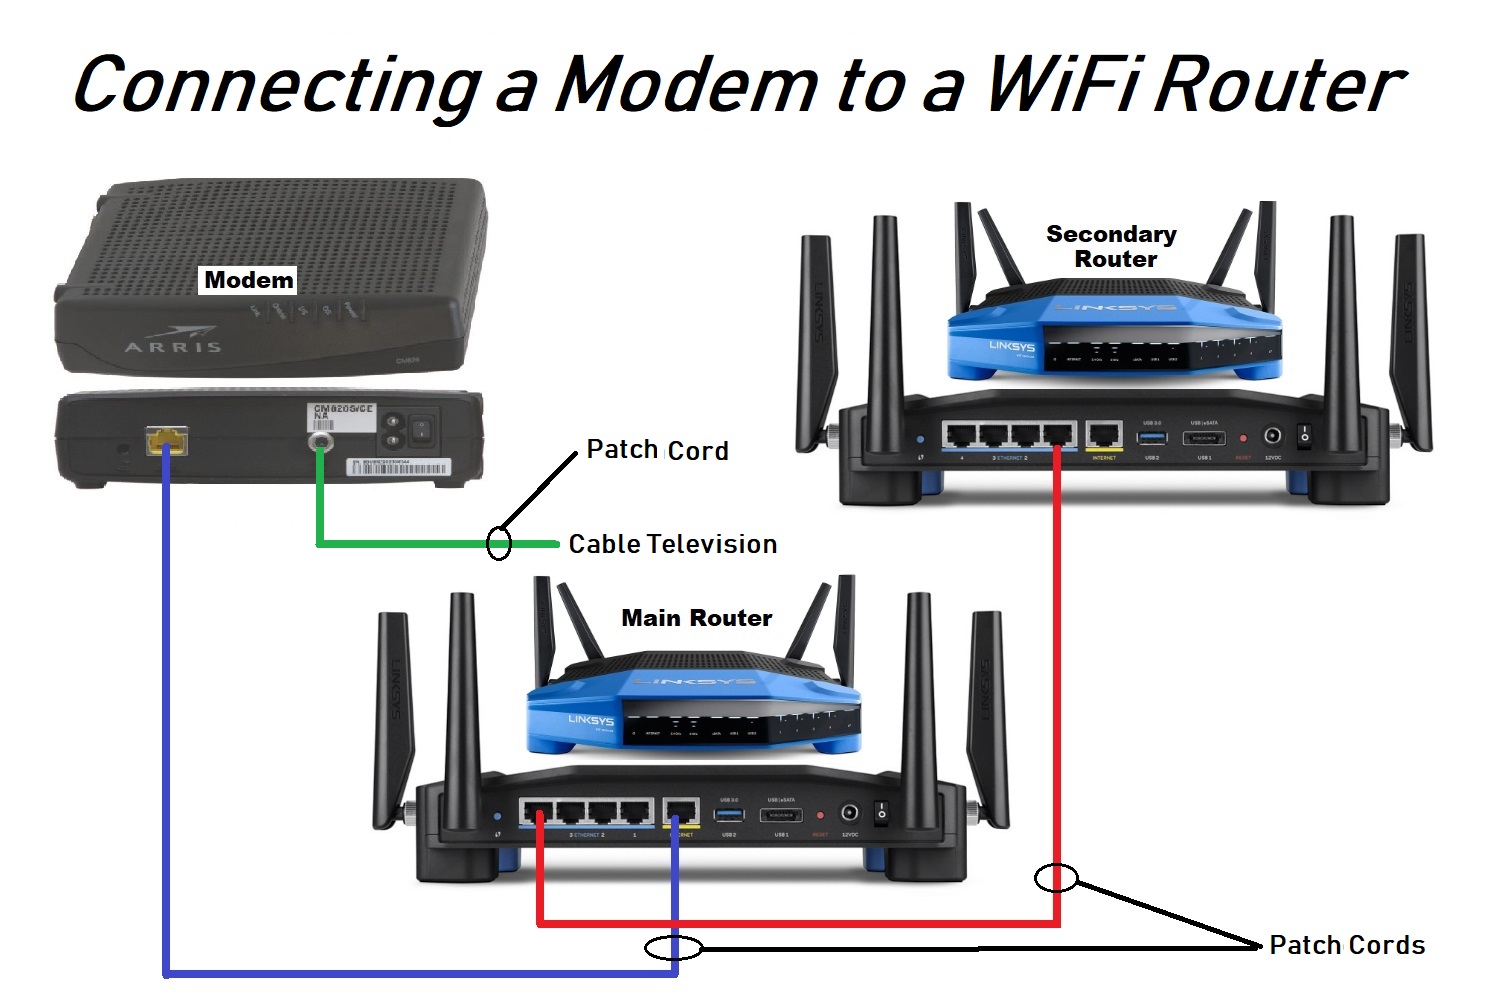
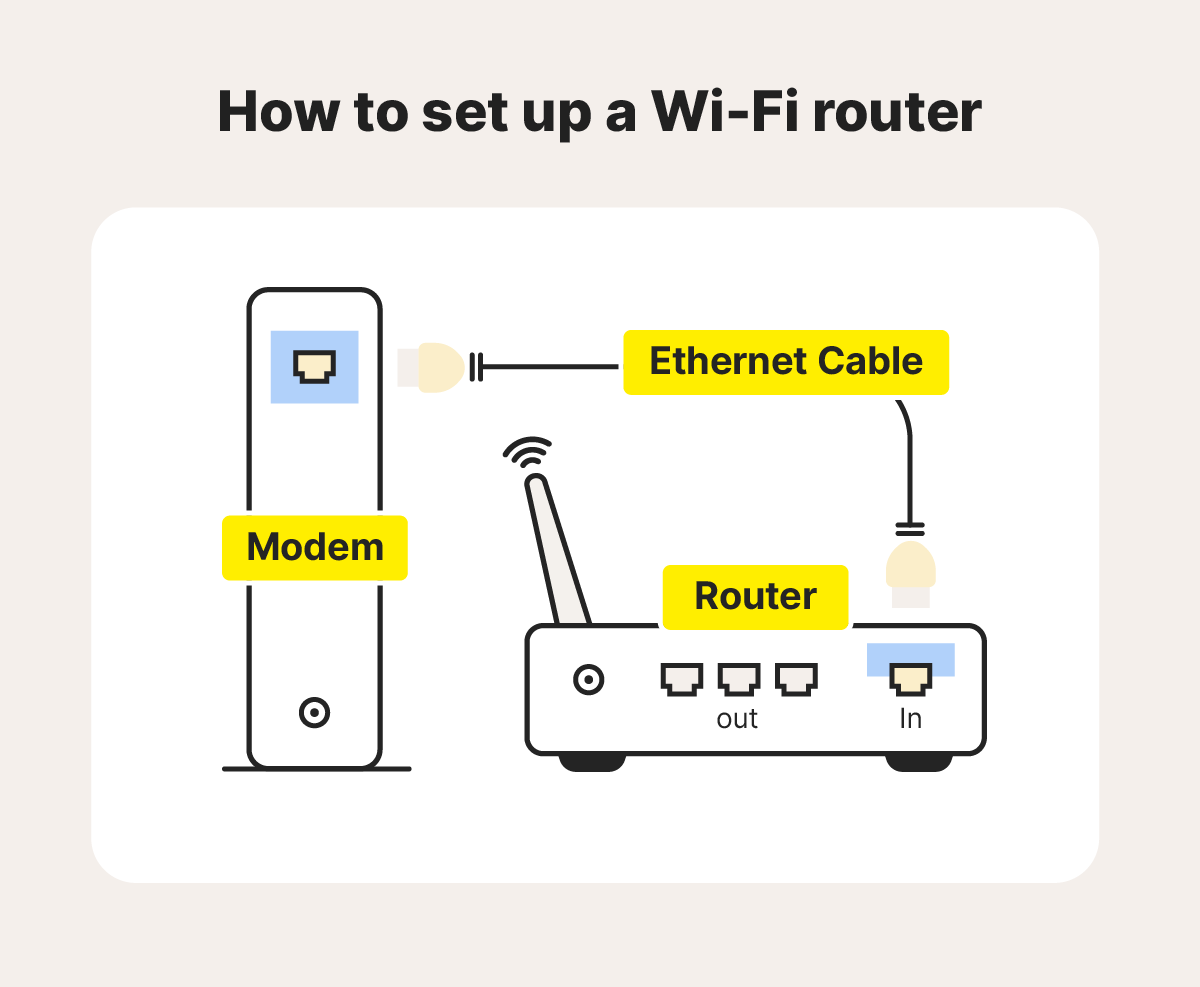
- Connect Router to Modem: Take one end of the short Ethernet cable (often the one that came with your new router) and plug it into the WAN port (also known as the Internet port) on your new WiFi router. This port is usually a different color (often blue) and clearly labeled. Then, plug the other end of this Ethernet cable into an available Ethernet port on your internet modem.
- Connect Router to Power: Plug the power adapter into your new WiFi router and then into a wall outlet.
- Wait for Router to Boot: Give your router a few minutes to power on and initialize. Look for indicator lights on the router (e.g., Power, Internet, WiFi) to light up and stabilize, indicating it’s ready for configuration. Refer to your router’s manual to understand what each light signifies. A blinking internet light often means it’s trying to establish a connection, while a solid light indicates success.
Establishing an Initial Connection: Wired Setup for Configuration
To configure your new router, you need a way to communicate with it. A wired connection is often the most stable and recommended method for the initial setup, especially if your new router doesn’t have a default WiFi network enabled or if you want to ensure no interruptions during critical settings adjustments.
- Connect Computer to Router (Wired): Take another Ethernet cable (if you’re using a desktop PC or laptop with an Ethernet port) and plug one end into a LAN port (often yellow, sometimes numbered 1-4) on your new WiFi router. Plug the other end into the Ethernet port on your computer. This creates a direct, local network connection between your computer and the router, bypassing any wireless complexities for now.
- Verify Connection: Once connected, your computer should automatically detect the network. You might see a network icon indicating a wired connection. If you’re using a laptop without an Ethernet port or prefer a wireless setup, you would typically look for a default WiFi network broadcast by the new router. This network name (SSID) and a default password are usually printed on a sticker on the router itself or found in its quick start guide. Connect to this default WiFi network from your device. While less stable for initial setup, it’s often the only option for tablet/smartphone users.
With these physical connections made, your router is now receiving an internet signal and is ready to communicate with your device, setting the stage for the crucial configuration steps.
Navigating the Setup Wizard: Your Router’s Digital Brain
Once your router is physically connected and powered on, the next step is to delve into its digital interface. This is where you customize your network settings, name your WiFi, set passwords, and secure your connection. Think of this as programming the brain of your home network.
Accessing the Router’s Web Interface
To configure your router, you’ll interact with its built-in web-based interface, a mini-website hosted directly on the router itself.
- Open a Web Browser: On the computer or device you’ve connected to the router (either wired or via its default WiFi network), open any web browser (Chrome, Firefox, Edge, Safari, etc.).
- Enter the Router’s IP Address: In the address bar of your web browser (where you usually type website URLs), enter the router’s default IP address. Common default IP addresses include:
192.168.1.1192.168.0.1192.168.1.25410.0.0.1(common for Xfinity/Comcast)
You can usually find the specific IP address on a sticker on the bottom or back of your router, or in its quick start guide. Type it in and press Enter.
- Enter Login Credentials: A login screen will appear, prompting you for a username and password. By default, these are often generic and easy to guess, making this a critical point for security. Common default combinations include:
- Username:
admin/ Password:admin - Username:
admin/ Password:password - Username:
admin/ Password: (blank)
Again, check the sticker on your router or its manual for the exact default credentials. Enter them and click “Login” or “Sign In.”
- Username:
If you encounter issues accessing the interface, double-check the IP address and ensure your device is properly connected to the router. A quick restart of both the computer and router can sometimes resolve connectivity glitches.
The Initial Setup Process: From Basic to Secure
Once logged in, you’ll typically be greeted by a setup wizard designed to guide you through the most essential configurations. This wizard simplifies the process, making it accessible even for those new to network administration.
- Run the Setup Wizard: Most modern routers automatically detect an internet connection during the initial setup. The wizard will often prompt you to perform steps like:
- Internet Connection Type: It might ask you to confirm your internet connection type (e.g., DHCP/Dynamic IP, PPPoE, Static IP). For most home users with cable or fiber modems, “Dynamic IP” or “DHCP” is the correct choice. Your router should often detect this automatically.
- Changing Router Admin Password: This is arguably the most important step for digital security. The default admin credentials are a significant vulnerability. The wizard should prompt you to create a new, strong password for accessing the router’s settings. Choose a password that is complex, combining uppercase and lowercase letters, numbers, and symbols, and do not use your WiFi password or any other common password. Write this new admin password down!
- Setting Up Your WiFi Network(s):
- SSID (Network Name): This is the name your WiFi network will display to devices searching for a connection (e.g., “MyHomeNetwork,” “OfficeWiFi”). Choose a unique, recognizable name, but avoid using personally identifiable information (like your full name or address) for security.
- WiFi Password (Security Key/Passphrase): This is the password your devices will use to connect to your WiFi network. Like your admin password, this needs to be strong and complex. A good WiFi password is at least 12-16 characters long.
- Security Type: The wizard will ask you to select a security protocol. Always choose the highest available option, which is typically WPA2-PSK (AES) or, ideally, WPA3. Avoid WEP and WPA/WPA-PSK (TKIP) as they are outdated and easily compromised, leaving your network vulnerable.
- Time Zone Settings: Set your local time zone. This is important for accurate logging and scheduling features on your router.
- Save Settings and Reboot: After making your selections, the wizard will prompt you to save the settings. The router will then likely reboot to apply these changes. This process can take a few minutes, during which your internet connection might temporarily drop.
Once the router reboots, it will start broadcasting your newly configured WiFi network with your chosen SSID and password. At this point, you can disconnect your computer from the wired connection (if you used one) and connect all your devices wirelessly to your new, secure WiFi network. This successful setup is a huge step towards realizing the full potential of your tech gadgets and productivity tools.
Securing Your Network: Fortifying Your Digital Frontier
In an era where digital security is paramount, a properly secured WiFi network is your first line of defense against unauthorized access, data breaches, and potential cyber threats. Neglecting network security can leave your personal information, smart devices, and online activities vulnerable. This section details crucial steps to harden your network.
Choosing a Strong SSID and Password
While seemingly basic, the strength of your network name (SSID) and password are foundational to your security.
- SSID (Service Set Identifier):
- Make it Unique but Not Revealing: While it’s tempting to use your name or address, doing so can provide information to potential intruders. Choose a name that is unique enough to distinguish it from neighbors’ networks but doesn’t give away personal details. For example, “TheNetZone” is better than “JohnDoe’s Home.”
- Consider Hiding Your SSID (Optional): Some routers offer an option to “hide” your SSID, meaning it won’t appear in the list of available networks. While this adds a minor layer of obscurity, it’s not a strong security measure as tools can still detect hidden networks. It also makes it slightly more inconvenient to connect new devices, as you’ll have to manually type the SSID. Prioritize a strong password over a hidden SSID.
- WiFi Password (WPA2/WPA3 Passphrase):
- Complexity is Key: Your WiFi password should be a robust passphrase, ideally 12-16 characters long, combining uppercase and lowercase letters, numbers, and special characters. Avoid dictionary words, sequential numbers, or personal information (birthdays, pet names).
- Uniqueness: Never use the same password for your WiFi as you do for email, banking, or social media. If one is compromised, the others remain safe.
- Memorability vs. Strength: Use a memorable phrase or a password manager to store complex passwords. For example, instead of “password123,” try “MyRouterIsAwesome!2023#”
Understanding Encryption Standards (WPA2/WPA3)
The encryption standard your router uses determines how securely your data is transmitted over WiFi.
- WPA2-PSK (AES): This has been the standard for many years and offers strong encryption. Most modern devices support WPA2. Always ensure your router is set to WPA2-PSK with AES encryption (not TKIP, which is less secure).
- WPA3: This is the latest and most secure WiFi encryption standard, offering enhanced protection against various attacks, including brute-force attacks and “KRACK” vulnerabilities that affected WPA2. If your router and devices support WPA3, enable it without hesitation. It provides a significant upgrade in wireless security.
- Avoid WEP and WPA/WPA-PSK (TKIP): These older standards are fundamentally flawed and should never be used. Using them is akin to leaving your front door unlocked.
Essential Security Tips for Your Home Network
Beyond passwords and encryption, several other practices can significantly bolster your digital security posture, aligning with the “Digital Security” aspect of the Tech topic.
- Change Default Router Admin Credentials: As mentioned during the setup, this is critical. A default username/password pair is the easiest entry point for an attacker. Change it immediately after installation to something complex and unique.
- Keep Router Firmware Updated: Router manufacturers regularly release firmware updates to patch security vulnerabilities, improve performance, and add new features. Check your router’s administration interface for an “Firmware Update” or “System Update” section and apply updates regularly. This is as important as updating your computer’s operating system.
- Disable WPS (WiFi Protected Setup): While convenient for easily connecting devices, WPS has known security vulnerabilities that can make it easier for attackers to guess your WiFi password. It’s generally recommended to disable WPS if your router offers the option.
- Enable a Guest Network: Most modern routers allow you to create a separate guest WiFi network. This is invaluable for security. When guests visit, they can connect to this network, which provides internet access but isolates them from your main network. This prevents them from potentially accessing your shared files, smart devices, or infecting your primary network with malware.
- Consider a Firewall: Your router usually has a built-in firewall. Ensure it’s enabled. For more advanced users or businesses, a separate hardware firewall can provide additional layers of protection.
- Regularly Review Connected Devices: Periodically log into your router’s interface and check the list of connected devices. If you see any unfamiliar devices, investigate immediately.
- Physical Security: While digital, don’t forget physical security. Place your router in a secure location where unauthorized individuals cannot easily access it or tamper with its buttons.
By diligently implementing these security measures, you transform your home network from a potential vulnerability into a fortified digital frontier, protecting your data, your privacy, and the seamless operation of all your connected technology.
Beyond the Basics: Optimizing Your WiFi Experience
Once your router is installed and secured, the journey doesn’t end. To truly leverage the power of your home network for productivity, advanced tech, and even online income generation, you’ll want to explore options for optimization and troubleshooting. This ensures not just connectivity, but optimal connectivity.
Advanced Settings for Enhanced Performance
Your router’s administration panel often hides a wealth of features designed to fine-tune your network.
- Quality of Service (QoS): If you have multiple users or bandwidth-intensive activities (like online gaming, video conferencing, or 4K streaming), QoS allows you to prioritize certain types of traffic or specific devices. For example, you can tell your router to give priority bandwidth to your work laptop during office hours or to your streaming device in the evenings, ensuring critical applications always perform smoothly. This is especially relevant for remote work and utilizing cloud-based AI tools that demand stable connections.
- Dual-Band (2.4 GHz and 5 GHz) Management: Most modern routers are dual-band, meaning they broadcast WiFi on two frequencies:
- 2.4 GHz: Offers wider coverage and better penetration through walls but is generally slower and more prone to interference. Good for smart home devices and general browsing.
- 5 GHz: Offers faster speeds and lower latency but has a shorter range and is less effective through obstacles. Ideal for gaming, streaming, and heavy data transfer.
You can often separate these bands into distinct SSIDs (e.g., “MyHomeNetwork-2.4GHz” and “MyHomeNetwork-5GHz”) or use a “Smart Connect” feature that automatically directs devices to the optimal band. Understanding and utilizing these bands can dramatically improve performance for specific tasks.
- Guest Networks: As mentioned in security, guest networks are also an optimization. They segregate guest traffic, preventing it from hogging bandwidth on your main network and protecting your primary devices from potential slowdowns.
- Port Forwarding / DMZ (for advanced users): If you host a game server, run a specific application that requires incoming connections, or use certain peer-to-peer services, you might need to configure port forwarding to direct specific internet traffic to a particular device on your network. The DMZ (Demilitarized Zone) feature sends all incoming traffic to one specific device, but this is a security risk and should only be used as a last resort for devices that must be fully exposed to the internet.
- Dynamic DNS (DDNS): If you want to access devices on your home network from outside (e.g., a security camera feed or a personal server) but have a dynamic IP address from your ISP, DDNS services map a consistent domain name to your fluctuating IP address.
Troubleshooting Common Router Issues
Even with a perfect setup, issues can arise. Knowing how to troubleshoot can save time and frustration.
- No Internet Connection:
- Check Cables: Ensure all Ethernet cables are securely plugged in (modem to router WAN, power cables).
- Check Indicator Lights: Verify the lights on both your modem and router. A solid internet/WAN light on the router indicates it’s receiving a signal.
- Power Cycle: Unplug both your modem and router for 30 seconds, then plug the modem back in, wait for it to stabilize, then plug in the router. This resolves many common glitches.
- Contact ISP: If modem lights indicate no internet signal, the issue is likely with your ISP.
- Slow WiFi Speeds:
- Router Placement: Review your router’s location for obstructions or interference.
- Channel Interference: WiFi networks operate on channels. Neighbors’ networks on the same channel can cause interference. Log into your router’s interface, look for “Wireless Settings,” and try changing the 2.4 GHz channel (e.g., 1, 6, or 11 are generally best) or the 5 GHz channel.
- Device Overload: Too many devices streaming or downloading simultaneously can saturate your bandwidth.
- Outdated Firmware: Ensure your router’s firmware is up to date.
- Old Devices: Older WiFi devices (e.g., 802.11n) can slow down an entire network operating on a newer standard (802.11ac or 802.11ax/WiFi 6).
- WiFi Dropouts:
- Firmware Updates: Again, critical for stability.
- Router Overheating: Ensure adequate ventilation for your router.
- Signal Strength: Move closer to the router or consider a mesh system/extender.
- Driver Updates: Ensure your device’s WiFi drivers are up to date.
Regular Maintenance for Lasting Connectivity
A little proactive maintenance can ensure your router performs optimally for years.
- Regular Reboots: A simple reboot once a month can clear out temporary glitches and keep your router running smoothly.
- Firmware Checks: Make it a habit to check for and apply firmware updates every few months.
- Dust Removal: Dust can accumulate inside the router, leading to overheating. Gently clean vents with compressed air periodically.
- Password Review: Periodically review and update your WiFi and admin passwords, especially if you suspect any unusual activity.
The Bigger Picture: How Your Router Powers Your Digital Lifestyle
Installing and optimizing your WiFi router isn’t just a technical task; it’s an investment in your digital future, directly influencing various aspects covered by our website’s themes: Tech, Brand, and Money. A well-managed network becomes an indispensable asset, supporting everything from cutting-edge technology to personal and professional growth.
Impact on Productivity and AI Tools
In the realm of “Tech,” a robust WiFi network is the backbone for nearly every productivity tool and emerging technology.
- Seamless Software and Cloud Access: Whether you’re collaborating on documents in the cloud, using SaaS (Software as a Service) applications, or syncing large files across devices, a fast and stable connection ensures fluid operations, preventing frustrating lag and data loss.
- Empowering AI Tools and Machine Learning: Many advanced AI tools, from sophisticated language models to data analytics platforms, often rely on cloud-based processing and real-time data exchange. A high-bandwidth, low-latency connection is essential for these tools to function effectively, enabling faster computations and more responsive interactions, thereby directly boosting your productivity.
- Reliable Remote Work and Learning: The shift towards remote work and online education has made dependable home internet critical. A properly installed router minimizes dropped video calls, speeds up large downloads, and ensures you can access all necessary resources without interruption, fostering efficiency and engagement.
- Smart Home Ecosystems: From smart thermostats and lighting to security cameras and voice assistants, the growing ecosystem of smart gadgets depends entirely on a stable WiFi connection. Your router ensures these devices communicate seamlessly, enhancing convenience and automation.
Supporting Your Online Presence and Financial Endeavors
Connecting to “Brand” and “Money,” your router indirectly but powerfully supports your online persona and financial activities.
- Building a Strong Personal Brand: In the digital age, your online presence is often a reflection of your personal brand. Consistent, high-quality internet connectivity ensures you can reliably engage on social media, update your professional portfolio, participate in online events, and maintain communication without technical glitches that could detract from your professional image. A reliable connection means you’re always “on” and ready to connect.
- Enabling Online Income and Side Hustles: For those engaged in “Online Income” or “Side Hustles,” a stable internet connection is literally your lifeline. Whether you’re a freelancer, an e-commerce entrepreneur, a content creator, or an online investor, dependable WiFi ensures you can process transactions, upload content, attend virtual client meetings, and monitor markets without interruption. Downtime due to poor connectivity can directly translate to lost income opportunities.
- Secure Financial Transactions and Tools: “Personal Finance” and “Business Finance” increasingly rely on secure online platforms. A well-secured router, with WPA3 encryption and strong passwords, provides a foundational layer of security for online banking, investment platforms, and financial management tools, protecting your sensitive data from potential eavesdropping or unauthorized access. The importance of digital security for financial transactions cannot be overstated.
- Cost-Effectiveness and DIY Empowerment: By learning how to install and manage your router yourself, you’re not only gaining a valuable skill but also potentially saving money on professional installation fees. This DIY approach aligns with smart “Personal Finance” practices, empowering you with greater control and reducing unnecessary expenditures.
In conclusion, installing a WiFi router is more than just plugging in cables; it’s about establishing the central nervous system of your digital life. By following these steps and understanding the broader implications of a well-managed network, you’re investing in a foundation that supports your technological pursuits, enhances your productivity, safeguards your digital identity, and ultimately empowers your financial success in an increasingly online world. Embrace the power of seamless connectivity, and unlock the full potential of your digital future.
aViewFromTheCave is a participant in the Amazon Services LLC Associates Program, an affiliate advertising program designed to provide a means for sites to earn advertising fees by advertising and linking to Amazon.com. Amazon, the Amazon logo, AmazonSupply, and the AmazonSupply logo are trademarks of Amazon.com, Inc. or its affiliates. As an Amazon Associate we earn affiliate commissions from qualifying purchases.