In an increasingly digital world, the bedrock of our personal and professional security often lies in the invisible architecture of our computing devices. Among the most critical components of this architecture is the Trusted Platform Module (TPM), particularly its 2.0 iteration. With the advent of Windows 11, TPM 2.0 has stepped out of the shadows to become a household name, morphing from an obscure technical specification into a prerequisite for the latest operating system. However, the term “installing” TPM 2.0 can be a bit misleading. In most modern systems, TPM 2.0 is already present on your motherboard as a dedicated chip or integrated firmware; the task at hand is typically to enable it within your system’s BIOS or UEFI settings.
This comprehensive guide will demystify TPM 2.0, explain its vital role in modern cybersecurity, and provide a step-by-step walkthrough on how to check its status and enable it on your system. Whether you’re upgrading to Windows 11, fortifying your digital defenses, or simply curious about this crucial technology, understanding and activating TPM 2.0 is a fundamental step toward enhanced digital security and system integrity.
Understanding TPM 2.0 and Its Importance
Before diving into the “how-to,” it’s essential to grasp what TPM 2.0 is and why it commands such significance in today’s technological landscape. Far from being a mere checkbox requirement, TPM 2.0 is a robust security measure designed to protect your data and ensure the integrity of your computing environment.
What is TPM? A Hardware-Based Security Fortress
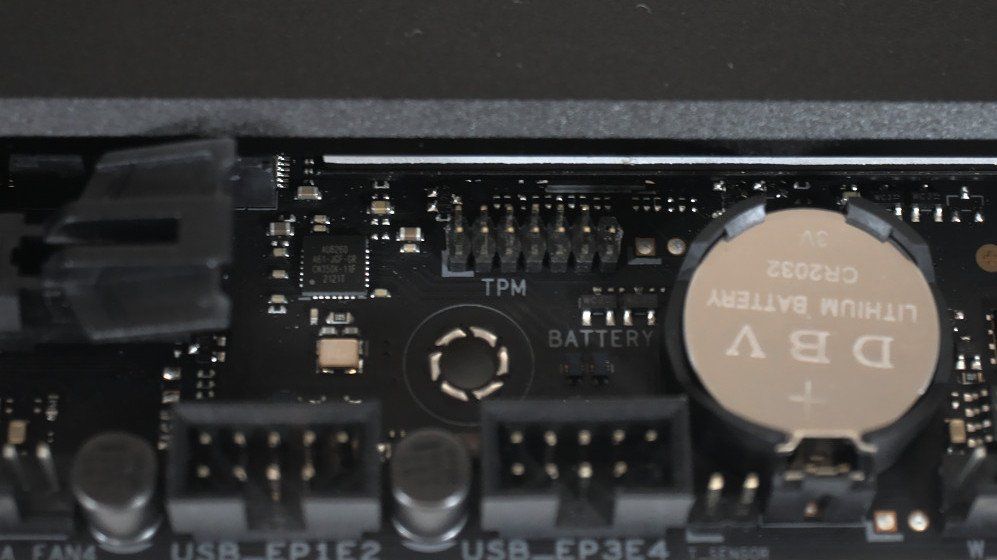
At its core, a Trusted Platform Module (TPM) is a secure cryptoprocessor, an international standard for a secure crypto-processor that can securely store artifacts used to authenticate the platform (your PC). This means it’s a dedicated hardware chip, usually integrated into your motherboard, that performs cryptographic operations and securely stores sensitive information like encryption keys, passwords, and digital certificates. Unlike software-based security, which can be vulnerable to attacks on the operating system, a TPM operates independently, providing a much higher level of protection.
Key functions of a TPM include:
- Secure Key Generation and Storage: It generates and stores cryptographic keys in a tamper-resistant environment, preventing malicious software from accessing them.
- Platform Integrity Verification: It verifies the integrity of your system’s hardware and software during the boot process. If any unauthorized changes are detected (e.g., malware attempting to modify boot files), the TPM can prevent the system from booting or notify you of the compromise.
- Hardware-Based Random Number Generation: Provides high-quality random numbers essential for strong encryption.
- Unique Endorsement Key (EK): Each TPM has a unique EK, a pair of asymmetric keys burned into the chip during manufacturing, which acts as its unique identifier.
TPM 2.0 is the latest specification, offering more flexibility, improved cryptographic algorithms, and enhanced security features compared to its predecessor, TPM 1.2. The shift to TPM 2.0 has been driven by the need for more robust, modern security protocols capable of defending against evolving cyber threats.
Why TPM 2.0 Matters Today: Beyond Windows 11
While Windows 11’s strict requirement for TPM 2.0 has brought it into the spotlight, its importance extends far beyond operating system compatibility. TPM 2.0 is a cornerstone of modern digital security, impacting everything from data privacy to corporate compliance.
- Windows 11 Compatibility: This is the most immediate reason for many users. Microsoft has mandated TPM 2.0, alongside Secure Boot, as a minimum system requirement for Windows 11. This decision reflects Microsoft’s commitment to building a more secure computing environment from the ground up, leveraging hardware-based security to protect against firmware attacks and advanced persistent threats.
- Enhanced Data Protection with BitLocker: TPM 2.0 significantly enhances the effectiveness of disk encryption tools like Microsoft’s BitLocker. When BitLocker is used with a TPM, the encryption keys are stored securely within the module. This means the drive can only be decrypted when the computer is in a known, secure state, making it incredibly difficult for unauthorized individuals to access your data, even if they physically remove the drive from your system.
- Secure Boot Integration: TPM 2.0 works hand-in-hand with Secure Boot, a UEFI firmware feature that ensures your PC only boots using software that is trusted by the PC manufacturer. Together, they form a robust defense against rootkits and other low-level malware that attempt to compromise the boot process.
- Device Health and Attestation: TPM 2.0 plays a crucial role in verifying the “health” of a device. It can attest to the integrity of the boot process and system components, which is vital for enterprise environments that need to ensure only secure, compliant devices can access network resources.
- Credential Protection and Biometric Authentication: TPM 2.0 helps secure user credentials and biometric data, making features like Windows Hello more robust. It protects the cryptographic keys used for authentication, preventing them from being stolen or compromised.
- Future-Proofing Your System: As cyber threats grow more sophisticated, hardware-based security solutions like TPM 2.0 will become increasingly integral. Ensuring your system has an active TPM 2.0 not only meets current requirements but also positions your device to handle future security challenges and leverage emerging security technologies.
In essence, TPM 2.0 isn’t just a component; it’s a foundational layer of trust that underpins the security posture of your entire system.
Checking Your System’s TPM Status
Before attempting to enable TPM 2.0, it’s crucial to confirm whether your system actually has it, what version it is, and if it’s already active. Many modern computers come with TPM 2.0 enabled by default, or at least present and awaiting activation. There are a couple of straightforward ways to check this in Windows.
Using the TPM Management Console (tpm.msc)
The most direct and reliable method to check your TPM status is through the dedicated TPM Management Console in Windows.
- Open the Run Dialog: Press the
Windows key + Rsimultaneously on your keyboard. - Type
tpm.msc: In the “Open:” field, typetpm.mscand pressEnteror clickOK. - Interpret the Results:
- “The TPM is ready for use”: If you see this message, congratulations! TPM 2.0 is already enabled and functioning correctly on your system. You’ll also see “Specification Version: 2.0” listed in the “TPM Manufacturer Information” section. You do not need to proceed with enabling it.
- “Compatible TPM cannot be found”: This indicates that either your system does not have a TPM, or it is disabled in the BIOS/UEFI settings. In this scenario, you’ll need to explore your BIOS/UEFI settings to enable it.
- “The TPM is ready for use, with Specification Version: 1.2”: If you see this, your system has TPM 1.2 enabled. While this provides some security, it does not meet the Windows 11 requirement. You’ll need to check your BIOS/UEFI for an option to switch to TPM 2.0 or for an Intel Platform Trust Technology (PTT) or AMD fTPM option, which often signifies a firmware-based TPM 2.0. In some older systems, a BIOS update might be required to enable TPM 2.0 functionality.
Verifying in Device Manager
Another way to quickly check for the presence of a TPM is through Windows Device Manager.
- Open Device Manager: Right-click the
Startbutton (or pressWindows key + X) and selectDevice Managerfrom the context menu. - Look for “Security devices”: Expand the “Security devices” category.
- Check for “Trusted Platform Module 2.0”: If you see “Trusted Platform Module 2.0” listed here, it means the TPM 2.0 module is recognized by your operating system. If it’s not listed, or if you see “Trusted Platform Module 1.2,” it suggests that TPM 2.0 might be disabled, not present, or needs activation.
These checks provide a clear picture of your TPM status and will guide your next steps. If tpm.msc reports that a compatible TPM cannot be found or is version 1.2, you’ll need to proceed to the next section to enable or upgrade it.
Enabling TPM 2.0 in Your BIOS/UEFI Settings
If your system checks revealed that TPM 2.0 is either disabled or running an older version, the next step is to enable it within your motherboard’s BIOS (Basic Input/Output System) or UEFI (Unified Extensible Firmware Interface) firmware settings. This is where the “installation” truly happens, by activating the embedded hardware.
Accessing Your BIOS/UEFI Firmware
Accessing the BIOS/UEFI is the first hurdle, as the method varies slightly depending on your computer’s manufacturer and model.
- Restart Your Computer: The most common way to enter BIOS/UEFI is by pressing a specific key during the very early stages of startup, before Windows begins to load.
- Identify the BIOS/UEFI Key: As your computer boots up, keep an eye out for a message on the screen (often at the bottom) that says something like “Press DEL to enter Setup,” “Press F2 for BIOS,” or “Press F10 to enter BIOS.” Common keys include:
- Del: Most custom-built PCs, ASUS, Gigabyte, MSI motherboards.
- F2: Dell, Acer, ASUS, HP, Lenovo.
- F10: HP.
- F12: Dell, Lenovo (for boot menu, sometimes includes BIOS option).
- Esc: HP, Acer.
- F1: Lenovo, Dell.
- Tip: If you miss it, just restart and try again. Sometimes rapid pressing of the key is required.
- Advanced Startup Options (Windows 10/11): If you’re struggling with the traditional method, Windows offers a way to enter UEFI firmware settings directly:
- Go to
Settings>System>Recovery. - Under “Recovery options,” find “Advanced startup” and click
Restart now. - Once your PC restarts into the advanced startup environment, select
Troubleshoot>Advanced options>UEFI Firmware Settings>Restart. This will directly boot you into your UEFI interface.
- Go to
Locating the TPM Setting
Once you’re in the BIOS/UEFI interface, navigation is typically done with arrow keys and the Enter key, though some modern UEFI interfaces support mouse input. The exact location of the TPM setting can differ significantly between manufacturers.
Here’s a general guide on where to look and what terms to search for:
-
Common Sections: Start by looking for tabs or menus named:
- Security: This is the most common location.
- Advanced: Often contains various hardware-related settings.
- Boot: Sometimes integrated under boot options or specific hardware configurations.
- Peripherals / Integrated Peripherals: Less common but worth checking.
- Trusted Computing: Some boards have a dedicated section.
-
Common Setting Names: The setting itself might not be explicitly labeled “TPM 2.0.” Instead, look for:
- Trusted Platform Module: The most straightforward naming.
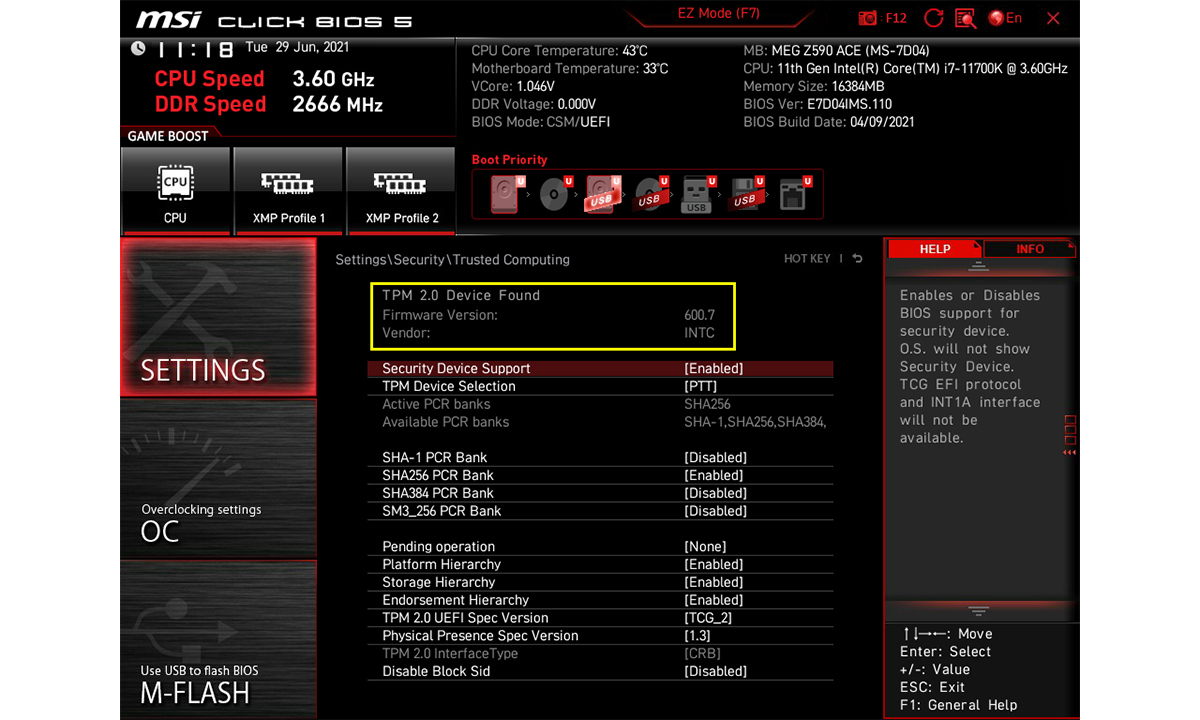
- Intel Platform Trust Technology (PTT): For Intel-based systems, this is Intel’s firmware-based TPM 2.0 solution. Enabling PTT usually activates TPM 2.0.
- AMD fTPM (Firmware TPM): For AMD-based systems, this is AMD’s firmware-based TPM 2.0. Enabling fTPM activates TPM 2.0.
- Security Device: A generic term that might lead to a TPM sub-menu.
- Discrete TPM (dTPM): If your system has a physical, separate TPM chip, it might be referred to as dTPM. You might have options for both fTPM/PTT and dTPM; you typically only need one active. For Windows 11, either is fine as long as it’s version 2.0.
-
Enable the Setting: Once you locate the appropriate setting (e.g., “Intel PTT,” “AMD fTPM,” or “Trusted Platform Module”), select it and change its status from
DisabledtoEnabled.
Activating and Saving Changes
After enabling the TPM setting:
- Save Changes: Navigate to the “Exit” or “Save & Exit” tab/menu. You’ll typically see an option like “Save Changes and Exit,” “Exit Saving Changes,” or similar. Select this option.
- Confirm: The system will usually ask for confirmation (e.g., “Save configuration changes and exit now?”). Confirm with
YesorOK. - Restart Your Computer: Your computer will restart. During the reboot, the system will initialize the TPM.
It’s crucial to save your changes before exiting the BIOS/UEFI, otherwise, your modifications won’t be applied, and TPM will remain disabled.
Post-Enablement and Troubleshooting Tips
Once you’ve enabled TPM 2.0 in your BIOS/UEFI, it’s essential to verify its status and be prepared for potential troubleshooting. While the process is generally straightforward, minor hiccups can occur.
Verifying TPM 2.0 After Enabling
After your computer restarts, the first thing to do is confirm that TPM 2.0 is now active and recognized by Windows.
- Re-run
tpm.msc: PressWindows key + R, typetpm.msc, and pressEnter. - Check Status and Version: You should now see “The TPM is ready for use” and “Specification Version: 2.0” in the “TPM Manufacturer Information” section. If you encounter any issues, refer to the troubleshooting steps below.
Common Issues and Solutions
While enabling TPM 2.0 is usually smooth, some users might encounter specific problems.
1. TPM Option Missing in BIOS/UEFI
- BIOS/UEFI Update: For older motherboards, especially those from around 2015-2018, the TPM 2.0 option or support for Intel PTT/AMD fTPM might be absent in the current BIOS version. Visit your motherboard manufacturer’s website (e.g., ASUS, MSI, Gigabyte, Dell, HP, Lenovo) and look for the latest BIOS/UEFI update for your specific model. BIOS updates often introduce support for newer hardware features or security standards. Caution: BIOS updates carry a small risk of bricking your motherboard if not done correctly. Follow the manufacturer’s instructions precisely.
- Motherboard Compatibility: Very old systems (pre-2015) might not have hardware support for TPM 2.0 at all, either as a discrete chip or firmware-based PTT/fTPM. In such cases, a motherboard upgrade or a new PC might be necessary if Windows 11 compatibility is your goal.
2. Secure Boot Requirement
- Enable Secure Boot: Windows 11 also requires Secure Boot to be enabled. Sometimes, enabling TPM 2.0 goes hand-in-hand with Secure Boot, and your system might require it for the TPM to function fully. Look for a “Secure Boot” option, typically in the “Boot” or “Security” section of your BIOS/UEFI, and ensure it’s
Enabled. - UEFI Mode: Secure Boot often requires your system to be in UEFI boot mode, not Legacy or CSM (Compatibility Support Module) mode. If your Secure Boot option is greyed out, check your “Boot Mode” or “OS Type” settings and ensure it’s set to
UEFIorWindows UEFI Mode.
3. Clearing the TPM
- When to Clear: Clearing the TPM deletes all existing keys stored within it. This is rarely needed for a simple enablement. However, it might be necessary if you’re transferring a hard drive to a new motherboard, experiencing persistent TPM-related errors, or want to “reset” the TPM entirely.
- How to Clear:
- In Windows: Open
tpm.msc, go to the “Action” pane on the right, and click “Clear TPM…”. Follow the on-screen prompts. - In BIOS/UEFI: Some BIOS/UEFI interfaces have an option to “Clear TPM” or “Reset TPM” within the TPM settings.
- In Windows: Open
- Consequences: Clearing the TPM will cause you to lose any keys stored there, which might include BitLocker recovery keys, virtual smart cards, or other encrypted data. Ensure you have backups or recovery keys for any data protected by the TPM before proceeding.
4. Legacy vs. UEFI Boot Modes
- As mentioned under Secure Boot, ensuring your system is configured for UEFI boot mode is critical. Older systems might default to “Legacy” or “CSM” mode, which can prevent TPM 2.0 and Secure Boot from activating correctly. In your BIOS/UEFI, look under “Boot Options” or “OS Type” and select
UEFIorWindows UEFI Mode. You might also need to disable CSM if it’s present. - Data Loss Risk: Changing boot modes from Legacy to UEFI after Windows has been installed can sometimes prevent Windows from booting or require reinstallation if your drive is partitioned in MBR (Master Boot Record) format instead of GPT (GUID Partition Table). Most Windows 10/11 installations on modern hardware use GPT and UEFI by default. You can check your disk partition style in Disk Management.
By carefully following these steps and considering the troubleshooting advice, you should be able to successfully enable TPM 2.0 on your system, paving the way for enhanced security and full compatibility with modern operating systems like Windows 11. The journey to a more secure digital existence often begins with understanding and utilizing the powerful hardware-based protections your computer already offers.

Conclusion
The journey to “install” TPM 2.0 is primarily one of activation, ensuring that the powerful security hardware already present in most modern PCs is functioning optimally. From understanding its role as a secure cryptoprocessor to navigating the intricacies of your BIOS/UEFI settings, we’ve covered the essential steps to enable this critical component.
By activating TPM 2.0, you’re not just meeting a system requirement for Windows 11; you’re significantly bolstering your device’s defenses against a myriad of cyber threats. You’re enabling stronger disk encryption with BitLocker, fortifying your boot process against rootkits with Secure Boot, and protecting sensitive data and credentials with hardware-level security. This commitment to hardware-based security is a testament to the evolving landscape of digital protection, where software alone is no longer sufficient.
In an era where digital security is paramount for both personal data and professional integrity, ensuring your systems are equipped with and utilizing technologies like TPM 2.0 is an investment in peace of mind. As technology continues to advance, so too will the methods of those who seek to exploit vulnerabilities. By taking the proactive step of enabling TPM 2.0, you position your devices to benefit from the latest security advancements, ensuring a more secure, reliable, and future-ready computing experience.
aViewFromTheCave is a participant in the Amazon Services LLC Associates Program, an affiliate advertising program designed to provide a means for sites to earn advertising fees by advertising and linking to Amazon.com. Amazon, the Amazon logo, AmazonSupply, and the AmazonSupply logo are trademarks of Amazon.com, Inc. or its affiliates. As an Amazon Associate we earn affiliate commissions from qualifying purchases.