Apple’s macOS ecosystem is renowned for its intuitive design and robust security, offering users a streamlined experience from the moment they unbox their device. A cornerstone of this experience is the ease with which users can discover, download, and install new software. However, the “how-to” isn’t always a one-size-fits-all answer. From the curated environment of the Mac App Store to the versatility of .dmg files and the power of command-line tools, understanding the various methods is key to truly mastering your Mac.
This comprehensive guide delves into every facet of software installation on macOS, designed to equip users of all technical proficiencies with the knowledge to manage their digital toolkit effectively. Whether you’re a casual user looking to install a new app or a power user leveraging advanced tools, we’ll navigate the processes, best practices, and essential considerations to ensure a secure, efficient, and hassle-free software experience. We’ll explore not just how to install, but also why certain methods are preferred in specific scenarios, touching on aspects of digital security, productivity, and leveraging technology trends to your advantage.
Understanding the macOS Software Installation Ecosystem
The macOS environment, a pillar of Apple’s technology prowess, offers a sophisticated yet user-friendly approach to software management. Unlike some operating systems that rely predominantly on a single method, macOS presents a multi-faceted ecosystem for installing applications, each designed to cater to different types of software and user preferences. Grasping this ecosystem is the first step towards becoming a proficient Mac user, ensuring that your software installations are not only successful but also secure and optimized for performance.
The macOS Philosophy: Security and User Experience
At the heart of macOS lies a strong commitment to both security and an exceptional user experience. Apple designs its operating system with robust safeguards, such as Gatekeeper, to protect users from malicious software. This philosophy dictates how software is distributed and installed, guiding users towards trusted sources and methods. The goal is to provide a seamless process while minimizing security risks, a critical aspect in today’s digital landscape where digital security is paramount. When you install software on a Mac, you’re interacting with a system engineered to prioritize your safety and productivity, often without you even realizing the complex mechanisms at play behind the scenes. This integration of security and user-centric design makes macOS a formidable platform for managing your software, contributing to a stable and reliable computing environment.
Key Installation Methods at a Glance
Before diving into the intricate details of each method, it’s beneficial to have an overview of the primary ways software finds its way onto your Mac. Each method serves a specific purpose, catering to different software types and distribution models:
- Mac App Store: The most straightforward and secure method, ideal for consumer applications, ensuring sandboxed apps and automatic updates.
- Disk Images (.dmg files): A common method for software downloaded directly from developers’ websites, often involving a simple drag-and-drop.
- Package Installers (.pkg files): Used for more complex software that requires system-level changes, often found with professional applications or drivers.
- Command-Line Tools (e.g., Homebrew): Favored by developers and power users for installing open-source software and development tools efficiently.
- Web-Based Installers & Proprietary Downloaders: Specific to certain software brands (like Adobe, Microsoft Office, Steam) that use their own custom installers or platforms.
Understanding these distinctions helps you anticipate the installation process and manage your applications more effectively, aligning with a broader understanding of technology trends and efficient app management.
Step-by-Step Guides for Every Installation Type
Navigating the various software installation methods on your Mac can seem daunting at first, but with a clear, step-by-step guide for each, you’ll find the process remarkably straightforward. Each method has its own nuances, but all are designed to integrate new applications smoothly into your macOS environment, enhancing your productivity and access to a wide array of apps and AI tools.
Method 1: The Mac App Store – Your Easiest Gateway
The Mac App Store is Apple’s curated marketplace for applications, offering the most secure and streamlined installation experience. Apps found here undergo a rigorous review process by Apple, ensuring they meet specific security and performance standards. This method is often the first choice for users seeking reliable, easy-to-manage software.
- Open the App Store: Click on the blue App Store icon in your Dock or find it via Spotlight (Command + Space and type “App Store”).
- Search or Browse: Use the search bar in the top-left corner to find a specific app, or explore categories, featured apps, and top charts.
- View App Details: Click on an app to view its description, screenshots, reviews, and system requirements. This is crucial for ensuring compatibility and making informed choices, much like reviewing gadgets before purchase.
- Download and Install:
- For free apps, click the “Get” button, then “Install App.”
- For paid apps, click the price button, then “Buy App.”
- You may be prompted to enter your Apple ID password, use Touch ID, or Face ID to authorize the purchase/download.
- Automatic Installation: The app will download and install itself automatically into your Applications folder. A progress circle on the App Store icon in the Dock will indicate its status.
- Launch: Once installed, you can launch the app from your Applications folder, Launchpad, or by searching with Spotlight.
Benefits: Unparalleled security, automatic updates, easy uninstallation directly from Launchpad, and seamless integration with your Apple ID. This method aligns perfectly with digital security best practices.
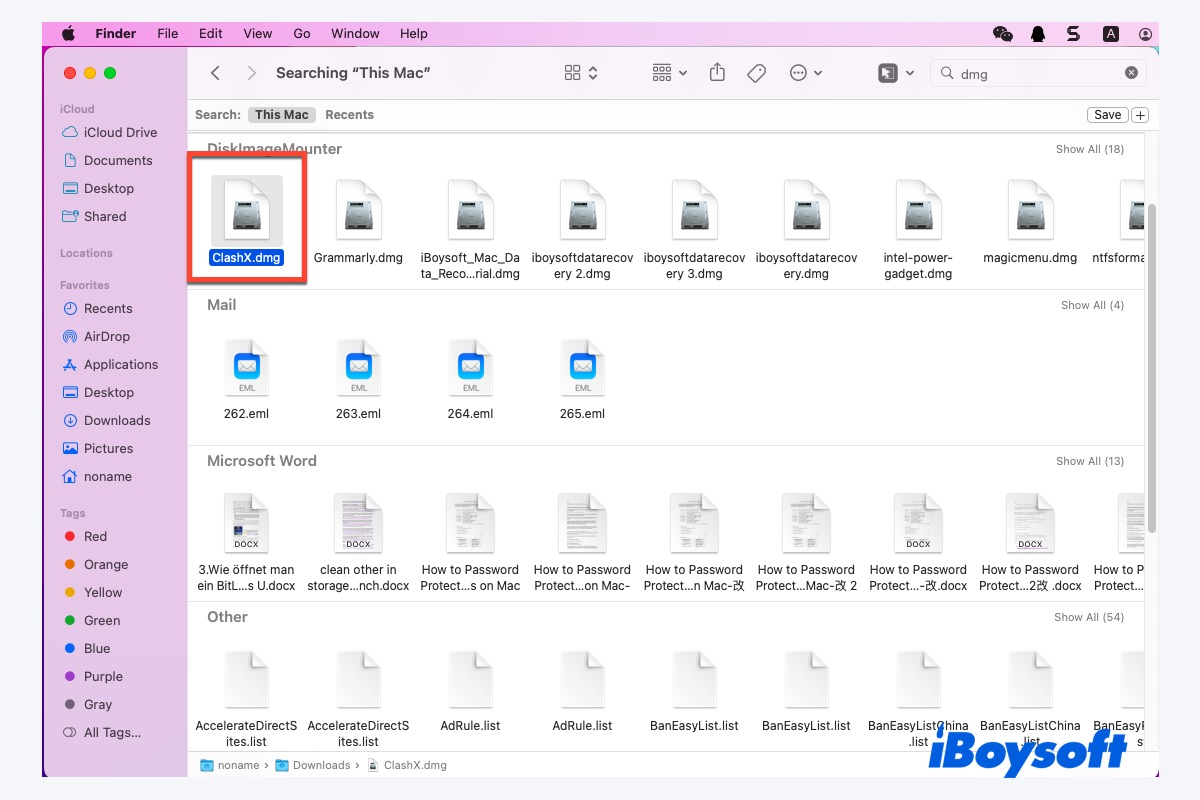
Method 2: Installing with .DMG Files – The Drag-and-Drop Classic
Disk Image files, commonly ending with the .dmg extension, are a widely used method for distributing software directly from developers. This method leverages macOS’s ability to “mount” a virtual disk, making the installation process simple and visually intuitive. Many popular applications, including web browsers and utility tools, use this distribution method.
- Download the .dmg File: Obtain the
.dmgfile from the software developer’s official website. Always ensure you’re downloading from a trusted source to prevent malware, a vital part of digital security. - Mount the Disk Image: Locate the downloaded
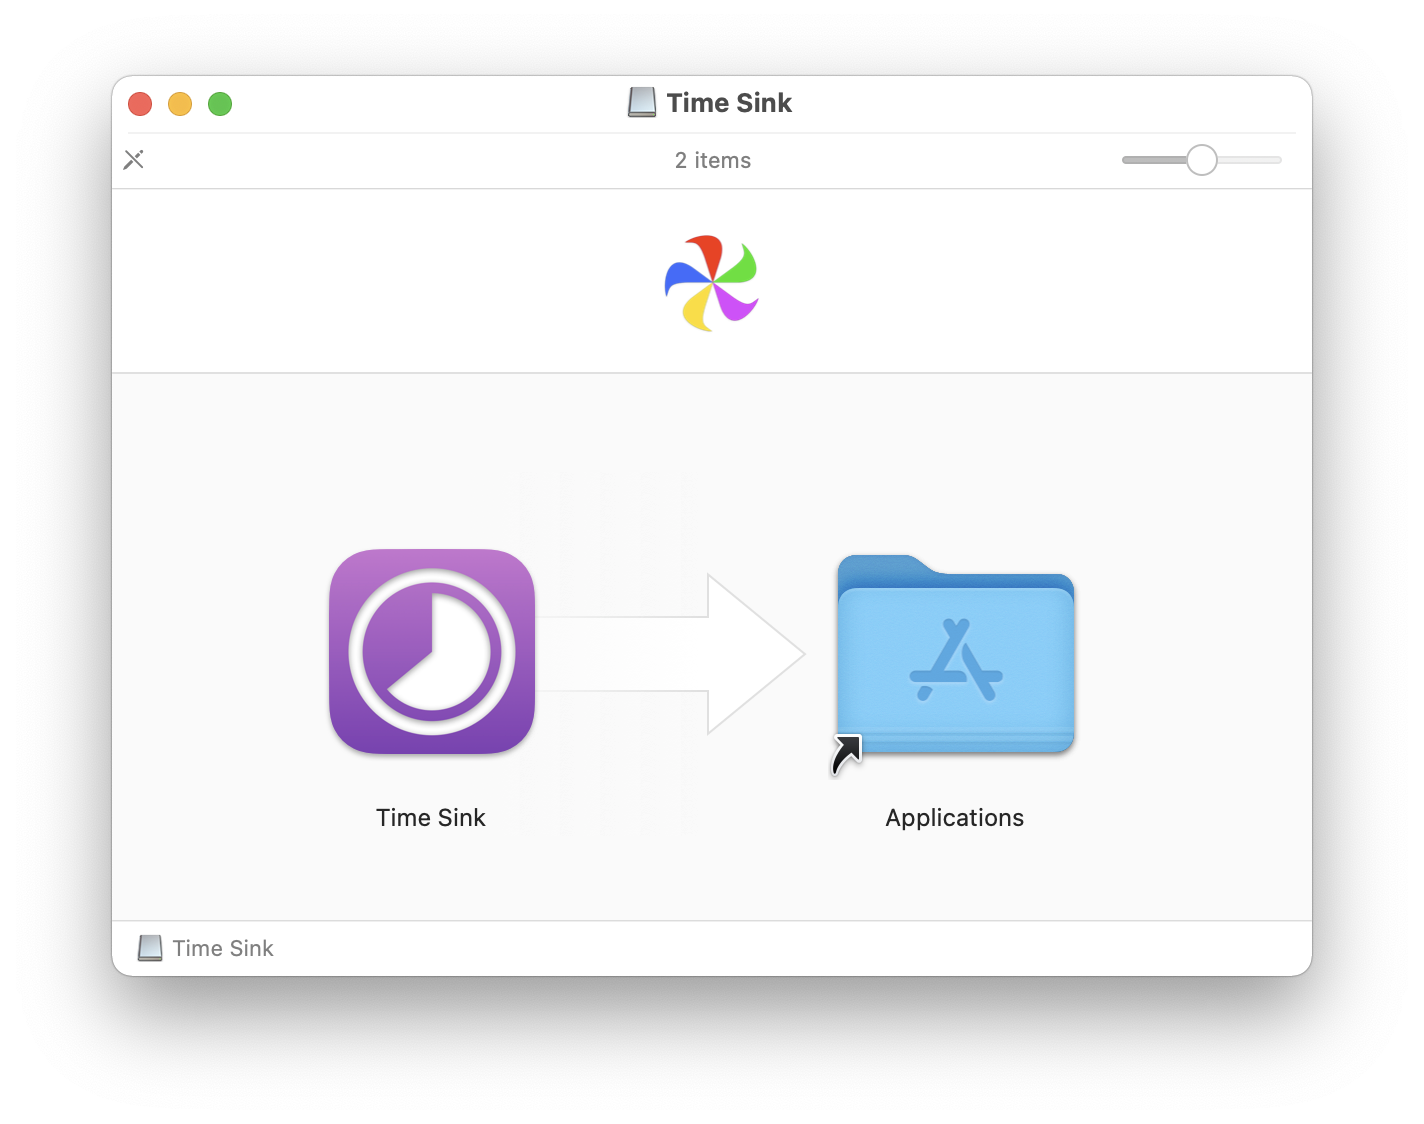
.dmgfile (usually in your Downloads folder) and double-click it. macOS will verify the image and then mount it, opening a new Finder window. This window typically contains the application icon and an alias to your Applications folder. - Install the Application: Drag the application icon from the mounted disk image window directly into your Applications folder alias. This copies the application bundle to your system.
- Eject the Disk Image: Once the copying is complete, drag the mounted disk image icon from your Desktop or the Finder sidebar to the Trash. Alternatively, click the “Eject” button next to its name in the Finder sidebar. This unmounts the virtual disk.
- Delete the .dmg File: After successful installation and ejecting the disk image, you can move the original
.dmgfile in your Downloads folder to the Trash to free up disk space.
Benefits: Direct download from developers, often includes application-specific configurations, relatively simple installation.
Method 3: Using .PKG Installers – For System-Level Software
Package Installer files, identifiable by the .pkg extension, are used for more complex software installations. These installers often involve multiple components, system-level modifications, or applications that need to be placed in specific locations beyond the standard Applications folder. This method is common for operating system updates, drivers, large productivity suites, or development tools.
- Download the .pkg File: Download the
.pkgfile from the official source. Again, verifying the source is paramount for digital security. - Launch the Installer: Double-click the
.pkgfile. This will launch the macOS Installer application. - Follow On-Screen Prompts: The installer will guide you through a series of steps:
- Introduction: Provides information about the software.
- License Agreement: You’ll need to agree to the software’s terms and conditions.
- Destination Select: Choose where you want to install the software (usually your main hard drive).
- Installation Type: For some installers, you might have options for a “Standard Install” or “Custom Install” to select specific components.
- Summary: Reviews your selections before proceeding.
- Authorize Installation: When prompted, enter your administrator password to authorize the installation. This is a security measure to ensure you have permission to make system-level changes.
- Complete Installation: The installer will copy files and configure the software. Once complete, you’ll see a “Installation was successful” message. You can then click “Close.” The installer may offer to move the
.pkgfile to the Trash; it’s generally safe to do so.
Benefits: Handles complex installations, installs necessary drivers and system files, ensures proper placement of all software components.
Method 4: Command-Line Installations with Homebrew – For Power Users and Developers
For tech-savvy users, developers, and those deeply involved in technology trends, Homebrew is an indispensable package manager for macOS. It simplifies the installation of open-source software, development tools, and utilities that aren’t typically found in the App Store or distributed as .dmg or .pkg files. This method significantly boosts productivity for those who frequently work with programming languages, AI tools, or various developer apps.
- Install Homebrew (if not already installed): Open the Terminal app (found in Applications/Utilities). Copy and paste the following command and press Enter:
bash

/bin/bash -c "$(curl -fsSL https://raw.githubusercontent.com/Homebrew/install/HEAD/install.sh)"
Follow the on-screen prompts, which may include entering your administrator password and installing Xcode Command Line Tools. - Update Homebrew: Before installing new software, it’s good practice to update Homebrew to ensure you have the latest package definitions:
bash

brew update
- Search for Software: If you’re unsure of the exact package name, you can search Homebrew’s extensive repository:
bash

brew search [software_name]
- Install Software: To install a package (e.g.,
wget), use theinstallcommand:
bash

brew install [package_name]
Homebrew will download and compile the software, placing it in an accessible location on your system. - Uninstall Software: To remove software installed via Homebrew:
bash

brew uninstall [package_name]
Benefits: Access to a vast library of open-source software, simplified updates and uninstallation, ideal for developer workflows and exploring new AI tools or productivity enhancements.
Method 5: Web-Based Installers and Proprietary Downloaders
Some major software brands, particularly those offering large suites of applications or subscription services, opt for their own proprietary web-based installers or download managers. Examples include Adobe Creative Cloud, Microsoft Office, Steam, and Epic Games Store. These platforms offer a centralized hub for managing multiple applications, updates, and user accounts.
- Download the Custom Installer: Visit the official website of the software provider (e.g., adobe.com, microsoft.com/office, store.steampowered.com). Download their specific installer or client application.
- Run the Installer/Client: Double-click the downloaded file (which might be a
.dmgor.pkgthat then installs their client app). - Follow Proprietary Instructions: Once their client application is installed (e.g., Adobe Creative Cloud Desktop app, Steam client), you’ll typically launch it. From there, you’ll manage the installation of individual applications within their ecosystem. This often involves logging in with your account, selecting desired apps, and initiating downloads.
- In-Client Management: Updates, uninstallation, and managing licenses are usually handled directly within the software provider’s client application.
Benefits: Centralized management for suites of applications, subscription handling, often includes unique features or ecosystems (like game stores).
Pre-Installation Considerations and Best Practices
Before you embark on the installation journey, taking a few preparatory steps can save you significant headaches, prevent errors, and ensure your Mac remains secure and performs optimally. These best practices are crucial for maintaining digital security and enhancing your overall productivity.
Ensuring Compatibility and System Requirements
Always check the software’s system requirements before downloading. This typically includes the minimum macOS version, processor type (Intel or Apple Silicon), RAM, and available disk space. Installing incompatible software can lead to crashes, performance issues, or simply a non-functional application, wasting your time and resources. Visiting the developer’s official website or checking the Mac App Store listing will provide this essential information. This diligence aligns with smart tech management, ensuring you leverage technology trends effectively without compatibility pitfalls.
Downloading from Trusted Sources – A Digital Security Imperative
One of the most critical aspects of software installation is ensuring you download from legitimate and trusted sources. Cybercriminals often distribute malicious software disguised as popular applications on unofficial websites.
- Official Developer Websites: Always prioritize downloading directly from the software developer’s official site.
- Mac App Store: As mentioned, the App Store is a highly secure and vetted source.
- Reputable Software Aggregators (with caution): If using third-party sites, ensure they have a strong reputation for vetting software and providing direct links to official downloads. Avoid sites that host modified or pirated software.
Adhering to this practice is a fundamental principle of digital security and protects your personal data and your Mac’s integrity.
Managing Disk Space and Resources
Software installations, especially for larger applications, consume significant disk space. Before installing, ensure you have enough free space. Regularly reviewing and clearing unnecessary files, old downloads, and applications you no longer use (as discussed in uninstallation later) is good practice. Your Mac needs sufficient free space for optimal performance, not just for new installations, but also for macOS updates and temporary files. Neglecting disk space management can lead to a sluggish system, impacting your productivity.
Security & Privacy Settings: Gatekeeper and Beyond
macOS includes robust security features like Gatekeeper, which prevents applications from running if they haven’t been signed by an identified developer or are not from the App Store. When you try to open an app from an “unidentified developer,” macOS will block it by default.
- To open such an app: Control-click (or right-click) the application icon, then choose “Open.” You’ll see a dialog box with an “Open” button. Clicking this will allow you to bypass Gatekeeper for that specific app. Be extremely cautious when doing this and only proceed if you absolutely trust the source.
- System Settings > Privacy & Security: Here you can manage various permissions for applications, such as access to your camera, microphone, location services, and full disk access. Review these settings post-installation to ensure apps only have the necessary permissions, further enhancing your digital security posture.
Post-Installation Management and Troubleshooting
Installing software is only half the battle; effective post-installation management is key to maintaining a healthy, secure, and efficient macOS environment. This involves knowing how to launch, update, and, crucially, uninstall software properly, along with addressing common issues that may arise. These practices are integral to long-term productivity and digital security.
Launching Your Newly Installed Software
Once an application is installed, there are several ways to launch it:
- Applications Folder: Navigate to
/Applicationsin Finder and double-click the app icon. - Launchpad: Click the Launchpad icon in your Dock (or pinch with four fingers on a trackpad), then click the app icon.
- Spotlight Search: Press
Command + Spacebar, start typing the app’s name, and press Enter when it appears. This is often the quickest method. - Dock: Drag frequently used applications to your Dock for quick access.
For apps installed via Homebrew, you might need to launch them from the Terminal or create an alias for easier access, especially for command-line tools.
Keeping Software Updated: Why It Matters
Regularly updating your software is paramount for security, stability, and access to new features. Updates often patch security vulnerabilities, improve performance, fix bugs, and introduce new functionalities, aligning with technology trends and ensuring your apps are always at their best.
- Mac App Store Apps: Updates are handled automatically or can be manually initiated via the “Updates” tab in the App Store.
- Directly Installed Apps (.dmg, .pkg): Many apps have built-in update mechanisms (e.g., “Check for Updates” within the app’s menu), or you may need to periodically visit the developer’s website to download the latest version.
- Homebrew Apps: Use
brew updatefollowed bybrew upgradein Terminal to update all Homebrew-installed software. - Proprietary Clients: Updates are managed directly within their respective client applications (e.g., Adobe Creative Cloud, Steam).
Neglecting updates can expose your system to security risks and lead to compatibility issues with the latest macOS versions.
How to Uninstall Software on Mac Effectively
Properly uninstalling software is just as important as installing it. Simply dragging an app to the Trash might leave behind residual files that clutter your system over time. Effective uninstallation frees up disk space and maintains your Mac’s performance.
- Apps Installed via .DMG (Drag-and-Drop):
- Quit the application.
- Open your Applications folder.
- Drag the application icon to the Trash.
- Empty the Trash.
- To remove lingering files: While often not strictly necessary, some advanced users delete associated preference files and application support folders found in
~/Library/Application Support/and~/Library/Preferences/. Be careful when manually deleting files from the Library folder.
- Apps from the Mac App Store:
- Open Launchpad.
- Click and hold down an app icon until all icons begin to jiggle.
- Click the “X” button that appears on the app icon, then click “Delete” to confirm.
- Apps Installed via .PKG Installers: These often come with a dedicated uninstaller program located in the application’s folder or within the original
.pkgfile. If not, follow the.dmgmethod, but be aware that some system files might remain. - Apps Installed via Homebrew:
- Open Terminal.
- Run
brew uninstall [package_name]. This cleans up almost everything Homebrew installed for that package.
- Proprietary Clients: Uninstall individual apps within their client application (e.g., uninstalling Photoshop via the Adobe Creative Cloud app). You can then uninstall the client itself if no other apps are managed by it.
- Third-Party Uninstallers (Use with Caution): Tools like CleanMyMac X or AppCleaner can help remove associated files, but ensure you choose reputable options.
Common Installation Issues and Quick Fixes
Even with the best practices, you might encounter issues. Here are some common problems and their solutions:
- “App cannot be opened because it is from an unidentified developer”: As discussed, Control-click the app and choose “Open.”
- “Application is damaged and can’t be opened”: The download might be corrupted. Delete the file, clear your browser cache, and re-download from the official source.
- Installer frozen or unresponsive: Force quit the installer (
Command + Option + Esc), then try restarting your Mac and attempting the installation again. - “Not enough disk space”: Free up space by deleting unnecessary files, emptying the Trash, or moving large files to external storage.
- Software crashes on launch: Check for updates, restart your Mac, or reinstall the application. Ensure your macOS version meets the app’s requirements.
- Permissions issues: Sometimes resetting file permissions can help. For App Store apps, reinstalling might fix this. For others, a disk utility repair (via macOS Recovery) might be needed in extreme cases.
Conclusion
Mastering software installation on your Mac is an essential skill for any user, enabling you to harness the full power of your device and stay ahead in the rapidly evolving world of technology. From the security and simplicity of the Mac App Store to the versatility of .dmg and .pkg files, and the power-user capabilities of Homebrew, macOS offers a diverse array of methods tailored to different needs.
By adhering to best practices—checking compatibility, downloading from trusted sources, managing disk space, and understanding your security settings—you ensure a smooth, secure, and efficient digital experience. Furthermore, actively managing your installed software through regular updates and proper uninstallation methods guarantees your Mac remains performant and protected. Embrace these insights to confidently navigate your digital landscape, optimize your productivity, and keep your macOS environment perfectly tuned.
aViewFromTheCave is a participant in the Amazon Services LLC Associates Program, an affiliate advertising program designed to provide a means for sites to earn advertising fees by advertising and linking to Amazon.com. Amazon, the Amazon logo, AmazonSupply, and the AmazonSupply logo are trademarks of Amazon.com, Inc. or its affiliates. As an Amazon Associate we earn affiliate commissions from qualifying purchases.