Python, with its elegant syntax and vast ecosystem, has solidified its position as one of the most popular and versatile programming languages in the world. From powering intricate web applications and driving data science innovations to fueling artificial intelligence breakthroughs and automating mundane tasks, Python’s applications are virtually limitless. If you’re looking to dive into the exciting world of programming, automate repetitive tasks, or explore cutting-edge technologies, installing Python on your Windows machine is the essential first step.
This comprehensive guide is designed for beginners and seasoned developers alike, providing a clear, step-by-step walkthrough to get Python up and running on your Windows operating system. We’ll cover everything from preparing your system to verifying your installation and setting up best practices for a productive development environment. By the end of this tutorial, you’ll not only have Python successfully installed but also a foundational understanding of how to manage your projects effectively.
Why Python? Understanding Its Ubiquity and Power
Before we delve into the installation process, it’s worth taking a moment to appreciate why Python is such a crucial tool in the modern technological landscape. Its widespread adoption isn’t merely a trend; it’s a testament to its inherent strengths, making it an indispensable asset for individual learners, startups, and global enterprises alike. Understanding its versatility will underscore the value of setting up your development environment correctly from the outset.
The Versatility of Python
Python’s appeal lies significantly in its incredible versatility. It’s not confined to a single domain but rather flourishes across a multitude of applications. For instance, in web development, frameworks like Django and Flask empower developers to build robust and scalable websites and APIs, handling everything from user authentication to database interactions with relative ease. The server-side logic of many popular web applications today runs on Python.
Beyond the web, Python has become the undisputed lingua franca of data science and machine learning. Libraries such as NumPy, Pandas, Scikit-learn, TensorFlow, and PyTorch provide powerful tools for data manipulation, statistical analysis, predictive modeling, and building complex neural networks. This makes Python an indispensable tool for anyone working with big data, performing advanced analytics, or designing AI solutions. Furthermore, Python excels in scripting and automation, allowing users to write simple programs to automate repetitive tasks, manage system operations, or interact with various software applications through APIs, thereby significantly boosting productivity for both technical and non-technical users. It’s also used for game development, desktop applications, scientific computing, and much more, truly earning its reputation as a “swiss army knife” of programming languages.
Python in the Modern Tech Landscape
Python’s influence extends deeply into the core of many modern technological advancements. Its clear, readable syntax lowers the barrier to entry for new programmers, fostering a large and active community that continuously contributes to its vast library ecosystem. This community support means that almost any problem you encounter has likely been addressed by someone else, and a solution or library is often readily available. This collaborative environment ensures that Python remains at the forefront of innovation.
Furthermore, Python’s cross-platform compatibility means that code written on a Windows machine can often run seamlessly on macOS or Linux with minimal modifications, promoting efficient development workflows across diverse operating environments. Major tech companies like Google, NASA, Instagram, and Spotify leverage Python extensively for their core services, infrastructure, and data processing pipelines. Its adaptability and the sheer volume of available resources — tutorials, documentation, and open-source projects — make it an incredibly attractive language for anyone looking to build, innovate, or simply understand the technological world around them. Installing Python isn’t just about getting a programming language; it’s about unlocking access to a world of creation and problem-solving.
Preparing for Installation: Essential Pre-requisites
Before you initiate the Python installation process, a few preparatory steps will ensure a smooth and hassle-free setup. Addressing these prerequisites now can prevent common issues later on, making your initial experience with Python a positive one. This section will guide you through understanding your system requirements and making an informed decision about which Python version is best for your needs.
System Requirements and Administrator Privileges
Python is designed to be highly compatible and can run on most modern Windows operating systems, typically Windows 7 or later. However, it’s always recommended to have a relatively up-to-date system for optimal performance and security. While Python itself has modest hardware requirements, the complexity of the projects you undertake later (e.g., intensive data science computations or large-scale web applications) might necessitate more robust hardware, such as additional RAM or a faster processor. For basic installation and simple scripting, most contemporary machines will suffice.
Crucially, you will need administrator privileges on your Windows account to install Python properly. The installer needs to make system-level changes, such as adding entries to environment variables and placing files in protected directories. If you’re using a computer where you don’t have administrative rights (e.g., a work or school computer), you might need to contact your IT administrator to perform the installation or provide temporary elevated permissions. Attempting to install without administrator rights can lead to incomplete installations, permission errors, and a non-functional Python environment, often resulting in frustrating “Python is not recognized” errors when you try to run commands from the command prompt.
Choosing the Right Python Version
One of the most frequent questions beginners ask is, “Which version of Python should I install?” The Python community primarily supports two major versions: Python 2.x and Python 3.x. However, Python 2 reached its end-of-life in 2020, meaning it no longer receives official security updates or bug fixes. Therefore, it is strongly recommended to install the latest stable release of Python 3.x.
As of writing, this would typically be Python 3.9, 3.10, 3.11, or newer. Python 3.x boasts numerous improvements over Python 2, including better Unicode support, more efficient syntax, and a vibrant, actively developed ecosystem of libraries. Starting with Python 3 ensures you’re learning the most current version of the language and can leverage the vast majority of modern Python libraries and frameworks.
When downloading, you’ll also notice options for 32-bit and 64-bit installers. Always choose the 64-bit installer if your Windows operating system is 64-bit, which most modern systems are. To check your system type, right-click on “This PC” (or “My Computer”) and select “Properties.” Look for “System type” to confirm if you have a 64-bit operating system. Installing the 64-bit version ensures compatibility with 64-bit libraries and optimizes performance, especially for memory-intensive tasks. If you inadvertently install the 32-bit version on a 64-bit system, it will still work but might limit your access to certain optimized libraries or configurations. Always opt for the 64-bit variant unless you have a very specific, niche reason not to.
Step-by-Step Installation Process
Now that your system is ready and you’ve decided on the correct Python version, it’s time to execute the installation. This section will walk you through each critical step, from downloading the official installer to configuring it correctly and verifying that Python is properly set up on your machine. Pay close attention to the details, especially regarding environment variables, as this is a common stumbling block for newcomers.
Downloading the Python Installer
The safest and most reliable place to download Python is from its official website. Navigating to https://www.python.org/downloads/windows/ will present you with the latest stable releases for Windows.
- Open your web browser and go to
www.python.org. - Hover over “Downloads” in the main navigation menu.
- Click on “Windows” from the dropdown options. This will take you to a dedicated page for Windows releases.
- On the Windows releases page, you’ll see a list of Python versions. Locate the latest stable Python 3.x release. For example, you might see “Python 3.11.x.”
- Under the relevant version, find the “Windows installer (64-bit)” link. Click this link to download the executable installer file (e.g.,
python-3.11.x-amd64.exe). Save the file to a location you can easily find, such as your “Downloads” folder.
It’s crucial to use the official website to avoid modified or outdated versions that might pose security risks or cause unexpected issues. The download is usually a relatively small file, so it should complete quickly depending on your internet connection.
Executing the Installer and Crucial Options
Once the installer is downloaded, it’s time to run it. This is the most critical part of the installation process, especially one particular checkbox that beginners often overlook.
- Locate the downloaded
.exefile and double-click it to start the installer. You may be prompted by User Account Control (UAC) to allow the app to make changes to your device; click “Yes.” - The Python installer window will appear. This is where you need to pay close attention. At the very bottom of the installer window, you will see a checkbox labeled “Add Python X.X to PATH.”
- CRUCIAL STEP: CHECK THIS BOX!
- Adding Python to your system’s PATH environment variable allows you to run Python commands (like
pythonandpip) directly from any command prompt window, regardless of your current directory. If you skip this, you’ll have to manually navigate to the Python installation directory or add it to PATH yourself, which can be cumbersome for beginners.
- After checking the “Add Python X.X to PATH” box, you have two primary installation options:
- “Install Now”: This is the recommended option for most users. It performs a default installation, including the IDLE development environment, pip (Python’s package installer), and documentation. It typically installs Python into your user’s
AppDatafolder. - “Customize installation”: This option allows you to select specific features to install, choose a custom installation location, and configure other advanced options. While useful for advanced users or specific development setups, beginners should stick with “Install Now” for simplicity.
- “Install Now”: This is the recommended option for most users. It performs a default installation, including the IDLE development environment, pip (Python’s package installer), and documentation. It typically installs Python into your user’s
- Click “Install Now.”
- The installation process will begin. It might take a few minutes. A progress bar will indicate the status.
- Once the installation is complete, you will see a “Setup was successful” message. There might also be an option labeled “Disable path length limit.” It’s generally a good idea to click this option if you plan on developing complex projects with long file paths, as it addresses a Windows limitation. If you choose not to, it’s usually not a problem for basic use.
- Click “Close” to exit the installer.
Congratulations! Python is now installed on your Windows machine.
Verifying Your Python Installation
After the installation completes, it’s essential to verify that Python has been installed correctly and is accessible from your command line. This step confirms that the “Add Python to PATH” option worked as intended and that you can start using Python immediately.
- Open the Command Prompt or PowerShell:
- You can do this by typing
cmdorpowershellinto the Windows search bar and pressing Enter.
- You can do this by typing
- Type the following command and press Enter:
bash

python --version
or simply
bash

python
If Python is correctly installed and added to your PATH, you should see the installed Python version displayed (e.g.,Python 3.11.x). If you just typepythonwithout--version, you will enter the Python interactive interpreter. To exit the interpreter, typeexit()and press Enter. - Verify Pip Installation: Pip is Python’s package installer, and it’s essential for installing external libraries. It’s automatically included with Python 3.4 and later. To verify pip, type:
bash

pip --version
You should see the pip version and the Python version it’s associated with (e.g.,pip 23.x.x from C:UsersYourUserAppDataLocalProgramsPythonPython311Libsite-packagespip (python 3.11)). - Verify the
pylauncher (Optional but Recommended): Windows also provides apylauncher, which helps manage multiple Python versions.
bash

py --version
This should also display the default Python version that the launcher points to. You can usepy -3to specify Python 3, orpy -3.11to specify Python 3.11 if you have multiple versions installed.
If all these commands return the expected output, your Python installation is successful and ready for use! If you encounter errors like “Python is not recognized as an internal or external command,” it indicates an issue with the PATH environment variable, which we will address in the troubleshooting section.
Best Practices for Python Development on Windows

Installing Python is just the beginning. To truly harness its power and maintain a clean, organized, and conflict-free development environment, it’s crucial to adopt some best practices right from the start. This includes understanding and utilizing virtual environments, which are fundamental to professional Python development, and running a simple test to confirm your setup.
The Importance of Virtual Environments
One of the most critical concepts for any Python developer is the use of virtual environments. Imagine you’re working on two different Python projects. Project A requires an older version of a library (e.g., requests 2.0), while Project B requires a newer version (e.g., requests 2.28). If you install these directly into your global Python environment, they will conflict, leading to broken dependencies and frustrating errors.
A virtual environment solves this problem by creating an isolated mini-Python installation for each project. It essentially creates a separate directory containing a copy of the Python interpreter and its own pip tool. This means that any packages you install within that virtual environment will only be available to that specific project, leaving your global Python installation and other projects unaffected. This prevents conflicts, makes dependency management straightforward, and ensures your projects are self-contained and easily shareable.
To create and activate a virtual environment:
- Navigate to your project directory in the Command Prompt or PowerShell. For example:
bash

cd C:UsersYourUserDocumentsMyPythonProject
If you don’t have a project directory yet, create one:
bash

mkdir MyPythonProject

cd MyPythonProject
- Create a virtual environment: Use the
venvmodule, which comes with Python. It’s common practice to name the virtual environment foldervenvor.venv.
bash

python -m venv venv
This command creates avenvfolder within yourMyPythonProjectdirectory, containing the isolated Python installation. - Activate the virtual environment:
bash

.venvScriptsactivate
You’ll know it’s active when your command prompt changes to include(venv)before your current path, like(venv) C:UsersYourUserDocumentsMyPythonProject>. - Deactivate the virtual environment: When you’re done working on a project, simply type:
bash

deactivate
Your command prompt will return to its normal state.
Always activate your virtual environment before installing project-specific packages or running project code to ensure isolation and proper dependency management. This single practice will save you countless hours of troubleshooting down the line.
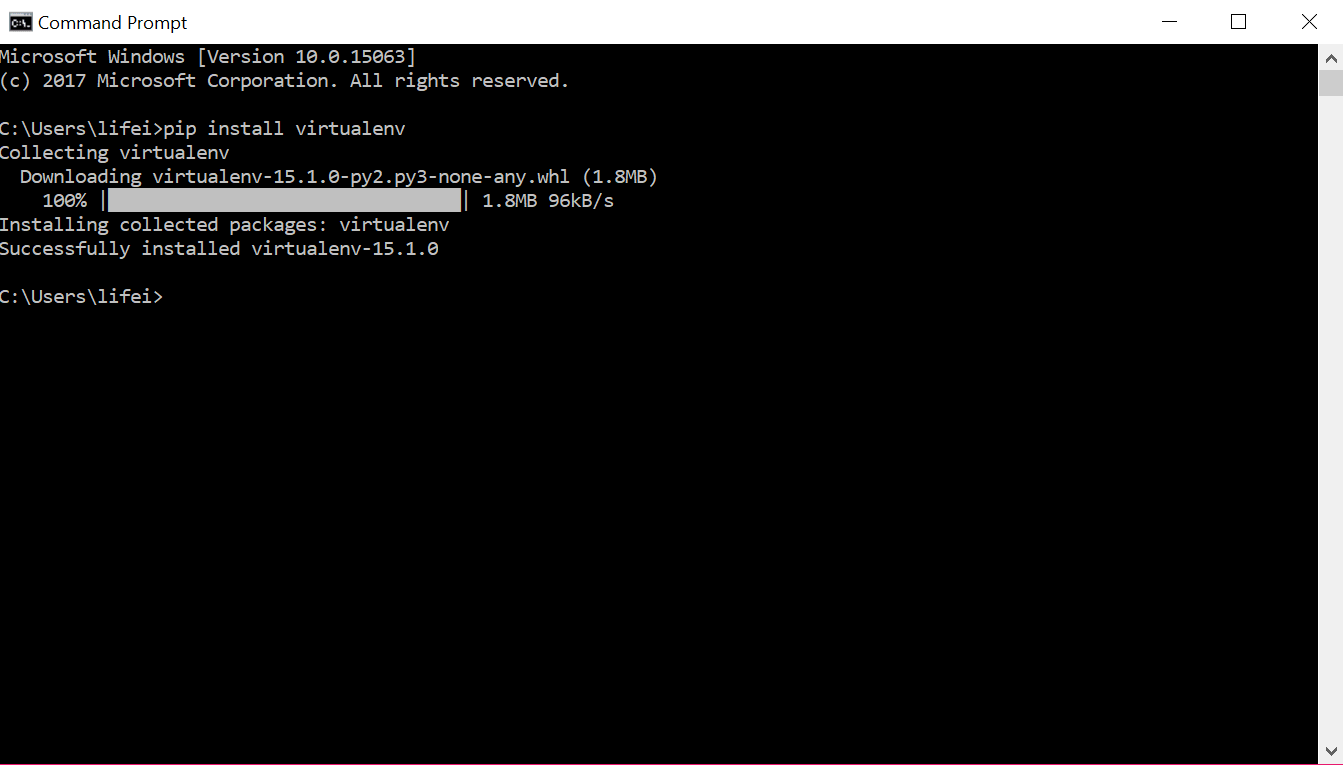
Installing pip and Your First Package
pip is Python’s standard package manager. It allows you to install and manage third-party libraries and modules that extend Python’s functionality. As mentioned earlier, pip is automatically installed when you install Python 3.4 or newer.
Once your virtual environment is active (you see (venv) in your prompt), you can use pip to install packages specific to that project. For example, let’s install the popular requests library, which is used for making HTTP requests:
- Ensure your virtual environment is active.
- Install the
requestspackage:
bash

pip install requests
You will seepipdownloading and installing the package and its dependencies. - Verify the installation:
bash

pip list
This command will show all packages installed within your current active virtual environment, includingrequests.
This demonstrates how easily you can add powerful functionalities to your Python projects without cluttering your global Python installation.
Your First Python Script: A Quick Test
To confirm everything is working as expected, let’s write and run a very simple Python script.
- Ensure your virtual environment is active (optional for this simple script, but good practice).
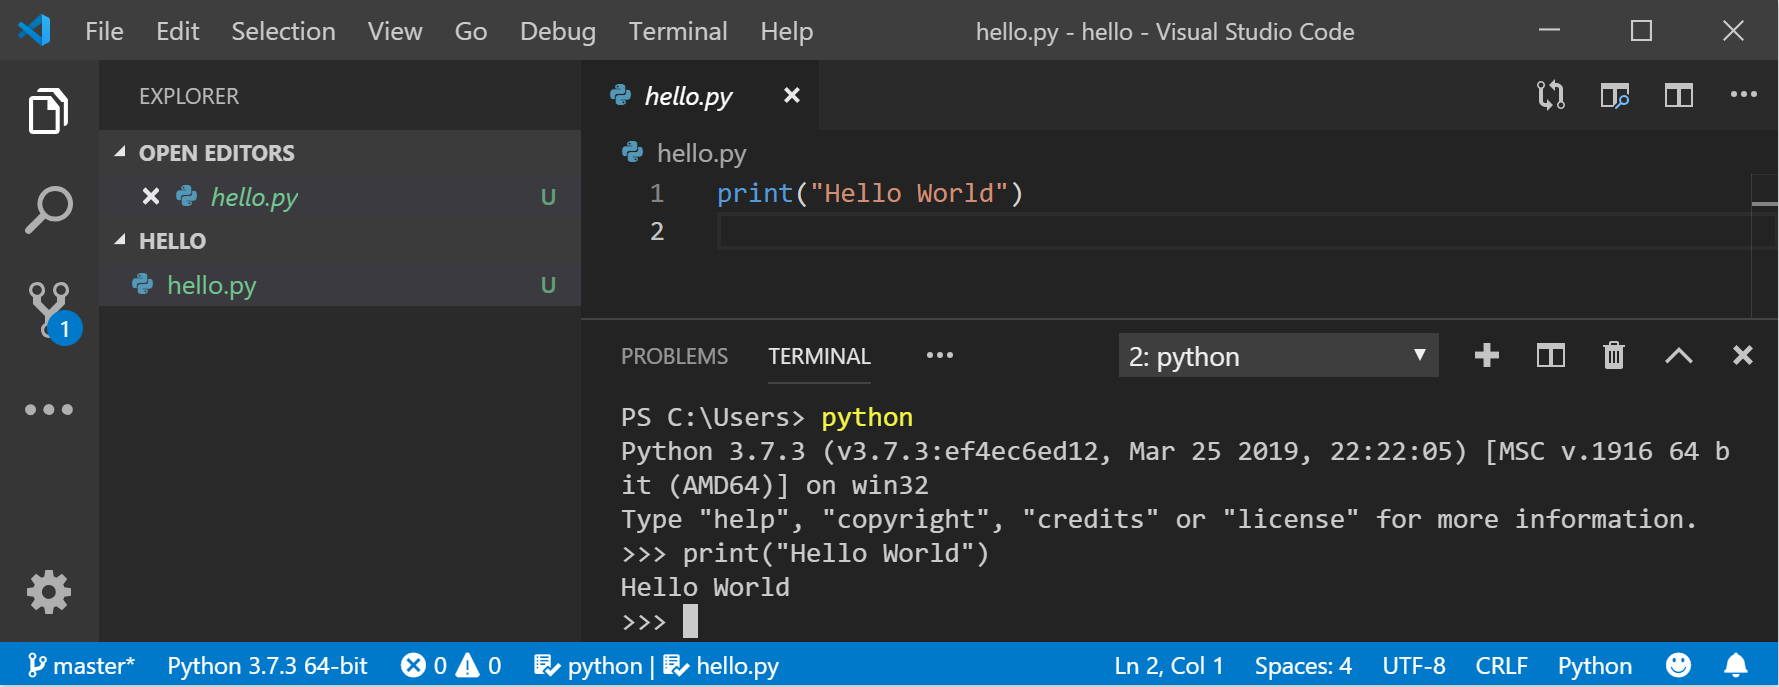
- Open a text editor (like Notepad, Visual Studio Code, or Sublime Text).
- Type the following code:
python

print("Hello, Python world! Installation successful!")

print("This script is running with Python version:")

import sys

print(sys.version)
- Save the file as
hello.pyinside yourMyPythonProjectdirectory. - Return to your Command Prompt or PowerShell (make sure you are in the
MyPythonProjectdirectory). - Run the script:
bash

python hello.py
You should see the output:
Hello, Python world! Installation successful!

This script is running with Python version:

3.x.x ... (the version you installed)
If you see this output, you’ve successfully installed Python, set up a virtual environment (if you chose to), and run your first script. You are now officially a Python user on Windows!
Troubleshooting Common Installation Issues and Next Steps
Even with a detailed guide, new users can sometimes encounter unexpected hurdles. This section addresses the most common installation problems and provides solutions. Furthermore, it outlines crucial next steps to enhance your Python development experience, guiding you towards more powerful tools and deeper learning.
“Python is not recognized” Error
This is by far the most common issue beginners face. If, after installation, typing python --version in your Command Prompt yields an error message like:
'python' is not recognized as an internal or external command,
operable program or batch file.
This almost certainly means that Python’s executable path was not correctly added to your system’s PATH environment variable during installation. This can happen if you forgot to check the “Add Python X.X to PATH” box or if there was a system error during that step.
Solution: You need to manually add Python to your PATH environment variables.
- Find your Python installation path:
- If you used “Install Now,” Python is usually in
C:UsersYourUserAppDataLocalProgramsPythonPython311(replaceYourUserwith your Windows username andPython311with your installed version, e.g.,Python39). - If you used “Customize installation,” navigate to the folder you specified.
- Within this folder, you’ll see a
Scriptssubfolder. You need both the main Python folder and itsScriptssubfolder added to PATH.
- If you used “Install Now,” Python is usually in
- Open Environment Variables:
- Search for “environment variables” in the Windows search bar and select “Edit the system environment variables.”
- In the System Properties window, click the “Environment Variables…” button.
- Edit the Path Variable:
- Under “User variables for [Your Username]” (or “System variables” if you want it available for all users), find the “Path” variable and select “Edit.”
- Click “New” and add the path to your Python installation directory (e.g.,
C:UsersYourUserAppDataLocalProgramsPythonPython311). - Click “New” again and add the path to Python’s
Scriptsdirectory (e.g.,C:UsersYourUserAppDataLocalProgramsPythonPython311Scripts). - Click “OK” on all open windows to save the changes.
- Restart your Command Prompt/PowerShell: Changes to environment variables only take effect in new instances of the command line. Close any open command windows and open a new one.
- Verify again: Type
python --versionandpip --version. They should now work.
Managing Multiple Python Versions
While it’s recommended to start with a single Python 3.x version, advanced users or developers working on legacy projects might need multiple Python versions (e.g., Python 3.9 and Python 3.11). Managing these can be tricky.
- The
pylauncher: Windows often installs apylauncher (e.g.,C:Windowspy.exe) that allows you to specify which Python version to use. For example,py -3.9 my_script.pyrunsmy_script.pywith Python 3.9. - Virtual Environments: Even with multiple global installations, virtual environments are still the best way to manage project-specific dependencies.
pyenv-win: For more robust version management, tools likepyenv-win(a Windows port ofpyenv) allow you to easily switch between different Python versions globally or per-project. This is an advanced topic for later exploration.
For beginners, stick to one Python 3.x installation and rely on virtual environments.
Exploring Integrated Development Environments (IDEs)
While you can write Python code in a simple text editor and run it from the command line, an Integrated Development Environment (IDE) or a powerful code editor significantly enhances productivity. IDEs offer features like:
- Syntax highlighting: Makes code easier to read.
- Code auto-completion: Suggests code as you type, saving time and reducing errors.
- Debugging tools: Helps you find and fix errors in your code.
- Integrated terminal: Allows you to run commands without leaving the editor.
- Version control integration: Connects with Git and other systems.
- Project management: Organizes your files and folders.
Popular choices for Python development on Windows include:
- Visual Studio Code (VS Code): A free, lightweight, and highly customizable code editor from Microsoft. With the Python extension, it becomes a powerful IDE, offering excellent debugging, IntelliSense, and virtual environment integration. It’s often recommended for beginners due to its balance of features and ease of use.
- PyCharm: A dedicated Python IDE developed by JetBrains. PyCharm comes in Community (free) and Professional (paid) editions. It offers robust features tailored specifically for Python development, making it an excellent choice for larger projects, web frameworks, and scientific computing. It can be more resource-intensive than VS Code.
- Sublime Text: A fast and sleek text editor known for its speed and rich plugin ecosystem. While not a full IDE out of the box, it can be extended with many Python-specific packages.
Installing and configuring an IDE will be your next logical step after successfully setting up Python, transforming your coding experience from basic text editing to a professional development workflow.
With Python installed, its core concepts understood, and best practices outlined, you are now well-equipped to embark on your programming journey. Remember that learning to code is an iterative process, and continuous practice, experimentation, and exploration are key to mastering Python. From automating simple tasks to building complex applications, the power of Python is now at your fingertips, ready for you to unleash your creativity and solve real-world problems. Happy coding!
aViewFromTheCave is a participant in the Amazon Services LLC Associates Program, an affiliate advertising program designed to provide a means for sites to earn advertising fees by advertising and linking to Amazon.com. Amazon, the Amazon logo, AmazonSupply, and the AmazonSupply logo are trademarks of Amazon.com, Inc. or its affiliates. As an Amazon Associate we earn affiliate commissions from qualifying purchases.