In the dynamic world of web development, Node.js has emerged as a powerhouse, enabling developers to build scalable, high-performance network applications using JavaScript on the server side. Its non-blocking, event-driven architecture makes it ideal for real-time applications, APIs, and microservices, solidifying its place in the modern tech stack. For Linux users, harnessing the power of Node.js is a straightforward process, albeit one with several viable installation paths depending on your specific needs and distribution preferences. This guide aims to demystify the installation process, offering detailed, step-by-step instructions for getting Node.js up and running on your Linux machine, empowering you to dive into the vast ecosystem of server-side JavaScript development.

Understanding Node.js and Its Importance
Before we delve into the technicalities of installation, let’s briefly explore what Node.js is and why it has become an indispensable tool for countless developers and organizations worldwide.
What is Node.js?
At its core, Node.js is an open-source, cross-platform JavaScript runtime environment that executes JavaScript code outside of a web browser. Built on Chrome’s V8 JavaScript engine, Node.js allows developers to use JavaScript for server-side scripting, opening up full-stack development possibilities where both frontend and backend are written in the same language. It leverages an event-driven, non-blocking I/O model, making it lightweight and efficient, perfect for data-intensive real-time applications that run across distributed devices.
Accompanying Node.js is npm (Node Package Manager), the world’s largest software registry. npm provides access to thousands of open-source libraries and tools, simplifying the process of managing project dependencies and distributing packages. This vast ecosystem is a significant factor in Node.js’s popularity, offering ready-made solutions for almost any development challenge.
Why Developers Choose Node.js
The widespread adoption of Node.js stems from several compelling advantages it offers to developers and businesses:
- Unified Language Stack: For many developers, the ability to use JavaScript for both client-side and server-side development streamlines the entire development process. This reduces context switching, promotes code reuse, and can lead to faster development cycles.
- High Performance and Scalability: Node.js’s non-blocking I/O and asynchronous nature make it exceptionally fast and efficient. It can handle a large number of concurrent connections with minimal overhead, making it highly scalable for applications that need to serve many users simultaneously, such as streaming services, chat applications, and APIs.
- Vast Ecosystem with npm: The npm registry is a treasure trove of modules and tools, dramatically accelerating development. Whatever functionality you need, chances are there’s already a well-maintained package for it, saving countless hours of development time.
- Cross-Platform Compatibility: Node.js runs seamlessly across various operating systems, including Linux, Windows, and macOS, ensuring consistent development and deployment environments.
- Strong Community Support: With a massive and active community, Node.js benefits from continuous innovation, extensive documentation, and readily available support through forums and online resources.
- Microservices Architecture: Node.js’s lightweight nature and focus on single-purpose modules make it an excellent choice for building microservices, allowing applications to be broken down into smaller, independently deployable services.
These factors make Node.js a strategic choice for building modern web applications, APIs, real-time services, and even desktop applications, solidifying its position as a cornerstone of the modern technological landscape.
Essential Prerequisites Before You Begin
Before you embark on the Node.js installation journey, it’s crucial to ensure your Linux environment is prepared. Addressing these prerequisites upfront will prevent common issues and ensure a smooth setup process.
System Compatibility
Node.js is compatible with virtually all modern Linux distributions. However, the specific commands and package names might vary slightly between families of distributions (e.g., Debian-based like Ubuntu, or Red Hat-based like Fedora and CentOS). This guide will cover the most popular ones, but regardless of your distribution, ensure your system is up-to-date. An outdated system can lead to conflicts with newer software versions or missing dependencies.
To update your system’s package list and upgrade existing packages, use the following commands:
- For Debian/Ubuntu-based distributions:
bash

sudo apt update

sudo apt upgrade
- For Red Hat/CentOS/Fedora-based distributions:
bash

sudo yum update  # For CentOS/RHEL 7 and older

sudo dnf update  # For Fedora, CentOS/RHEL 8 and newer
(Note:dnfis the successor toyumin newer RHEL-based systems.)
Administrative Privileges
Most Node.js installation methods require administrative privileges (root access) to install software system-wide. You’ll typically use the sudo command before installation commands. Ensure your user account has sudo access, or perform the installation as the root user if necessary. Using sudo is generally preferred for security reasons, as it limits the scope of root access to specific commands.
Having these basics in check will pave the way for a trouble-free installation process.
Diverse Methods for Node.js Installation on Linux
Linux offers several ways to install Node.js, each with its own advantages, catering to different user preferences and requirements. We’ll explore the most popular and recommended methods, from using standard package managers to flexible version managers.
Method 1: Installing Node.js via Package Managers
This is often the simplest method for basic installations and is recommended for users who prefer system-wide installations and don’t need to switch between multiple Node.js versions frequently. However, the Node.js version available in official distribution repositories might sometimes be outdated.
On Debian/Ubuntu-based Systems (using apt)
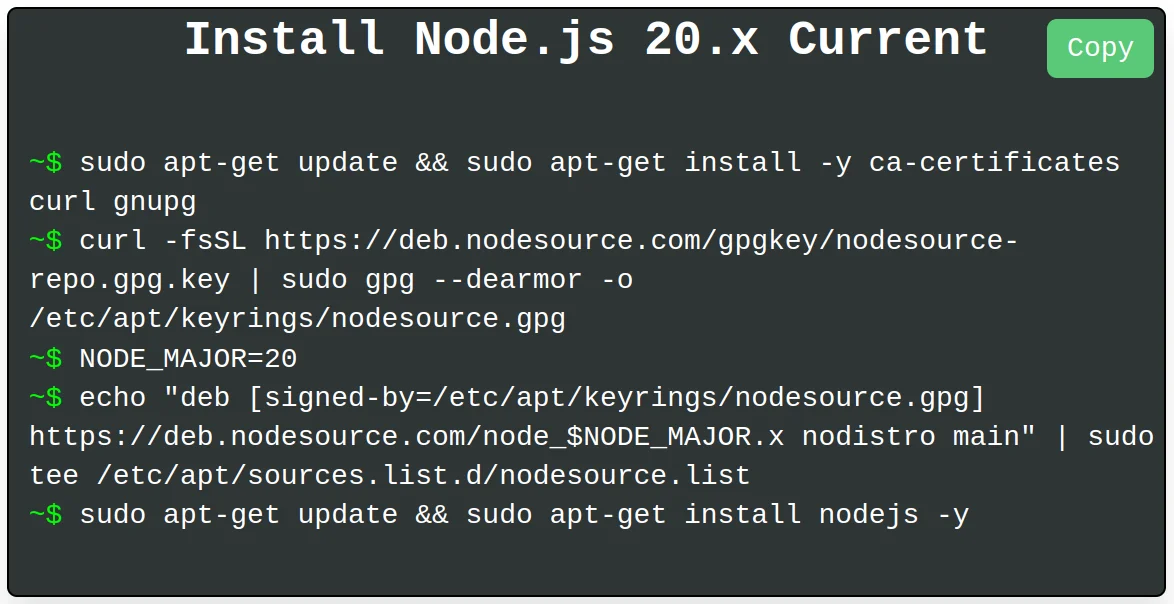
While Node.js is available in the default Ubuntu/Debian repositories, these versions can sometimes lag behind the latest releases. For the most current stable versions, it’s recommended to use the official NodeSource repository.
- Install
curl(if not already present):
bash

sudo apt install curl
- Add the NodeSource APT repository:
NodeSource maintains up-to-date packages for Node.js. You can choose the desired version (e.g., Node.js 20.x, 21.x, or the latest LTS). For the latest LTS (Long Term Support) version, which is recommended for most production environments, replaceNODE_MAJORwith the current LTS version number (e.g.,20). For the latest current release, replaceNODE_MAJORwith21(or whatever the latest current version is).
bash

curl -fsSL https://deb.nodesource.com/setup_NODE_MAJOR.x | sudo -E bash -

# Example for Node.js 20.x LTS:

# curl -fsSL https://deb.nodesource.com/setup_20.x | sudo -E bash -
This command downloads and executes a script that configures your APT sources to point to the NodeSource repository. - Install Node.js and npm:
bash

sudo apt install nodejs
This command will install both Node.js and npm.
On Red Hat/CentOS/Fedora-based Systems (using dnf or yum)
Similar to Debian/Ubuntu, Node.js packages might be available in official repositories but could be outdated. For recent versions, using the official NodeSource repository is the preferred approach.
- Install
curl(if not already present):
bash

sudo yum install curl  # For CentOS/RHEL 7

sudo dnf install curl  # For Fedora, CentOS/RHEL 8+
- Add the NodeSource repository:
Again, choose your desired Node.js version (e.g.,20for LTS,21for current).
bash

curl -fsSL https://rpm.nodesource.com/setup_NODE_MAJOR.x | sudo -E bash -

# Example for Node.js 20.x LTS:

# curl -fsSL https://rpm.nodesource.com/setup_20.x | sudo -E bash -
This script adds the NodeSource repository to your system. - Install Node.js and npm:
bash

sudo yum install nodejs  # For CentOS/RHEL 7

sudo dnf install nodejs  # For Fedora, CentOS/RHEL 8+
Method 2: Leveraging Node Version Manager (NVM) for Flexibility
For developers who work on multiple projects that might require different Node.js versions, or those who simply want more control over their Node.js environment, Node Version Manager (NVM) is an invaluable tool. NVM allows you to install and manage multiple Node.js versions on a single machine, switching between them with ease. This method is highly recommended for development environments.
- Install NVM:
You can install NVM by fetching its installation script from its GitHub repository usingcurlorwget.
bash

curl -o- https://raw.githubusercontent.com/nvm-sh/nvm/v0.39.7/install.sh | bash

# Or using wget:

# wget -qO- https://raw.githubusercontent.com/nvm-sh/nvm/v0.39.7/install.sh | bash
Note: Always check the NVM GitHub page for the latest stable version (v0.39.7in this example might be outdated by the time you read this).
The script clones the NVM repository to~/.nvmand adds the necessary lines to your shell’s profile file (~/.bashrc,~/.zshrc, or~/.profile) to load NVM on startup. - Verify NVM Installation:
After installation, close and reopen your terminal, or source your shell’s profile file:
bash

source ~/.bashrc  # Or ~/.zshrc, ~/.profile
Then, check if NVM is correctly installed:
bash

nvm --version
This should output the NVM version number. - Install Node.js using NVM:
Now you can install specific Node.js versions.- To install the latest LTS version:
bash

nvm install --lts
- To install the latest stable version:
bash

nvm install node
- To install a specific version (e.g., 18.17.0):
bash

nvm install 18.17.0
- To install the latest version of a major release (e.g., latest 18.x):
bash

nvm install 18
- To install the latest LTS version:
- Set a Default Node.js Version:
Once you’ve installed a version, you can set it as the default for new shells:
bash

nvm alias default 18.17.0 # Or whatever version you prefer
- Switch Between Versions:
To use a different installed version for your current shell:
bash

nvm use 16.20.0 # Example: switch to Node.js 16.20.0
- List Installed Versions:
See all Node.js versions installed via NVM:
bash

nvm ls
NVM is a powerful tool for maintaining a flexible and robust Node.js development environment, allowing you to easily adapt to various project requirements.
Method 3: Simplified Installation with Snap (Ubuntu/Snap-enabled systems)
Snap is a universal packaging system developed by Canonical (the creators of Ubuntu) that works across a range of Linux distributions. Snaps are self-contained applications that bundle all their dependencies, making them easy to install and manage. If you’re on Ubuntu 16.04+ or another Snap-enabled distribution, this can be a very straightforward installation method.

- Ensure Snapd is Installed:
Snapd, the daemon that manages snaps, is usually pre-installed on modern Ubuntu versions. If not, install it:
bash

sudo apt install snapd
- Install Node.js via Snap:
Node.js is available as a snap package. You can choose a specific channel for different Node.js versions.- To install the latest LTS version (e.g., 20/stable):
bash

sudo snap install node --channel=20/stable --classic
- To install a specific version (e.g., 18/stable):
bash

sudo snap install node --channel=18/stable --classic
The--classicflag is often required for development tools to allow broader file system access, which snaps normally restrict for security.
- To install the latest LTS version (e.g., 20/stable):
- Verify Installation:
bash

node -v

npm -v
While convenient, Snap installations might sometimes have slightly different directory structures or permission behaviors compared to native package manager or NVM installations, which might require minor adjustments in some build scripts. However, for most users, it offers a quick and easy way to get Node.js running.
Method 4: Manual Installation from Binary Files
This method involves downloading the pre-compiled Node.js binary files and placing them in a directory within your system’s PATH. This approach is generally recommended for advanced users, specific server configurations, or when you need a version not available through other methods.
- Download Node.js Binaries:
Visit the official Node.js website (nodejs.org) and navigate to the “Downloads” section. Locate the Linux Binaries (.tar.xzfile) for your system architecture (e.g.,x64). Copy the download link. - Download using
wget(orcurl):
Replace the URL with the actual download link for the version you want.
bash

cd /tmp

wget https://nodejs.org/dist/vXX.YY.Z/node-vXX.YY.Z-linux-x64.tar.xz

# Example: wget https://nodejs.org/dist/v20.10.0/node-v20.10.0-linux-x64.tar.xz
- Extract the Archive:
bash

tar -xvf node-vXX.YY.Z-linux-x64.tar.xz
- Move to a System Path:
You can move the extracted directory to/usr/localor/opt. This example uses/usr/local.
bash

sudo mv node-vXX.YY.Z-linux-x64 /usr/local/node-vXX.YY.Z
- Create Symbolic Links (Optional but Recommended):
To makenodeandnpmaccessible system-wide without modifying yourPATHenvironment variable (if/usr/local/binis already in yourPATH), create symbolic links:
bash

sudo ln -s /usr/local/node-vXX.YY.Z/bin/node /usr/local/bin/node

sudo ln -s /usr/local/node-vXX.YY.Z/bin/npm /usr/local/bin/npm

# If using npx is desired:

sudo ln -s /usr/local/node-vXX.YY.Z/bin/npx /usr/local/bin/npx
Ensure that/usr/local/binis in your system’sPATH. Most Linux distributions include it by default.
This manual method gives you granular control but requires more attention to directory management and PATH configuration.
Verifying Your Node.js Installation and Next Steps
Regardless of the method you choose, the crucial final step is to verify that Node.js and npm are correctly installed and accessible from your terminal.
Confirming Node.js and npm Versions
Open a new terminal window or tab (to ensure any PATH changes are loaded) and execute the following commands:
node -v
npm -v
You should see the version numbers printed for both Node.js and npm. If you encounter “command not found” errors, revisit the installation steps, paying close attention to PATH configurations (especially for NVM or manual installations) and ensuring no errors occurred during package manager operations.
A successful output might look something like this:
v20.10.0
10.2.3
Running Your First Node.js Application
To confirm everything is working, let’s create a simple Node.js script.
- Create a file:
bash

nano hello.js
(Or your preferred text editor likevi,gedit, orcode) - Add the following code:
javascript

console.log("Hello from Node.js on Linux!");
- Save and exit the editor.
- Run the script:
bash

node hello.js
You should see the output: Hello from Node.js on Linux!. Congratulations, you have successfully installed Node.js and run your first application on Linux!
Troubleshooting Common Node.js Installation Issues
Even with careful execution, sometimes issues can arise during software installation. Here are some common problems and their solutions when installing Node.js on Linux.
Permission Errors
If you encounter EACCES errors (permission denied) when trying to install global npm packages (npm install -g <package>), it typically means npm doesn’t have the necessary write permissions to the global installation directory.
Solutions:
- Use NVM: This is the recommended solution. NVM installs Node.js and global packages into your user’s home directory, avoiding
sudofor global package installations. - Change npm’s default directory: You can configure npm to install global packages in a user-owned directory. This is safer than modifying permissions for system directories.
bash

mkdir ~/.npm-global

npm config set prefix '~/.npm-global'
Then, add~/.npm-global/binto yourPATHenvironment variable by adding the following line to your~/.profileor~/.bashrcfile:
bash

export PATH=~/.npm-global/bin:$PATH
After editing, runsource ~/.profile(or~/.bashrc) and try installing global packages withoutsudo. - Install with
sudo(least recommended): Whilesudo npm install -g <package>might work, it’s generally discouraged due to potential security risks and permission inconsistencies.
Version Conflicts
Running multiple Node.js versions can lead to conflicts if not managed properly. This is especially true if you have installed Node.js via both a package manager and NVM.
Solution:
- Prioritize NVM: If you use NVM, ensure that NVM’s path comes before any system-wide Node.js installations in your
PATHenvironment variable. NVM usually handles this automatically. - Remove System-wide Installations: If you primarily use NVM, consider uninstalling any system-wide Node.js installations to prevent confusion.
- For
apt:sudo apt remove nodejs && sudo apt autoremove - For
dnf/yum:sudo dnf remove nodejs && sudo dnf autoremove
- For
Outdated Packages
If you’re stuck with an older version of Node.js or npm from your distribution’s default repositories, you might miss out on new features or security patches.
Solutions:
- Use NodeSource repositories: As demonstrated in Method 1, NodeSource provides up-to-date packages for major Linux distributions.
- Use NVM: NVM allows you to install and switch to the latest stable or LTS versions easily.
- Regularly update npm: Even if your Node.js version is fixed, you can often update npm independently:
bash

npm install -g npm@latest
By understanding these common pitfalls, you can quickly diagnose and resolve most Node.js installation issues, ensuring a smooth development workflow.
Conclusion: Empowering Your Linux Development Environment
Installing Node.js on Linux is a foundational step for any developer looking to leverage the power of JavaScript for server-side applications, real-time services, or command-line tools. Whether you opt for the simplicity of system package managers, the flexibility of NVM, the convenience of Snap, or the granular control of manual binary installation, each method provides a robust pathway to integrating Node.js into your development toolkit.
With Node.js and its extensive npm ecosystem at your fingertips, your Linux machine transforms into a powerful environment capable of building modern, scalable, and high-performance applications. Embrace the journey, experiment with different tools, and unlock new possibilities in the ever-evolving landscape of technology. Your next great project awaits!
aViewFromTheCave is a participant in the Amazon Services LLC Associates Program, an affiliate advertising program designed to provide a means for sites to earn advertising fees by advertising and linking to Amazon.com. Amazon, the Amazon logo, AmazonSupply, and the AmazonSupply logo are trademarks of Amazon.com, Inc. or its affiliates. As an Amazon Associate we earn affiliate commissions from qualifying purchases.