For aspiring game developers and creators on the Windows operating system, Roblox Studio is an indispensable tool. It’s the platform where imagination takes flight, allowing users to design, build, and publish their own interactive experiences within the vast Roblox universe. However, a common hurdle for many users, especially those with limited primary storage (typically the C: drive), is managing installation locations. This article delves into the straightforward yet crucial process of installing Roblox Studio on an alternative drive, specifically the D: drive. This is a practical solution that not only conserves space on your system drive but can also contribute to better organization and potentially faster loading times for your projects, especially if your D: drive is a solid-state drive (SSD).
The primary motivation behind wanting to install applications on a drive other than the default C: drive often boils down to storage management. Modern operating systems and applications can consume a significant amount of space. By strategically placing larger programs, like Roblox Studio, on a secondary drive, users can ensure their C: drive remains lean, which is often beneficial for overall system performance. This is particularly relevant for users who have a smaller SSD as their boot drive and a larger, perhaps traditional hard disk drive (HDD) or another SSD, designated as their D: drive for storing data and applications.
This guide will walk you through the entire process, from understanding the prerequisites to executing the installation with precision. We will cover how to locate and download the Roblox Studio installer, how to navigate the installation wizard to select your desired drive, and what to do if you encounter any common issues. Our aim is to provide a comprehensive tutorial that empowers you to successfully set up Roblox Studio on your D: drive, enabling you to jump into the world of game development without storage concerns.
Understanding the Benefits of Installing on the D: Drive
Before we dive into the “how-to,” it’s essential to understand why installing Roblox Studio on your D: drive is a wise decision for many users. This strategic choice offers several advantages that contribute to a smoother and more efficient user experience.
Storage Space Optimization
The most immediate and apparent benefit is the preservation of space on your primary C: drive. Your C: drive is typically where your operating system, essential system files, and most installed applications reside. Over time, as you download software, install updates, and create files, this drive can become quite full. A cluttered C: drive can lead to slower system boot times, reduced performance for applications, and even errors. By installing Roblox Studio, which can be a substantial application, onto your D: drive, you effectively offload a significant chunk of data, keeping your C: drive more agile. This is especially crucial for users with Solid State Drives (SSDs) as their C: drive, as SSDs have a finite amount of write cycles, and keeping them less full can potentially extend their lifespan, although modern SSDs are very robust.
Potential Performance Enhancements
If your D: drive is a faster storage device, such as an SSD, compared to your C: drive (perhaps you have a smaller SSD for the OS and a larger HDD for data), then installing Roblox Studio on the D: drive can lead to tangible performance improvements. Applications installed on faster drives generally load quicker, and their associated assets and project files can be accessed with lower latency. For a development tool like Roblox Studio, where you’ll be loading large project files, working with numerous assets, and potentially running simulations, faster I/O operations can translate into a more responsive development environment. Even if both drives are SSDs, distributing the load can sometimes prevent bottlenecks.
Better Organization and Data Management
Having a dedicated drive for larger applications, games, or creative tools like Roblox Studio can significantly improve your computer’s organization. You can establish a clear hierarchy: C: for the operating system and essential programs, and D: for your extensive software library and user-generated content. This makes it easier to back up your important applications and data, as you can focus on backing up the contents of your D: drive without having to sift through numerous system folders on C:. Furthermore, if you ever need to reinstall your operating system or replace your C: drive, your Roblox Studio installation and all your projects on the D: drive will remain untouched and readily accessible, minimizing downtime and data loss.
Flexibility for System Upgrades and Reinstalls
In the unfortunate event that you need to perform a clean installation of Windows or upgrade your operating system, having your applications on a separate drive like D: simplifies the process immensely. You won’t need to reinstall every single application from scratch. After re-establishing your operating system on the C: drive, you can simply point your existing applications to their installation directories on the D: drive, or in the case of some applications that don’t offer explicit relocation options, you might need to uninstall and reinstall them, but at least your project files are safe. For Roblox Studio, while it typically installs to a default user directory, the ability to manage its location offers an advantage in such scenarios.
Prerequisites and Initial Steps
Before you embark on the installation journey, it’s essential to ensure you have everything in place. This section outlines the necessary preparations and the very first steps you’ll take to get Roblox Studio ready for installation on your D: drive.
Checking Your D: Drive
The first and most critical prerequisite is to ensure your D: drive is properly formatted and accessible.
- Verify Drive Existence: Open File Explorer (Windows Explorer) and navigate to “This PC.” You should see your D: drive listed among your storage devices. If it’s not present, you may need to initialize and format it through Disk Management in Windows.
- Sufficient Space: While Roblox Studio might not be the largest application in the world, it’s always good practice to have ample free space on your D: drive. We recommend at least 10-20 GB of free space to comfortably accommodate the application, its future updates, and the projects you’ll create within it. Running out of space during installation can lead to errors and corruption.
- Drive Type (SSD vs. HDD): As mentioned earlier, if your D: drive is an SSD, you’re in for a treat regarding performance. If it’s an HDD, you’ll still benefit from storage space optimization, but the performance gains might be less pronounced.
Downloading the Official Roblox Studio Installer
It’s paramount to download Roblox Studio only from the official Roblox website to ensure you’re getting a legitimate, safe, and up-to-date version of the software.
- Navigate to the Roblox Website: Open your preferred web browser and go to the official Roblox website (www.roblox.com).
- Log In or Create an Account: You’ll need to log in to your existing Roblox account or create a new one if you don’t have an account yet. This account is essential for accessing Roblox Studio and publishing your creations.
- Access the Create Page: Once logged in, look for an option to “Create” or “Develop.” This is usually found in the main navigation menu or within your profile settings. Clicking this will typically redirect you to the Roblox Studio download page.
- Download the Installer: On the Roblox Studio download page, you will find a button to download the application. Click this button. The installer (usually a small
.exefile) will be downloaded to your computer, typically to your “Downloads” folder.
Understanding the Default Installation Path (and why we’re changing it)
By default, most Windows applications, including Roblox Studio, are designed to install to a specific folder within your user profile on the C: drive. For Roblox Studio, this often looks something like:
C:Users[Your Username]AppDataLocalRobloxVersions
This default path is convenient for quick installations but is precisely what we want to bypass to utilize our D: drive. The Roblox Studio installer itself doesn’t always provide a direct option to change the installation directory during the initial setup. This is a common characteristic of many applications that are deeply integrated with the Windows user environment. Therefore, our strategy will involve utilizing a specific feature or a common workaround to redirect the installation.
Installing Roblox Studio on Your D: Drive
Now that we’ve prepared our system and downloaded the necessary installer, we can proceed with the installation process. The key here is to intercept the default installation path and redirect it to your D: drive.
The Installation Wizard and Drive Selection

The Roblox Studio installer is designed to be user-friendly. When you run the downloaded .exe file, a setup wizard will appear.
- Run the Installer: Locate the downloaded Roblox Studio installer file (e.g.,
RobloxStudioInstaller.exe) in your Downloads folder and double-click it to launch the installation wizard. - Initial Setup Steps: You will likely see a welcome screen and an “Install Now” or “Next” button. Click through these initial screens.
- The Crucial Step: Choosing the Installation Directory: This is where most applications offer a “Browse” or “Change Directory” option. However, Roblox Studio’s installer might be more streamlined and not immediately present this option in a prominent way. Instead, it might proceed with a default download and installation.
The “Move” or “Change Installation Location” Strategy
Since Roblox Studio’s installer doesn’t always offer an explicit choice of installation directory during the initial setup, we need to employ a slightly different approach. The most common and effective method involves allowing the initial installation to proceed to its default location (which might be temporary or a stub installer) and then using a feature provided by Roblox or Windows to relocate the installed application.
Important Note: Roblox has historically made it somewhat challenging to directly change the installation directory during the initial setup of Roblox Studio. Some users resort to manual file copying and registry editing, which is not recommended due to the risk of breaking the application or your system.
However, a more robust and often supported method involves the following steps, which assume that the initial download places files in a location that can be managed:
- Allow Initial Installation: Run the installer and let it complete its initial download and installation process. It’s likely to install in a default location on your C: drive. Don’t be alarmed if it seems to install quickly, as it might be downloading the full application data in the background.
- Locate Roblox Studio: Once the installation is seemingly complete, find the Roblox Studio application. You can usually find a shortcut on your Desktop or in your Start Menu.
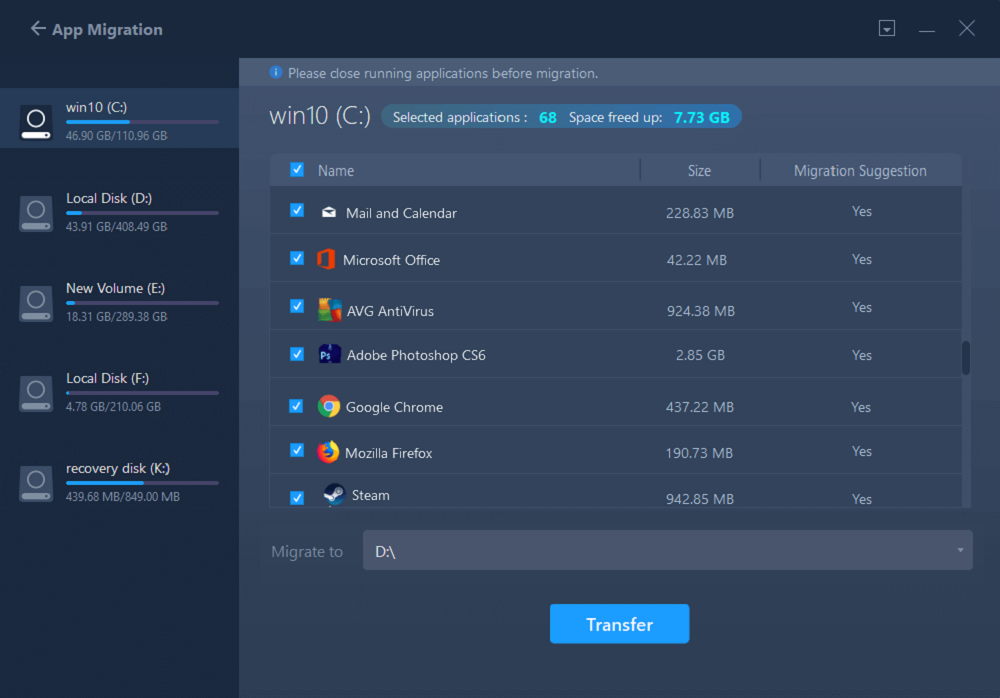
- Look for a “Move” Option (If Available): Some applications, when installed via the Microsoft Store or certain newer installers, offer a built-in “Move” option within Windows’s application settings. To check this:
- Go to Settings > Apps > Apps & features.
- Find “Roblox Studio” in the list.
- Click on it, and if the “Move” button is enabled, click it.
- A dialog box will appear allowing you to select your D: drive. Choose your D: drive and confirm the move.
- Windows will then transfer the application files to the selected drive.
What if the “Move” option is disabled or not present?
This is a common scenario for Roblox Studio. In such cases, a more manual, yet still relatively safe, method is often employed, which involves:
- Uninstalling Roblox Studio: The simplest way to achieve a new installation location is to first uninstall Roblox Studio from your C: drive.
- Go to Settings > Apps > Apps & features.
- Find “Roblox Studio” and click “Uninstall.”
- Re-running the Installer and Utilizing User-Specific Paths: After uninstalling, re-download the Roblox Studio installer from the official Roblox website.
- When you run the installer, pay close attention to any prompts. Roblox Studio, when installed for a specific user, often installs within the user’s profile folders. The installer itself might not give you a direct choice for the parent directory.
- Crucially, Roblox Studio installations are often tied to your user profile and Roblox account. The installer is designed to place the necessary files in user-specific directories. While you can’t typically choose a top-level installation directory like “D:Roblox Studio”, the Roblox client (which Roblox Studio is part of) is designed to manage its files in a way that can be influenced by where the user data is stored.
A more advanced, but generally successful approach for older versions or specific configurations:
Some users have had success by:
-
Installing to the default C: drive location.
-
Manually copying the entire “Roblox” folder (or its relevant subfolders like “Versions”) from
AppDataLocaltoD:Program FilesRobloxor a similar designated location. -
Then, using symbolic links (mklink command in Command Prompt) to trick Windows into thinking the folder is still in its original C: drive location while the actual files reside on the D: drive.
- Example:
- Open Command Prompt as Administrator.
mklink /D "C:Users[Your Username]AppDataLocalRoblox" "D:Roblox"(This command creates a symbolic link from the C: drive path to your D: drive path).
This symbolic link method is powerful but requires caution. It’s a more advanced technique and if done incorrectly, can lead to issues. We are presenting this as a common workaround users have employed, but the built-in “Move” feature in Windows Settings is the safest and most recommended method if available.
- Example:
Recommendation: Always try the Windows “Settings > Apps > Apps & features > Move” option first. If it’s not available, and you’re comfortable with command-line tools, the symbolic link method can be effective. If not, then accepting the default installation on C: and managing space through other means might be the most straightforward path.
Post-Installation Verification
Once the installation or move process is complete, it’s vital to verify that Roblox Studio is functioning correctly from its new location.
- Launch Roblox Studio: Find the Roblox Studio shortcut on your desktop or in your Start Menu and launch it.
- Log In: You will be prompted to log in to your Roblox account.
- Check Project Creation: Try creating a new project or opening an existing one. Ensure that assets load correctly and that there are no immediate errors.
- Verify Installation Location (Optional): You can revisit Settings > Apps > Apps & features, click on Roblox Studio, and check the listed installation location. If you used the “Move” feature, it should now indicate your D: drive.
Troubleshooting Common Installation Issues
Despite best efforts, sometimes installations don’t go as smoothly as planned. Here are some common issues you might encounter and how to address them when trying to install Roblox Studio on your D: drive.
Installation Fails or Gets Stuck
- Insufficient Disk Space: Double-check that your D: drive has enough free space. Even if you have plenty of space, temporary files generated during installation can also require significant room.
- Corrupted Installer: If the download was interrupted or incomplete, the installer file might be corrupted. Delete the downloaded installer and download a fresh copy from the official Roblox website.
- Antivirus Interference: Aggressive antivirus software can sometimes mistake installation processes for malicious activity and block them. Temporarily disable your antivirus (remember to re-enable it afterward) and try the installation again.
- Administrator Privileges: Ensure you are running the installer with administrator privileges. Right-click the installer file and select “Run as administrator.”
Roblox Studio Doesn’t Launch or Crashes
- Incomplete Installation: The installation might not have completed fully, or some files might be missing. Try uninstalling Roblox Studio and reinstalling it, paying close attention to the process.
- Driver Issues: Outdated graphics drivers can cause applications like Roblox Studio to crash. Ensure your graphics card drivers are up to date by visiting the manufacturer’s website (NVIDIA, AMD, Intel).
- Conflicting Software: Other applications running in the background might conflict with Roblox Studio. Close any unnecessary programs before launching Roblox Studio.
- User Profile Corruption: In rare cases, your Windows user profile might be corrupted. You might consider creating a new user account on your computer and trying to install Roblox Studio there.
Cannot Find the “Move” Option in Settings
As discussed, this is a common scenario for Roblox Studio. If the “Move” option is greyed out or absent, it means Windows doesn’t recognize Roblox Studio as an application that can be moved through the standard settings interface. In this situation, you will likely need to:
- Uninstall Roblox Studio.
- Re-download the installer.
- Accept the default installation location on your C: drive during the initial setup.
- If you are determined to have it on your D: drive, consider the more advanced symbolic linking method (mklink command), but only if you are comfortable with command-line operations and understand the risks involved.
By following these steps and troubleshooting tips, you should be able to successfully install Roblox Studio on your D: drive, optimizing your system’s storage and potentially improving your game development workflow. Happy creating!
aViewFromTheCave is a participant in the Amazon Services LLC Associates Program, an affiliate advertising program designed to provide a means for sites to earn advertising fees by advertising and linking to Amazon.com. Amazon, the Amazon logo, AmazonSupply, and the AmazonSupply logo are trademarks of Amazon.com, Inc. or its affiliates. As an Amazon Associate we earn affiliate commissions from qualifying purchases.