In the rapidly evolving landscape of technology, robust and reliable database management systems are the backbone of countless applications, data analysis initiatives, and digital infrastructures. Among the pantheon of powerful databases, PostgreSQL stands out as an open-source, object-relational database system renowned for its stability, feature richness, and extensibility. For Windows users, integrating such a sophisticated tool might seem daunting, but with the right guidance, the installation process is straightforward. This comprehensive guide is tailored to walk you through every step of installing PostgreSQL on your Windows machine, ensuring you can harness its full potential for your development projects, data management tasks, or educational pursuits.
Whether you’re building a cutting-edge web application, delving into complex data analytics, or simply exploring the capabilities of a world-class database, having PostgreSQL properly set up is your first crucial step. We’ll cover everything from understanding its core value to navigating the installer and verifying your setup, empowering you to integrate this vital piece of technology into your workflow seamlessly.
Understanding PostgreSQL: Why It Matters for Your Windows Environment
Before diving into the mechanics of installation, it’s essential to grasp what PostgreSQL is and why it has garnered such widespread acclaim in the technology world. Its reputation isn’t just hearsay; it’s built on a foundation of features that make it a top choice for professionals and hobbyists alike.
What is PostgreSQL?
PostgreSQL, often simply referred to as Postgres, is an advanced open-source object-relational database management system (ORDBMS). Unlike many other relational databases, PostgreSQL offers a unique blend of traditional relational database features with object-oriented capabilities, allowing for more complex data types and queries. It adheres strictly to SQL standards, ensuring broad compatibility, and supports a vast array of advanced features such as foreign keys, joins, views, triggers, and stored procedures.
Its open-source nature means it’s free to use, modify, and distribute, fostering a vibrant community that continuously contributes to its development and improvement. This community support also translates into extensive documentation and readily available help, making it an excellent choice for individuals and enterprises seeking both powerful and cost-effective database solutions.
Key Features and Benefits
The reasons for PostgreSQL’s popularity are multifaceted, stemming from a core set of features that prioritize data integrity, flexibility, and performance:
- Robustness and Reliability: PostgreSQL boasts an incredibly stable and mature codebase, developed over three decades. It’s known for its transactional integrity (ACID compliance) and its ability to handle very large data sets and high concurrency without compromising performance or data consistency.
- Extensibility: One of PostgreSQL’s most compelling features is its extensibility. Users can define their own data types, index types, function languages, and even foreign data wrappers to connect to other databases or data sources. This modularity allows developers to tailor the database precisely to their application’s needs, a rarity among database systems.
- Advanced Data Types: Beyond standard numeric and string types, PostgreSQL supports a rich set of advanced data types, including JSON/JSONB for NoSQL-like document storage, HSTORE for key-value pairs, range types, arrays, network addresses, and geometric types. This flexibility makes it suitable for diverse application requirements, from web analytics to geospatial data processing.
- Concurrency Control (MVCC): PostgreSQL utilizes Multi-Version Concurrency Control (MVCC), which allows multiple users to access and modify the database simultaneously without locking conflicts, significantly improving performance and throughput in high-transaction environments.
- Security Features: With robust authentication methods (including password, Kerberos, SSL, and GSSAPI) and granular access control mechanisms, PostgreSQL provides comprehensive security to protect sensitive data.
- Open-Source Advantage: Being open-source eliminates licensing costs, making it a highly attractive option for startups, small businesses, and large corporations looking to optimize their tech budgets. The transparency of its code also enhances trust and allows for community-driven security audits and improvements.
Use Cases
Given its versatile feature set, PostgreSQL finds applications across a broad spectrum of industries and use cases:
- Web Applications: It’s a popular choice for web development frameworks like Django (Python), Ruby on Rails, Node.js (with various ORMs), and PHP, forming the backbone for dynamic and data-intensive websites.
- Data Warehousing and Analytics: Its ability to handle complex queries, large data volumes, and support for analytical functions makes it suitable for data warehousing, business intelligence, and scientific data analysis.
- Geospatial Data (PostGIS): With the PostGIS extension, PostgreSQL becomes a powerful spatial database, capable of storing, querying, and analyzing geographic information systems (GIS) data, making it invaluable for mapping, location-based services, and environmental modeling.
- Financial Applications: The strong ACID compliance and data integrity features make it a reliable choice for financial systems where data accuracy is paramount.
- Research and Academic Projects: Its open-source nature and extensibility make it an ideal platform for academic research, prototyping, and educational purposes.
By choosing PostgreSQL for your Windows environment, you’re not just installing a database; you’re adopting a powerful, flexible, and future-proof tool that can significantly enhance your technological capabilities.
Preparing for Installation: Pre-requisites and Download
With a clear understanding of PostgreSQL’s value proposition, the next logical step is to prepare your Windows system for its arrival. This involves ensuring your system meets basic requirements and, crucially, downloading the correct installer.
System Requirements
Fortunately, PostgreSQL is relatively light on system resources for typical development or small-scale production use. The primary requirements include:
- Operating System: Modern versions of Windows (Windows 10, Windows 11, Windows Server 2016 and later) are fully supported.
- Processor: A reasonably modern x86 or x64 processor.
- RAM: While 2GB is often sufficient for basic use, 4GB or more is recommended for better performance, especially when dealing with larger databases or multiple concurrent connections.
- Disk Space: Around 500MB to 1GB for the initial installation files and a small database. However, plan for significantly more if you anticipate storing large amounts of data. Databases grow, so ensure you have ample free space on the drive where you intend to store your data directories.
- Network Port: PostgreSQL defaults to using port
5432. Ensure this port is not already in use by another application if you plan to stick with the default.
Downloading the PostgreSQL Installer
The most common and recommended way to install PostgreSQL on Windows is by using the graphical installer provided by EnterpriseDB (EDB), which is available directly from the official PostgreSQL website. This installer bundles the PostgreSQL server, pgAdmin (a popular graphical administration tool), Stack Builder (for installing additional drivers and tools), and command-line utilities.
- Navigate to the Official PostgreSQL Website: Open your web browser and go to
www.postgresql.org. - Locate the Downloads Section: Click on the “Download” link in the main navigation.
- Select Windows: On the download page, choose the “Windows” option.
- Download the Installer: You will typically be directed to a page with a link to download the EDB installer. Select the latest stable version of PostgreSQL for your Windows operating system (e.g., “Windows x86-64” for 64-bit systems). It’s generally advisable to download the latest stable release to benefit from the newest features, performance improvements, and security patches.
- Save the Installer: Save the executable file (
.exe) to a location on your computer where you can easily find it, such as your “Downloads” folder.
Having the installer ready is the last piece of preparation. Now, you’re ready to execute the installation process itself.
Step-by-Step Installation Process on Windows
The EDB graphical installer for PostgreSQL on Windows is designed to be user-friendly, guiding you through each stage with clear prompts. Follow these steps meticulously to ensure a smooth installation.
Running the Installer and Initial Setup
- Launch the Installer: Locate the downloaded
.exefile and double-click it. You might be prompted by User Account Control (UAC) to allow the app to make changes to your device; click “Yes.” - Welcome Screen: The PostgreSQL Setup Wizard will appear. Click “Next” to proceed.
- Installation Directory: The installer will ask you to choose an installation directory. The default path, typically
C:Program FilesPostgreSQL<version>, is generally suitable. Unless you have specific reasons, it’s recommended to stick with the default. Click “Next.”
Selecting Components
This is a crucial step where you decide which components of the PostgreSQL ecosystem you want to install.
- PostgreSQL Server: This is the core database server itself. This must be selected.
- pgAdmin 4: A powerful, open-source graphical administration tool for PostgreSQL. It provides a web-based interface for managing databases, tables, users, and running SQL queries. Highly recommended for ease of use.
- Stack Builder: A utility to download and install additional tools, drivers, and extensions for PostgreSQL after the main installation is complete. Recommended, as it’s useful for future expansions.
- Command Line Tools: Includes
psql(the interactive terminal for PostgreSQL),pg_dump(for backups), and other utilities that allow you to interact with the database from the command prompt. Essential for developers and highly recommended.
For most users, selecting all four components is the best approach to get a fully functional and well-equipped PostgreSQL environment. Click “Next.”
Configuring the Data Directory and Database Superuser
This section involves setting up where your database files will be stored and configuring the crucial database superuser.

- Data Directory: You’ll be asked to choose a data directory, which is where all your databases, tables, and other data files will reside. The default path, often
C:Program FilesPostgreSQL<version>data, is typically fine. However, for production environments or systems with dedicated data drives, you might want to choose a different location (e.g.,D:PostgreSQLData). Ensure the chosen directory has enough free space and appropriate permissions. Click “Next.” - Password for the Superuser (postgres): This is one of the most critical steps. You need to set a strong password for the default database superuser, named
postgres. This user has full administrative privileges over all databases.- Choose a strong, memorable password. It’s crucial for security.
- Do not forget this password. You will need it to connect to your PostgreSQL server, especially from
pgAdminorpsql. - Enter the password in both fields and click “Next.”
- Port Number: PostgreSQL listens for connections on a specific network port. The default port is
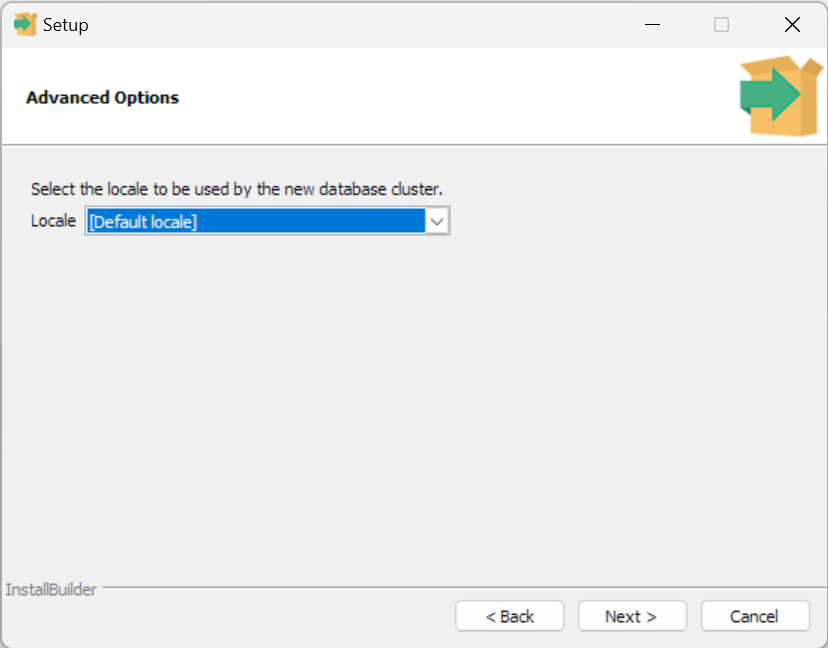
5432. It’s generally recommended to stick with this default unless you have a specific reason (e.g., another PostgreSQL instance or application already using5432). If you change it, remember the new port number. Click “Next.” - Advanced Options (Locale): This setting determines the default locale for new databases, affecting things like character sets, sorting order, and number formatting. The default setting, usually “Default locale” (which uses your operating system’s locale), is suitable for most users. If you have specific internationalization requirements, you can select a different locale from the dropdown. Click “Next.”
Finalizing the Installation
- Pre-Installation Summary: The installer will present a summary of your chosen settings. Review them carefully to ensure everything is correct. If you need to make changes, you can go “Back.” If satisfied, click “Next.”
- Installation Begins: The installer will now proceed to copy files, create directories, and configure the PostgreSQL server. This process can take several minutes.
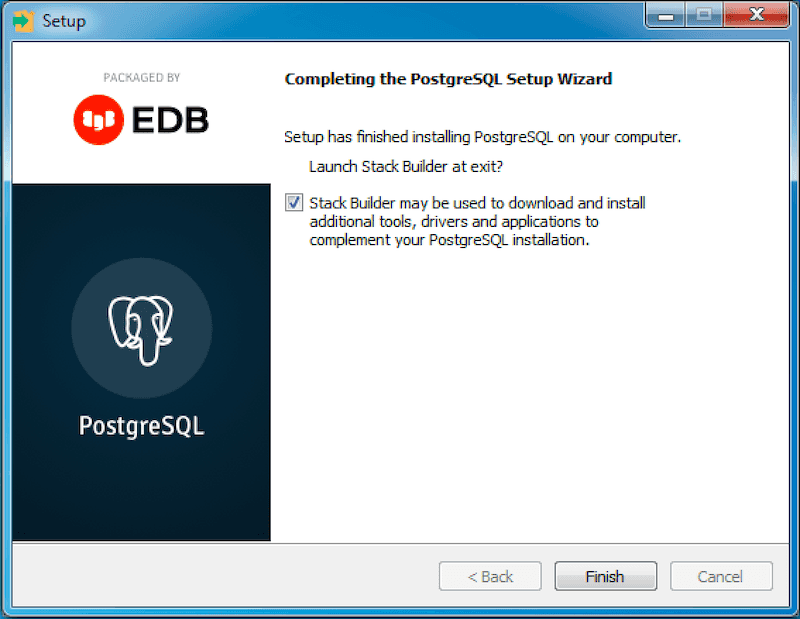
- Completion: Once the installation is complete, a final screen will appear. You might see a checkbox labeled “Launch Stack Builder at exit.” It’s generally a good idea to leave this checked if you intend to install additional components (like database drivers or specific extensions) immediately. Click “Finish.”
Congratulations! PostgreSQL is now installed on your Windows machine. The next steps involve verifying the installation and performing initial configurations.
Post-Installation Configuration and Verification
Installing the software is only half the battle. To truly leverage PostgreSQL, you need to ensure it’s running correctly, know how to connect to it, and potentially install additional tools.
Utilizing Stack Builder for Additional Tools
If you left “Launch Stack Builder at exit” checked, Stack Builder will open automatically. If not, you can find it in your Start Menu under the PostgreSQL program group.
- Select Installation: In Stack Builder, select your PostgreSQL installation from the dropdown list and click “Next.”
- Choose Categories: Stack Builder categorizes available applications. Common installations include database drivers (like
psqlODBCorNpgsqlfor .NET) or extensions. For example, if you plan to connect to PostgreSQL from Python, you might need a specific driver. - Download and Install: Select the components you wish to install, click “Next,” and Stack Builder will guide you through the download and installation of these additional tools. You may need to accept licenses and choose installation directories for these components as well.
- Finish: Once all selected components are installed, click “Finish” to close Stack Builder.
Connecting to PostgreSQL via pgAdmin 4
pgAdmin 4 is the most popular graphical interface for managing PostgreSQL. It’s user-friendly and powerful.
- Launch pgAdmin 4: Find pgAdmin 4 in your Windows Start Menu under the “PostgreSQL” program group and launch it. It usually opens in your default web browser (or as a desktop application that uses browser technology).
- Master Password: The first time you run pgAdmin 4, it will ask you to set a master password. This password is for pgAdmin itself, not for your PostgreSQL server. It’s used to secure saved server passwords within pgAdmin. Set a strong password and remember it.
- Add a New Server:
- In the pgAdmin interface, under “Servers” in the left pane, right-click and choose “Register” > “Server…”.
- General Tab:
- Name: Give your server connection a descriptive name (e.g., “Local PostgreSQL 16”).
- Connection Tab:
- Host name/address:
localhost(since it’s installed on your machine) - Port:
5432(or the port you configured during installation) - Maintenance database:
postgres(default administrative database) - Username:
postgres(the superuser you created) - Password: Enter the password you set for the
postgressuperuser during the installation. Check “Save password?” for convenience, but be mindful of security implications on shared machines.
- Host name/address:
- Click “Save.”
- Verify Connection: If the connection is successful, your server will appear under “Servers” in the left pane. You can expand it to view databases, schemas, tables, and other objects, confirming that PostgreSQL is running and accessible.
Using psql Command Line Tool
For those who prefer the command line or need to script database interactions, psql is an invaluable tool.
- Open Command Prompt: Search for “cmd” in the Start Menu and open the Command Prompt.
- Navigate to psql Directory (Optional, but good for understanding): The
psqlexecutable is located in thebindirectory of your PostgreSQL installation (e.g.,C:Program FilesPostgreSQL<version>bin). If this directory is added to your system’s PATH environment variable (which the installer usually does), you can runpsqlfrom any directory. Otherwise, you’ll need to navigate there or provide the full path. - Connect to PostgreSQL: Type the following command and press Enter:
bash

psql -U postgres
This attempts to connect to thepostgresdatabase as thepostgresuser. - Enter Password: You’ll be prompted for the password of the
postgresuser. Enter the password you set during installation. - Verification: If successful, you’ll see a
postgres=#prompt, indicating you are connected to the database. You can now execute SQL commands. For example, typelto list all databases, orqto exit.
Verifying PostgreSQL Service Status
PostgreSQL runs as a Windows service. You can check its status to ensure it’s running in the background.
- Open Services: Search for “Services” in the Windows Start Menu and open the “Services” desktop app.
- Locate PostgreSQL: Scroll down to find services starting with “postgresql-x64-
” (e.g., postgresql-x64-16). - Check Status: Ensure its “Status” column shows “Running” and its “Startup Type” is “Automatic.” If it’s not running, you can right-click and select “Start.” This confirms that your PostgreSQL server is active and will start automatically with Windows.
Troubleshooting Common Installation Issues
Even with a comprehensive guide, minor hitches can occur. Here are some common issues and their solutions to help you get back on track.
Port Conflicts
Symptom: The installer fails during the “Initializing database cluster” phase, or PostgreSQL service fails to start, with messages indicating the port is already in use.
Cause: Another application (like a previously installed database, a web server, or even another PostgreSQL instance) is already using port 5432.
Solution:
- Identify the conflicting process: Open Command Prompt as Administrator and run
netstat -ano | findstr :5432. This will show you the process ID (PID) using that port. You can then check Task Manager to identify the application associated with that PID. - Change PostgreSQL port: Rerun the PostgreSQL installer and choose a different port number (e.g.,
5433). - Alternatively, stop the conflicting service/application: If the conflicting application is not essential or can be reconfigured, stop its service or change its port.
Firewall Blocking
Symptom: You cannot connect to PostgreSQL from another machine or even from your local machine using a hostname instead of localhost, but psql and pgAdmin work when connecting to localhost.
Cause: The Windows Firewall (or a third-party firewall) is blocking incoming connections to port 5432.
Solution:
- Add a Firewall Rule:
- Open “Windows Defender Firewall with Advanced Security” (search in Start Menu).
- In the left pane, select “Inbound Rules.”
- In the right pane, click “New Rule…”
- Choose “Port,” click “Next.”
- Select “TCP,” and in “Specific local ports,” type
5432(or your custom port). Click “Next.” - Select “Allow the connection,” click “Next.”
- Choose when the rule applies (e.g., “Domain,” “Private,” “Public”). For most local development, “Private” might suffice, but “Domain” is often needed in corporate settings. Click “Next.”
- Give the rule a name (e.g., “PostgreSQL Port 5432 Inbound”) and an optional description. Click “Finish.”
Permission Errors
Symptom: Installation fails, or the PostgreSQL service fails to start, with errors related to file access or directory permissions, especially for the data directory.
Cause: The user account running the installer or the PostgreSQL service doesn’t have sufficient permissions to create/write to the specified directories.
Solution:
- Run as Administrator: Ensure you run the PostgreSQL installer by right-clicking the
.exeand selecting “Run as administrator.” - Check Data Directory Permissions: If you chose a custom data directory, ensure the “NETWORK SERVICE” account (or the specific service account PostgreSQL is configured to run under) has full control over that directory.
- Right-click the data directory > “Properties” > “Security” tab.
- Click “Edit” > “Add.”
- Type
NETWORK SERVICE(or the appropriate service account name) and click “Check Names” then “OK.” - Grant “Full control” to this account and apply changes.
- Re-install: Sometimes, a clean re-installation after correcting permissions or running as administrator can resolve persistent issues.
Failed Services
Symptom: PostgreSQL service is installed but fails to start or stops unexpectedly.
Cause: Corruption during installation, incorrect configuration, or underlying system issues.
Solution:
- Check Event Viewer: Open “Event Viewer” (search in Start Menu), navigate to “Windows Logs” > “Application” and “System” logs. Look for errors related to “PostgreSQL” or “postgres” around the time the service failed. These logs often provide specific error codes or messages that can pinpoint the problem.
- Review PostgreSQL Logs: PostgreSQL maintains its own logs, usually located within the data directory in a
logsubdirectory (e.g.,C:Program FilesPostgreSQL<version>datalog). These logs offer detailed insights into server startup issues, configuration errors, and runtime problems. - Re-install: If logs are inconclusive and other troubleshooting steps fail, a complete uninstall (via “Add or Remove Programs”) followed by a fresh installation, ensuring to run the installer as administrator, is often the most effective solution.
By addressing these common issues, you can navigate potential roadblocks and ensure a successful PostgreSQL installation on your Windows system.
Conclusion
Successfully installing PostgreSQL on Windows marks a significant step in enhancing your technological toolkit. You’ve not only set up a world-class, open-source database system but also gained insight into its profound capabilities and the foundational steps required to integrate such a powerful tool into your development or data management workflow.
From understanding PostgreSQL’s robust features and diverse use cases to navigating the EDB installer’s options and performing vital post-installation checks with pgAdmin 4 and psql, you are now equipped with a fully functional and ready-to-use PostgreSQL environment. Remember the importance of secure password management and understanding your chosen data directories and port numbers, as these are critical for both security and seamless operation.
PostgreSQL’s role in modern technology stacks, from powering intricate web applications to driving complex data analytics, underscores its importance. As you embark on your journey with PostgreSQL, explore its extensive documentation, experiment with creating databases, tables, and performing queries, and consider leveraging its vast array of extensions. The vibrant PostgreSQL community and abundant online resources are excellent places to continue learning and expanding your expertise.
This comprehensive guide aims to provide a solid foundation, empowering you to confidently harness PostgreSQL’s power and contribute to the ever-evolving landscape of technology. Your Windows machine is now ready to become a hub for sophisticated data management and application development.
aViewFromTheCave is a participant in the Amazon Services LLC Associates Program, an affiliate advertising program designed to provide a means for sites to earn advertising fees by advertising and linking to Amazon.com. Amazon, the Amazon logo, AmazonSupply, and the AmazonSupply logo are trademarks of Amazon.com, Inc. or its affiliates. As an Amazon Associate we earn affiliate commissions from qualifying purchases.