
In the digital age, where visual communication reigns supreme, the humble font plays an unexpectedly pivotal role. For Mac users, whether you’re a seasoned graphic designer, a content creator building a personal brand, a small business owner crafting marketing materials, or simply someone who appreciates aesthetic precision in their documents, the ability to seamlessly install and manage new fonts is an indispensable skill. Beyond mere aesthetics, the right typeface can profoundly impact readability, convey brand personality, and even boost productivity by enhancing the professional polish of your work.
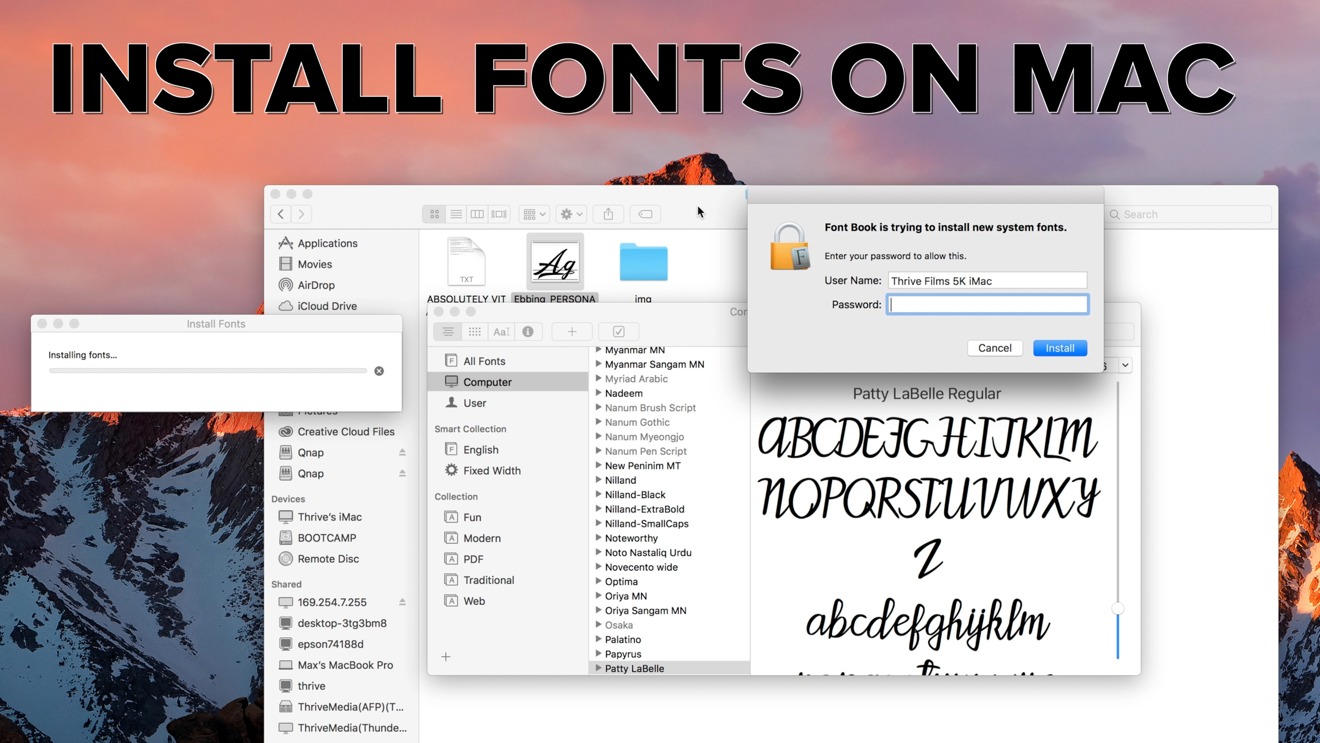
Our journey into the world of Mac font installation will demystify the process, transforming a potentially daunting task into a straightforward one. We’ll explore the underlying technology, delve into the robust built-in tools macOS provides, and touch upon advanced strategies for managing extensive font libraries. This guide is designed not just to show you how to install fonts, but to empower you with the knowledge to make informed choices, troubleshoot common issues, and harness the full creative potential that a diverse typographic palette offers – all within the familiar ecosystem of your Apple device.
From understanding different font file types to navigating the intuitive Font Book application, and even venturing into the realm of professional font management tools, we’ll cover every essential aspect. By the end of this article, you’ll not only be proficient in bringing new typefaces to your Mac but will also appreciate how this seemingly small technical detail can significantly contribute to your digital security, creative output, and overall brand presence in an increasingly visual world.
The Foundation: Understanding Font Formats and Sources
Before we dive into the nitty-gritty of installation, it’s crucial to understand what kind of font files you’ll be encountering and where to reliably source them. This foundational knowledge ensures you download compatible files and make responsible choices regarding licensing and quality.
Decoding Font File Types: TTF, OTF, and Beyond
When you download a font, it typically comes in one of a few common file formats. Understanding these formats is key to ensuring compatibility and leveraging their specific features:
-
TrueType Font (TTF): Developed by Apple in the late 1980s and later adopted by Microsoft, TTF has been a standard font format for decades. It’s widely supported across virtually all operating systems and applications. TTF fonts are known for their simplicity and widespread compatibility, making them a safe bet for most users. They contain all the necessary font data, including outlines and metrics, within a single file. For general use and ensuring a font displays correctly almost everywhere, TTF is often a go-to choice.
-
OpenType Font (OTF): Created jointly by Adobe and Microsoft, OTF is a more advanced and versatile font format that emerged as an evolution of TrueType. OTF fonts offer several advantages, particularly for professional designers. They can store more characters, support a wider range of linguistic features (like ligatures, small caps, alternate characters, and stylistic sets), and handle more complex typographic layouts. While they are backward compatible with TTF (meaning they’ll generally work in older software), their advanced features are best utilized in applications that fully support OpenType, such as Adobe Creative Suite programs, Microsoft Word (newer versions), and Apple’s Pages or Keynote. For those heavily invested in graphic design or advanced typography, OTF fonts often provide richer creative possibilities.
-
Web Open Font Format (WOFF/WOFF2): While not typically installed on your local machine for desktop use, WOFF and its successor WOFF2 are critical for web design. These formats are optimized for web performance, offering compression and faster loading times. If you’re building websites, you’ll encounter these, but for installing fonts on your Mac for applications like Word, Photoshop, or Pages, you’ll be focusing on TTF and OTF. Occasionally, font packages might include these for completeness, but they won’t be what you install into Font Book.
-
PostScript Type 1 Fonts: An older format, primarily used in professional publishing during the desktop publishing revolution. While still occasionally encountered, especially in legacy design files, Type 1 fonts are gradually being phased out and are not fully supported by newer macOS versions. If you encounter them, it’s often best to find a modern OTF or TTF equivalent for optimal compatibility and future-proofing.
Where to Discover Your Next Favorite Typeface: Free vs. Paid Sources
The world of fonts offers an incredible array of choices, from elegant serifs to modern sans-serifs, playful scripts, and bold display faces. Knowing where to find them, and understanding the implications of their licensing, is vital.
Free Font Sources:
Many excellent fonts are available for free, making them ideal for personal projects, budget-conscious individuals, or those experimenting with different styles. However, “free” doesn’t always mean “free for commercial use,” so always check the license.
- Google Fonts: An incredible resource for high-quality, open-source fonts. All fonts on Google Fonts are licensed under open licenses, meaning they are free to use for both personal and commercial projects. They are meticulously curated, often hinting-optimized for screen display, and come with a reliable reputation. It’s an ideal starting point for anyone looking for professional-grade free fonts.
- DaFont: One of the most popular archives of free downloadable fonts. DaFont offers an extensive collection, often featuring unique and stylistic typefaces submitted by designers. Crucially, each font listing clearly indicates its license (e.g., “100% Free,” “Free for personal use,” “Donationware”). Always check the license before using fonts from DaFont, especially for commercial ventures, to avoid potential copyright issues that could impact your brand.
- Font Squirrel: This site curates a collection of high-quality, free fonts that are specifically licensed for commercial use. Font Squirrel is an excellent resource if you need a reliable font for a business project without incurring costs. They also offer a useful “Webfont Generator” for optimizing fonts for web use.
- 1001 Free Fonts: Similar to DaFont, this site offers a vast collection of fonts, many of which are free for personal use. Again, always verify the license for commercial projects.
Paid (Commercial) Font Sources:
Investing in commercial fonts is often a worthwhile decision for businesses, professional designers, and anyone serious about their brand identity. Paid fonts typically come with comprehensive licensing, robust character sets, extensive weights and styles, and professional support. This is where “Brand Strategy” and “Corporate Identity” truly come into play, as unique, high-quality typography can differentiate a business.
- Adobe Fonts (Included with Creative Cloud): If you’re a subscriber to Adobe Creative Cloud, you have access to a vast library of high-quality fonts from leading type foundries. These fonts can be activated and synced directly from the Creative Cloud app or the Adobe Fonts website, making installation seamless across your Adobe applications. This is a massive benefit for “Productivity” and “Workflow” for anyone in the creative industries.
- MyFonts: One of the largest online retailers for commercial fonts. MyFonts hosts typefaces from hundreds of independent foundries and major publishers, offering an unparalleled selection. You can browse by style, foundry, price, and even test fonts with your own text before purchasing.
- Fontspring: Known for its “worry-free licensing,” Fontspring aims to simplify font purchasing by offering clear, broad licenses that cover most commercial uses. They also have a curated selection of high-quality fonts.
- Commercial Foundries (e.g., House Industries, Hoefler&Co., Commercial Type): Many independent type foundries sell their unique and often award-winning typefaces directly from their websites. These are typically premium fonts that can significantly elevate a brand’s visual identity, reflecting a commitment to distinctive design. While an investment, the unique character and comprehensive families offered by these sources can be invaluable for “Brand Strategy.”
When considering paid fonts, remember that the cost is often an investment in quality, versatility, and legal peace of mind. For a business, a strong, consistent typographic identity can contribute significantly to brand recognition and professionalism, making the “Money” spent on licenses a sound financial decision for long-term brand building.
Installing Fonts on Mac: Step-by-Step with Font Book
macOS includes a robust, user-friendly application called Font Book, specifically designed for managing your font collection. It’s the primary tool you’ll use for installing, organizing, and troubleshooting fonts on your Mac.
Downloading and Preparing Your Fonts
The first step is always to acquire the font files.
- Download from Your Chosen Source: Navigate to your preferred font source (e.g., Google Fonts, DaFont, MyFonts) and download the font file(s) you wish to install.
- Locate the Downloaded File: Most browsers will save downloaded files to your “Downloads” folder.
- Unzip the File (If Necessary): Font files are often compressed into a
.ziparchive. Double-click the.zipfile to extract its contents. This will typically create a new folder containing the font files (e.g.,.ttf,.otf) and often a licensing text file. It’s good practice to briefly read the license, especially for free fonts, to understand usage rights.
Seamless Installation via Font Book
Once you have the uncompressed font files, installing them using Font Book is incredibly straightforward. You have a few options:
-
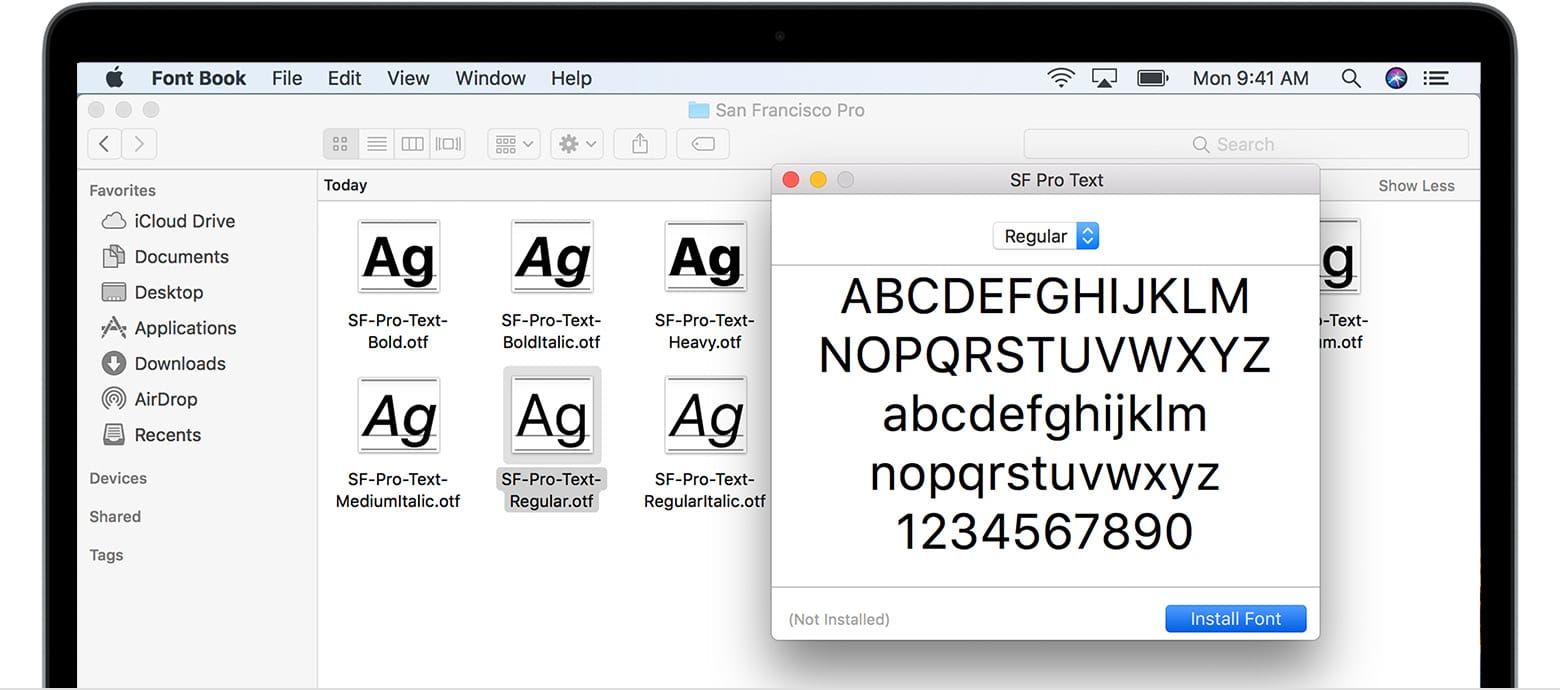
Method 1: Double-Click the Font File (Most Common):
- Locate the
.ttfor.otffont file within the unzipped folder. - Double-click the font file. This will automatically open Font Book and display a preview of the font.
- A dialog box will appear, showing a preview and providing details about the font. Click the “Install Font” button at the bottom of the window.
- Font Book will then perform a quick validation check. If the font passes, it will be installed and become available across all your applications (Pages, Keynote, Microsoft Office, Adobe Creative Suite, etc.).
- Locate the
-
Method 2: Drag and Drop into Font Book:
- Open Font Book. You can find it in your Applications folder, or search for it using Spotlight (Cmd + Spacebar).
- In Font Book, select “All Fonts” in the sidebar to see your entire collection.
- Drag the
.ttfor.otffont file (or multiple files) directly from your Finder window into the Font Book window, specifically into the main font list area or into a custom collection you’ve created. - Font Book will prompt you to confirm the installation and perform the validation check.
-
Method 3: Using Font Book’s “Add” Feature:
- Open Font Book.
- Go to
File>Add Fonts...in the menu bar (or click the+button in the toolbar). - A Finder window will open. Navigate to the folder where your font files are located.
- Select the
.ttfor.otffont file(s) you wish to install. - Click “Open.” Font Book will then install the selected fonts after the validation check.
After successful installation, the new font will appear in your Font Book library and should be immediately accessible in most applications. You may need to restart certain applications (especially older ones) for the newly installed fonts to appear in their font menus.
Managing Your Font Collection: Activation, Validation, and Duplicates
Font Book isn’t just for installation; it’s a powerful tool for managing your entire typographic library. Efficient font management is crucial for maintaining system performance, ensuring creative consistency, and streamlining your “Productivity.”
-
Activating and Deactivating Fonts:
- One of the most valuable features of Font Book is the ability to activate and deactivate fonts. When a font is active, it’s available to all applications on your Mac. When it’s deactivated, it’s essentially “turned off” and won’t appear in your application’s font menus, but it remains installed on your system.
- To activate or deactivate a font, simply select it in Font Book and click the checkbox next to its name in the preview pane (or right-click the font and choose “Enable” or “Disable”).
- Why deactivate? A common “Tech” best practice is to only keep fonts active that you are currently using. Having too many active fonts, especially poorly made ones, can sometimes slow down your system or cause application instability. Deactivating unused fonts helps keep your system lean and responsive.
-
Validating Fonts for Errors:
- Font files, like any other software, can sometimes be corrupt or malformed, leading to display issues, crashes, or printing problems. Font Book has a built-in validation tool to check for such errors.
- When you install a font, Font Book automatically performs a quick validation. If it finds issues, it will warn you.
- To manually validate fonts (e.g., if you’re experiencing problems), select one or more fonts in Font Book and go to
File>Validate Fonts. Font Book will scan the selected fonts and report any errors or warnings. Critical errors (marked with a red icon) usually mean the font is unusable and should be removed. Minor warnings (yellow icon) might indicate potential but not critical issues.
-
Resolving Duplicate Fonts:
- It’s common to end up with duplicate fonts, especially if you install fonts from various sources or reinstall macOS. Duplicate fonts can cause confusion, unexpected behavior in applications (where the wrong version of a font might load), and unnecessary system clutter.
- Font Book is excellent at identifying and helping you resolve duplicates. If Font Book detects duplicates during installation or upon opening, it will alert you and offer options:
- Resolve Duplicates: This option allows Font Book to automatically deactivate or remove older or less complete versions, leaving only the recommended version active.
- Manually Resolve: You can choose to keep both, or decide which version to deactivate or remove yourself.
- To manually check for duplicates anytime, go to
Edit>Look for Enabled Duplicates...(orResolve Duplicates...in newer macOS versions). Font Book will then present you with the duplicates and options for resolution. Keeping your font library tidy by resolving duplicates contributes significantly to system stability and “Productivity.”
Elevating Your Workflow: Third-Party Font Managers and Advanced Tips
While Font Book is excellent for most Mac users, those with extensive font collections, specific professional requirements, or collaborative workflows may benefit from third-party font management software. Additionally, adopting best practices can further enhance your typographic experience.
Beyond Font Book: The Power of Professional Font Managers
For professional designers, marketing teams, and businesses heavily reliant on typography for their “Brand Strategy” and “Corporate Identity,” specialized font managers offer features that go beyond Font Book’s capabilities:
- Adobe Fonts Integration: As mentioned, Adobe Creative Cloud subscribers get seamless access to Adobe Fonts. These fonts can be activated and synced directly through the Creative Cloud desktop app or within applications like Photoshop, Illustrator, and InDesign. This is incredibly efficient, eliminating the need for manual downloads and installations for a vast library of professional typefaces, significantly boosting “Productivity” for creatives.
- Extensis Connect (Suitcase Fusion): Suitcase Fusion (now part of Extensis Connect) has long been an industry standard. It provides powerful tools for organizing vast font libraries, automatically activating fonts when specific design documents are opened, and managing font licenses. Its features include:
- Auto-activation: Detects fonts needed for a project and activates them automatically.
- Font Vaulting: A secure, centralized repository for your font files.
- Cloud Syncing: Syncs your font libraries across multiple computers.
- Team Collaboration: Allows teams to share and manage fonts, ensuring consistency across projects and reducing errors, which is critical for “Brand” consistency.
- Advanced search and tagging: Helps locate specific fonts quickly within massive collections.
- RightFont, FontExplorer X Pro, etc.: Several other excellent font managers offer similar professional features. They often include:
- Tagging and categorization: Helps organize fonts by style, project, or client.
- Cloud integration: For syncing and backup.
- Plugin support: For auto-activation within design applications.
- Font comparison tools: To help choose the perfect typeface.
These tools represent an “Investment” (often a subscription fee, fitting into “Business Finance”) that pays dividends in “Productivity,” “Efficiency,” and “Brand Consistency” for creative professionals and agencies. For large organizations, managing font licenses and ensuring all team members use the correct brand fonts is paramount for maintaining a cohesive “Corporate Identity.”
Essential Font Management Best Practices
Beyond the tools, adopting smart habits is crucial for a healthy font ecosystem on your Mac.
- Understand Font Licensing: This is perhaps the most critical tip, especially for “Brand” and “Money” aspects. Just because you’ve installed a font doesn’t mean you own the rights to use it commercially.
- Personal Use: Many free fonts are only licensed for personal, non-commercial use.
- Commercial Use: If you’re using a font for a business logo, website, marketing materials, or any client work, you must ensure you have the appropriate commercial license. Using an unlicensed font can lead to legal issues, fines, and reputational damage to your brand. Always read the End User License Agreement (EULA) or licensing terms carefully. When purchasing fonts, understand what the license covers (e.g., desktop use, web use, app embedding, number of users).
- Organize Your Font Files: While Font Book manages the installed fonts, keep your original downloaded font files organized in a dedicated folder (e.g.,
~/Documents/My Fonts). Create subfolders for different sources (e.g., “Google Fonts,” “Purchased Fonts,” “Client Fonts”) or types (e.g., “Serif,” “Sans-serif,” “Script”). This makes it easy to find and reinstall fonts if needed, serving as a form of “Digital Security” for your assets. - Backup Your Fonts: Font files are relatively small but immensely valuable, especially if you’ve purchased commercial licenses. Include your original font files in your regular backup strategy (e.g., Time Machine, cloud storage). Losing unique or expensive fonts can be a major setback for projects and “Business Finance.”
- Only Install What You Need: As mentioned, having an excessive number of active fonts can impact system performance and clutter your application font menus. Deactivate fonts you’re not actively using. If you have a professional font manager, leverage its auto-activation features to manage this dynamically.
- Regularly Review Your Collection: Periodically go through your Font Book or font manager. Remove fonts you no longer use, resolve any lingering duplicates, and validate fonts to catch potential errors. A clean, well-maintained font library contributes to better system health and a more efficient creative workflow, embodying good “Tech” management practices.
Troubleshooting Common Font Installation Issues
Even with the best practices, sometimes things don’t go as planned. Here are solutions to common font-related problems on your Mac.
When Fonts Don’t Appear: Basic Diagnostics
You’ve installed a font, but it’s not showing up in your favorite application. Here’s what to check:
- Restart the Application: This is the most common fix. Many applications load their font lists when they launch. If you install a font while an app is open, it might not refresh its list until you quit and reopen it.
- Verify Installation in Font Book:
- Open Font Book and search for the font by name.
- Ensure the font is active (the checkbox next to its name should be ticked). If it’s deactivated, activate it.
- Check if it’s categorized as a “User” font (installed for your user account) or a “Computer” font (available to all users). Both should generally work.
- Check for Validation Errors: In Font Book, select the problematic font and check its status. If there’s a red exclamation mark or a warning, the font might be corrupt. Try reinstalling it or obtaining a fresh copy.
- Clear Font Caches: Sometimes, macOS or individual applications can have corrupted font caches.
- System Font Cache: Open Terminal (Applications > Utilities > Terminal) and type:
sudo atsutil databases -removethen press Enter. You’ll be prompted for your administrator password. Restart your Mac after this. This command clears system-level font caches. - Application-Specific Caches: For Adobe applications, you might need to clear their specific font caches (e.g.,
~/Library/Application Support/Adobe/Caches/or~/Library/Application Support/Adobe/TypeSupport/often contain font cache files). Deleting these and restarting the application can help.
- System Font Cache: Open Terminal (Applications > Utilities > Terminal) and type:
- Check Font Folder Permissions: Ensure your user account has read/write permissions to the
~/Library/Fontsfolder (for user-installed fonts). This is rarely an issue but can be checked via Get Info (Cmd+I) on the folder. - Conflicting Font Versions/Duplicates: Font Book is good at handling this, but sometimes a duplicate font with the same name (even if slightly different in content) can cause confusion. Use Font Book’s “Resolve Duplicates” feature.

Dealing with Corrupt Files and System Performance
Beyond fonts not appearing, more serious issues can arise from poorly made or corrupt font files.
- Corrupt Font Files:
- Symptoms: Text appears garbled, applications crash when opening documents with specific fonts, font previews don’t work, or Font Book reports critical errors during validation.
- Solution: If Font Book reports a critical error, the font file is likely corrupt. Delete the problematic font from Font Book (right-click and choose “Remove ‘Font Name'”). Then, try downloading the font again from a reputable source. If the issue persists, the font itself might be flawed, and you should consider finding an alternative.
- System Performance Issues:
- Symptoms: Slowdowns in applications (especially creative suites), long document loading times, or general system sluggishness when dealing with text.
- Solution: While rare for modern Macs, a very large number of active fonts can sometimes contribute to performance issues. Use Font Book to deactivate any fonts you’re not actively using. If you have thousands of fonts, consider a professional font manager to control which fonts are active at any given time. Always ensure your macOS is updated to the latest version, as Apple continually optimizes font rendering and management.
- Printing Problems:
- Symptoms: Fonts not printing correctly, characters missing, or substitution with a different font on the printed page.
- Solution: This often points to a corrupt font or a PostScript issue (less common now).
- Validate the font in Font Book.
- Try printing to a PDF first to see if the font renders correctly in the PDF. If it does, the issue might be with your printer driver.
- If possible, convert text to outlines in your design software (e.g., Illustrator, InDesign) before sending to print. This embeds the font shapes as vectors, eliminating font dependency.
Successfully navigating these troubleshooting steps ensures your creative workflow remains uninterrupted, allowing you to focus on the expressive power of typography rather than technical glitches. By maintaining a clean, validated, and intelligently managed font library, your Mac can continue to be a powerful tool for all your “Tech,” “Brand,” and “Productivity” endeavors.
In conclusion, mastering the art of installing and managing fonts on your Mac is more than just a technical skill; it’s an investment in your creative toolkit, your brand’s voice, and your overall digital productivity. From the straightforward double-click installation using Font Book to leveraging advanced features of professional font managers, every step contributes to a more polished, professional, and unique output. Remember that each typeface carries its own personality and message, and by expanding your font library responsibly, you expand your capacity for compelling visual communication. So go forth, explore the boundless world of typography, and let your Mac unlock new dimensions of creativity!
aViewFromTheCave is a participant in the Amazon Services LLC Associates Program, an affiliate advertising program designed to provide a means for sites to earn advertising fees by advertising and linking to Amazon.com. Amazon, the Amazon logo, AmazonSupply, and the AmazonSupply logo are trademarks of Amazon.com, Inc. or its affiliates. As an Amazon Associate we earn affiliate commissions from qualifying purchases.