
The modern home is increasingly defined by its intelligence. From refrigerators that order groceries to thermostats that learn your preferences, smart technology has woven itself into the fabric of daily life, promising unparalleled convenience, efficiency, and control. Among the myriad smart gadgets available, the smart light switch stands out as a foundational upgrade, offering a gateway into the automated home experience without requiring every single bulb in your house to be smart. It transforms ordinary lighting fixtures into intelligent components of your smart ecosystem, offering features far beyond a simple on/off toggle.
This comprehensive guide is designed to demystify the installation process of a smart light switch, empowering you to undertake this popular DIY smart home project with confidence. Whether you’re looking to dim lights from your couch, schedule them to turn on before you arrive home, or integrate them into a sophisticated smart home routine, upgrading to a smart light switch is a practical and rewarding endeavor. We’ll cover everything from understanding the technology and preparing your workspace to the step-by-step wiring process and initial setup, ensuring a smooth transition to smarter lighting. Let’s illuminate the path to a more connected home.
Preparing for Your Smart Home Lighting Upgrade
Before you even pick up a screwdriver, a thorough understanding of smart light switches and a careful pre-installation checklist are crucial. This foundational knowledge not only ensures a successful installation but also helps you choose the right smart switch for your specific needs and existing home infrastructure.
Understanding Smart Light Switches and Their Benefits
At its core, a smart light switch replaces your traditional wall-mounted switch, but with added connectivity. Most smart switches connect to your home Wi-Fi network or a smart home hub (using protocols like Zigbee or Z-Wave), allowing them to be controlled wirelessly via a smartphone app, voice commands through virtual assistants like Amazon Alexa or Google Assistant, or through sophisticated automation routines.
The benefits extend far beyond remote control:
- Convenience: Imagine turning off all the lights from your bed, or illuminating your home as you pull into the driveway, all with a tap on your phone or a simple voice command. No more fumbling in the dark or walking through the house just to flip a switch.
- Energy Efficiency: Smart switches allow for precise scheduling, ensuring lights are only on when needed. Many also offer dimming capabilities, reducing energy consumption and extending bulb life. Some advanced models can even monitor energy usage.
- Enhanced Security: Integrate your lights into “away” modes that randomly turn lights on and off, simulating occupancy to deter potential intruders. You can also turn on specific lights remotely if you receive an alert from a smart security camera.
- Ambiance and Mood Setting: Create custom lighting scenes for different activities – a dim, warm glow for movie night, bright task lighting for reading, or a gentle wake-up light routine.
- Integration with Smart Home Ecosystems: Smart switches often seamlessly integrate with broader smart home platforms, allowing them to communicate and trigger actions with other devices like smart thermostats, door sensors, or blinds, creating powerful automation scenarios.
Pre-Installation Checklist: What You Need to Know Before You Buy and Install
The success of your smart switch installation hinges on careful planning and ensuring compatibility. Don’t skip these crucial steps!
Compatibility Considerations
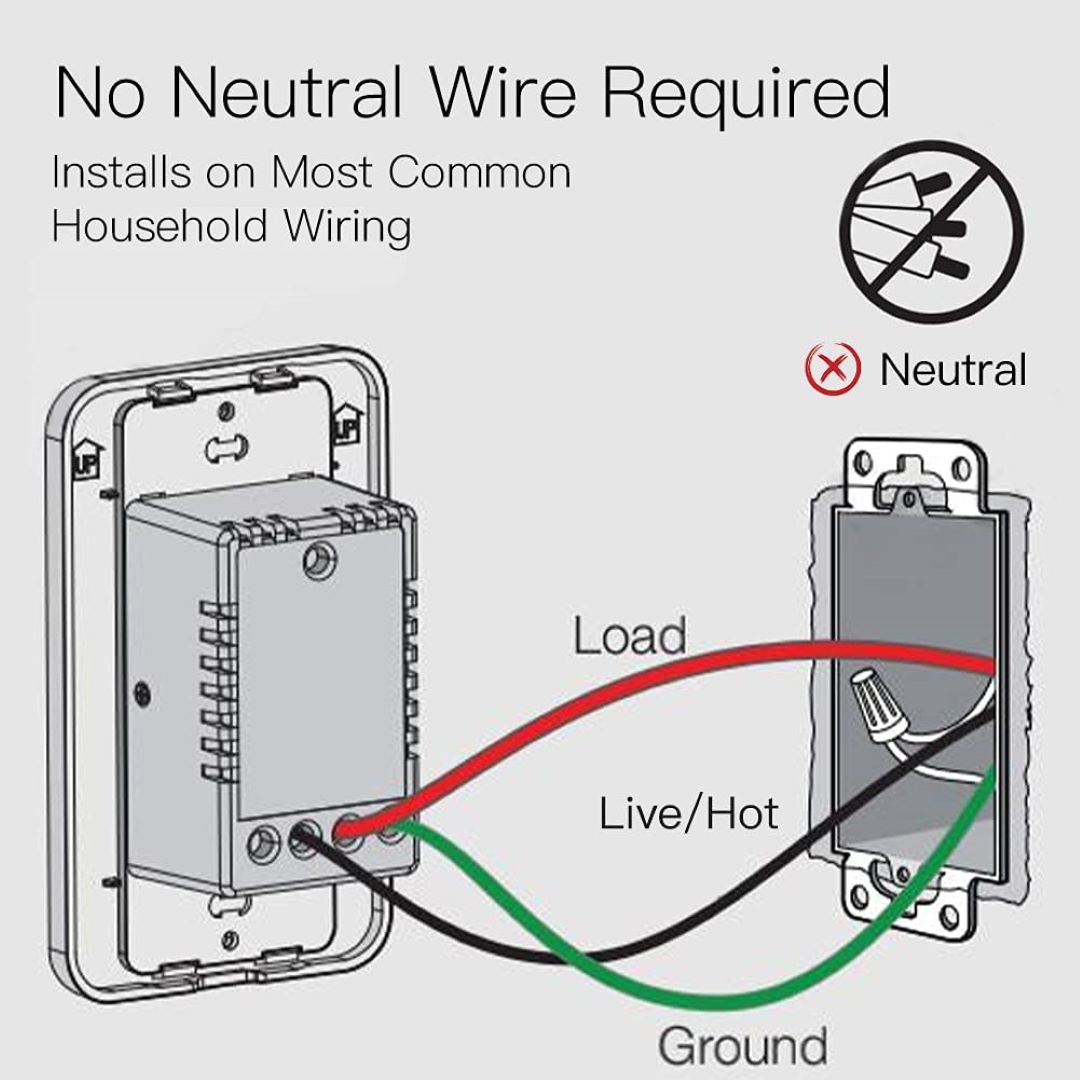
- Neutral Wire Requirement: This is perhaps the most critical factor. Most smart light switches require a neutral wire in the switch box to operate correctly. A neutral wire provides the constant power supply the smart switch needs for its internal electronics, Wi-Fi radio, and processor, even when the lights are off.
- How to Check: Turn off the power at the breaker. Remove your existing wall plate and gently pull the old switch out from the box. Look for a bundle of white wires twisted together, often capped with a wire nut. This is usually the neutral bundle. If you don’t see one, you likely don’t have a neutral wire in that box, and you’ll need to either opt for a smart switch designed for no-neutral installations (which are less common and sometimes have limitations) or consult an electrician to run a neutral wire.
- Switch Type (Single-Pole, 3-Way, 4-Way):
- Single-Pole: Controls one light fixture or group of fixtures from a single location. This is the simplest type, and most smart switches are available in single-pole versions.
- 3-Way: Controls one light fixture or group of fixtures from two different locations (e.g., at the top and bottom of a staircase, or both ends of a hallway). Installing a smart switch in a 3-way setup usually requires specific 3-way smart switches (often requiring a “master” and “add-on” switch) or a different wiring approach. Ensure the smart switch you purchase explicitly supports 3-way configurations if needed.
- 4-Way: Controls one light fixture or group of fixtures from three or more locations. These are more complex and less common, and often require specialized smart switches or professional installation.
- How to Check: Count the number of switches that control the same light. If it’s one, it’s single-pole. If it’s two, it’s 3-way. If it’s three or more, it’s 4-way.
- Bulb Type (for Dimming Switches): If you’re installing a smart dimmer switch, ensure it’s compatible with your light bulbs. Most modern smart dimmers work well with dimmable LEDs, but older dimmers might be designed for incandescent or CFLs, leading to flickering or buzzing with LEDs if not correctly matched.
- Smart Home Ecosystem: Consider which smart home platform you use or plan to use (e.g., Apple HomeKit, Google Home, Amazon Alexa, SmartThings, Hue Bridge). Choose a smart switch that is compatible with your preferred ecosystem for seamless integration and control.
Tools & Materials You’ll Need
Having the right tools on hand makes the installation process much smoother and safer.
- New Smart Light Switch: The star of the show.
- Flathead Screwdriver: For removing the wall plate and sometimes the switch.
- Phillips Head Screwdriver: For removing and installing the switch mounting screws.
- Wire Strippers: If wires need to be trimmed or insulation removed.
- Non-Contact Voltage Tester: Absolutely essential for safety. This device detects electrical current without direct contact, allowing you to confirm power is off before touching any wires.
- Electrical Tape: For labeling wires and securing connections.
- Needle-Nose Pliers: Useful for bending wires into hooks or tightening wire nuts.
- Wire Nuts: Typically come with the smart switch, but having extras can be helpful.
- New Wall Plate (Optional): Some smart switches come with a new faceplate, but ensure it matches your aesthetic.
- Safety Glasses: Recommended to protect your eyes.
- Flashlight or Headlamp: For working in dimly lit electrical boxes.
Safety First: The Golden Rule
Electricity can be dangerous. Always prioritize safety. The most important rule is: ALWAYS TURN OFF THE POWER AT THE CIRCUIT BREAKER BEFORE STARTING ANY ELECTRICAL WORK. Confirm the power is off using your non-contact voltage tester before touching any wires. If you are ever unsure or uncomfortable, do not hesitate to consult a qualified electrician.
The Step-by-Step Smart Switch Installation Process
With your preparations complete and tools ready, it’s time to get hands-on. Follow these steps carefully to ensure a safe and successful installation.
Disconnecting the Old Switch
This stage requires meticulous attention to detail, especially when identifying and labeling wires.
Step 1: Power Down Your Circuit
Go to your electrical service panel (breaker box) and locate the breaker that controls the light fixture you’re working on. Flip it to the “OFF” position. It’s often helpful to have someone confirm the lights are off.
Step 2: Verify Power is Off
Return to the switch location. Use your non-contact voltage tester to touch all existing wires in the switch box, as well as the switch terminals. The tester should emit no sound or light, confirming there is no live current. Do not proceed until you have verified the power is off.
Step 3: Remove the Old Wall Plate and Switch
Using a flathead screwdriver, carefully remove the two screws holding the wall plate in place. Then, use a Phillips head screwdriver to remove the two screws (one at the top, one at the bottom) that secure the existing light switch to the electrical box. Gently pull the switch out from the box, being careful not to tug too hard on the wires.
Step 4: Identify and Label Wires
This is a critical step, especially for 3-way switches or older wiring. You’ll typically find three to four types of wires connected to your switch:

- Line (Hot) Wire: This brings power from the electrical panel to the switch. It’s usually black and will often be connected to a dark-colored or “common” screw on the old switch.
- Load Wire: This carries power from the switch to the light fixture. It’s also usually black.
- Ground Wire: This is a safety wire, typically bare copper or green insulation. It connects to the ground screw on the switch and often to the metal electrical box.
- Neutral Wire: As discussed, this is usually white and provides a return path for current. It might be bundled with other white wires and not directly connected to your old mechanical switch.
Crucial Tip for Labeling: Use small pieces of electrical tape to create labels (e.g., “LINE,” “LOAD,” “NEUTRAL,” “GROUND”) as you identify them. For 3-way switches, label the “traveler” wires as well (these typically connect the two 3-way switches and carry power between them, often red or black). Taking a photo with your phone before disconnecting anything is also a very smart move for reference.
Step 5: Disconnect the Wires
Once labeled, carefully disconnect each wire from the old switch. You may need to loosen terminal screws or untwist wire nuts. Keep the labeled wires separate and ensure they don’t accidentally touch each other or the electrical box.
Installing Your New Smart Switch
Now, let’s connect your smart technology. Refer to the wiring diagram included with your smart switch, as specific models may have slight variations.
Step 6: Connect the Ground Wire
Take the bare copper or green insulated ground wire from your electrical box and connect it to the green or bare copper ground wire on your new smart switch using a wire nut. If the electrical box is metal and has a ground screw, ensure the box is also grounded.
Step 7: Connect the Neutral Wire
Locate the neutral wire (the white wire you identified, likely in a bundle). If your smart switch has a white neutral wire, connect it to the neutral wire in the electrical box using a wire nut. If the neutral wire in your box is part of a larger bundle, you may need to add a pigtail (a short piece of white wire) to connect to your smart switch. Remember, most smart switches require a neutral wire.
Step 8: Connect the Line (Hot) Wire
Connect the labeled “LINE” wire from your electrical box to the wire on your smart switch designated for “LINE” or “HOT” (often black, but always check your switch’s diagram). Secure with a wire nut.
Step 9: Connect the Load Wire
Connect the labeled “LOAD” wire from your electrical box to the wire on your smart switch designated for “LOAD” (often black, but again, check your switch’s diagram). Secure with a wire nut.
Step 10: Secure Wires and Mount the Switch
Double-check all your wire connections to ensure they are tight and secure. Gently fold the wires and push them back into the electrical box, being careful not to pinch or crimp any wires. Align the new smart switch with the screw holes in the electrical box and secure it with the provided mounting screws.
Step 11: Attach the New Wall Plate
Once the switch is securely mounted, attach the new decorative wall plate over the switch.
Powering Up and Initial Setup
The final steps bring your smart switch to life.
Step 12: Restore Power and Test Manually
Return to your electrical service panel and flip the circuit breaker back to the “ON” position. Come back to the switch location and manually press the smart switch’s button. The lights should turn on and off as expected.
Step 13: Connect to Wi-Fi / Smart Home Ecosystem
This is where the “smart” aspect comes in.
- Download the App: Install the manufacturer’s dedicated app on your smartphone or tablet.
- Follow In-App Instructions: The app will guide you through the process of connecting your smart switch to your home Wi-Fi network. This typically involves putting the switch into pairing mode (often by pressing a button for a few seconds) and then selecting it within the app.
- Integrate with Your Smart Home Hub/Voice Assistant: Once connected to the manufacturer’s app, you can usually link it to your broader smart home ecosystem (e.g., Google Home, Amazon Alexa, Apple HomeKit, SmartThings). This allows for voice control and inclusion in automations.
Maximizing Your Smart Light Switch Experience
Installation is just the beginning. The true power of a smart light switch lies in its configurable features and integration possibilities.
Configuration and Automation
Your smart switch’s app is your control center. Dive in to customize its behavior:
- Scheduling: Set lights to turn on or off at specific times, aligning with your daily routine or simulating occupancy when you’re away. For example, lights in the living room can turn on at sunset and off at bedtime.
- Scenes: Create custom lighting presets for different activities or moods. A “Movie Night” scene might dim the lights to 30%, while a “Morning Wake-Up” scene could gently brighten them over 15 minutes.
- Voice Control: Once integrated with a voice assistant, you can simply say, “Alexa, turn on the living room lights,” or “Hey Google, dim the kitchen lights to 50%.”
- Advanced Automations: Connect your smart switch with other smart devices. For instance, if a motion sensor detects movement in a hallway at night, the lights could turn on at a low brightness. Or, if your smart door lock registers that you’ve unlocked the front door, the entry lights could automatically illuminate. You can even set “if this, then that” (IFTTT) routines to trigger actions based on weather, time, or other device statuses.
Troubleshooting Common Issues
While smart switch installations are generally straightforward, issues can arise. Here are some common problems and their solutions:
- No Power to the Switch or Lights:
- Check the circuit breaker again.
- Ensure all wire connections are secure and tight, especially the line and load wires.
- Verify the neutral wire is correctly connected, as most smart switches require it.
- Switch Not Connecting to Wi-Fi:
- Ensure your Wi-Fi router is within range and functioning correctly.
- Confirm you’re connecting to a 2.4 GHz network (most smart devices don’t support 5 GHz).
- Try moving your router closer or using a Wi-Fi extender.
- Perform a factory reset on the smart switch (refer to its manual) and try pairing again.
- Lights Flickering or Buzzing (especially with Dimmers):
- The most common cause is incompatible bulbs. Ensure your LED bulbs are explicitly labeled “dimmable.”
- Adjust the minimum/maximum dimming range in the smart switch’s app, if available.
- Intermittent Connection / Drops Offline:
- Weak Wi-Fi signal.
- Too many devices on your Wi-Fi network.
- Firmware update might be needed for the switch.
- Switch Not Responding to Voice Commands:
- Verify the switch is correctly linked to your smart assistant’s app.
- Check if the device name in the smart assistant app matches what you’re saying.
- Ensure your smart assistant device (Echo, Google Home) is online and working.
If issues persist, consult the troubleshooting section of your smart switch’s manual or contact the manufacturer’s support.

Conclusion
Installing a smart light switch is a practical and impactful step towards modernizing your home. It’s a project that combines basic electrical work with the exciting world of smart technology, offering a tangible upgrade in convenience, energy management, and home security. By carefully following the preparation steps, understanding the wiring, and meticulously carrying out the installation, you can successfully integrate this smart gadget into your living space.
The shift from manual control to voice commands and automated schedules fundamentally changes how you interact with your home environment, ushering in an era of effortless living. As you become comfortable with this initial upgrade, you’ll find yourself empowered to explore further smart home integrations, turning your dwelling into an intelligent, responsive ecosystem. So, go ahead, illuminate your world with smart technology – your home, and your daily routine, will thank you for it. Explore more of our tech tutorials and gadget reviews to continue your smart home journey!
aViewFromTheCave is a participant in the Amazon Services LLC Associates Program, an affiliate advertising program designed to provide a means for sites to earn advertising fees by advertising and linking to Amazon.com. Amazon, the Amazon logo, AmazonSupply, and the AmazonSupply logo are trademarks of Amazon.com, Inc. or its affiliates. As an Amazon Associate we earn affiliate commissions from qualifying purchases.