In the dynamic world of software development, efficiency and consistency are paramount. Projects often involve numerous dependencies, complex build processes, and rigorous testing phases. Managing these elements manually can quickly become a bottleneck, leading to errors, delays, and frustrated development teams. This is where build automation tools like Apache Maven step in, transforming chaotic development cycles into streamlined, predictable workflows.
Apache Maven is more than just a build tool; it’s a project management tool that encompasses a project object model (POM), a set of standard lifecycles, a dependency management system, and logic for executing plugin goals at defined phases in a lifecycle. For Windows users looking to leverage Maven’s power in their development environment, this comprehensive guide will walk you through every step of the installation process, ensuring you’re ready to build, manage, and deploy your projects with confidence. By integrating Maven into your Windows setup, you’ll unlock significant productivity gains, align with industry best practices, and lay a solid foundation for robust software development.
Understanding Apache Maven: Why It Matters for Modern Development
Before diving into the installation specifics, it’s crucial to grasp what Apache Maven is and why it has become an indispensable tool for countless developers and organizations. Maven, an open-source project from the Apache Software Foundation, is written in Java and is primarily used for Java projects, though its principles can be applied to other languages.
At its core, Maven simplifies the build process. Instead of writing intricate scripts to compile code, package applications, or run tests, developers define their project’s structure, dependencies, and build requirements in an XML file called the Project Object Model (POM). Maven then takes this POM file and handles the rest, automating tasks that would otherwise consume significant time and effort.
Here’s why Maven is a game-changer:
- Standardized Project Structure: Maven enforces a conventional directory layout. This standardization means that any developer familiar with Maven can quickly understand the structure of a new project, reducing the learning curve and improving team collaboration.
- Dependency Management: One of Maven’s most powerful features is its ability to manage project dependencies automatically. Instead of manually downloading JAR files and adding them to your classpath, you simply declare the required libraries (and their versions) in your
pom.xml. Maven then fetches these dependencies from a central repository (Maven Central) and makes them available to your project. This eliminates “dependency hell” and ensures consistent builds across different environments. - Consistent Build Process: Maven defines a standard build lifecycle (e.g.,
validate,compile,test,package,install,deploy). Developers can invoke specific phases, and Maven will execute all preceding phases in order. This consistency ensures that every build, whether on a local machine or a continuous integration server, follows the same sequence of operations, leading to reliable and reproducible results. - Plugin Architecture: Maven’s functionality is extended through a rich ecosystem of plugins. These plugins allow Maven to perform a vast array of tasks, from compiling Java code to generating documentation, running unit tests, creating WAR/JAR files, deploying applications to servers, and much more. This extensibility makes Maven incredibly versatile.
- Project Information and Documentation: Beyond building, Maven can generate various project reports, including dependency reports, test coverage reports, and site documentation. This transparency helps maintain project quality and provides valuable insights to stakeholders.
For developers working on complex, multi-module projects, or those seeking to integrate with continuous integration/continuous deployment (CI/CD) pipelines, Maven is an essential tool. It significantly boosts productivity, reduces manual errors, and fosters a more organized and professional development environment. Installing it correctly on your Windows machine is the first step towards harnessing these benefits.
Prerequisites for a Seamless Maven Installation
Before you embark on the Maven installation journey, there are a couple of fundamental prerequisites you need to address. Ensuring these are in place will prevent common installation hiccups and provide a smooth experience.
1. Ensure Java Development Kit (JDK) is Installed
Apache Maven is a Java-based tool, which means it requires a Java Development Kit (JDK) to run. A Java Runtime Environment (JRE) is not sufficient, as Maven needs the compilation tools and libraries provided by the JDK.
-
Minimum Requirement: Maven 3.3+ requires JDK 1.7 or later. For modern development, it’s highly recommended to use a recent LTS (Long Term Support) version like JDK 11, JDK 17, or the latest stable version.
-
Checking for Existing JDK:
To verify if you already have a JDK installed and configured correctly, open your Command Prompt (or PowerShell) and type:java -version javac -versionIf you see version information for both
javaandjavac(Java Compiler), then you likely have a JDK installed. The output forjavacspecifically confirms a JDK, not just a JRE. -
Installing JDK (If Not Present):
If the commands above return an error or indicate a JRE only, you’ll need to install a JDK. You can download one from:- Oracle JDK: oracle.com/java/technologies/downloads (requires an Oracle account for commercial use/updates beyond free tier)
- OpenJDK Distributions (Recommended for most users):
- Adoptium (Eclipse Temurin): adoptium.net (highly recommended, free, open-source builds)
- Amazon Corretto: aws.amazon.com/corretto
- Microsoft Build of OpenJDK: microsoft.com/openjdk
Choose a recent LTS version (e.g., JDK 17). Download the Windows installer (.msifile) and follow the on-screen instructions. Install it to a straightforward path likeC:Program FilesJavajdk-17orC:Program FilesEclipse Adoptiumjdk-17.0.x.x-hotspot.
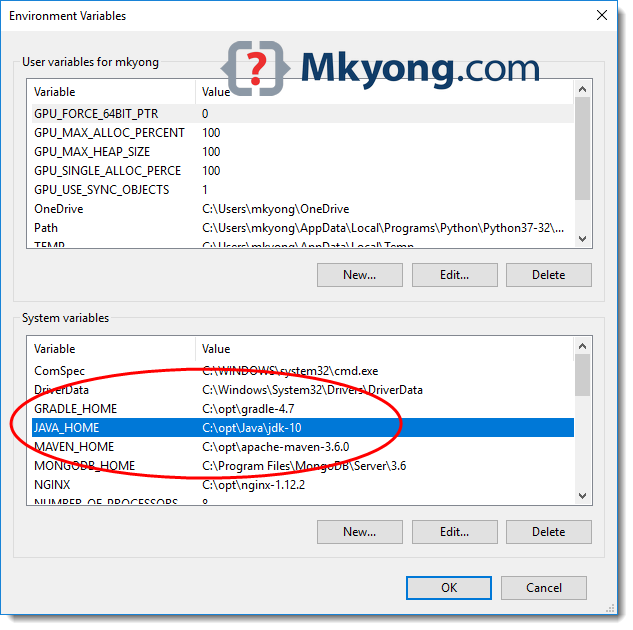
2. Configure JAVA_HOME Environment Variable
Even if you have a JDK installed, Maven needs to know where it is located. This is done by setting the JAVA_HOME environment variable.
- How to Set
JAVA_HOME:- Right-click on “This PC” (or “My Computer”) and select “Properties.”
- Click “Advanced system settings” on the left pane.
- In the “System Properties” window, click the “Environment Variables…” button.
- Under “System variables,” click “New…”
- For “Variable name,” enter
JAVA_HOME. - For “Variable value,” enter the path to your JDK installation directory (e.g.,
C:Program FilesJavajdk-17.0.9). Do not includebinat the end. - Click “OK” to create the variable.
- Next, find the “Path” variable under “System variables,” select it, and click “Edit.”
- Click “New” and add
%JAVA_HOME%binto the list. Ensure this entry is high up in the list to prioritize your chosen JDK. - Click “OK” on all open windows to save the changes.
- Verify
JAVA_HOME: Open a new Command Prompt window (important, as existing ones won’t recognize new variables) and type:
bash

echo %JAVA_HOME%
You should see the path to your JDK.
With your JDK correctly installed and JAVA_HOME configured, you’re ready to proceed with the Maven installation itself.
Step-by-Step Maven Installation on Windows
Now that your system is prepared, let’s proceed with downloading, extracting, and configuring Apache Maven.
1. Downloading the Apache Maven Binary
The first step is to obtain the Maven distribution. Always download from the official Apache Maven website to ensure you get a legitimate and secure version.
- Visit the Official Download Page: Go to maven.apache.org/download.cgi.
- Choose the Binary Archive: Look for the “Files” section and download the binary zip archive (e.g.,
apache-maven-X.Y.Z-bin.zip). Avoid the “source” archive unless you intend to build Maven from scratch. As of writing, Maven 3.9.x is a common choice. - Download Location: Save the
.zipfile to a temporary location, such as your “Downloads” folder. - Checksum Verification (Optional but Recommended): For security, you can verify the integrity of the downloaded file using the provided SHA512 or MD5 checksums on the download page. Open a Command Prompt in the directory where you downloaded the file and use a tool like
certutil(built into Windows) for SHA512:
bash

certutil -hashfile apache-maven-X.Y.Z-bin.zip SHA512
Compare the output hash with the one listed on the Apache Maven download page.
2. Extracting Maven to a Suitable Location
Once downloaded, you need to extract the Maven archive to a permanent and easily accessible location on your system.
- Extraction Process:
- Navigate to where you downloaded
apache-maven-X.Y.Z-bin.zip. - Right-click the zip file and choose “Extract All…” or use a tool like 7-Zip/WinRAR.
- Choose a Destination: Extract the contents to a directory that is easy to remember and doesn’t contain spaces or special characters in its path, if possible. A common and recommended location is
C:Program FilesApache MavenorC:devapache-maven-X.Y.Z.- Recommendation: Rename the extracted folder from
apache-maven-X.Y.Zto simplyapache-maven(ormaven) if you plan on updating Maven frequently. This way, your environment variables won’t need to change with every Maven version update. For this guide, let’s assume the path isC:Program FilesApache Mavenapache-maven-3.x.x.
- Recommendation: Rename the extracted folder from
- After extraction, you should find a directory structure like
C:Program FilesApache Mavenapache-maven-3.x.xbin,C:Program FilesApache Mavenapache-maven-3.x.xlib, etc.
- Navigate to where you downloaded
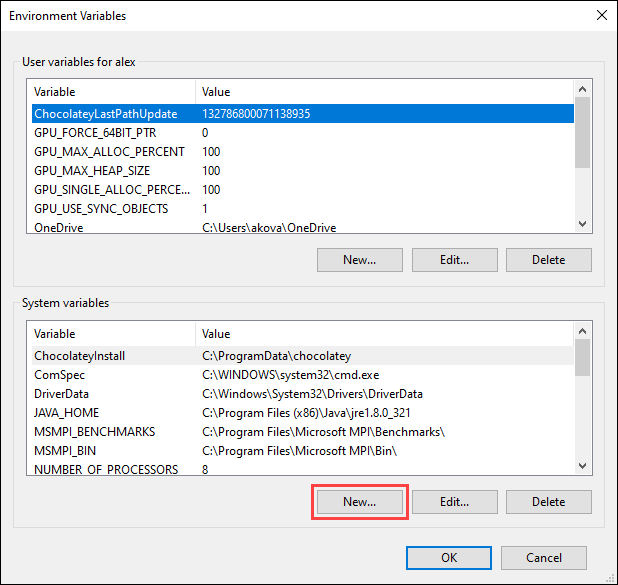
3. Configuring Environment Variables: The Crucial Step
This is the most critical part of the installation. Properly configuring environment variables ensures that Windows can find and execute Maven commands from any directory.
-
Access Environment Variables:
- Right-click on “This PC” (or “My Computer”) and select “Properties.”
- Click “Advanced system settings” on the left pane.
- In the “System Properties” window, click the “Environment Variables…” button.
-
Set
M2_HOME(orM2):- Under “System variables,” click “New…”
- For “Variable name,” enter
M2_HOME(orMAVEN_HOME, butM2_HOMEis traditionally used). - For “Variable value,” enter the path to your Maven installation directory. This is the folder you extracted Maven into, e.g.,
C:Program FilesApache Mavenapache-maven-3.x.x. Do not includebinat the end. - Click “OK.”
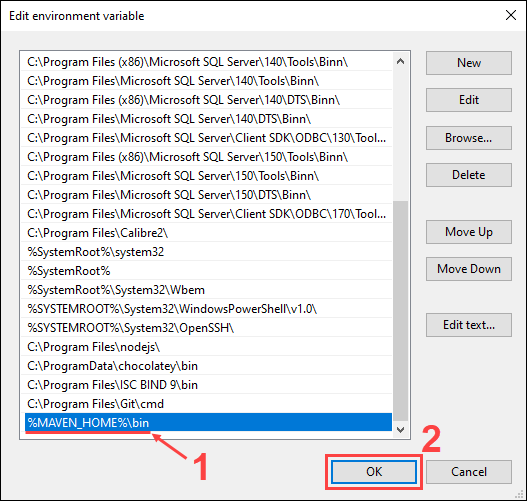
-
Update the
PathVariable:- Under “System variables,” find the “Path” variable, select it, and click “Edit.”
- In the “Edit environment variable” dialog, click “New.”
- Add
%M2_HOME%binto the list. This entry tells Windows where to find themvn.cmdexecutable. - Ensure that this entry is present and correctly spelled. You might want to move it up in the list to prioritize it over other potential Maven installations.
- Click “OK” on all open windows to save the changes.
Note: If you encounter issues, sometimes adding
C:Program FilesApache Mavenapache-maven-3.x.xbindirectly to thePath(without using%M2_HOME%) can help troubleshoot, but using%M2_HOME%is cleaner for future updates.
Verifying Your Maven Setup and Beyond
After completing the installation and configuration steps, it’s essential to verify that Maven is correctly installed and accessible from your command line.
1. Verifying the Installation
Open a new Command Prompt or PowerShell window. It’s crucial to open a new one because existing command prompts won’t have the updated environment variables.
- Run the Maven Version Command:
bash

mvn -version
or simply
bash

mvn -v
- Expected Output: If Maven is installed correctly, you should see output similar to this (versions will vary):
Apache Maven 3.x.x (xxxxxxx; 20XX-XX-XXTXX:XX:XX+XX:XX)

Maven home: C:Program FilesApache Mavenapache-maven-3.x.x

Java version: 17.0.x, vendor: Eclipse Adoptium, runtime: C:Program FilesEclipse Adoptiumjdk-17.0.x.x-hotspot

Default locale: en_US, platform encoding: UTF-8

OS name: "windows 10", version: "10.0", arch: "amd64", family: "windows"
This output confirms:- The Maven version
- The
M2_HOMEpath Maven is using - The Java JDK version Maven is using (confirming your
JAVA_HOMEis also correct) - Your operating system details
If you receive an error message like 'mvn' is not recognized as an internal or external command, operable program or batch file., revisit the environment variable setup, especially the Path variable, and ensure it correctly points to %M2_HOME%bin. Remember to open a new command prompt after every change to environment variables.
2. Basic Maven Commands to Get Started
Once verified, you can start exploring Maven’s capabilities. Here are a few basic commands to get you oriented:
-
Create a New Maven Project (Archetype):
This command generates a basic project structure using a Maven archetype.mvn archetype:generate -DgroupId=com.mycompany.app -DartifactId=my-first-maven-app -DarchetypeArtifactId=maven-archetype-quickstart -DarchetypeVersion=1.4 -DinteractiveMode=falseThis will create a
my-first-maven-appdirectory with a standard Maven project structure, including apom.xml,src/main/java, andsrc/test/javafolders. -
Compile the Project:
Navigate into your new project directory (cd my-first-maven-app) and run:mvn compileThis command compiles the source code of the project.
-
Run Tests:
mvn testThis command executes all unit tests defined in your project.
-
Package the Project:
mvn packageThis command compiles the code, runs tests, and packages the compiled code into a distributable format (e.g., a JAR file) in the
targetdirectory. -
Install to Local Repository:
bash

mvn install
This command not only packages the project but also installs the artifact into your local Maven repository (~/.m2/repository). This makes the artifact available for other Maven projects on your machine that declare it as a dependency.
These commands represent just the tip of the iceberg of what Maven can do, but they provide a solid starting point for building and managing your Java projects.
3. Integrating Maven with Your IDE
Most modern Integrated Development Environments (IDEs) like IntelliJ IDEA, Eclipse, and VS Code have excellent built-in support for Maven.
- IntelliJ IDEA: IntelliJ automatically detects
pom.xmlfiles and configures projects as Maven projects. You can import existing Maven projects or create new ones directly from the IDE. The IDE integrates with Maven’s lifecycle phases, allowing you to runcompile,test,package, etc., directly from its interface. - Eclipse: Similar to IntelliJ, Eclipse offers robust Maven integration via the M2Eclipse plugin (usually bundled by default in newer versions). You can import Maven projects, update dependencies, and run build goals from within Eclipse.
- VS Code: While not a full-fledged IDE for Java, VS Code with the Java Extension Pack and Maven for Java extension provides excellent support for Maven projects, including dependency management, running goals, and code completion for
pom.xml.
Integrating Maven with your IDE further streamlines the development process, providing a graphical interface for managing your build and dependencies, along with real-time feedback and error checking.
Common Troubleshooting and Best Practices
While the Maven installation process on Windows is generally straightforward, you might encounter a few common issues. Knowing how to troubleshoot them and adhering to best practices can save you a lot of time.
Common Troubleshooting Scenarios
- “mvn is not recognized…” Error:
- Cause: The
Pathenvironment variable is not correctly configured to include%M2_HOME%bin(or the direct path to Maven’sbindirectory). - Solution: Double-check the
Pathvariable under “System variables.” Ensure the entry%M2_HOME%bin(orC:Program FilesApache Mavenapache-maven-3.x.xbin) is present and spelled correctly. Remember to open a new Command Prompt after making changes.
- Cause: The
- “JAVA_HOME is not defined correctly…” Error:
- Cause: Maven cannot find your Java Development Kit (JDK). This usually means
JAVA_HOMEis not set or points to a JRE instead of a JDK, or to an incorrect path. - Solution: Verify your
JAVA_HOMEsystem variable points directly to the root of your JDK installation (e.g.,C:Program FilesJavajdk-17.0.9), not to thebinfolder within it. Also, check that%JAVA_HOME%binis correctly added to yourPathvariable.
- Cause: Maven cannot find your Java Development Kit (JDK). This usually means
- Proxy Settings Issues:
- Cause: If you’re behind a corporate proxy, Maven might fail to download dependencies from remote repositories.
- Solution: Configure Maven’s proxy settings. Edit the
settings.xmlfile located inC:Users<YourUsername>.m2(your user’s Maven directory) or in your Maven installation’sconffolder (e.g.,C:Program FilesApache Mavenapache-maven-3.x.xconf). Uncomment and configure the<proxies>section with your proxy details:
xml

<proxies>

    <proxy>

        <id>myproxy</id>

        <active>true</active>

        <protocol>http</protocol>

        <host>proxy.example.com</host>

        <port>8080</port>

        <!-- <username>proxyuser</username> -->

        <!-- <password>proxypass</password> -->

        <!-- <nonProxyHosts>*.example.com|localhost</nonProxyHosts> -->

    </proxy>

</proxies>
- Slow Downloads / Repository Issues:
- Cause: Sometimes, accessing Maven Central can be slow, or your corporate network might use a local Maven repository manager (like Nexus or Artifactory).
- Solution: If using a local repository manager, configure your
settings.xmlto point to it instead of Maven Central. This often involves adding a<mirror>entry.
Best Practices for Maven Users on Windows
- Consistent Naming and Paths: Use clear, consistent, and preferably short paths for your JDK and Maven installations. Avoid paths with spaces if possible, though modern versions handle them better.
- Centralized Maven Installation: For teams, consider a shared network drive for Maven installation if all developers access the same shared network, or ensure consistent installation paths across developer machines.
- Global
settings.xmlvs. Usersettings.xml:- The
settings.xmlin your Maven installation’sconffolder (M2_HOMEconfsettings.xml) is the global configuration. - The
settings.xmlin your user’s.m2directory (C:Users<YourUsername>.m2settings.xml) is your personal configuration. - It’s generally recommended to make personal configurations (like proxy, local repository location, or server credentials) in your user’s
settings.xmlto avoid modifying the core Maven distribution files. If the usersettings.xmldoesn’t exist, you can copy it from theM2_HOMEconfdirectory and modify it.
- The
- Regular Updates: Keep your JDK and Maven installations reasonably up-to-date. Newer versions often include performance improvements, bug fixes, and security enhancements.
- Understand the Local Repository: Maven downloads dependencies to your local repository, usually located at
C:Users<YourUsername>.m2repository. This local cache speeds up subsequent builds. If you suspect corrupt dependencies, you can try deleting the specific dependency folder from this directory and letting Maven redownload it. - Version Control for
pom.xml: Always commit yourpom.xmlfile to your version control system (Git, SVN, etc.). It defines your project’s entire build configuration and dependencies.
By following these best practices, you can ensure a robust and efficient Maven environment, enabling you to focus on developing quality software rather than battling build configuration issues.
Conclusion
Installing Apache Maven on Windows is a fundamental step for any serious Java developer looking to streamline their build processes, manage complex dependencies efficiently, and embrace best practices in software development. From ensuring the correct Java Development Kit is in place to meticulously configuring environment variables and verifying the installation, each step contributes to creating a stable and powerful development environment.
With Maven correctly set up, you unlock a world of possibilities: automated builds, consistent project structures, simplified dependency management, and seamless integration with popular IDEs. This guide has provided you with the detailed instructions and insights needed to navigate the installation process successfully, alongside common troubleshooting tips and best practices that will serve you well in your development journey.
Embrace Maven, and you’ll find your development workflow becoming more predictable, your projects more manageable, and your productivity significantly enhanced. Now, with Maven at your command, you’re ready to build, test, and deploy your applications with the efficiency and reliability that modern software demands. Happy coding!
aViewFromTheCave is a participant in the Amazon Services LLC Associates Program, an affiliate advertising program designed to provide a means for sites to earn advertising fees by advertising and linking to Amazon.com. Amazon, the Amazon logo, AmazonSupply, and the AmazonSupply logo are trademarks of Amazon.com, Inc. or its affiliates. As an Amazon Associate we earn affiliate commissions from qualifying purchases.