
The graphics card, often referred to as the GPU (Graphics Processing Unit), is the beating heart of any powerful computer system. It’s the dedicated hardware responsible for rendering images, videos, and animations, translating complex data into the stunning visuals you see on your screen. Whether you’re a hardcore gamer chasing the highest frame rates, a content creator rendering intricate 3D models, an AI enthusiast crunching data, or simply looking to enhance your system’s overall performance, upgrading or installing a new graphics card is one of the most impactful hardware changes you can make.
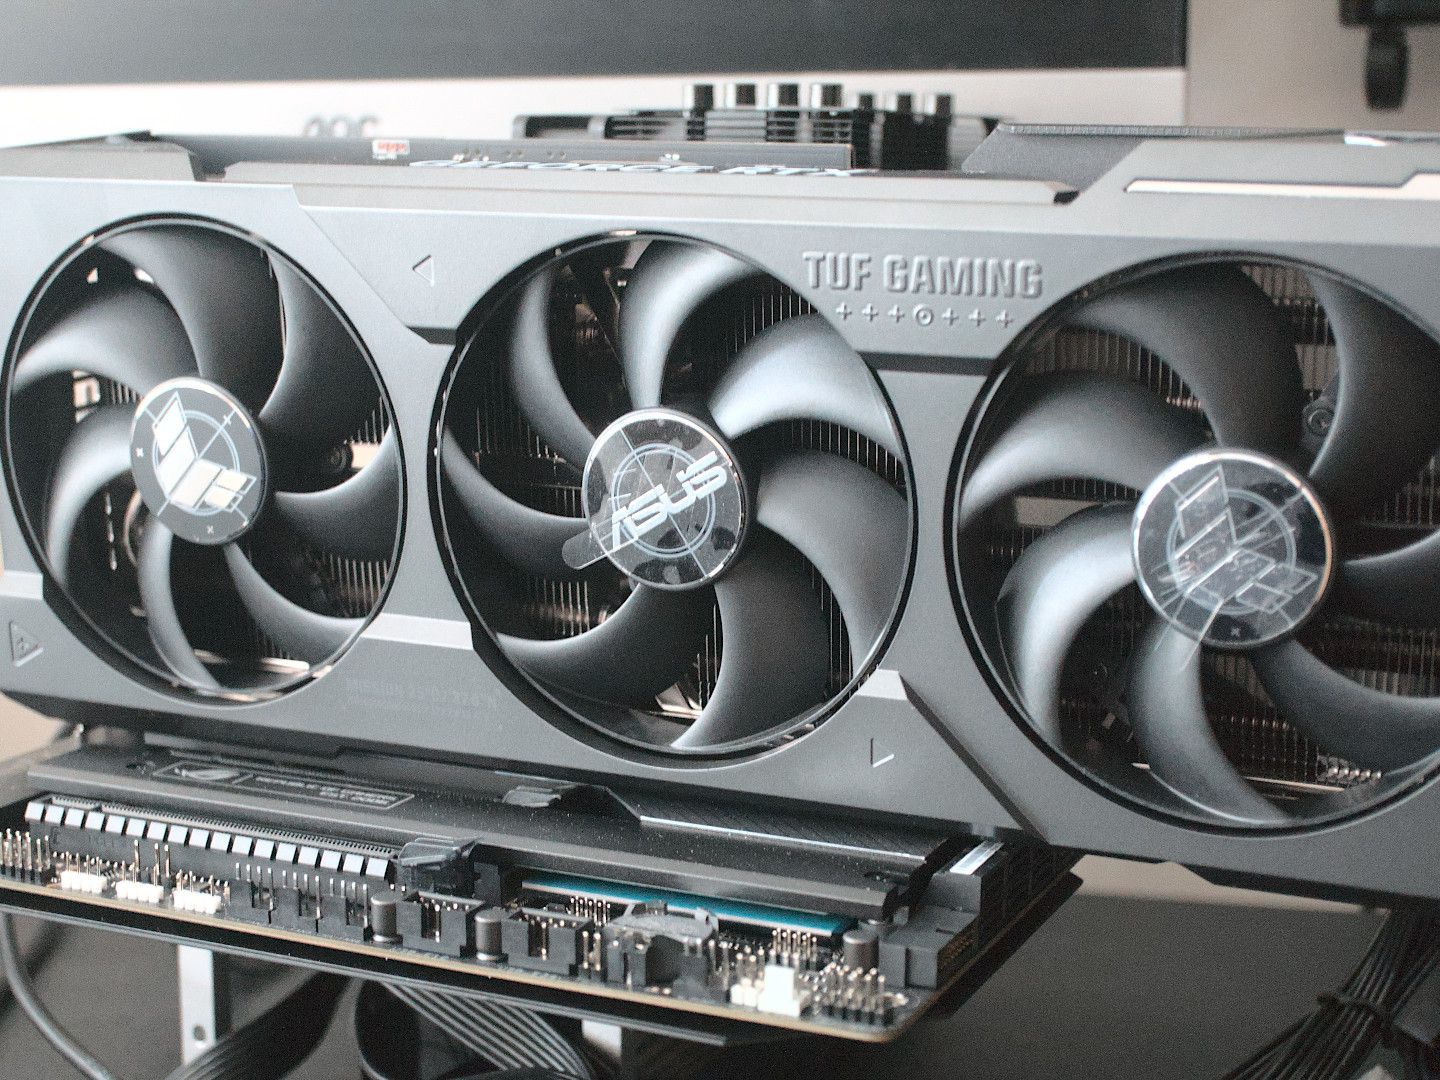
This tutorial serves as a step-by-step guide to confidently and safely install a new graphics card into your desktop PC. While the process might seem daunting at first glance, especially for those new to PC building, it’s a manageable task that, with careful attention to detail, can significantly unlock your system’s true potential. We’ll cover everything from crucial pre-installation checks and necessary tools to the physical installation process and essential post-installation driver setup, ensuring a smooth transition and an immediate boost to your digital experience. Get ready to unleash the full visual prowess of your machine.
Before You Begin: Essential Preparations for a Smooth Upgrade
A successful graphics card installation hinges on thorough preparation. Skipping these crucial preliminary steps can lead to compatibility issues, frustrating troubleshooting, or even damage to your components. Taking the time to plan will save you a lot of hassle in the long run.
Checking Compatibility and Power Requirements
Before you even unbox your new GPU, it’s vital to ensure it’s a good fit for your existing system. This involves several key considerations:
- Motherboard Compatibility: Modern graphics cards utilize the PCI Express (PCIe) x16 slot. Virtually all motherboards manufactured in the last decade will have at least one of these slots. While a newer GPU (e.g., PCIe 4.0 or 5.0) will technically work in an older PCIe 3.0 slot, it might be bandwidth-limited, meaning it won’t operate at its absolute maximum theoretical speed. However, for most users, this bottleneck is negligible unless you’re pushing extremely high-end scenarios. Ensure the slot is physically clear and accessible.
- Case Clearance: Graphics cards vary significantly in size. High-performance models often come with bulky cooling solutions, making them quite long, tall, and wide. Measure the available space inside your PC case before purchasing to avoid any physical obstructions. Pay attention to the length (from the back bracket to the front of the card), height (from the PCIe slot to the top of the card), and thickness (how many expansion slots it occupies). You don’t want to find your brand-new card literally doesn’t fit!
- Power Supply Unit (PSU): This is perhaps the most critical compatibility check. Graphics cards are power-hungry components, and your PSU needs to be capable of providing sufficient wattage.
- Wattage: Check the recommended PSU wattage for your specific GPU model (usually found on the manufacturer’s website or the product box). Add a buffer of 100-200 watts to account for your CPU and other components. An underpowered PSU can lead to system instability, crashes, or simply prevent your PC from booting.
- Connectors: Modern high-end GPUs require dedicated PCIe power connectors from your PSU, typically 6-pin, 8-pin, or the newer 12VHPWR (12+4 pin) connectors for NVIDIA’s 40-series cards. Verify that your PSU has the correct type and number of connectors. Avoid using SATA-to-PCIe power adapters, as these can be unsafe and unreliable under load. If your PSU lacks the necessary connectors or wattage, a PSU upgrade will also be part of your project.
- CPU Bottlenecking: While not a direct installation concern, it’s worth a brief mention. Even with a powerful new GPU, an older or weaker CPU might “bottleneck” its performance, meaning the CPU can’t feed data to the GPU fast enough, preventing the GPU from running at its full potential. Researching your CPU and target GPU combination can help manage performance expectations.
- Existing Drivers: If you’re replacing an old graphics card, especially if you’re switching between NVIDIA and AMD, it’s good practice to uninstall the old drivers before removing the old card. This prevents potential driver conflicts. Tools like Display Driver Uninstaller (DDU) are excellent for performing a clean sweep of old drivers.
Gathering Your Tools and Workspace Setup
Preparation extends to your physical workspace and tools. A well-organized and safe environment makes the installation process much smoother.
- Essential Tools:
- Phillips-head Screwdriver: Most PC screws are Phillips-head. A magnetic tip can be helpful for those tiny screws.
- Anti-static Wrist Strap or Mat: Crucial for preventing electrostatic discharge (ESD), which can permanently damage sensitive electronic components. If you don’t have one, regularly touch a grounded metal object (like your PC case’s unpainted metal frame) to discharge any static buildup.
- Flashlight (Optional but Recommended): Helps illuminate cramped or dimly lit areas inside the case.
- Zip Ties or Velcro Straps: Useful for cable management, keeping your case tidy and improving airflow.
- Small Container: To hold screws and small parts, preventing them from getting lost.
- Safe Workspace: Choose a clean, flat, and well-lit area. Avoid working on carpeted floors, as carpets are notorious for generating static electricity. A wooden or laminate table is ideal. Ensure enough space to comfortably open your PC case and maneuver components.
- Backing Up Data: While a graphics card installation typically doesn’t affect your data, it’s always wise to back up important files before performing any major hardware changes. Better safe than sorry!
The Installation Process: A Step-by-Step Walkthrough
With your preparations complete, it’s time to dive into the physical installation. Take your time, follow each step carefully, and don’t force anything. Patience is key.
Preparing Your System
- Power Down and Unplug: This is the most critical safety step. Completely shut down your computer. Once it’s off, unplug the power cable from the back of the PSU and disconnect all other peripherals (monitor, keyboard, mouse, USB devices). This ensures no residual power flows through the system.
- Move to Your Workspace: Place your PC case on your prepared, static-free workspace.
- Open the PC Case: Most cases have a side panel secured by a few thumbscrews or standard Phillips-head screws at the back. Remove these screws and gently slide or lift off the side panel. It’s usually the left-hand panel when looking at the front of the case.
- Static Discharge: Before touching any internal components, wear your anti-static wrist strap and attach it to an unpainted metal part of your PC case. Alternatively, if you don’t have a strap, frequently touch the metal frame of the case.
Removing Your Old Graphics Card (If Applicable)
If you’re upgrading, you’ll need to remove the existing GPU first. If this is a new build or your first GPU installation, you can skip this section.
- Disconnect Power Cables: Locate any PCIe power cables running from your PSU to the old graphics card. These are typically 6-pin or 8-pin connectors. Squeeze the release clip on the connector and gently pull them straight out.
- Unscrew Mounting Bracket: The graphics card is secured to the case’s expansion slots with one or two Phillips-head screws (sometimes a tool-less retention clip). Unscrew and remove these.
- Release PCIe Retention Clip: At the very end of the PCIe x16 slot on your motherboard, there’s a small plastic lever or clip. This clip holds the card firmly in place. Carefully push or press this clip (it might spring open or need manual manipulation) to release the card. Do not try to pull the card out without releasing this clip, as you could damage the motherboard slot or the card itself.
- Gently Remove the Card: Once the clip is released, grasp the graphics card firmly but gently at both ends and pull it straight up and out of the PCIe slot. Place it safely back in its anti-static bag or box.
Installing Your New Graphics Card
Now for the exciting part!
- Clear the PCIe Slot: If there were blanking plates covering the expansion slots at the back of your case where the new GPU will go, remove them. Some cases have reusable screws, while others have punch-out tabs you’ll need to bend until they break off. Make sure the slot you’re using for the GPU (usually the top-most PCIe x16 slot) is clear.
- Align and Insert the Card:
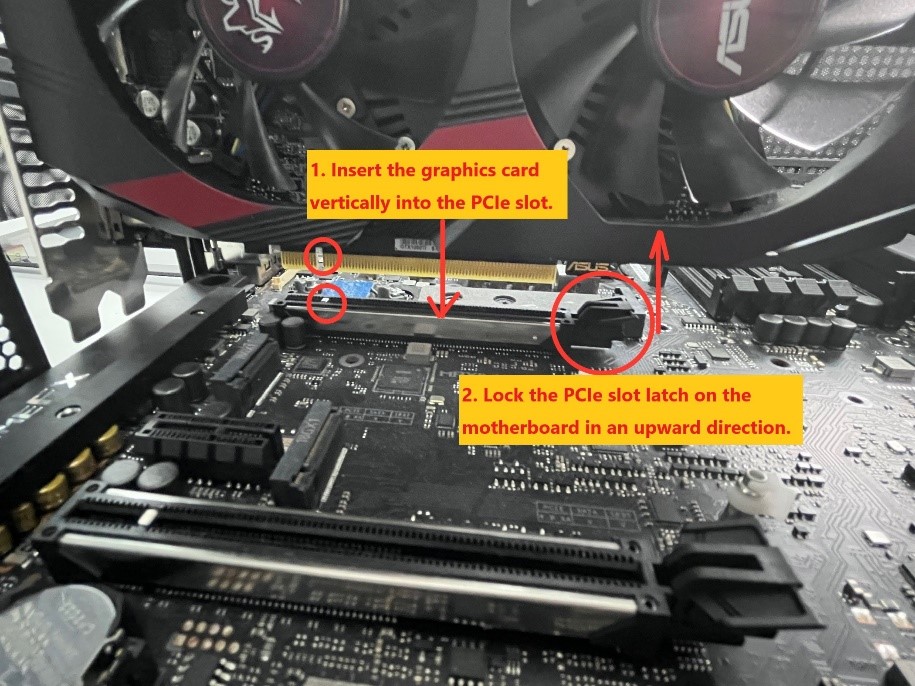
- Carefully align the new graphics card with the PCIe x16 slot on your motherboard. The gold contacts on the card should line up perfectly with the slot.
- Hold the card by its edges (avoid touching the delicate components or fan blades).
- Position the card over the slot and apply firm, even pressure to both ends until it slides fully into the slot. You should feel it click into place, and the PCIe retention clip at the end of the slot should automatically close and lock the card. Double-check that the clip has engaged properly. The card should sit level and firmly in the slot.
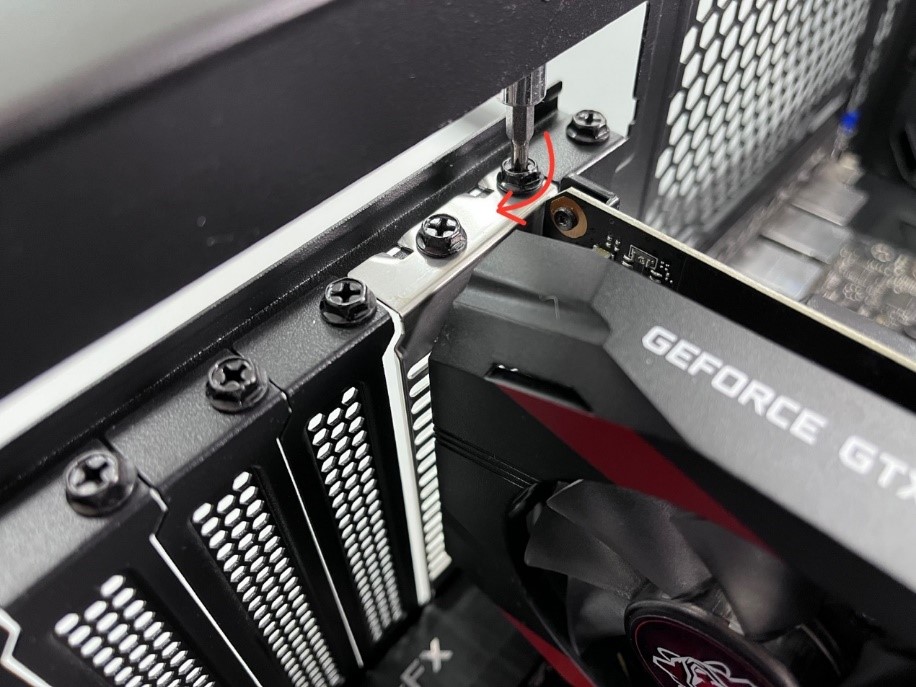
- Secure the Card: Once the card is fully seated, use the screws you removed earlier (or new ones provided with your case) to secure the graphics card’s mounting bracket to the PC case’s expansion slots. This prevents the card from sagging or wiggling.
- Connect Power Cables: This is crucial. Locate the PCIe power connectors on your new graphics card. They are typically on the top or side edge. Take the appropriate 6-pin, 8-pin, or 12VHPWR cables from your PSU and plug them firmly into the graphics card. Ensure each connector clicks securely into place. Many modern cards require two or even three 8-pin connectors, so make sure all required connectors are plugged in. Do not skimp on power connectors; an improperly powered card will not function or will be unstable.
- Cable Management (Optional but Recommended): If you have extra zip ties or Velcro straps, take a moment to route the power cables neatly, tucking them away to improve airflow and the aesthetics of your build.
Final Checks Before Closing the Case
- Double-Check Connections: Visually inspect everything one last time. Are all power cables firmly seated? Is the graphics card fully in its slot and secured with screws? Is the monitor cable ready to be plugged into the new graphics card?
- No Loose Screws or Tools: Ensure you haven’t left any screws, tools, or other foreign objects inside the PC case. A forgotten screw could potentially short out components.
- Close the Case: Carefully reattach the side panel of your PC case, ensuring it’s properly aligned, and secure it with its screws.
Post-Installation: Drivers, Testing, and Optimization
The physical installation is only half the battle. Software configuration, especially driver installation, is paramount to getting your new GPU to perform at its best.
Initial Boot-Up and Driver Installation
- Connect Monitor: Crucially, plug your monitor’s display cable (HDMI, DisplayPort, DVI) directly into one of the output ports on your new graphics card, not the motherboard’s integrated graphics ports.
- Power On: Reconnect all your peripherals and the power cable to the PSU. Press the power button on your PC.
- Observe Initial Boot: Your system should boot up normally. If everything is correct, you should see a display on your monitor. Windows might boot into a basic resolution using generic drivers. Don’t worry, this is normal.
- Installing Drivers: This is the most critical software step.
- Download Latest Drivers: Immediately after booting into Windows, navigate to the graphics card manufacturer’s official website (NVIDIA or AMD). Go to their driver download section and download the very latest drivers specific to your GPU model and operating system.
- Run Driver Installer: Execute the downloaded driver package. Follow the on-screen prompts. Typically, you’ll choose a “Custom” or “Express” installation. It’s often recommended to perform a “clean installation” option if available, as this wipes any residual old driver files.
- Monitor Blinks/Resets: During driver installation, your screen may flicker, go black, or reset resolution multiple times. This is normal behavior as the new drivers are being loaded and configured.
- Restart PC: Once the driver installation is complete, restart your computer as prompted.
- Clean Driver Installation (Advanced): If you’re switching between NVIDIA and AMD or encounter persistent display issues, consider using Display Driver Uninstaller (DDU). This free utility allows for a thorough removal of all graphics drivers in Safe Mode, ensuring no conflicts when installing new ones. Use DDU before installing your new GPU’s drivers.
Testing Your New GPU
Once the drivers are installed and your PC has restarted, it’s time to verify everything is working as expected.
- Basic Functionality: Check your display resolution in Windows settings. Ensure it’s set to your monitor’s native resolution and refresh rate. Test multi-monitor setups if applicable.
- Performance Benchmarking: To truly test your GPU’s capabilities, run a demanding game or a dedicated benchmarking tool like 3DMark, Unigine Heaven/Superposition Benchmark, or Cinebench. Monitor frame rates and overall stability.
- Monitoring Temperatures: Install hardware monitoring software like HWMonitor, GPU-Z, or the manufacturer’s own utility (e.g., NVIDIA GeForce Experience, AMD Adrenalin Software). Monitor your GPU’s temperature while under load (e.g., during gaming or benchmarks). Normal operating temperatures typically range from 60-80°C under load, though some high-end cards can go higher. Excessive temperatures (e.g., consistently above 90°C) could indicate poor airflow, an issue with the card’s cooler, or an improperly seated card.
Troubleshooting Common Issues
Even with careful preparation, issues can sometimes arise. Here are solutions to common problems:
- No Display Output:
- Double-check that your monitor cable is plugged into the new graphics card and not the motherboard.
- Ensure all PCIe power cables are securely connected to the GPU.
- Reseat the graphics card: power down, unplug, open case, remove and reinsert the card firmly.
- Check your PSU wattage; it might be insufficient.
- Try booting with only the bare essentials (one RAM stick, CPU, GPU) to rule out other components.
- System Not Booting/Black Screen:
- This often indicates a power issue or a short. Double-check all power connections, especially to the motherboard and GPU.
- Clear your motherboard’s CMOS (refer to your motherboard manual).
- Verify your PSU has enough wattage for all components.
- Driver Crashes/Instability/Artifacts:
- Perform a clean driver installation using DDU.
- Ensure Windows is fully updated.
- Check GPU temperatures; overheating can cause instability.
- If using an older PSU, it might not be delivering stable power under load.
- Coil Whine: A high-pitched buzzing or whining sound from the GPU, especially under load. While annoying, it’s generally harmless and not a sign of a faulty card. It’s caused by electromagnetic vibrations within the electrical components.
Maximizing Your GPU’s Potential: Maintenance and Beyond
Your new graphics card is now installed and running. To ensure it continues to deliver peak performance and a long lifespan, a little ongoing care and optimization go a long way.
- Regular Driver Updates: Both NVIDIA and AMD frequently release new drivers, often including performance optimizations for the latest games, bug fixes, and new features. Make it a habit to check for and install these updates regularly. Use the manufacturer’s software (GeForce Experience or Adrenalin Software) to manage this.
- Keeping it Cool: Dust is the enemy of electronics. Over time, dust buildup can choke your GPU’s fans and heatsink, leading to higher temperatures and reduced performance.
- Clean Your Case: Periodically open your PC case (every 3-6 months) and use compressed air to blow out dust from the GPU’s heatsink, fans, and other components.
- Optimize Airflow: Ensure your case fans are properly configured for optimal airflow (intake fans bringing cool air in, exhaust fans pushing hot air out). Good airflow helps your GPU stay cool.
- Overclocking (For Advanced Users): If you’re looking to squeeze every last bit of performance out of your GPU, overclocking can be an option. This involves increasing the GPU’s clock speed and memory frequency beyond factory settings. However, it requires careful monitoring of temperatures and stability, and improper overclocking can lead to instability or reduce the lifespan of your card. Use manufacturer-provided or reputable third-party tools for this.
- Monitoring Software: Continue using hardware monitoring tools (HWMonitor, GPU-Z, MSI Afterburner) to keep an eye on your GPU’s temperatures, clock speeds, and usage. This can help you identify potential issues before they become serious.
Conclusion: Unleash Your System’s True Power
Congratulations! You’ve successfully navigated the process of installing a new graphics card. This upgrade is one of the most rewarding for any PC user, fundamentally transforming your computing experience. From buttery-smooth gameplay and lightning-fast rendering to enhanced productivity in visually intensive applications, your system is now capable of tackling demands it might have struggled with before.
By understanding the necessary preparations, meticulously following the installation steps, and diligently managing post-installation drivers, you’ve not only empowered your machine but also gained valuable insight into the intricacies of PC hardware. This newfound confidence opens the door to further explorations in tech, whether it’s optimizing your system, learning more about other components, or even venturing into more complex builds. Enjoy the enhanced visuals and performance – your digital world just got a significant upgrade!
aViewFromTheCave is a participant in the Amazon Services LLC Associates Program, an affiliate advertising program designed to provide a means for sites to earn advertising fees by advertising and linking to Amazon.com. Amazon, the Amazon logo, AmazonSupply, and the AmazonSupply logo are trademarks of Amazon.com, Inc. or its affiliates. As an Amazon Associate we earn affiliate commissions from qualifying purchases.