
In the ever-evolving landscape of digital creation and communication, fonts are the silent architects of our visual experience. They convey emotion, establish brand identity, and dictate readability. Whether you’re a graphic designer crafting a compelling brand identity, a writer aiming for a specific aesthetic in your document, or simply a user looking to personalize your digital environment, understanding how to install and manage fonts is a fundamental skill. This guide will delve into the intricacies of font installation across various operating systems and applications, empowering you to unlock a world of typographic possibilities.

Understanding Font File Types and Their Importance
Before embarking on the installation process, it’s beneficial to understand the common font file types you’ll encounter. These formats dictate how fonts are rendered and supported across different platforms. Familiarity with these types will help you troubleshoot potential issues and ensure compatibility.
OpenType (.otf) and TrueType (.ttf) Fonts: The Modern Standards
The vast majority of fonts you download or purchase will be in either OpenType (.otf) or TrueType (.ttf) format. Both are widely supported and offer excellent quality.
-
TrueType (.ttf): Developed by Apple and later adopted by Microsoft, TrueType fonts are known for their scalability and ease of use. They are designed to display consistently on screen and in print. TrueType fonts contain detailed outline information that allows them to be rendered smoothly at any size, preventing pixelation. This was a significant advancement over earlier bitmap fonts, which were resolution-dependent.
-
OpenType (.otf): An extension of TrueType, OpenType was developed jointly by Adobe and Microsoft. It offers a richer feature set than TrueType, including advanced typographic capabilities such as ligatures, stylistic alternates, small caps, and swashes. OpenType fonts can also incorporate more extensive character sets, supporting multiple languages and symbol sets within a single font file. This makes them incredibly versatile for designers working with diverse typographic needs. For many professional designers, OpenType is the preferred format due to its enhanced features and broad compatibility.
Web Open Font Format (.woff and .woff2): For the Web
If you’re involved in web design or development, you’ll frequently encounter Web Open Font Format (.woff and .woff2) files. These formats are specifically optimized for web use, offering smaller file sizes and faster loading times for websites.
-
Web Open Font Format (.woff): WOFF is a font format for the web that uses compression to reduce file size. It’s based on the OpenType and TrueType formats but is packaged in a way that is more efficient for transmission over networks.
-
Web Open Font Format 2.0 (.woff2): WOFF2 is a more advanced compression format that offers even greater file size reductions compared to WOFF, leading to faster website loading speeds. It employs Brotli compression, which is highly effective for fonts. While you might not install these directly onto your operating system for general use, understanding them is crucial for web developers who embed fonts in their sites.
Portable Font Format (.pff): Less Common, but Worth Knowing
While less common in contemporary usage, you might occasionally come across Portable Font Format (.pff) files. These are proprietary formats and may require specific software to install or use. For general purposes, focusing on .otf and .ttf is usually sufficient.
Why Font Types Matter for Installation
The font file type can influence how your operating system handles the installation. Most modern operating systems are adept at recognizing and installing .ttf and .otf files without any special procedures. However, for less common formats, or if you encounter installation errors, understanding the file type can be a starting point for troubleshooting. The installation process itself is generally straightforward, regardless of the file type, but knowing what you’re working with can save you time and frustration.
Installing Fonts on Windows: A Seamless Process
Windows, being the most widely used desktop operating system, offers an intuitive and straightforward method for installing new fonts. Whether you’ve downloaded a font for a personal project or for a professional design endeavor, integrating it into your system is a matter of a few clicks. This section will guide you through the most common and efficient ways to install fonts on Windows.
Method 1: The Drag-and-Drop Method (Quick and Easy)
This is arguably the simplest and fastest way to install fonts on Windows.
- Locate Your Font Files: Navigate to the folder where you have downloaded or extracted your font files. You’ll typically see files with extensions like .ttf, .otf, or .woff.
- Open the Fonts Folder:
- Press the
Windows key + Rto open the Run dialog box. - Type
fontsand press Enter. This will open the main Fonts folder in your Control Panel.
- Press the
- Drag and Drop: Select the font files you wish to install and drag them directly into the open Fonts folder.
Windows will automatically recognize the files and begin the installation process. You’ll see a progress bar indicating the installation. Once complete, the font will be available in all your applications.
Method 2: Using the Font Previewer
Each font file on Windows has an associated previewer that allows you to see what the font looks like before installing it. This method is useful for verifying the font and initiating the installation.
- Locate Your Font Files: Again, navigate to the folder containing your font files.
- Double-Click the Font File: Double-clicking on a .ttf or .otf file will open the Font Viewer. This window displays the font in various sizes, along with a preview of all its characters.
- Click “Install”: At the top of the Font Viewer window, you will find an “Install” button. Clicking this button initiates the installation process.
The font will then be added to your system and become available for use in your applications. This method is particularly helpful if you’re unsure about the font and want to get a good look at it before committing to installation.
Method 3: Installing Fonts via Settings (Windows 10 and Later)
Windows 10 and subsequent versions offer a more integrated approach to font management through the Settings app.
- Open Settings: Click on the Start button and select the gear icon to open the Settings app.
- Navigate to Personalization: Click on “Personalization.”
- Select Fonts: In the left-hand menu, click on “Fonts.”
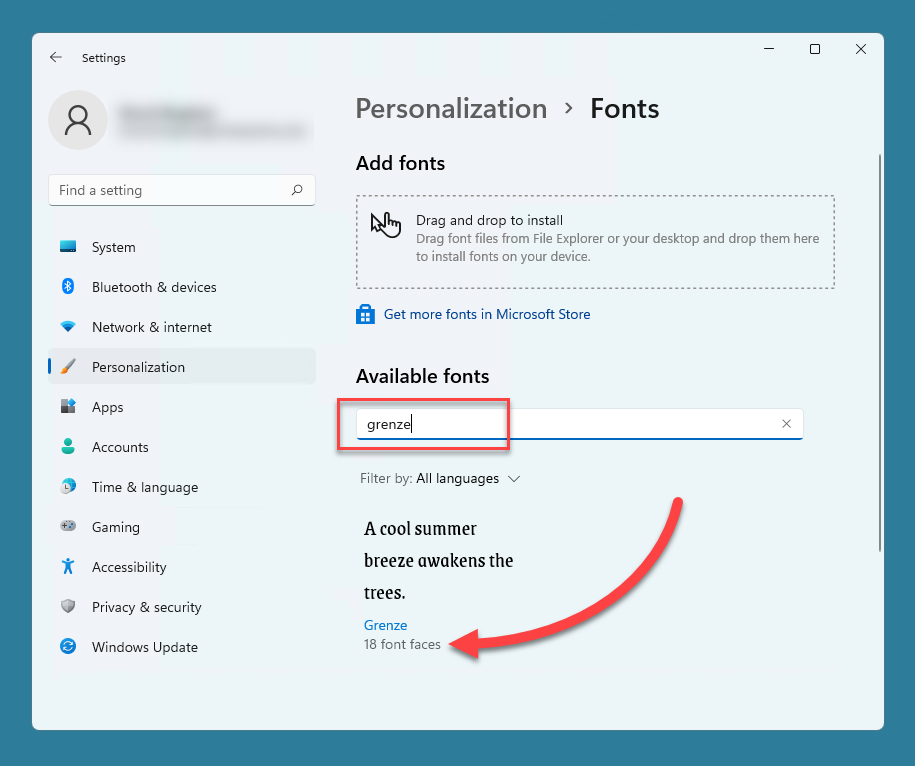
- Drag and Drop into Settings: Similar to the Fonts folder method, you can drag and drop your font files directly into the designated area in the Fonts settings. Alternatively, you’ll see an “Add fonts” button or a search bar where you can browse for your font files.
This method provides a centralized location for managing all installed fonts on your system, offering a cleaner interface for adding and viewing fonts. It also allows you to uninstall fonts directly from this interface.
Installing Fonts for All Users vs. Current User
When installing fonts, Windows might present you with an option to install them for “All Users” or just for the “Current User.”
- Install for All Users: This option requires administrator privileges. The font will be available to every user account on that computer. This is generally the preferred method for shared computers or if you intend to use the font across multiple user profiles.
- Install for Current User: The font will only be available to the user account that is currently logged in. This is useful for personalizing your own workspace without affecting other users or if you don’t have administrator rights.
If you are unsure, installing for “All Users” is usually the most convenient option if you have the necessary permissions.
Installing Fonts on macOS: A User-Friendly Experience
macOS boasts a robust and visually appealing font management system, making it a joy to install and organize your typographic resources. The primary tool for this is Font Book, a built-in application that handles all your font needs with ease.
Using Font Book: The Core of macOS Font Management
Font Book is your central hub for managing fonts on your Mac. It allows you to install, preview, organize, and even validate fonts.
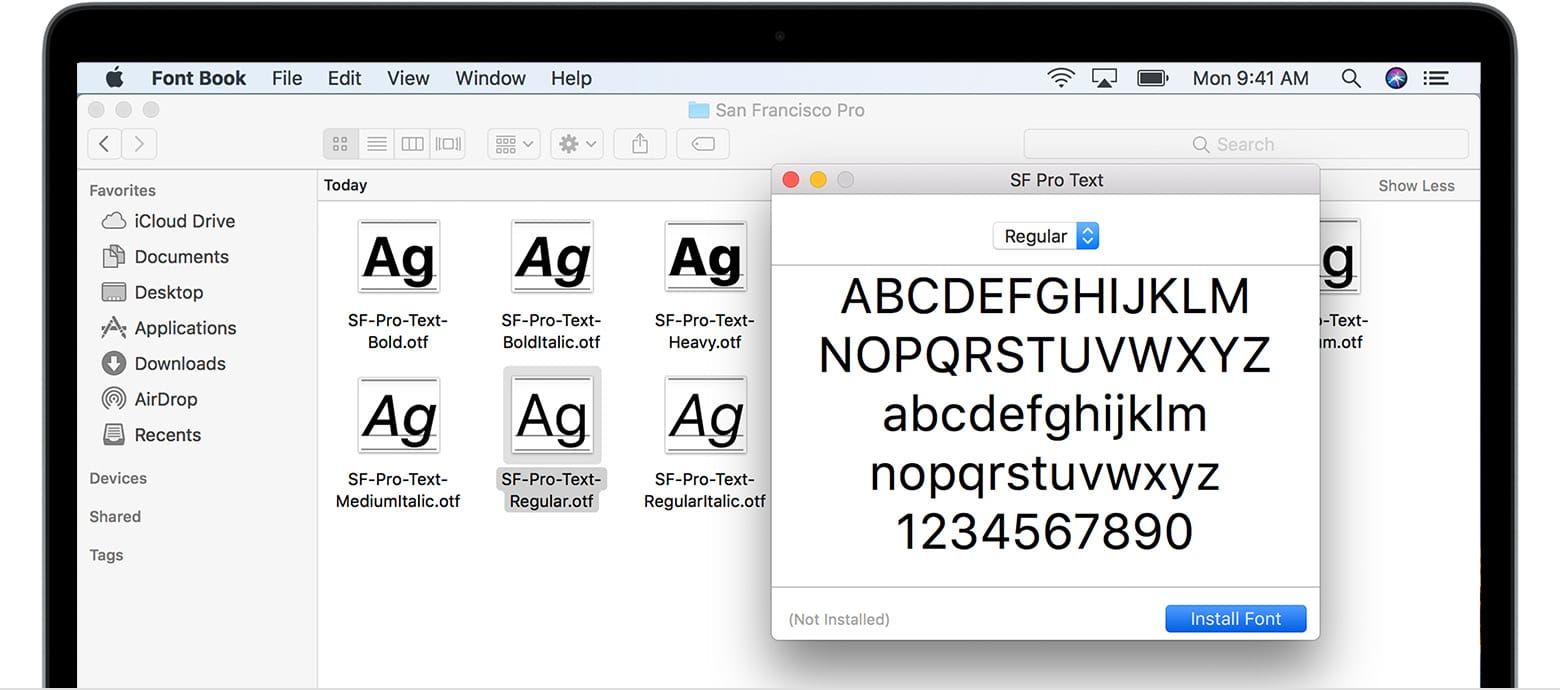
- Locate Your Font Files: Find your downloaded font files (.ttf, .otf) in Finder.
- Double-Click the Font File: Similar to Windows, double-clicking a font file will launch Font Book and present you with a preview of the font.
- Click “Install Font”: In the Font Book window, you’ll see an “Install Font” button. Clicking this will install the font.
Font Book will automatically validate the font for common errors before installation, ensuring its integrity.
Installing Fonts via the Font Book Application Interface
You can also add fonts directly through the Font Book application itself.
- Open Font Book:
- Open Finder.
- Go to your Applications folder and open Font Book.
- Alternatively, use Spotlight Search (Cmd + Spacebar) and type “Font Book.”
- Add Fonts:
- Click the “+” button in the Font Book toolbar.
- Navigate to the folder containing your font files, select them, and click “Open.”
- Alternatively, you can drag and drop your font files directly into the Font Book window.
Font Book will then analyze and install the selected fonts.
Installing Fonts for All Users vs. Current User on macOS
When installing fonts, Font Book typically asks if you want to install them for the “User” (current user) or for “Computer” (all users).
- Install for User: The font will be available only to the currently logged-in user. This is the default and recommended option if you’re installing fonts for your personal use.
- Install for Computer: This option requires administrator privileges and makes the font available to all user accounts on the Mac. This is useful for shared machines or if you want to ensure a consistent font set across different user profiles.
You can also control this default behavior within Font Book’s preferences.
Font Validation and Disabling Fonts
Font Book also offers powerful tools for font maintenance.
- Font Validation: Before installing, Font Book automatically checks for corrupt or duplicate font files. If it finds issues, it will prompt you to resolve them. You can also manually validate selected fonts by going to
File > Validate Font. - Disabling Fonts: If you have a large collection of fonts, you can disable those you aren’t currently using. This can help speed up application startup times and reduce clutter in font menus. Select the font(s) in Font Book and click the “Disable” button (often a checkbox or a dedicated button). Disabled fonts remain on your system but are not active until you re-enable them.
This meticulous approach to font management ensures a smooth and efficient workflow, especially for professionals dealing with extensive font libraries.
Installing Fonts in Applications: Specific Software Needs
While installing fonts at the operating system level makes them available to most applications, some software, particularly professional creative suites, may have their own specific font management or installation procedures. Understanding these can ensure you’re utilizing your fonts to their full potential within your chosen tools.
Adobe Creative Cloud (Photoshop, Illustrator, InDesign, etc.)
Adobe’s Creative Cloud applications are heavily reliant on typography. They integrate seamlessly with system-installed fonts, but also offer their own font management solutions.
- System-Installed Fonts: Any font you install on your operating system (Windows or macOS) will generally be available within Adobe applications. Simply restart the Adobe application after installing a new font on your system, and it should appear in the font lists.
- Adobe Fonts (formerly Typekit): Adobe Creative Cloud subscribers have access to a vast library of high-quality fonts through Adobe Fonts. You can activate fonts directly from the Adobe Creative Cloud desktop app or within individual Adobe applications. Once activated, these fonts are synced to your system and behave like any other installed font. You don’t “install” them in the traditional sense but rather “activate” them for use.
It’s important to note that if you activate a font from Adobe Fonts, it requires an active Creative Cloud subscription to remain usable.
Microsoft Office Suite (Word, PowerPoint, etc.)
The Microsoft Office suite is a ubiquitous tool for document creation and presentations. It relies on the fonts installed on your operating system.
- Automatic Availability: Once a font is installed on Windows or macOS, it will automatically appear in the font selection dropdown menus within Word, PowerPoint, Excel, and other Office applications.
- Font Embedding: When sharing Office documents, especially if you’re using custom or less common fonts, consider embedding the fonts within the document. This ensures that the document will display correctly on other computers, even if they don’t have those specific fonts installed. In Word, you can find this option under
File > Options > Save > Embed fonts in the file. Be mindful of font licensing when embedding.
Other Design Software and Applications
Many other design and productivity applications utilize system-installed fonts. This includes software like:
- Affinity Suite (Designer, Photo, Publisher): Similar to Adobe products, Affinity applications leverage system fonts.
- CorelDRAW: Another professional design tool that accesses system fonts.
- General Productivity Apps: Text editors, code editors, and other general applications will also draw from your system’s font library.
Key Takeaway for Application-Specific Installation: For most applications, the core step is to ensure the font is correctly installed at the operating system level. For those that are part of a larger suite or service (like Adobe Creative Cloud), explore their native font management or activation features for an even richer typographic experience and optimized workflows.
Troubleshooting Common Font Installation Issues
While font installation is generally a smooth process, occasionally you might encounter hiccups. Understanding common problems and their solutions can save you valuable time and ensure your design projects remain on track.
Font Files Are Corrupt or Incomplete
- Symptom: The font fails to install, or it installs but displays incorrectly (e.g., missing characters, garbled text).
- Solution: This often indicates a problem with the font file itself.
- Redownload the Font: The most straightforward solution is to download the font again from a reputable source. The original download might have been interrupted or corrupted.
- Check File Size: Compare the file size of the downloaded font to what might be expected. A significantly smaller file size could indicate an incomplete download.
- Use Font Validation Tools: As mentioned in the macOS section, use built-in tools like Font Book (on Mac) or third-party font validators (available for Windows) to check for corruption before installation.
“Font Not Valid” or Similar Error Messages
- Symptom: Your operating system or font management software explicitly flags the font as invalid.
- Solution:
- Incorrect Font Type: Ensure you are trying to install a recognized font format (.ttf, .otf, .woff). Some applications might try to “install” other file types by mistake.
- Licensing Restrictions: Some fonts come with specific licensing that might prevent installation or distribution without proper authorization.
- Compatibility Issues: While rare with modern OS versions, very old or proprietary font formats might not be compatible with current systems.
Fonts Not Appearing in Applications After Installation
- Symptom: You’ve successfully installed a font, but it doesn’t show up in the font list within your favorite applications.
- Solution:
- Restart the Application: This is the most common fix. Many applications load their font lists when they start. Closing and reopening the application will force it to rescan your system for installed fonts.
- Restart Your Computer: If restarting the application doesn’t work, a full system reboot can resolve more deeply embedded caching issues.
- Check Font Availability: Verify that the font is indeed installed correctly by checking your operating system’s font directory (Control Panel > Fonts on Windows, Font Book on macOS).
- Application-Specific Font Caches: Some professional applications might maintain their own font caches that can become corrupted. Clearing these caches (refer to the application’s documentation) can sometimes help.
Duplicate Fonts
- Symptom: You have multiple versions of the same font installed, leading to confusion or potential conflicts.
- Solution:
- Use Font Management Tools: Font Book on macOS has excellent duplicate detection. On Windows, you can manually check your Fonts folder or use third-party font management software to identify and remove duplicates.
- Be Mindful During Installation: Before installing a new font, it’s good practice to search your existing fonts to see if you already have it.
By understanding these common issues and their resolutions, you can navigate the world of font installation with confidence, ensuring your digital creations always look their best. A well-curated and properly managed font library is a cornerstone of effective visual communication and personal branding.
aViewFromTheCave is a participant in the Amazon Services LLC Associates Program, an affiliate advertising program designed to provide a means for sites to earn advertising fees by advertising and linking to Amazon.com. Amazon, the Amazon logo, AmazonSupply, and the AmazonSupply logo are trademarks of Amazon.com, Inc. or its affiliates. As an Amazon Associate we earn affiliate commissions from qualifying purchases.