
The hum of a properly functioning air conditioning unit is a comfort during warmer months, a silent guardian against oppressive heat. However, when that hum turns into a grind, a whine, or ceases altogether, your comfort—and the longevity of your HVAC system—is at stake. Often, the culprit is a failing condenser fan motor. This critical component is responsible for dissipating heat from your refrigerant, allowing your AC to cool efficiently. Replacing it might seem like a daunting task, but with the right knowledge, tools, and a methodical approach, it’s a DIY project well within the capabilities of a dedicated homeowner or a budding technician. This guide will walk you through the precise steps to install a new condenser fan motor, ensuring your cooling system operates optimally once more.

Understanding Your HVAC System and the Condenser Fan’s Role
Before diving into the mechanical aspects of replacement, it’s crucial to grasp the function of the condenser fan motor within the broader HVAC system. Located in the outdoor unit, this motor drives a fan that pulls air across the condenser coils. As the refrigerant, now a hot gas, passes through these coils, the fan helps dissipate the heat into the surrounding atmosphere, causing the refrigerant to condense back into a liquid. This process is fundamental to the refrigeration cycle. Without a functioning condenser fan, the heat cannot be properly expelled, leading to insufficient cooling, increased energy consumption, and potential damage to the compressor—the heart of your AC unit.
Why Your Condenser Fan Motor Might Fail
Condenser fan motors operate under demanding conditions. They are exposed to outdoor elements—heat, cold, rain, dust, and debris—and run for extended periods during cooling seasons. Several factors can contribute to their eventual failure:
-
Age and Wear: Like any mechanical component, motors have a lifespan. Bearings can wear out, windings can degrade, and internal components can succumb to fatigue over years of operation.
-
Overheating: If the motor is constantly working harder due to restricted airflow (e.g., dirty coils, blocked vents) or an oversized fan blade, it can overheat, leading to insulation breakdown and motor failure.
-
Electrical Issues: Power surges, consistent low voltage, or faulty capacitors can put undue stress on the motor’s electrical components, leading to burnout.
-
Environmental Factors: Water intrusion (from rain or sprinkler systems), pest infestations (rodents chewing wires), or accumulation of dust and debris can compromise the motor’s integrity.
-
Lubrication Failure: Many motors require periodic lubrication, and a lack thereof can lead to increased friction, heat, and eventual seizure of the bearings.
Recognizing the Symptoms of a Failing Motor
Catching the signs of a failing condenser fan motor early can prevent further damage to your HVAC system. Be vigilant for:
-
No Fan Rotation: The most obvious sign is if the fan blade in the outdoor unit isn’t spinning when the AC is running. You might hear the compressor still attempting to operate, but no air movement from the fan.
-
Unusual Noises: Grinding, squealing, buzzing, or humming sounds coming from the outdoor unit often indicate worn-out bearings or an ailing motor.
-
Reduced Cooling Performance: If your home isn’t cooling as effectively as it used to, or the unit is running constantly without reaching the set temperature, a faulty fan motor could be preventing proper heat dissipation.
-
Overheating Unit: The outdoor unit might feel excessively hot to the touch, indicating that heat is not being properly expelled.
-
Tripping Breaker: A failing motor drawing too much current can trip the circuit breaker, interrupting power to the unit.
Essential Preparations: Safety First and Gathering Your Tools
Safety is paramount when working with electrical appliances, especially high-voltage HVAC systems. Neglecting proper safety precautions can lead to serious injury or even fatality. Beyond safety, having the right tools and materials at hand will streamline the installation process, preventing frustrating delays.
Prioritizing Electrical Safety
ALWAYS begin by disconnecting power to the outdoor unit. This typically involves two steps:
-
At the Thermostat: Set your thermostat to “Off” to prevent accidental activation.
-
At the Breaker Panel: Locate the circuit breaker that controls your outdoor AC unit (often labeled “AC” or “Condenser”) and switch it to the “Off” position. For added safety, you can also consider turning off the main breaker if you’re unsure which specific breaker controls the AC unit.
-
At the Disconnect Box: Most outdoor units have a dedicated electrical disconnect box mounted on the exterior wall near the unit. Open this box and pull out the fuse block or switch the lever to the “Off” position. This physically isolates the unit from the power supply, providing an extra layer of protection. Use a non-contact voltage tester to confirm that no power is reaching the unit before touching any wires.
Must-Have Tools and Materials
Having these items ready will ensure a smooth installation:
-
New Condenser Fan Motor: Ensure it’s an exact match in terms of horsepower (HP), RPM (revolutions per minute), voltage, amperage, rotation direction (CW for clockwise, CCW for counter-clockwise, or Reversible), and shaft size. It’s often best to remove the old motor and take it to a reputable HVAC supply store to ensure a perfect match.
-
New Capacitor (if applicable): Many fan motors use a run capacitor. It’s highly recommended to replace the capacitor when replacing the motor, as a failing capacitor can quickly damage a new motor. Match the MFD (microfarad) rating and voltage.
-
Screwdrivers: Flat-head and Phillips-head.
-
Nut Drivers or Wrenches: For removing bolts and nuts (typically 1/4″, 5/16″, 3/8″, 1/2″).
-
Wire Cutters/Strippers: For safely cutting and stripping electrical wires.
-
Needle-Nose Pliers: Useful for manipulating small wires and components.
-
Electrical Tape: High-quality electrical tape for securing connections.
-
Digital Multimeter: For testing voltage and capacitance.
-
Non-Contact Voltage Tester: For confirming power is off.
-
Adjustable Wrench: For general loosening and tightening.
-
Permanent Marker: To label wires before disconnecting.
-
Camera/Smartphone: To take pictures of wiring configurations before disassembly.
-
Gloves and Safety Glasses: Essential personal protective equipment.
-
Zip Ties or Wire Nuts: For securing new wiring.
Step-by-Step Replacement: Removing the Old Motor
With safety precautions in place and tools at the ready, the removal of the old motor can begin. This process requires attention to detail, especially regarding wiring.
Disconnecting Power and Accessing the Unit
As reiterated, ensure all power to the outdoor unit is off. Then, proceed to:
-
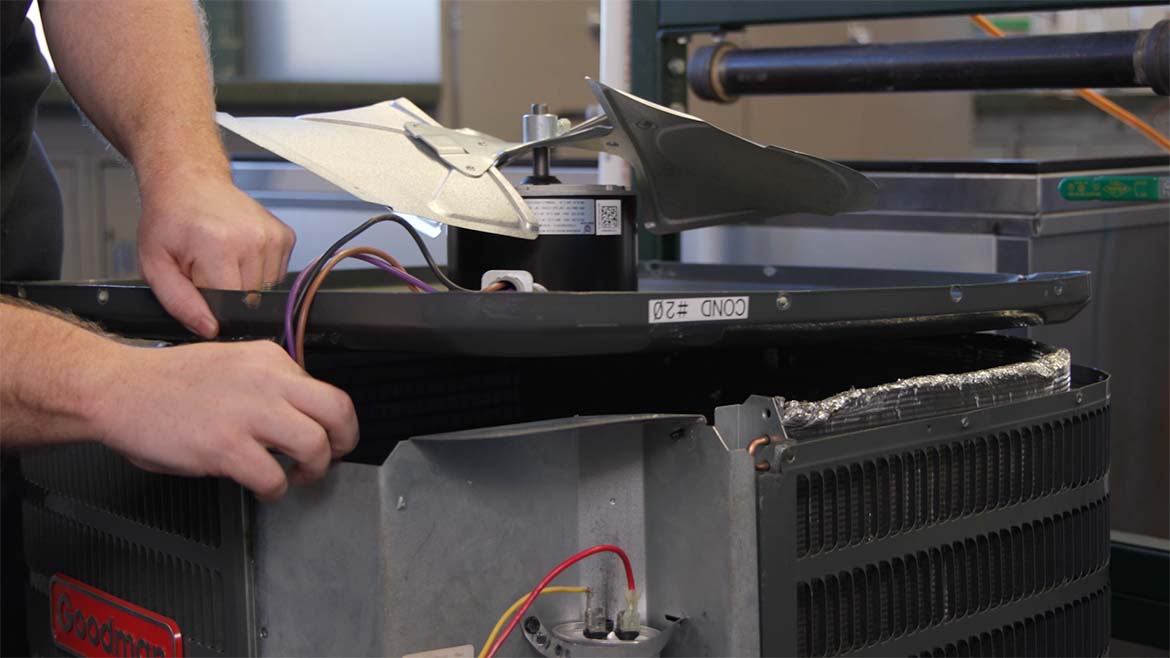
Remove the Top Grille: Most condenser units have a protective grille or cage on top, secured by screws or bolts. Carefully remove these fasteners and lift the grille, often with the fan motor still attached, setting it aside safely.
-
Inspect for Debris: Take this opportunity to clear any leaves, twigs, or other debris that may have accumulated inside the unit.
Documenting Wiring and Component Removal

This is perhaps the most critical step for a successful DIY replacement:
-
Take Pictures: Before touching any wires, use your smartphone to take multiple, clear photographs of the existing wiring connections from different angles. Pay close attention to which wire goes to which terminal on the motor, the capacitor, and the contactor.
-
Label Wires: Use a permanent marker to label each wire before disconnecting it. For instance, “Contactor L1,” “Capacitor Herm,” “Capacitor Fan,” etc. This will be invaluable during reinstallation.
-
Disconnect Wires: Carefully disconnect the motor’s electrical wires from the capacitor and the contactor. Note any ground wires and disconnect them as well.
Extracting the Old Motor
Once the wiring is documented and disconnected:
-
Remove Fan Blade: The fan blade is usually attached to the motor shaft with a setscrew. Loosen this setscrew with an Allen wrench or a screwdriver. Carefully slide the fan blade off the shaft. Be gentle, as the blade can be brittle.
- Tip: Mark the orientation of the fan blade on the shaft (e.g., with tape) to ensure it’s reinstalled facing the correct direction.
-
Unmount the Motor: The motor itself is typically mounted to a bracket or a spider-like frame with bolts or screws. Remove these fasteners.
-
Remove the Motor: Carefully lift the old motor out of the unit.
Installing the New Motor: Precision and Connection
With the old motor removed, the installation of the new one can begin. This phase demands precision in mounting and meticulous attention to electrical connections.
Mounting the New Motor Securely
-
Transfer Mounting Hardware (if needed): Some new motors come with their own mounting hardware, while others require you to reuse components from the old motor (e.g., specific brackets or rings). Ensure all necessary hardware is ready.
-
Position the New Motor: Carefully place the new motor into the condenser unit, aligning its mounting holes with the bracket or frame.
-
Secure the Motor: Fasten the new motor securely using the appropriate bolts or screws. Ensure it’s snug and doesn’t wobble.
-
Install the Fan Blade: Slide the fan blade onto the new motor shaft, paying attention to the correct orientation (as noted during removal, or ensuring the curved edge scoops air upwards). Ensure the blade is positioned at the correct height within the shroud (usually flush with the top of the shroud or as per manufacturer specifications). Tighten the setscrew firmly to secure the blade to the shaft. Double-check that the blade spins freely without rubbing against the shroud or any wires.
Wiring the New Motor Correctly
This is where your detailed photos and labels become invaluable.
-
Identify Wires: New motors typically come with several wires, usually color-coded:
-
Black/Red: Often the high-speed run wire.
-
White: Common or neutral.
-
Brown/Yellow: Capacitor wires.
-
Green: Ground.
-
-
Connect Capacitor Wires: Connect the new motor’s capacitor wires (usually two brown or one brown and one yellow) to the “Fan” terminals on the new capacitor. If using a dual-run capacitor (which also serves the compressor), the “Fan” terminal will be clearly marked, and the other common terminal for the compressor will be marked “Herm” (Hermetic).
-
Connect Power Wires:
-
Connect the common (white) wire from the motor to the common terminal on the contactor (or the “C” terminal on a dual-run capacitor if applicable, or directly to the white wire from your main power).
-
Connect the run (black or red) wire from the motor to the appropriate terminal on the contactor, often labeled “L1” or one of the terminals where the main power line comes in. Consult your wiring diagram if unsure.
-
-
Connect Ground Wire: Securely attach the green ground wire from the motor to the unit’s metal frame.
-
Secure Connections: Use wire nuts or appropriate connectors to ensure all electrical connections are tight and secure. Wrap exposed connections with electrical tape for added insulation and protection.
-
Verify Rotation: It’s critical that the fan spins in the correct direction (usually counter-clockwise when viewed from the top, pulling air up and out of the unit). Many new motors are reversible, with instructions on how to change rotation if needed. Consult the motor’s wiring diagram.
Reassembling the Condenser Unit
-
Tidy Wiring: Ensure all wires are neatly routed and secured with zip ties, keeping them away from moving parts (like the fan blade) and sharp edges.
-
Replace Grille: Carefully lower the top grille back into place, ensuring no wires are pinched. Fasten all screws or bolts securely.
Final Checks and System Startup
After all components are installed and secured, a series of final checks is necessary before restoring power to the unit. These steps ensure everything is correctly aligned and functioning, preventing potential damage or safety hazards.
Verifying Connections and Clearances
-
Double-Check All Wiring: Review your photographs and labels one last time to confirm every wire is connected to its correct terminal. Ensure all wire nuts are tight and electrical tape is securely wrapped.
-
Confirm Grounding: Verify that the motor’s ground wire is firmly attached to the unit’s metal chassis.
-
Inspect Fan Blade Clearance: Manually spin the fan blade a few times to ensure it rotates freely without striking any part of the shroud, coils, or wires. There should be ample clearance. A slight bend in the blade can cause significant vibration and noise, so ensure it’s straight.
-
Tighten All Fasteners: Confirm that all mounting bolts, screws, and setscrews are tightened properly. Loose components can lead to noise and premature wear.
Testing the New Motor and System Performance
Once satisfied with all physical and electrical connections:
-
Restore Power at Disconnect: Flip the switch or reinsert the fuse block in the outdoor unit’s disconnect box.
-
Restore Power at Breaker Panel: Turn the AC unit’s circuit breaker back to the “On” position.
-
Activate System: Go to your thermostat and set it to “Cool” with a temperature setting lower than the current room temperature.
-
Observe Operation: Return to the outdoor unit. The condenser fan should start spinning smoothly, quietly, and in the correct direction (pulling air up). Listen for any unusual noises (grinding, squealing, excessive vibration).
-
Check Airflow: Confirm that air is being effectively pulled through the coils and expelled upwards from the unit.
-
Monitor Cooling: Allow the system to run for at least 15-20 minutes and observe if your home is cooling effectively. Check the temperature of the air coming out of your vents.
Post-Installation Tips for Longevity
To maximize the lifespan of your new condenser fan motor and maintain your HVAC system’s efficiency:
-
Regular Cleaning: Periodically clean the condenser coils of dust, dirt, leaves, and other debris. Blocked coils force the fan motor to work harder and reduce heat dissipation.
-
Keep Surroundings Clear: Ensure there’s adequate clearance around the outdoor unit (typically 2-3 feet on all sides) to allow for unrestricted airflow. Trim back any bushes or vegetation.
-
Inspect Annually: Consider an annual inspection by an HVAC professional. They can check refrigerant levels, electrical connections, and overall system health, catching potential issues before they become major problems.
-
Monitor Performance: Pay attention to any changes in your AC unit’s sound or cooling performance. Early detection of issues can prevent costly repairs.
By following this comprehensive guide, you’ve not only successfully installed a new condenser fan motor but also gained valuable insight into the workings of your HVAC system. This DIY project empowers you to maintain your home’s comfort and extend the life of your air conditioning unit, all while saving on professional service costs. Remember, when in doubt, especially concerning electrical work, it’s always wise to consult a certified HVAC technician.
aViewFromTheCave is a participant in the Amazon Services LLC Associates Program, an affiliate advertising program designed to provide a means for sites to earn advertising fees by advertising and linking to Amazon.com. Amazon, the Amazon logo, AmazonSupply, and the AmazonSupply logo are trademarks of Amazon.com, Inc. or its affiliates. As an Amazon Associate we earn affiliate commissions from qualifying purchases.