In today’s fast-paced digital landscape, a reliable printer is more than just a convenience; it’s an indispensable tool for productivity, whether you’re managing a bustling home office, running a small business, or simply need to print important documents. Among the myriad of choices, Brother printers have carved a strong niche, celebrated for their robustness, efficiency, and impressive feature sets. From compact inkjet models perfect for everyday use to high-capacity laser printers built for demanding professional environments, Brother offers a diverse range that caters to virtually every need. However, acquiring the right hardware is only half the battle; the true potential of your new Brother device is unlocked through a correct and efficient installation process.

This comprehensive guide is designed to demystify the installation of your Brother printer, transforming what can sometimes feel like a daunting task into a straightforward, empowering experience. We’ll walk you through every critical step, from the initial unboxing and physical setup to connecting to your network and installing the necessary drivers and software. Our aim is not just to provide instructions but to equip you with the knowledge to troubleshoot common issues and ensure your printer operates at peak performance, maximizing your return on investment and enhancing your daily workflow. By following this guide, you’ll not only save time and avoid potential frustrations but also gain a deeper understanding of your device, reinforcing Brother’s brand promise of user-friendly technology.
Preparing for Installation: The Foundation of a Smooth Setup
Before diving into the technicalities, a well-prepared groundwork is crucial for a successful and stress-free printer installation. Just as a strong brand strategy requires meticulous planning, setting up your new tech gadget demands attention to detail from the outset. Rushing through these initial steps can lead to unnecessary complications later, costing you valuable time and potentially requiring tech support. Investing a few moments here can save you significant hassle and ensure your Brother printer becomes a reliable asset from day one.
Unboxing and Physical Placement: First Steps to Success
The journey begins with carefully unboxing your new Brother printer. Start by placing the box on a flat, stable surface. Gently open the packaging, removing all packing materials, tape, and protective films from the printer itself. Pay close attention to the often-overlooked internal packing materials or orange protective tapes, which are designed to safeguard components during transit but must be removed before operation. Failure to do so can cause paper jams or damage the printer’s internal mechanisms.
Next, consider the printer’s physical placement. Location is key for optimal performance and user convenience. Choose a flat, stable surface that can comfortably support the printer’s weight and dimensions. Ensure there’s ample space around the printer for proper ventilation, especially if it’s a laser model that generates heat during operation. Adequate clearance also allows for easy access to paper trays, ink/toner cartridges, and rear connection ports. For wireless printers, proximity to your Wi-Fi router can significantly impact signal strength and connection reliability, directly influencing printing speed and stability. Good placement not only extends the life of your device but also contributes to a more productive and ergonomic workspace, a direct boost to your digital security and productivity goals.
Gathering Your Essentials: What You’ll Need
Before you even think about plugging in your printer, gather all the necessary components and information. This pre-emptive step is akin to preparing your financial tools before making an investment; it ensures you have everything at hand, preventing interruptions.
- The Brother Printer and its Accessories: This includes the printer itself, the power cord, any included USB cables, starter ink cartridges or toner, and the installation CD-ROM (if provided).
- A Computer or Mobile Device: You’ll need a device to install drivers and software. Ensure your computer meets the minimum system requirements for the printer’s software, including adequate free hard drive space and a compatible operating system version (Windows, macOS, Linux).
- Network Information (for Wireless/Wired Network Printers): If you’re connecting wirelessly, you’ll need your Wi-Fi network name (SSID) and password. For wired connections, an Ethernet cable and an available port on your router or network switch are essential.
- Internet Access: This is often overlooked but critical. While some printers come with installation CDs, most modern installations benefit greatly from downloading the latest drivers and software directly from Brother’s official support website. This ensures compatibility, includes the most recent feature enhancements, and often addresses any known bugs or security vulnerabilities, aligning with best practices for digital security.
- User Manual: Though often ignored, the user manual is a valuable resource for model-specific instructions and troubleshooting tips. It’s an important piece of documentation, much like the terms and conditions of a financial product.
By taking these preparatory steps, you’re laying a solid foundation for a seamless installation experience, honoring Brother’s commitment to user-centric design and ensuring your technology investment pays off quickly in terms of efficiency and functionality.
Connecting Your Brother Printer: Wired, Wireless, and Beyond
Connecting your Brother printer to your computer or network is the next crucial phase, offering various options depending on your specific needs and the printer model. Each connection type has its advantages, impacting everything from installation simplicity to network integration and printing flexibility. Understanding these options helps you choose the best setup for your home or office environment, directly influencing your productivity and the overall user experience – a testament to Brother’s diverse product offerings that cater to varied demands.
USB Connection: Simplicity and Reliability
The Universal Serial Bus (USB) connection remains the most straightforward and reliable method for connecting a printer directly to a single computer. This plug-and-play approach is ideal for individual users who primarily print from one device and prefer a direct, stable link without relying on network infrastructure.
How to Install via USB:
- Do Not Connect Yet: Crucially, do not connect the USB cable to your computer or printer until prompted by the software installation process. This prevents your operating system from trying to install a generic, potentially incompatible driver before the correct Brother-specific software is initiated.
- Install Software First: Begin by inserting the installation CD-ROM into your computer, or, preferably, download the “Full Driver & Software Package” for your specific Brother printer model directly from the official Brother support website.
- Run the Installer: Execute the downloaded file or run the setup program from the CD. Follow the on-screen prompts, agreeing to the terms and conditions.
- Connect When Prompted: The installer will guide you through the process, eventually instructing you to connect the USB cable between your computer and the printer. Once connected, the software will detect the printer and complete the driver installation.
- Complete Setup: Continue following any remaining on-screen instructions to finalize the installation, including registering the product or performing a test print.
The simplicity of USB installation underscores Brother’s dedication to user-friendliness, ensuring even those less tech-savvy can get their printer up and running efficiently. This direct approach eliminates network complexities, making it a reliable choice for consistent, local printing.
Wireless Network Connection: The Freedom of Mobility
Wireless (Wi-Fi) connectivity offers unparalleled flexibility, allowing multiple devices on your network—from laptops and desktops to smartphones and tablets—to print to a single Brother printer without the clutter of cables. This option is perfect for modern workspaces and homes, supporting collaborative environments and mobile productivity. Leveraging wireless technology aligns with current tech trends, providing freedom and convenience that directly boost efficiency.
How to Install via Wireless Network:
Brother printers typically offer a few methods for wireless setup:
-
Using the Installer Software (Recommended):
- Download the “Full Driver & Software Package” from Brother’s website.
- Run the installer and select “Wireless Network Connection” when prompted for the connection type.
- The software will guide you through connecting your printer to your Wi-Fi network, often by temporarily connecting your computer to the printer’s ad-hoc network, or by using WPS (Wi-Fi Protected Setup) if your router supports it.
- Once the printer is connected to your Wi-Fi, the software will help install the necessary drivers on your computer, automatically detecting the printer on the network.
- Tip: Ensure your computer is connected to the same Wi-Fi network you intend to connect the printer to.
-
Using the Printer’s Control Panel:
- On the printer’s LCD screen or control panel, navigate to the “Network” or “Wi-Fi Setup” menu.
- Select “Setup Wizard” or “WLAN Setup Wizard.”
- The printer will scan for available Wi-Fi networks. Select your network (SSID) from the list.
- Enter your Wi-Fi password (network key) accurately using the printer’s keypad.
- Once connected, the printer will confirm the connection. You can then proceed to install the printer drivers on your computer, selecting “Network Connection” during the driver installation process. The installer will search for and detect the printer on your network.
-
Using Wi-Fi Protected Setup (WPS):
- If your router has a WPS button (often labeled with two arrows forming a circle), this is the fastest method.
- On your Brother printer, navigate to the Network/Wi-Fi Setup menu and select “WPS” or “Push Button Method.”
- Press the WPS button on your router within two minutes. The printer and router will automatically establish a secure connection.
- Once connected, install the drivers on your computer via the “Network Connection” option.
Wireless printing offers substantial benefits in terms of flexibility and convenience, enhancing the user experience and justifying the investment in a feature-rich Brother printer. It also integrates well with mobile apps and cloud printing services, expanding the utility of your device.
Wired Network Connection: Stability for Your Workspace
For environments requiring maximum stability, security, and consistent high-volume printing, a wired Ethernet connection is the preferred choice. This method bypasses potential wireless interference and offers robust data transfer speeds, making it ideal for shared office spaces or critical business applications where uninterrupted printing is paramount. It ensures a stable connection, reducing downtime and supporting business finance by maintaining productivity.
How to Install via Wired Network:
- Connect Ethernet Cable: Plug one end of a standard Ethernet cable into the LAN port on the back of your Brother printer and the other end into an available port on your router or network switch.
- Power On Printer: Turn on your Brother printer. It will automatically acquire an IP address from your network’s DHCP server.
- Install Software: Just like with wireless setup, download the “Full Driver & Software Package” from the Brother support website for your specific model.
- Run Installer: Execute the installer and select “Wired Network Connection” (or “Ethernet”) when prompted for the connection type.
- Detect Printer: The installer will scan your network for the connected Brother printer. Once detected, select it from the list and proceed with the driver and software installation.
- Complete Setup: Follow any remaining on-screen instructions to finish the installation.
A wired network connection provides a bedrock of reliability, ensuring your Brother printer is always accessible and performs consistently, especially in environments where network stability is non-negotiable. This robust connectivity is a key aspect of maximizing the long-term value and reputation of Brother products in professional settings.
Driver and Software Installation: Bringing Your Printer to Life
Once your Brother printer is physically connected—whether via USB, Wi-Fi, or Ethernet—the next crucial step is installing the appropriate drivers and accompanying software. These components are the bridge between your computer’s operating system and your printer’s hardware, allowing them to communicate effectively. Brother’s commitment to delivering comprehensive software packages ensures that users not only get essential drivers but also utility tools that enhance productivity and streamline printing tasks. This is where the tech aspect truly comes to life, turning a piece of hardware into a fully functional, integrated system.
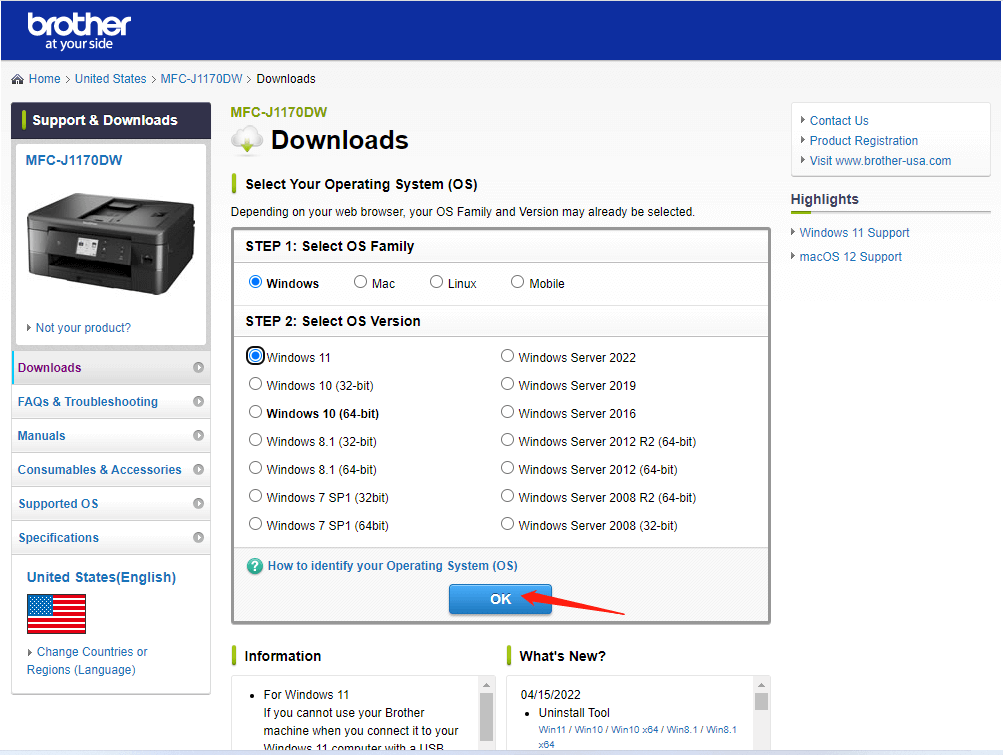
Windows Installation: Step-by-Step Guidance
Windows users represent a vast segment of the market, and Brother provides extensive support to ensure a smooth installation process on various Windows versions.
- Download the Full Driver & Software Package: For the best experience, always download the latest “Full Driver & Software Package” from your Brother model’s support page on the official Brother website. This package includes not only the necessary printer drivers but also useful utilities like Status Monitor, ControlCenter (for scanning and printing management), and other applications that enhance functionality and provide a more integrated user experience.
- Run the Installer: Locate the downloaded
.exefile and double-click to run it. - Accept License Agreement: Review and accept the license agreement to proceed.
- Select Connection Type: Choose the connection method you used (Local Connection/USB, Wireless Network Connection, or Wired Network Connection) and click “Next.”
- Follow On-Screen Prompts:
- For USB: The installer will prompt you when to connect the USB cable. Connect it then and allow the software to detect the printer.
- For Network: The installer will search for available Brother printers on your network. Select your printer from the list, confirm its IP address if prompted, and proceed.
- Install Drivers and Software: The installer will now proceed to copy the necessary files and configure your printer. This may take several minutes.
- Complete Setup: Once the installation is complete, you may be prompted to set up the default printer, register your product, or install additional recommended software. It’s often beneficial to install any included utilities like ControlCenter, as they significantly enhance the printer’s capabilities, especially for multi-function devices (MFPs) that scan, copy, and fax.
- Test Print: Perform a test print to confirm successful communication between your computer and the printer.
Windows installation is generally robust, leveraging Brother’s investment in software development to deliver a user-friendly and feature-rich experience.
macOS Installation: Seamless Integration
Apple users appreciate simplicity and integration, and Brother printers are designed to integrate smoothly with macOS environments. The process is similar to Windows but often feels even more streamlined.
- Download the Full Driver & Software Package: As with Windows, download the comprehensive package from the Brother support website. This ensures you get the latest drivers and any macOS-specific utilities.
- Run the Installer: Open the downloaded
.dmgfile and then double-click the installer package (.pkgfile) inside. - Follow Installer Prompts: The installer will guide you through the process, prompting you to agree to the license, select the connection type (USB, Wireless, or Wired Network), and choose where to install the software.
- Add Printer: During the installation, macOS’s “Add Printer” dialog might appear.
- For USB: Your printer should appear automatically. Select it.
- For Network: Click the
+button, select “Default” or “IP” (if you know the IP address), and wait for your Brother printer to appear. Select it, ensure “Brother XXX-XXXX series” is chosen in the “Use” or “Print Using” dropdown (this ensures the correct driver is selected), and then click “Add.”
- Complete Installation: The Brother installer will finish copying files and setting up any additional utilities.
- Test Print: Print a document to verify full functionality.
Brother’s dedication to providing robust macOS drivers and utilities ensures that Apple users can enjoy the full spectrum of their printer’s features, maintaining the high standards of user experience expected from the brand.
Mobile Printing Setup: Printing on the Go
In an increasingly mobile-first world, the ability to print directly from smartphones and tablets is a significant advantage. Brother supports various mobile printing solutions, allowing you to print documents, photos, and web pages from your iOS or Android devices. This feature aligns perfectly with current technology trends and boosts personal and corporate productivity by untethering printing from traditional desktop setups.
- Brother iPrint&Scan App: This is Brother’s proprietary app, available for free on the Apple App Store and Google Play Store. Download and install the app on your mobile device. Ensure your mobile device is connected to the same Wi-Fi network as your Brother printer. The app will automatically detect your printer, allowing you to print photos, documents, and even scan directly to your device.
- AirPrint (for iOS devices): Most modern Brother printers are AirPrint-compatible. If your iPhone or iPad is on the same Wi-Fi network as your printer, you can print directly from many apps without needing to install additional drivers or apps. Simply tap the share icon, then select “Print.”
- Brother Print Service Plugin (for Android devices): For Android users, the Brother Print Service Plugin enhances the native Android printing framework, allowing you to print directly from many applications. Install it from the Google Play Store, and enable it in your device’s “Printing” settings.
Enabling mobile printing capabilities dramatically expands the utility of your Brother printer, offering convenience and flexibility that truly reflects modern digital security and productivity needs.
Verifying and Troubleshooting: Ensuring Flawless Operation
After completing the installation, it’s essential to verify that your Brother printer is functioning correctly. Just as a business audits its finances, you should confirm your technology investment is performing as expected. Even with the most meticulous installation, minor hiccups can occur. This section guides you through testing your printer and addressing common issues, ensuring uninterrupted productivity and maximizing the value of your Brother device.
Running a Test Print: The Moment of Truth
A test print is the simplest and most effective way to confirm that your printer is properly installed and communicating with your computer or network. This step validates the entire setup process.
- From Your Computer:
- Windows: Open “Settings” > “Bluetooth & devices” > “Printers & scanners.” Select your Brother printer, then click “Printer properties” (or “Printing preferences”). In the new window, look for a “Print Test Page” button (often found under the “General” or “Advanced” tab).
- macOS: Open “System Settings” (or “System Preferences”) > “Printers & Scanners.” Select your Brother printer from the list. Click “Open Print Queue…” (or “Print Queue”), then in the “Printer” menu, select “Print Test Page.”
- From the Printer’s Control Panel: Many Brother printers also have an option to print a test page, network configuration report, or nozzle check directly from their own control panel. Consult your printer’s manual or navigate through the menu options (often under “Information,” “Reports,” or “Maintenance”).
A successful test print indicates that the drivers are correctly installed, the printer is connected, and ink/toner is present. If the test print fails or looks incorrect, it’s time for troubleshooting.
Common Installation Hurdles and Their Solutions
Even with careful preparation, you might encounter issues. Here’s how to address some of the most frequent problems:
-
Printer Not Detected:
- Check Connections: Ensure all cables (power, USB, Ethernet) are securely plugged in. For wireless, verify the printer is connected to the correct Wi-Fi network and your computer is on the same network.
- Power Cycle: Turn off both the printer and your computer/router, wait for 30 seconds, then turn them back on.
- Firewall/Antivirus: Temporarily disable your computer’s firewall and antivirus software. Sometimes, these can block network discovery. Remember to re-enable them after installation.
- IP Address (Network Printers): If you’re tech-savvy, check if your network printer has an IP address (you can usually print a network configuration report from the printer itself). Ensure it’s on the same subnet as your computer.
- Driver Reinstallation: Sometimes, a corrupted driver installation can be the culprit. Uninstall the printer drivers completely from your system and try installing them again from scratch using the latest package from Brother’s website.
-
Print Jobs Stuck in Queue:
- Clear Print Queue: In Windows, go to “Printers & scanners,” select your printer, and click “Open print queue.” Right-click any stuck jobs and select “Cancel.” In macOS, open “Print Queue” from “Printers & Scanners” and delete jobs.
- Restart Print Spooler (Windows): Open “Services” (type
services.mscin Run dialog), find “Print Spooler,” right-click, and select “Restart.” - Check Paper/Ink/Toner: Ensure there are no paper jams, and ink/toner levels are sufficient.
-
Poor Print Quality:
- Nozzle Check/Print Head Cleaning: For inkjet printers, perform a nozzle check and then a print head cleaning cycle via the printer’s utility software or control panel.
- Alignment: For some models, print head alignment might be necessary.
- Toner/Drum Unit (Laser Printers): For laser printers, low toner or a worn drum unit can cause quality issues. Check these components.
- Paper Type: Ensure you’re using the correct paper type setting in your print dialog for the media you’re using.
-
Software Not Installing:
- Administrator Rights: Ensure you are logged in as an administrator on your computer to install software.
- Compatibility: Verify the downloaded software is for your specific printer model and operating system version.
- Corrupt Download: Try downloading the installer package again, as the previous download might have been corrupted.
Brother’s reputation for reliability is built not just on hardware but also on comprehensive support. Their official support website is an invaluable resource, offering FAQs, troubleshooting guides, and direct contact options. By familiarizing yourself with these common issues and solutions, you can maintain your printer’s performance, ensuring your investment in Brother technology continues to deliver excellent value and unhindered productivity.
Maintaining Your Printer for Long-Term Performance
Proper installation is just the beginning. Regular maintenance and adherence to best practices will significantly extend the life of your Brother printer and ensure consistent performance, safeguarding your investment and contributing to long-term financial prudence by avoiding premature replacements.
- Keep Drivers Updated: Periodically check Brother’s website for updated drivers and software. These updates often include performance enhancements, bug fixes, and security improvements, crucial for digital security.
- Clean Regularly: Dust and debris can accumulate inside the printer. Gently clean the exterior with a soft, lint-free cloth. For inkjet printers, running a cleaning cycle can prevent clogs. For laser printers, a toner spill can impact print quality, so careful handling of cartridges is advised.
- Use Quality Consumables: Always use genuine Brother ink cartridges or toner. While third-party alternatives might seem cheaper, they can often lead to poor print quality, reduced printer lifespan, and potentially void your warranty. This is a classic example of how short-term savings can lead to long-term costs, impacting your business finance or personal finance adversely.
- Proper Shutdown: When not in use for extended periods, it’s good practice to properly shut down your printer to conserve energy and protect its components.
By following these simple maintenance tips, you ensure your Brother printer remains a reliable and efficient workhorse for years to come, reflecting positively on the brand’s reputation for durability and providing excellent value for your money.
Installing your Brother printer doesn’t have to be a tech challenge. By systematically following these steps, from thoughtful preparation and careful connection to meticulous driver installation and proactive troubleshooting, you can ensure a smooth, efficient setup. A properly installed and maintained Brother printer is a cornerstone of productivity, an investment that continuously delivers value, supporting your creative endeavors, business operations, and daily tasks with unwavering reliability. Embrace the seamless printing experience that Brother is renowned for, and unlock the full potential of your technological companion.
aViewFromTheCave is a participant in the Amazon Services LLC Associates Program, an affiliate advertising program designed to provide a means for sites to earn advertising fees by advertising and linking to Amazon.com. Amazon, the Amazon logo, AmazonSupply, and the AmazonSupply logo are trademarks of Amazon.com, Inc. or its affiliates. As an Amazon Associate we earn affiliate commissions from qualifying purchases.