In the rapidly evolving world of personal computing, the quest for speed and efficiency is perpetual. Among the most transformative advancements in recent years is the widespread adoption of PCIe (Peripheral Component Interconnect Express) Solid State Drives (SSDs). These aren’t just faster storage devices; they represent a fundamental shift in how data is accessed and processed within your system. If you’ve been grappling with sluggish load times, slow file transfers, or an overall feeling that your computer is holding you back, upgrading to a PCIe SSD could be the most impactful enhancement you make. This comprehensive guide will walk you through every step of installing a PCIe SSD, ensuring a smooth and successful upgrade that will unlock your system’s true potential.
The Power of PCIe SSDs: Why Upgrade?
Before diving into the installation process, it’s crucial to understand why PCIe SSDs have become the gold standard for high-performance storage. This foundational knowledge not only justifies the investment but also highlights the significant performance leap you’re about to experience.
Understanding PCIe and NVMe Technology
At the heart of a PCIe SSD’s superior performance lies its connection interface: PCIe. Unlike older SATA (Serial Advanced Technology Attachment) interfaces, which were originally designed for traditional spinning hard drives, PCIe offers a direct, high-bandwidth communication pathway to your computer’s CPU. Imagine a highway: SATA is a two-lane road with a speed limit, while PCIe is a multi-lane, high-speed autobahn directly connected to the city center.
Complementing PCIe is NVMe (Non-Volatile Memory Express), a communication protocol specifically designed for SSDs. NVMe leverages the parallelism of PCIe, allowing SSDs to handle multiple commands simultaneously and at incredibly low latency. Traditional SATA drives and their AHCI (Advanced Host Controller Interface) protocol were limited by a single-command queue, causing bottlenecks. NVMe, in contrast, can manage tens of thousands of parallel command queues, each capable of handling thousands of commands. This synergy between PCIe hardware and NVMe software is what truly sets these drives apart. When you see an SSD advertised as “NVMe PCIe,” it means you’re getting the best of both worlds – a direct, high-speed connection combined with an optimized communication protocol built for flash storage.
Performance Advantages Over SATA Drives
The theoretical benefits of PCIe and NVMe translate into tangible real-world performance gains. A typical SATA III SSD offers maximum sequential read/write speeds of around 550 MB/s. While a significant improvement over traditional HDDs, this pales in comparison to modern PCIe NVMe SSDs, which can easily achieve sequential read/write speeds ranging from 3,000 MB/s to over 7,000 MB/s, depending on the generation (PCIe Gen3, Gen4, or Gen5).
Beyond sequential speeds, which are relevant for large file transfers, the real game-changer is in random read/write performance – the speed at which the drive accesses small, fragmented pieces of data. This is critical for operating system responsiveness, application launch times, and loading complex game environments. PCIe NVMe drives offer vastly superior random IOPS (Input/Output Operations Per Second), leading to a snappier, more fluid computing experience across the board. From booting your PC in seconds to opening resource-intensive applications almost instantly, the performance difference is not just noticeable; it’s transformative.
Who Benefits Most from a PCIe SSD?
While virtually any computer user will appreciate the speed boost, certain demographics and use cases benefit most profoundly from a PCIe SSD upgrade:
- Gamers: Faster game loading times, smoother texture streaming, and quicker level transitions dramatically enhance the gaming experience.
- Content Creators: Video editors, graphic designers, and 3D artists will see massive improvements in rendering times, file exports, and overall workflow efficiency when working with large media files.
- Power Users & Professionals: Anyone running virtual machines, large databases, or complex analytical software will find that a PCIe SSD significantly reduces wait times and improves productivity.
- Everyday Users: Even for basic tasks like web browsing, document editing, and email, the overall system responsiveness will feel dramatically better, leading to a more pleasant computing experience.
In essence, if your daily computing involves anything beyond the most basic tasks, a PCIe SSD is no longer a luxury but a fundamental component for a modern, efficient system.
Essential Preparations Before Installation
Before you even think about opening your computer case, thorough preparation is key to a smooth and trouble-free installation. Skipping these preliminary steps can lead to compatibility issues, data loss, or even damage to your components.
Checking System Compatibility: Motherboard and BIOS
The most critical step is ensuring your motherboard supports a PCIe NVMe SSD. Most modern motherboards (manufactured in the last 5-7 years) feature at least one M.2 slot, which is the physical interface typically used for NVMe drives. However, not all M.2 slots are created equal. Some M.2 slots might only support SATA-based M.2 SSDs, while others support both SATA and NVMe, and crucially, some are exclusively NVMe (PCIe) compatible.
To verify compatibility:
- Consult your motherboard’s manual: This is your definitive source of information. Look for sections detailing “M.2 slots,” “storage devices,” or “PCIe lanes.” It will specify the M.2 slot type (Key M, Key B+M), the supported interface (SATA, PCIe x2, PCIe x4), and the supported SSD lengths (e.g., 2242, 2260, 2280, 22110 – where the last four digits indicate length in millimeters). Most NVMe SSDs come in the 2280 form factor.
- Visually inspect your motherboard: Locate the M.2 slot(s). They are typically small, horizontal slots, often with a small screw stand-off nearby. If you see two distinct notches in the M.2 slot (Key B+M), it might support both SATA and PCIe. If it only has one notch (Key M), it’s almost certainly PCIe NVMe compatible.
- BIOS/UEFI Support: Ensure your BIOS/UEFI firmware is up to date. Older BIOS versions might not fully recognize or support NVMe drives as boot devices, even if the hardware is present. Visit your motherboard manufacturer’s website for the latest firmware updates and flashing instructions.
Gathering Your Tools: Screwdrivers and Anti-Static Measures
Having the right tools at hand makes the installation process much simpler and safer:
- Phillips-head screwdriver: Typically, a small #1 or #2 Phillips head screwdriver is all you’ll need for opening the computer case and securing the M.2 drive. Some M.2 retention mechanisms are tool-less, but a screwdriver is still wise to have.
- Anti-static wrist strap: Electrostatic discharge (ESD) can permanently damage sensitive electronic components. An anti-static wrist strap, clipped to an unpainted metal part of your computer case, is the best defense.
- A clean, well-lit workspace: Ensure you have ample space to work and good lighting to see the intricate parts inside your PC.
- Optional: Tweezers: These can be helpful for handling the tiny M.2 screw if you have large fingers.
Critical Data Backup: A Non-Negotiable Step
Before making any hardware changes to your computer, always back up your critical data. While installing an SSD is generally straightforward, unforeseen issues can arise. A full backup of your existing operating system drive, important documents, photos, and other irreplaceable files is an absolute necessity. You can use external hard drives, cloud storage services, or specialized backup software. This step is your ultimate safety net against potential data loss.
Powering Down and Static Discharge
Once backups are complete and tools are ready, it’s time to prepare your system physically:
- Shut down your computer completely: Don’t just put it to sleep. Perform a full shutdown from your operating system.
- Unplug all cables: Disconnect the power cable, monitor cables, USB devices, Ethernet, and any other peripherals connected to your PC.
- Press the power button: With the power cable unplugged, press and hold your PC’s power button for 10-15 seconds. This drains any residual power from the system’s capacitors, further reducing the risk of static discharge.
- Discharge static electricity: If you don’t have an anti-static wrist strap, frequently touch an unpainted metal part of your computer case before and during handling internal components. Avoid working on carpet, and consider touching a grounded metal object (like a radiator) beforehand.
Step-by-Step Physical Installation
With your preparations complete, you’re ready to physically install the new PCIe NVMe SSD into your system. Take your time, be gentle, and follow these steps carefully.
Accessing Your Computer’s Interior
- Open the computer case: Most desktop cases have side panels secured by thumbscrews or regular screws at the rear. Remove these and carefully slide or lift off the side panel. For laptops, consult your laptop’s service manual for instructions on how to access internal components, as this varies widely by model.
- Identify components: Familiarize yourself with the layout. Locate the motherboard, CPU cooler, RAM sticks, and any existing storage drives.
Locating the M.2 Slot
The M.2 slot is typically a small, horizontal connector on the motherboard. Modern motherboards often have multiple M.2 slots.
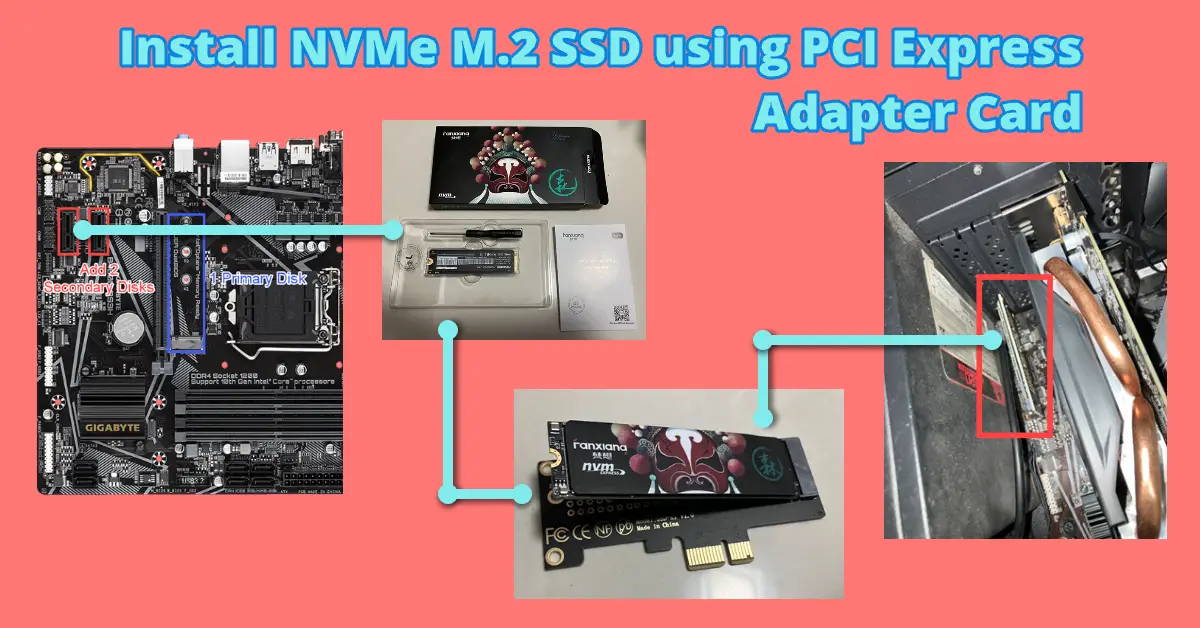
- Primary Slot: The primary M.2 slot (often labeled M2_1) is usually located near the CPU socket, sometimes beneath the graphics card or under a heatsink. This slot typically offers the highest bandwidth (e.g., PCIe Gen4 x4) and is ideal for your boot drive.
- Secondary Slots: Other M.2 slots may be located further down the motherboard. Check your motherboard manual to confirm which slots support NVMe and their respective PCIe lane configurations, as some might share lanes with other components, potentially reducing bandwidth.
- Remove Heatsink (if applicable): Many motherboards, especially those designed for high-performance NVMe drives, come with a dedicated M.2 heatsink. If your chosen slot has one, you’ll need to unscrew it and set it aside. Ensure you don’t lose the thermal pad usually affixed to the underside of the heatsink; if it’s not present, your new SSD might have come with one to apply.
Gently Inserting the NVMe SSD
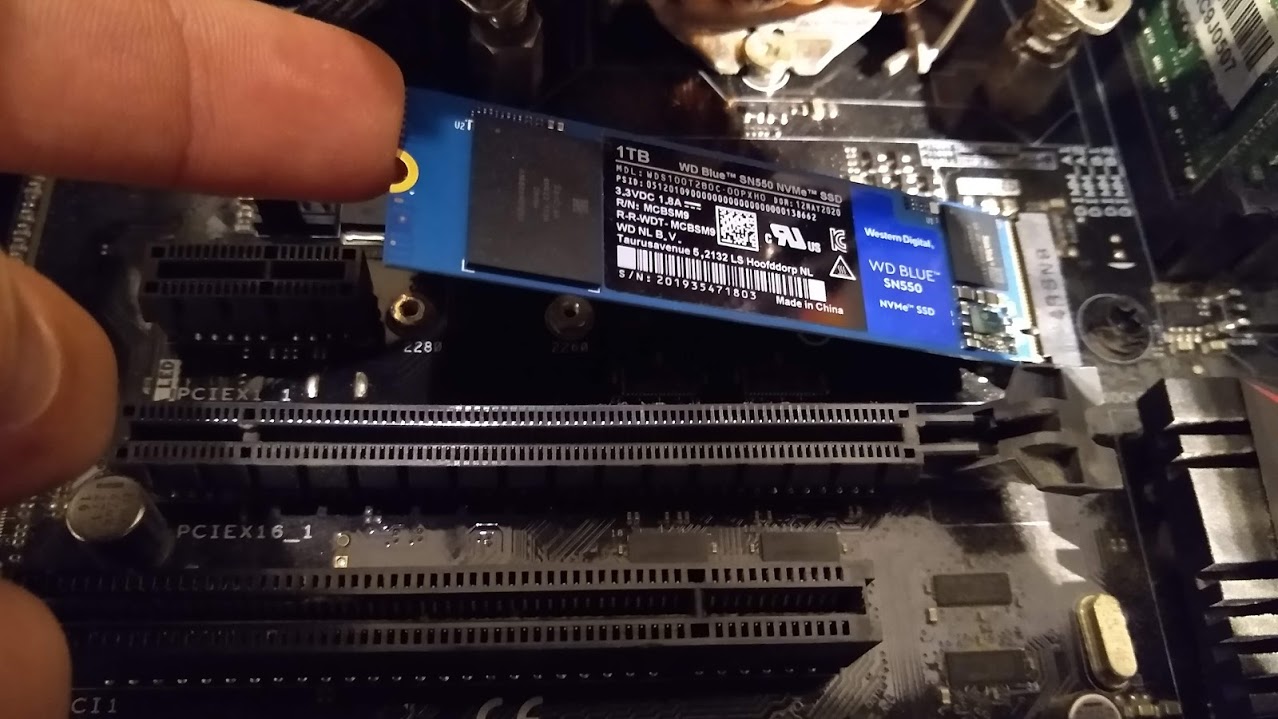
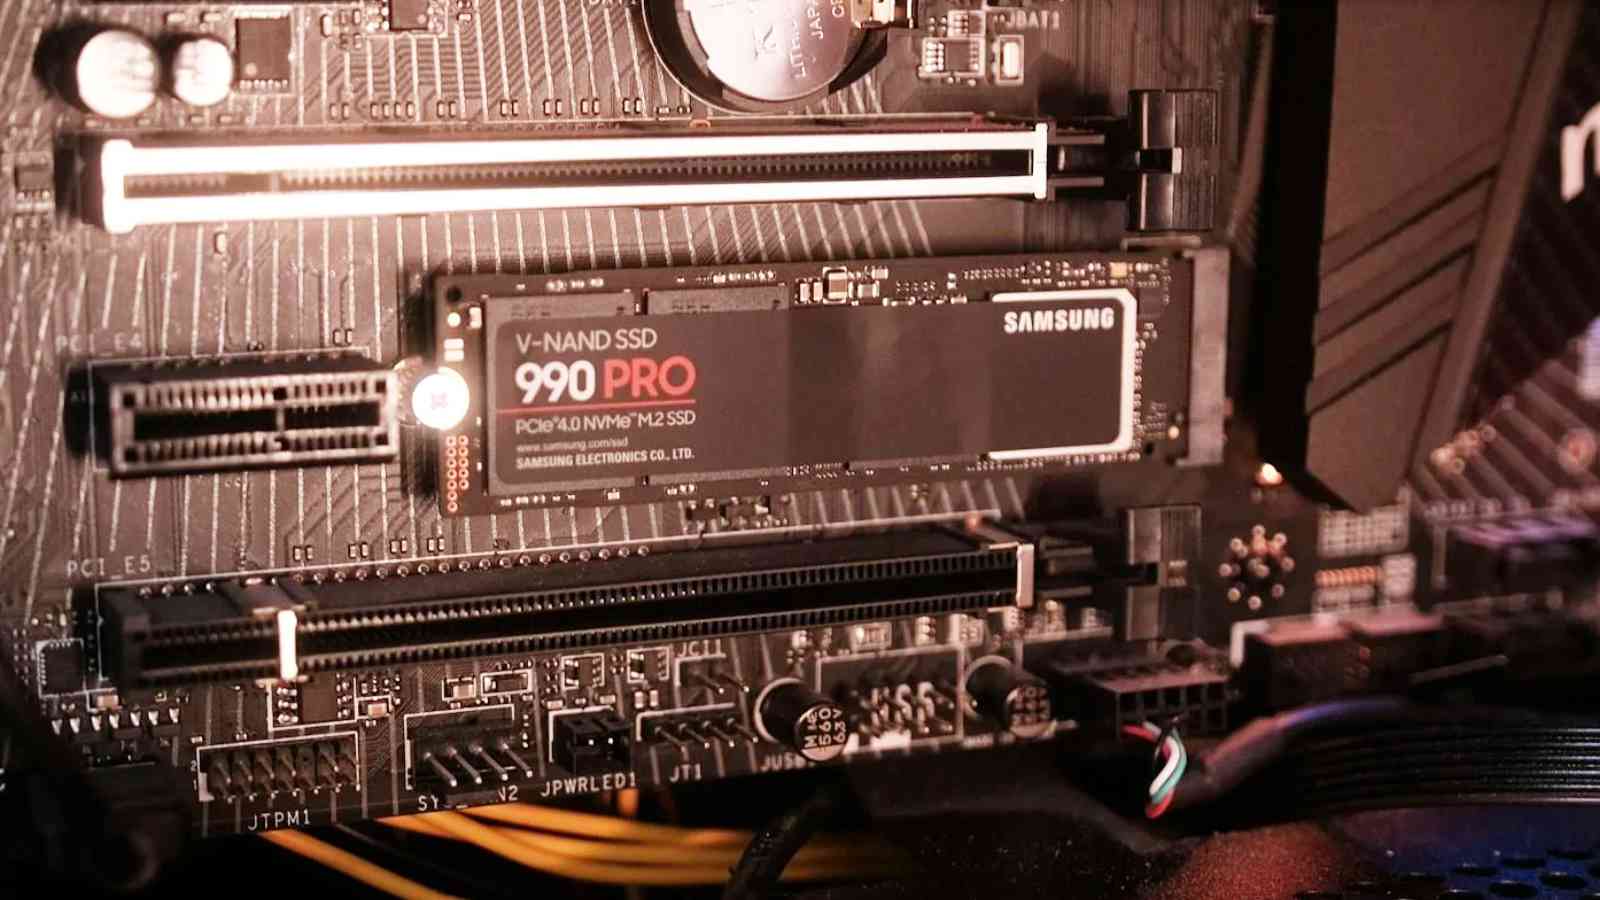
- Orient the SSD: Hold your NVMe SSD by its edges, avoiding touching the gold contacts or integrated circuits. Align the notch on the SSD’s connector with the key (notch) in the M.2 slot on the motherboard. The gold pins on the SSD should face downwards, into the slot.
- Insert at an angle: Gently slide the SSD into the M.2 slot at a slight upward angle (around 15-30 degrees). You should feel it slide in smoothly. Do not force it. If it doesn’t go in easily, double-check the orientation and ensure the notch is aligned correctly.
- Push down: Once fully seated in the slot, the SSD will be angled upwards. Gently press the free end of the SSD down towards the motherboard until it lies flat.
Securing the Drive with a Screw or Clip
- Locate the stand-off: Near the end of the M.2 slot where you just pushed the SSD down, there will be a small screw stand-off. This is where the M.2 screw will secure the drive. Motherboards usually come with these stand-offs pre-installed or included in the accessory box. If the stand-off is for a different SSD length (e.g., 2260 instead of 2280), you may need to move it to the correct position.
- Insert the screw: Carefully place the small M.2 screw (usually provided with your motherboard or the SSD itself) into the hole at the end of the SSD and screw it into the stand-off. Tighten it just enough to hold the SSD firmly in place; over-tightening can damage the drive or motherboard. Some motherboards use tool-less clips or plastic latches instead of screws, which simplify this step.
- Reattach Heatsink (if applicable): If you removed an M.2 heatsink, make sure its thermal pad (peel off any protective film if new) is making contact with the top of the SSD, then reattach the heatsink by screwing it back into place.
Reassembling Your System
- Double-check connections: Before closing the case, take a moment to visually inspect your work. Ensure the SSD is securely seated and screwed down, no cables were accidentally dislodged, and everything looks tidy.
- Close the case: Carefully reattach the side panel(s) of your computer case and secure them with their screws or thumbscrews.
- Reconnect cables: Plug all external cables (power, monitor, peripherals) back into your computer.
Software Configuration and Optimization
The physical installation is just half the battle. Now, your operating system needs to recognize and prepare the new drive for use. This involves initializing, formatting, and potentially migrating your OS.
Initializing the New Drive in Disk Management
After powering on your PC for the first time with the new SSD:
- Access Disk Management (Windows): Right-click the Start button and select “Disk Management” or search for it in the Start menu.
- Initialize Disk: A “Initialize Disk” window should automatically pop up, prompting you to initialize the new SSD. If it doesn’t, look for a disk marked “Unknown” and “Not Initialized.” Right-click it and select “Initialize Disk.”
- Choose Partition Style: For modern systems and drives larger than 2TB, select “GPT (GUID Partition Table).” For older systems or drives under 2TB, MBR (Master Boot Record) is also an option, but GPT is generally recommended. Click “OK.”
Formatting the SSD for Use
Once initialized, the drive will appear as “Unallocated Space.”
- Create New Simple Volume: Right-click the “Unallocated” space on your new SSD and select “New Simple Volume.”
- Follow the Wizard: The New Simple Volume Wizard will guide you through the process:
- Specify Volume Size: Accept the default maximum size to use the entire drive.
- Assign Drive Letter: Choose an available drive letter.
- Format Partition:
- File System: NTFS (New Technology File System) is the standard for Windows.
- Allocation unit size: Leave as “Default.”
- Volume label: Give your new drive a descriptive name (e.g., “NVMeGames” or “DataSSD”).
- Perform a quick format: Ensure this box is checked for speed.
- Complete the process: Click “Next” and then “Finish.” Your new PCIe SSD should now appear as a usable drive in “This PC” (or “My Computer”).
Operating System Migration (Optional but Recommended)
For maximum performance benefits, installing your operating system (OS) on the new PCIe SSD is highly recommended, making it your boot drive. This will dramatically improve boot times and overall system responsiveness.
- Clean Installation: The cleanest and often most problem-free method is a fresh installation of Windows (or your preferred OS) onto the new NVMe SSD. You’ll need a bootable USB drive with your OS installer. During installation, select your new NVMe drive as the target.
- Cloning/Migration: Alternatively, you can “clone” your existing OS installation from your old drive to the new NVMe SSD. Many SSD manufacturers provide free cloning software (e.g., Samsung Data Migration, Acronis True Image for Crucial). Ensure the source drive’s data fits on the new SSD. This method saves you from reinstalling all your applications and settings. After cloning, you’ll need to enter your BIOS/UEFI settings and set the new NVMe SSD as the primary boot device.
Updating Drivers and Firmware
While most NVMe drives work out of the box with generic drivers, specialized drivers from the SSD manufacturer or chipset manufacturer (e.g., Intel, AMD) can sometimes provide performance optimizations or improved stability.
- SSD Manufacturer Website: Visit the support section of your SSD manufacturer’s website (e.g., Samsung, Western Digital, Crucial) to check for any specific NVMe drivers or firmware updates for your model.
- Motherboard Manufacturer Website: Check your motherboard’s download page for chipset drivers, which can also impact NVMe performance.
- Firmware Updates: SSD firmware updates can sometimes improve performance, fix bugs, or enhance compatibility. Exercise caution when updating firmware; always follow the manufacturer’s instructions precisely, as an interrupted update can “brick” the drive.
Troubleshooting Common Installation Issues
Even with careful preparation, you might encounter an issue or two. Here are some common problems and their solutions:
SSD Not Detected in BIOS/UEFI
- Physical Connection: Double-check that the SSD is fully seated in the M.2 slot and the screw is holding it down correctly. Reseat the drive.
- Motherboard Compatibility: Reconfirm that your M.2 slot supports NVMe drives. Some older M.2 slots are SATA-only.
- BIOS/UEFI Settings:
- M.2 Mode: In BIOS/UEFI, look for settings related to M.2 slots. Ensure the slot is set to “PCIe” or “NVMe” mode, not “SATA” (if applicable).
- PCIe Lane Sharing: Some motherboards share PCIe lanes between M.2 slots, PCIe expansion slots, or SATA ports. If another component (e.g., a graphics card in a secondary slot, certain SATA ports) is using the lanes needed by your M.2 slot, it might disable the M.2 slot. Consult your motherboard manual for these specifics and try moving other components or using a different M.2 slot.
- CSM/Legacy Mode: Ensure your BIOS/UEFI is set to “UEFI mode” rather than “Legacy” or “CSM” (Compatibility Support Module) for NVMe boot support.
- Firmware: An outdated BIOS/UEFI firmware might not recognize newer NVMe drives. Update your motherboard’s BIOS/UEFI.
Slow Performance or Drive Errors
- Correct Slot: Ensure the NVMe SSD is in the fastest available M.2 slot (e.g., a Gen4 x4 slot if your SSD is Gen4). Some M.2 slots have lower bandwidth.
- Thermal Throttling: NVMe drives can generate heat. If yours lacks a heatsink and is under heavy load, it might thermally throttle, reducing performance. Consider adding an aftermarket M.2 heatsink.
- Drivers: Install the latest NVMe drivers from your SSD manufacturer or chipset manufacturer.
- Firmware: Check for SSD firmware updates.
- Alignment: Ensure the drive is properly aligned (NTFS allocation unit size “Default” is usually fine).
- TRIM: Verify that TRIM is enabled for your SSD (it usually is by default in modern Windows versions). Open an elevated Command Prompt and type
fsutil behavior query disabledeletenotify. If the result is0, TRIM is enabled.
Boot Order and OS Migration Challenges
- BIOS Boot Order: After cloning or a clean install, you must enter your BIOS/UEFI and set the new NVMe SSD as the primary boot device.
- Source Drive Removal: If you cloned your OS, remove or disconnect the old OS drive before the first boot from the new NVMe SSD. This prevents potential boot conflicts. Once confirmed working, you can reconnect the old drive and reformat it for data storage.
- Partition Style: Ensure both your old and new drives (if cloning) and your OS installation are using the correct partition style (GPT for UEFI boot).
Conclusion: Maximizing Your System’s Potential
Installing a PCIe NVMe SSD is one of the most impactful upgrades you can make to your computer. It’s a leap in storage technology that transcends incremental improvements, delivering a fundamentally faster and more responsive user experience. By diligently following the steps outlined in this guide – from understanding the technology and preparing your system to executing the physical installation and configuring the software – you can confidently unlock the full potential of your PC. The days of waiting for your computer are over; embrace the blistering speeds and seamless performance that a PCIe SSD brings, and enjoy a computing experience that is truly optimized for the demands of the modern digital world.
aViewFromTheCave is a participant in the Amazon Services LLC Associates Program, an affiliate advertising program designed to provide a means for sites to earn advertising fees by advertising and linking to Amazon.com. Amazon, the Amazon logo, AmazonSupply, and the AmazonSupply logo are trademarks of Amazon.com, Inc. or its affiliates. As an Amazon Associate we earn affiliate commissions from qualifying purchases.