
For decades, Apple’s Macintosh computers have been synonymous with innovation, robust design, and a user-friendly operating system. macOS offers a powerful and secure environment perfect for creative professionals, developers, and everyday users alike. However, there are times when the need arises to run software or play games exclusively designed for Microsoft Windows. Whether it’s for a specific professional application, a must-play PC game, or just to access a particular Windows-only utility, the desire to bridge the gap between these two operating systems is a common one.
This is where Boot Camp comes into play. Apple’s native utility provides a seamless and official way to install Microsoft Windows directly onto your Intel-based Mac, allowing you to switch between macOS and Windows whenever you need. Unlike virtual machines that run Windows within macOS, Boot Camp offers a true native experience, utilizing your Mac’s full hardware potential for Windows. This guide will walk you through every step of the process, from preparation to post-installation, ensuring a smooth transition to your new dual-boot setup.
Understanding Boot Camp: Bridging the OS Divide
Before diving into the technicalities, it’s crucial to understand what Boot Camp is and why it’s a popular choice for many Mac users. It represents a powerful capability built into your Mac, enabling a flexibility that often surprises new users.
What is Boot Camp?
Boot Camp is a utility included with macOS that allows users to install a compatible version of Microsoft Windows on an Intel-based Mac. When you use Boot Camp, your Mac essentially becomes a dual-boot machine, meaning you can choose which operating system to start up with each time you turn on your computer. It allocates a separate partition on your internal hard drive specifically for Windows, keeping your macOS partition entirely distinct and untouched.
The key distinction of Boot Camp is that Windows runs directly on your Mac’s hardware, not in a virtualized environment. This means Windows has direct access to your Mac’s processor, memory, graphics card, and other components, delivering performance comparable to, or even identical to, that of a dedicated Windows PC with similar specifications. Boot Camp Assistant, the primary tool for this process, handles the partitioning of your disk, downloads necessary Windows support software (drivers for your Mac’s hardware), and helps you through the installation of Windows itself.
Why Run Windows on Your Mac? Practical Use Cases
The reasons for wanting to run Windows on a Mac are varied and often stem from specific needs that macOS cannot natively fulfill. Understanding these common use cases can help you determine if Boot Camp is the right solution for you.
- Gaming: This is perhaps one of the most common reasons. While macOS has a growing gaming library, the vast majority of PC games are developed primarily for Windows. Many popular titles and high-performance games simply aren’t available on macOS or perform better on Windows due to optimized drivers and wider developer support. With Boot Camp, your Mac becomes a powerful gaming machine capable of running the latest Windows games at their best.
- Software Compatibility: Certain industry-specific software, legacy applications, or niche utilities are exclusively available on Windows. This can include specialized engineering tools, accounting software, certain CAD programs, or even specific versions of Microsoft Office with features not present in the Mac version. For professionals who rely on these applications, Boot Camp ensures they don’t have to invest in a separate Windows machine.
- Development and Testing: Developers often need to test their applications across multiple operating systems. Having a native Windows environment on their Mac allows them to ensure compatibility, troubleshoot issues, and optimize their software for both platforms without needing a second computer.
- Browser Compatibility and Web Testing: For web developers and designers, testing websites and web applications across various browsers and operating systems is critical. Internet Explorer and certain versions of Microsoft Edge are Windows-only, making a Boot Camp installation invaluable for comprehensive cross-browser testing.
- Security Research and Specific Hardware Support: In some specialized fields, like digital forensics or hardware development, specific Windows-only tools or drivers are required to interact with particular devices or perform certain analyses. Boot Camp provides the necessary environment.
- Familiarity and Personal Preference: Some users might be new to Mac and prefer to have a familiar Windows environment for certain tasks, easing their transition into the Apple ecosystem while still leveraging their Mac’s superior hardware.
By offering a robust and performant Windows environment, Boot Camp significantly expands the versatility of your Mac, allowing it to seamlessly handle almost any computing task thrown its way.
Essential Preparations Before You Begin
Installing Windows via Boot Camp is a significant process that involves partitioning your hard drive and installing a new operating system. Careful preparation is key to a successful and smooth installation. Skipping these steps can lead to data loss, frustrating errors, or a non-optimal setup.
System Requirements and Compatibility
Not all Macs are created equal, especially when it comes to Boot Camp. The most critical requirement is that your Mac must be Intel-based. Apple Silicon Macs (M1, M2, M3 chips) do not support Boot Camp, as they use a different processor architecture incompatible with standard Windows installations. If you have an Apple Silicon Mac, you’ll need to look into virtualization software like Parallels Desktop, which can run the ARM version of Windows.
Beyond the processor, here are other crucial compatibility factors:
- macOS Version: Ensure your macOS is updated to the latest version compatible with your Mac. Boot Camp Assistant often receives updates with macOS, and newer versions support newer Windows versions.
- Storage Space: This is paramount. Microsoft recommends at least 64GB of free space for Windows, but for a practical, usable installation (especially for gaming or large applications), you should allocate at least 128GB to 256GB of free storage. The more you allocate, the more applications and data you can store on your Windows partition.
- Administrator Account: You must be logged into your Mac with an administrator account to run Boot Camp Assistant and make system-level changes.
- Stable Internet Connection: Required for downloading Windows support software and potentially the Windows ISO.
To check your Mac’s compatibility, simply open About This Mac from the Apple menu (top-left corner of your screen). Under the “Overview” tab, look for “Processor” or “Chip.” If it says “Intel,” you’re good to go. If it says “Apple M1,” “Apple M2,” or similar, Boot Camp is not an option.
Gathering Your Tools: Windows ISO and USB Drive
Once you’ve confirmed compatibility, it’s time to gather the necessary components for the installation.
- Windows ISO File: You’ll need an official Windows installation ISO file. For most users, Windows 10 or Windows 11 is recommended. You can download the ISO directly from Microsoft’s official website:
- For Windows 10: Visit Microsoft’s Windows 10 download page.
- For Windows 11: Visit Microsoft’s Windows 11 download page.
Choose the correct edition (e.g., Home or Pro) and language. Make sure it’s the 64-bit version. Save this ISO file to a convenient location on your Mac, such as your Downloads folder.
- USB Flash Drive (Optional but Recommended for Older Macs/macOS): For some older Macs or macOS versions (typically macOS High Sierra and earlier), Boot Camp Assistant may require a USB drive of at least 16GB. This drive will be formatted by Boot Camp Assistant to create a bootable Windows installer and store the necessary support software. If your Mac and macOS version are newer (e.g., Mojave, Catalina, Big Sur, Monterey, Ventura, Sonoma), Boot Camp Assistant might create a temporary bootable partition directly on your internal drive, negating the need for a USB. However, having a USB drive prepared is always a safe bet as a fallback. Ensure it’s empty, as its contents will be erased.
- External Keyboard and Mouse (Optional): While your Mac’s built-in keyboard and trackpad often work during Windows installation, having a wired USB keyboard and mouse on hand can be useful for troubleshooting in case wireless peripherals aren’t recognized immediately.
Crucial Pre-Installation Steps
These steps are non-negotiable for a secure and smooth Boot Camp installation.
- Back Up Your Mac: This is the most important step. Anytime you’re re-partitioning a hard drive or installing a new operating system, there’s a small but real risk of data loss. Use Time Machine to create a complete backup of your macOS partition. Connect an external hard drive, open Time Machine in System Settings/Preferences, and start a backup. Ensure it completes successfully. This backup will be your safeguard if anything goes wrong.
- Update macOS: Ensure your macOS is fully updated. Go to System Settings/Preferences > General > Software Update and install any pending updates. This ensures you have the latest version of Boot Camp Assistant with any bug fixes and compatibility improvements.
- Ensure Sufficient Free Space: Double-check that you have enough free space on your internal drive. If not, delete unnecessary files, move large media files to external storage, or uninstall unused applications to free up room. Boot Camp Assistant will inform you if you don’t have enough space, but it’s better to prepare beforehand.
- Disconnect External Peripherals: Disconnect any non-essential external hard drives, USB devices (except for the one intended for Boot Camp, if applicable), or monitors. This minimizes potential conflicts during the installation process.
- Charge Your MacBook (if applicable): If you’re using a MacBook, ensure it’s connected to power throughout the entire installation process. A power interruption during partitioning or OS installation can lead to serious issues.
By diligently following these preparation steps, you lay a solid foundation for a successful Boot Camp installation, minimizing potential headaches and ensuring your data remains safe.
The Step-by-Step Boot Camp Installation Process
With all your preparations complete, you are now ready to embark on the actual installation of Windows on your Mac. This process is guided primarily by Apple’s Boot Camp Assistant utility, simplifying what could otherwise be a complex task.
Using Boot Camp Assistant
Boot Camp Assistant is your primary tool for preparing your Mac’s hard drive and initiating the Windows installation.
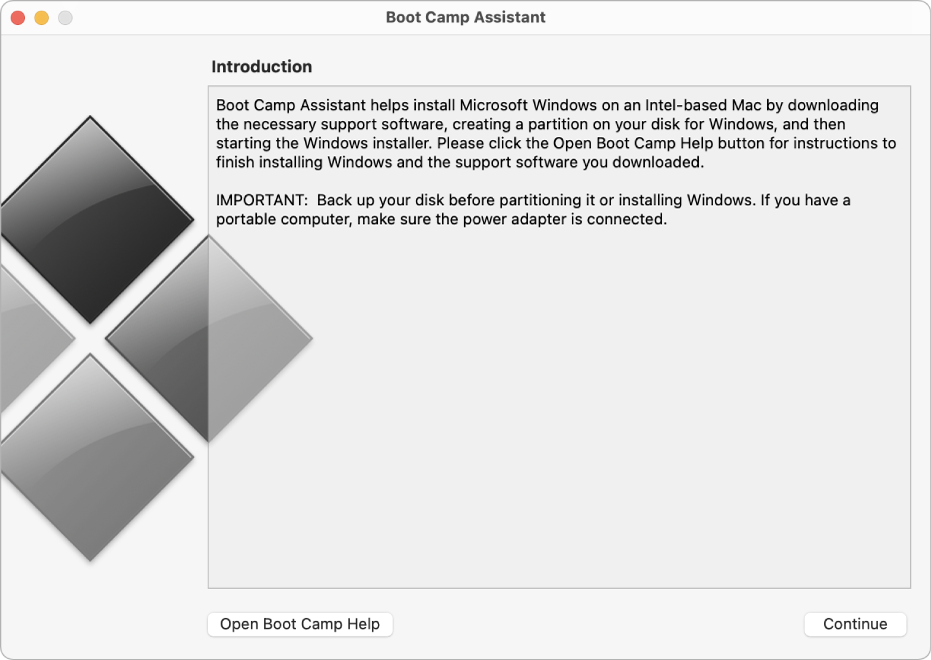
- Open Boot Camp Assistant: Navigate to
Applications > Utilitiesand double-clickBoot Camp Assistant. - Introduction and Overview: Read the introduction. It explains what Boot Camp does and reminds you to back up your Mac (which you’ve already done!). Click
Continue. - Select Tasks (for older macOS versions): If prompted, you might need to select tasks such as “Create a Windows 7 or later install disk” and “Install Windows 7 or later version.” On newer macOS versions, Boot Camp Assistant might automatically detect the ISO and support software.
- Locate Windows ISO and Prepare Drive:
- Boot Camp Assistant will ask you to select your Windows ISO file. Click
Choose...and navigate to where you saved the Windows ISO. - If a USB drive is required for your Mac/macOS version, it will prompt you to select the target USB drive. Ensure it’s the correct one, as it will be erased.
- Boot Camp Assistant will then download the necessary Windows support software (drivers for your Mac’s hardware). This can take some time, depending on your internet speed.
- Boot Camp Assistant will ask you to select your Windows ISO file. Click
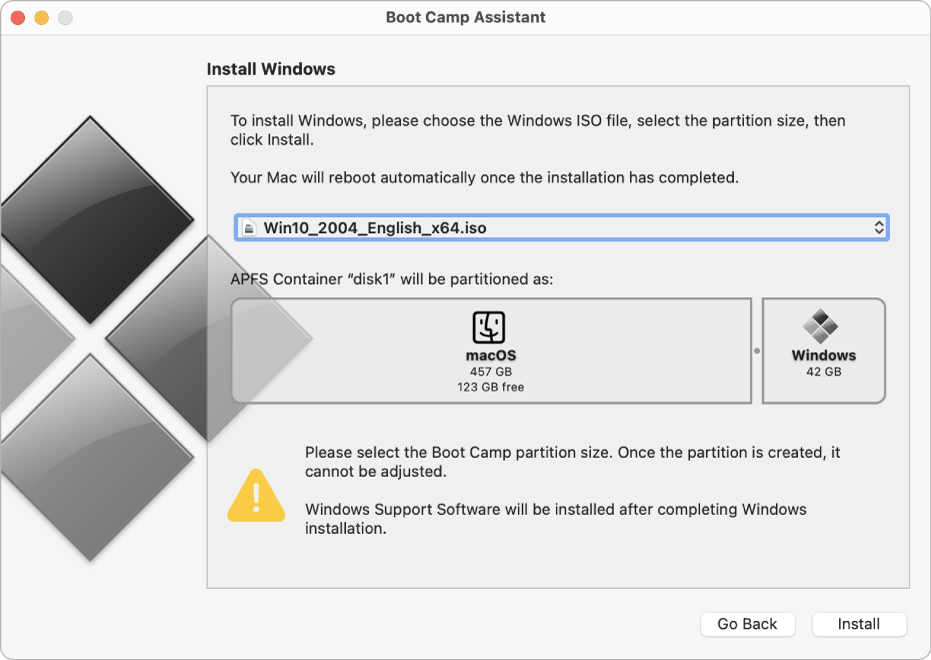
- Create the Windows Partition:
- This is a crucial step. You’ll see a slider that allows you to determine how much space to allocate to your macOS partition and how much to the new Windows (BOOTCAMP) partition.
- Drag the divider to allocate the desired amount of space for Windows. Remember the recommendations: at least 128GB for practical use, more for gaming or heavy applications.
- Once you’re satisfied with the partition sizes, click
Install. - Boot Camp Assistant will now partition your hard drive, copy the Windows installation files (and support software) to the designated partition or USB drive, and then restart your Mac. This process can take a few minutes.
Windows Installation Walkthrough
After your Mac restarts, it will boot directly into the Windows installer. Follow the on-screen prompts carefully.
- Windows Setup Language and Region: Select your language, time and currency format, and keyboard layout. Click
Next. - Install Now: Click the
Install nowbutton. - Product Key: If prompted, enter your Windows product key. If you don’t have one yet, you can often click
I don't have a product keyand proceed with the installation. You’ll need to activate Windows later. - Choose Operating System: Select the version of Windows you purchased or intend to use (e.g., Windows 10 Pro, Windows 11 Home). Click
Next. - Accept License Terms: Read and accept the Microsoft Software License Terms. Click
Next. - Installation Type: Select
Custom: Install Windows only (advanced). DO NOT choose “Upgrade.” - Select Partition: This is another critical step. You will see a list of partitions. Look for the one named
BOOTCAMP. It should be the size you allocated in Boot Camp Assistant. IMPORTANT: Select theBOOTCAMPpartition and then clickFormat. If you format the wrong partition, you could erase your macOS installation! After formatting, ensure it’s still selected and clickNext. - Windows Installation: Windows will now begin installing. Your Mac will restart several times during this process. Do not interrupt it. This stage can take anywhere from 15 minutes to an hour or more, depending on your Mac’s speed.
- Initial Windows Setup: After the final restart, you’ll be greeted by the Windows Out-of-Box Experience (OOBE). Follow the prompts to:
- Select your region and keyboard layout.
- Connect to a Wi-Fi network.
- Sign in with a Microsoft account or create an offline account.
- Set up PIN, privacy settings, etc.
- Once this is complete, you will finally land on the Windows desktop.
Installing Boot Camp Support Software
Even though Windows is installed, you’re not quite done. Your Mac’s hardware (Wi-Fi, Bluetooth, trackpad, graphics, audio, etc.) won’t function optimally, or at all, without the specific drivers provided by Apple.
- Automatic Installation (Most Common):
- If you used a USB drive or if Boot Camp Assistant created a temporary bootable partition, the Boot Camp installer should automatically launch shortly after you reach the Windows desktop.
- If it doesn’t, navigate to
File Explorerin Windows, locate theOSXRESERVEDorBOOTCAMPdrive (if it was copied there) or your USB drive. Open it and find theBootCampfolder. - Inside the
BootCampfolder, double-clicksetup.exeto launch the installer.
- Follow Installer Prompts: Click
Next, accept the license agreement, and clickInstall. The installer will install all the necessary Apple drivers. This process can also take some time, and your Mac might restart once or twice. - Complete Installation: Once the Boot Camp installer finishes, click
Finishand allow your Mac to restart if prompted. - Check for Updates: After restarting into Windows, it’s a good idea to run Windows Update (Settings > Update & Security > Windows Update) to ensure all system updates and potentially newer hardware drivers are installed.
Congratulations! You have successfully installed Windows on your Mac using Boot Camp. Your Mac is now a fully functional dual-boot machine.
Navigating Your Dual-Boot System
Now that you have both macOS and Windows installed, understanding how to switch between them and manage your new dual-boot environment is essential for a seamless user experience.
Switching Between macOS and Windows
One of the primary benefits of a Boot Camp setup is the ability to choose which operating system you want to use at startup.
- At Startup:
- Shut down your Mac completely.
- Press the power button.
- Immediately press and hold the
Option(Alt) key on your keyboard. Keep holding it until you see a screen displaying icons for your available bootable drives. - You will see icons for your macOS drive (usually named “Macintosh HD” or similar) and your Windows drive (usually named “BOOTCAMP” or “Windows”).
- Use your arrow keys or mouse to select the operating system you wish to boot into, then press
Enteror click the arrow.
- From macOS to Windows:
- In macOS, go to
System Settings(orSystem Preferenceson older macOS versions). - Click on
Startup Disk. - Click the lock icon in the bottom-left corner to authenticate with your administrator password.
- Select the
BOOTCAMPorWindowsdisk. - Click
Restart...to immediately reboot your Mac into Windows.
- In macOS, go to
- From Windows to macOS:
- In Windows, look for the
Boot Campicon in the system tray (the small icons near the clock on the taskbar). It usually looks like a grey diamond or a stylized square. - Click the
Boot Campicon. - Select
Restart in macOS...(or “Restart in OS X…”). - Confirm the restart. Your Mac will reboot directly into macOS.
- In Windows, look for the
You can also set a default operating system if you primarily use one over the other. In Startup Disk in macOS or via the Boot Camp Control Panel in Windows, you can choose which OS your Mac will boot into automatically if no selection is made at startup.
Managing Disk Partitions (Advanced)
Once Windows is installed, changing the size of your Boot Camp partition can be complex and carries risks. It’s always best to get the allocation right during the initial setup.
-
Resizing Partitions:
- Increasing Windows partition size: This is generally difficult and often requires specialized third-party partition management software (like MiniTool Partition Wizard or Paragon Partition Manager for Windows) or rebuilding the Boot Camp partition entirely. It’s not officially supported by Apple and carries a risk of data loss.
- Decreasing Windows partition size: Similarly challenging. You cannot easily shrink the Boot Camp partition from macOS without third-party tools.
- Recommendation: If you realize you need significantly more space for Windows or macOS after installation, the safest and most reliable method is often to completely remove the Boot Camp partition and reinstall Windows, allocating the desired space from the start.
-
Removing Boot Camp: If you no longer need Windows on your Mac, you can easily remove it and reclaim the disk space for macOS.
- Boot into macOS.
- Open
Boot Camp Assistant(Applications > Utilities). - Click
Continuepast the introduction. - You should see an option to “Remove Windows 10 or later version.” Select it.
- Click
Restore. Boot Camp Assistant will remove the Windows partition, delete all its contents, and restore your disk to a single macOS partition. This process is generally quick and straightforward. Ensure you back up any data you want to keep from your Windows partition before removing it.
Managing your dual-boot system effectively ensures you get the most out of both macOS and Windows, leveraging the strengths of each operating system on your versatile Mac.
Troubleshooting and Alternatives
While the Boot Camp installation process is generally smooth, you might encounter issues. Additionally, if Boot Camp isn’t quite right for your needs, there are excellent alternatives worth considering.
Common Boot Camp Installation Issues
Encountering problems during or after installation can be frustrating. Here are some common issues and potential solutions:
- “Not enough free space” error:
- Solution: Ensure you have at least 128GB (preferably more) of contiguous free space on your macOS startup disk. Delete large files, move data to external drives, or uninstall applications. Empty your Trash. Boot Camp Assistant requires the space to be contiguous, so sometimes even if your Finder shows enough free space, macOS might need to defragment itself (usually handled automatically, but freeing up more space helps).
- Boot Camp Assistant crashes or freezes:
- Solution: Restart your Mac and try again. Ensure macOS is fully updated. Try resetting PRAM/NVRAM (restart, hold Option-Command-P-R until Mac restarts a second time). Sometimes, booting into macOS Recovery (restart, hold Command-R) and running Disk Utility’s “First Aid” on your main drive can resolve underlying disk issues.
- Windows installer cannot find the BOOTCAMP partition or gives a “drive not compatible” error:
- Solution: In the Windows installer’s partition selection screen, make sure you selected the
BOOTCAMPpartition and clickedFormatbefore proceeding. If it still doesn’t work, delete theBOOTCAMPpartition from within the Windows installer (if possible), then restart your Mac into macOS and try the entire Boot Camp process again from scratch.
- Solution: In the Windows installer’s partition selection screen, make sure you selected the
- Windows installs, but drivers are missing (Wi-Fi, sound, trackpad, etc.):
- Solution: This means the Boot Camp support software (drivers) didn’t install correctly.
- If you used a USB drive, try to manually run
setup.exefrom theBootCampfolder on that drive once in Windows. - If the drivers weren’t copied to your internal drive, you might need to download them manually. In macOS, open Boot Camp Assistant, go to
Actionmenu (top menubar), and chooseDownload Windows Support Software. Save it to a USB drive or external hard drive, then boot into Windows and run thesetup.exefrom that drive. - Ensure your Windows installation is activated and fully updated via Windows Update.
- If you used a USB drive, try to manually run
- Solution: This means the Boot Camp support software (drivers) didn’t install correctly.
- Mac boots directly into Windows/macOS without showing boot menu:
- Solution: If you want the option to choose, ensure you hold down the
Optionkey immediately after pressing the power button until the boot manager appears. Check yourStartup Disksettings in both macOS and Windows to ensure no single OS is set as the permanent default without giving you an option.
- Solution: If you want the option to choose, ensure you hold down the
- Bluetooth not working in Windows:
- Solution: Sometimes the Bluetooth driver needs a specific order of installation or a restart. Ensure all Boot Camp drivers are installed. If issues persist, try going to Device Manager in Windows, finding the Bluetooth adapter, uninstalling its driver, and then restarting Windows to let it reinstall.
When troubleshooting, patience is key. Always ensure your backups are current before attempting any major changes or re-installations. Searching Apple’s support pages or community forums with specific error messages can also provide targeted solutions.
Exploring Virtual Machine Options
While Boot Camp offers native performance, it has a significant drawback: you can only run one operating system at a time. If your workflow requires simultaneously accessing both macOS and Windows applications, or if you have an Apple Silicon Mac, virtual machines (VMs) are a superior alternative.
- What are Virtual Machines?
Virtualization software creates a “virtual computer” environment within your existing operating system. This virtual machine then runs its own operating system (the “guest OS”), such as Windows, completely isolated from your main macOS (the “host OS”). - Key Advantages of Virtual Machines:
- Simultaneous Operation: Run macOS and Windows at the same time, copying and pasting between them, and even sharing files easily.
- No Re-partitioning: VMs use virtual disk files, so you don’t need to re-partition your physical hard drive.
- Snapshots: Easily save the state of your VM and revert to it later, ideal for testing software or development.
- Easy Removal: Simply delete the VM file to remove Windows entirely.
- Apple Silicon Compatibility: Modern VM software (like Parallels Desktop and VMware Fusion) supports running the ARM version of Windows (Windows 11 for ARM) on Apple Silicon Macs.
- Key Disadvantages of Virtual Machines:
- Performance Overhead: Because two operating systems are running simultaneously, VMs generally have a performance overhead compared to native Boot Camp, especially for demanding tasks like gaming or intensive graphics applications.
- Resource Allocation: You need sufficient RAM and CPU cores to comfortably run both macOS and your Windows VM.
- Popular Virtualization Software:
- Parallels Desktop: The most popular and often recommended solution for Mac users. It offers excellent performance, tight integration with macOS (e.g., Coherence mode allows Windows apps to appear seamlessly on the macOS desktop), and robust support for Apple Silicon.
- VMware Fusion: Another highly capable virtualization solution, popular in enterprise environments. It also offers good performance and features.
- VirtualBox: A free and open-source option from Oracle. While powerful, it generally requires more technical setup and might not offer the same level of integration or performance as paid alternatives.
The choice between Boot Camp and a virtual machine largely depends on your specific needs. If you need maximum performance for Windows-only games or highly demanding applications and don’t mind rebooting, Boot Camp is excellent. If you need to switch between operating systems frequently, require specific Windows apps alongside macOS apps, or have an Apple Silicon Mac, a virtual machine is the way to go.
In conclusion, installing Windows on your Mac via Boot Camp is a powerful way to expand your computer’s capabilities. By carefully following the preparation and installation steps, you can create a robust dual-boot system that offers the best of both macOS and Windows, truly making your Mac a versatile powerhouse for any task.
aViewFromTheCave is a participant in the Amazon Services LLC Associates Program, an affiliate advertising program designed to provide a means for sites to earn advertising fees by advertising and linking to Amazon.com. Amazon, the Amazon logo, AmazonSupply, and the AmazonSupply logo are trademarks of Amazon.com, Inc. or its affiliates. As an Amazon Associate we earn affiliate commissions from qualifying purchases.