
In today’s interconnected digital landscape, wireless connectivity is no longer a luxury but a fundamental necessity. From headphones and speakers to keyboards, mice, and even fitness trackers, Bluetooth technology underpins a vast ecosystem of devices, enabling us to interact with our computers without the tangle of wires. For Windows 10 users, mastering Bluetooth setup and troubleshooting is key to unlocking a world of productivity and entertainment. This comprehensive guide will walk you through everything you need to know about installing, enabling, and managing Bluetooth on your Windows 10 PC, ensuring a smooth and hassle-free experience.
Bluetooth, a short-range wireless technology standard, facilitates data exchange over short distances using UHF radio waves in the ISM band from 2.402 GHz to 2.480 GHz. Its low power consumption and robust, secure connections have made it ubiquitous across personal computing and mobile devices. Whether you’re looking to enjoy crystal-clear audio from your wireless headphones during an intense gaming session or streamline your workstation with a cable-free mouse and keyboard, understanding how to properly configure Bluetooth on Windows 10 is your first step. Our focus here is on empowering you with the practical steps and troubleshooting techniques, aligning perfectly with the “Tech” aspect of our platform, which emphasizes software tutorials, gadget integration, and enhancing digital productivity.
Before You Begin: Essential Checks for Bluetooth Readiness
Before diving into the actual installation or pairing process, it’s crucial to confirm that your Windows 10 PC is equipped with Bluetooth capabilities and that the necessary prerequisites are met. Skipping these initial checks can lead to frustration and wasted time later on.
Does Your PC Have Bluetooth? Identifying Hardware Capabilities
The very first step is to determine whether your computer has built-in Bluetooth hardware. Most modern laptops and many desktop motherboards come with integrated Bluetooth. If you’re unsure, there are a few ways to check:
- Check Device Manager:
- Right-click the Start button (or press
Windows key + X) to open the Quick Link menu. - Select Device Manager.
- In the Device Manager window, look for a category named “Bluetooth.” If you see it, your PC has Bluetooth. Expand this category to see the specific Bluetooth adapter (e.g., “Intel Wireless Bluetooth,” “Realtek Bluetooth Adapter”).
- If you don’t see “Bluetooth,” it’s possible it’s under “Network adapters” or “Other devices” (with a yellow exclamation mark if drivers are missing). However, if there’s no mention of Bluetooth anywhere, your PC likely lacks integrated hardware.
- Right-click the Start button (or press
- Look for a Bluetooth Icon in the Taskbar or Action Center:
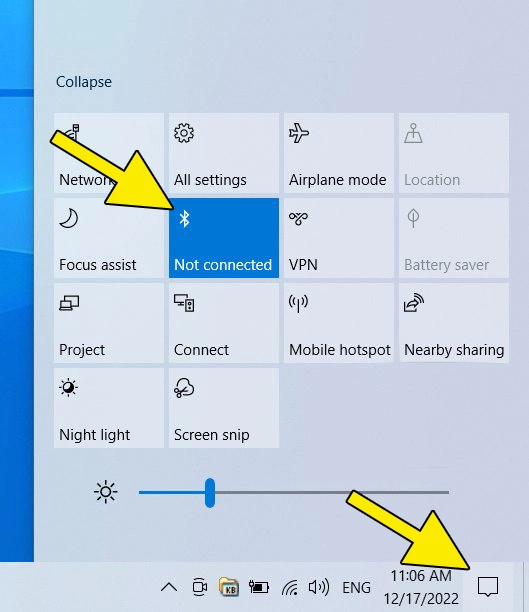
- Click the Action Center icon in the bottom-right corner of your taskbar (it looks like a speech bubble).
- Look for a “Bluetooth” quick action button. If it’s present, your PC has Bluetooth.
- Check Your PC’s Specifications: If you know your computer’s model, a quick search on the manufacturer’s website for its specifications should clearly state whether Bluetooth is included.
If your PC does not have built-in Bluetooth, don’t worry! You can easily add this functionality using an external USB Bluetooth adapter, which we’ll cover later in this guide. These small, affordable dongles simply plug into a USB port and provide instant Bluetooth capabilities.
Is Bluetooth Enabled? Quick Toggles and Settings
Even if your PC has Bluetooth hardware, it might be disabled by default or have been turned off manually. Ensuring it’s enabled is a quick and essential check.
- Via Action Center:
- Click the Action Center icon (speech bubble) in the bottom-right corner of your taskbar.
- Find the “Bluetooth” tile. If it’s greyed out, click it to turn it blue (enabled).
- Via Windows Settings:
- Open Settings by clicking the Start button and then the gear icon, or by pressing
Windows key + I. - Go to Devices > Bluetooth & other devices.
- Ensure the “Bluetooth” toggle is set to On. If it’s already on, try toggling it off and then back on, as this can sometimes resolve minor glitches.
- Open Settings by clicking the Start button and then the gear icon, or by pressing
If you encounter an error message like “Bluetooth is turned off” or “Bluetooth not available,” and you’ve confirmed your hardware is present and enabled in settings, it might indicate a driver issue, which we’ll address in the troubleshooting section.
Update Windows 10: Ensuring System Stability and Compatibility
Keeping your Windows 10 operating system up to date is paramount for optimal performance, security, and hardware compatibility. Microsoft frequently releases updates that include driver improvements, bug fixes, and enhanced support for various peripherals, including Bluetooth devices.
- Check for Updates:
- Open Settings (
Windows key + I). - Go to Update & Security > Windows Update.
- Click Check for updates.
- Install any pending updates and restart your computer if prompted.
- Open Settings (
Outdated Windows versions can lead to compatibility issues, dropped connections, or even prevent Bluetooth from functioning entirely. Performing this check first can save you from unnecessary troubleshooting steps down the line.
Enabling and Pairing Bluetooth Devices on Windows 10
Once you’ve confirmed your PC has Bluetooth and it’s enabled, the next step is to connect your wireless devices. The process is straightforward and typically involves putting your device into pairing mode and then adding it through Windows settings.
Activating Bluetooth in Settings for Device Discovery
Before you can pair a device, Windows needs to be actively scanning for new Bluetooth peripherals.
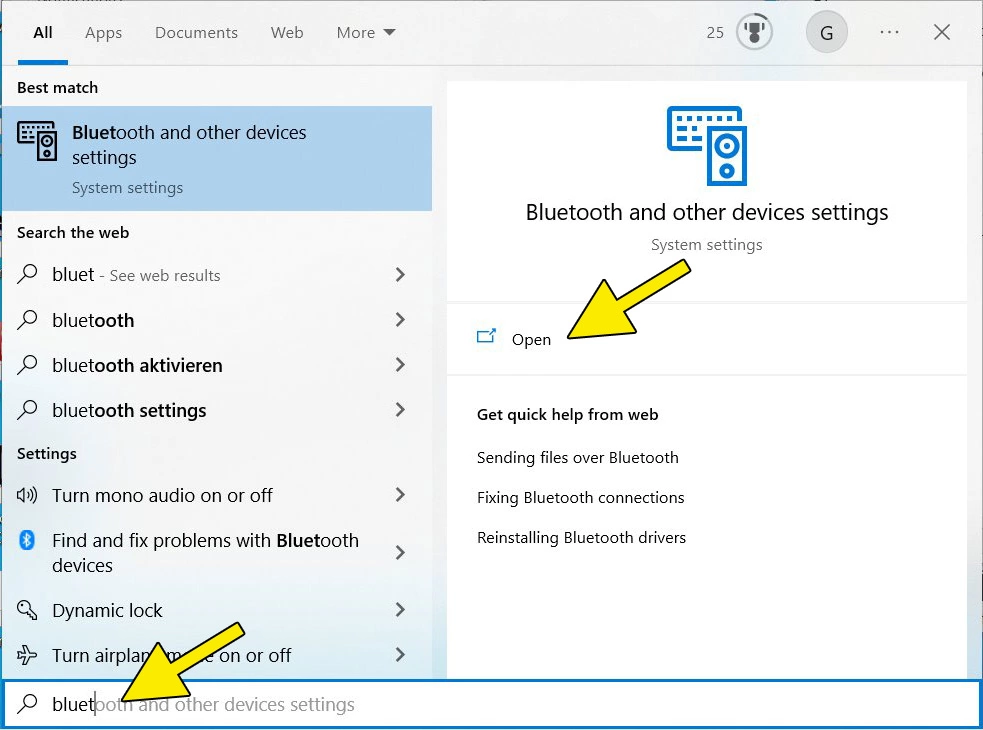
- Open Bluetooth & other devices settings:
- Press
Windows key + Ito open Settings. - Click on Devices.
- Select Bluetooth & other devices from the left-hand menu.
- Press
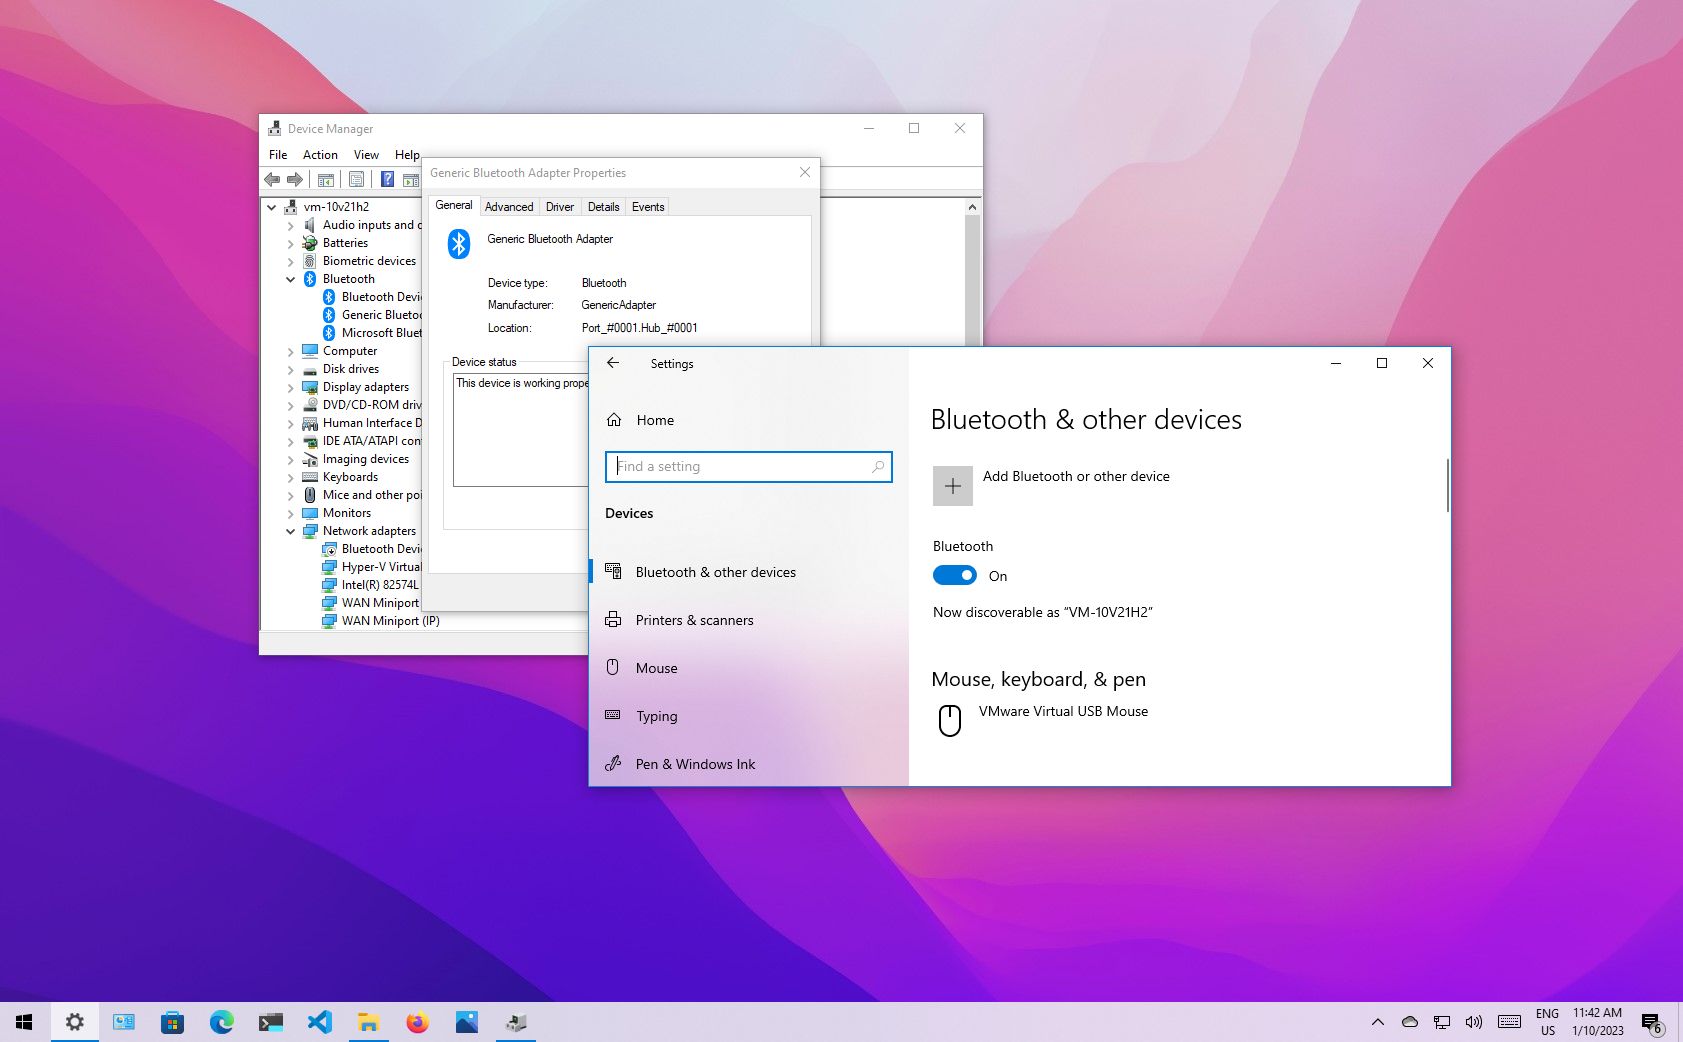
- Ensure Bluetooth is On:
- At the top of the “Bluetooth & other devices” section, you should see a toggle labeled “Bluetooth.” Make sure this is switched to On. When Bluetooth is enabled, your PC will become discoverable by other devices (for a limited time) and will also be able to detect nearby Bluetooth devices that are in pairing mode.
This window is your central hub for managing all Bluetooth-connected devices, offering an overview of what’s currently paired and the option to add new ones.
Pairing a New Bluetooth Device: Step-by-Step
This is the core process for connecting any new Bluetooth gadget to your Windows 10 PC. The exact steps may vary slightly depending on the type of device (e.g., headphones, mouse, speaker), but the general principle remains the same.
- Prepare Your Bluetooth Device for Pairing:
- Crucial Step: Put your Bluetooth device into “pairing mode” or “discovery mode.” This is usually done by pressing and holding a dedicated Bluetooth button on the device (often indicated by a Bluetooth logo) until an indicator light starts blinking rapidly (e.g., blue and red, or just blue).
- Refer to your device’s manual if you’re unsure how to activate pairing mode, as this step is device-specific. Some devices automatically enter pairing mode when first turned on, while others require a manual action.
- Add the Device in Windows Settings:
- In the Bluetooth & other devices window on your PC, click Add Bluetooth or other device.
- A new “Add a device” window will appear. Select Bluetooth (the first option) from the list. This tells Windows to search for Bluetooth devices.
- Select Your Device:
- Windows will start scanning for nearby Bluetooth devices in pairing mode. You should see a list populate with available devices.
- Click on the name of your device when it appears in the list.
- Complete the Pairing Process:
- Depending on the device, you might be prompted to confirm a PIN (e.g., “0000” or “1234” for generic devices, or a specific PIN displayed on your PC/device). Most modern devices don’t require manual PIN entry and will connect automatically.
- Once connected, Windows will display a “Your device is ready to go!” message or similar. Your device will now appear under the “Mouse, keyboard, & pen,” “Audio,” or “Other devices” sections in the Bluetooth & other devices settings.
Congratulations! Your Bluetooth device is now paired and ready for use. You might need to select the device as an output (for audio) or input (for microphone) in your sound settings if it doesn’t automatically become the default.
Reconnecting Previously Paired Devices
Once a device is paired, it should automatically reconnect when it’s within range and both Bluetooth on your PC and the device itself are turned on.
- If a previously paired device isn’t reconnecting, try these steps:
- Ensure the device is turned on and charged.
- Check that Bluetooth is still enabled on your Windows 10 PC.
- In Settings > Devices > Bluetooth & other devices, find your device in the list. It might say “Paired” but not “Connected.” Click on the device and select Connect.
- Sometimes, simply turning the Bluetooth device off and on again, or toggling Bluetooth on your PC off and on, can resolve connection issues.
Troubleshooting Common Bluetooth Issues on Windows 10
Bluetooth can sometimes be finicky. If you’re encountering problems like devices not connecting, frequent disconnections, or poor audio quality, a structured approach to troubleshooting can help resolve most issues.
Updating or Reinstalling Bluetooth Drivers: The First Line of Defense
Outdated, corrupted, or incompatible drivers are one of the most common culprits behind Bluetooth problems. Drivers are software that allows your operating system to communicate with your hardware.
- Update Bluetooth Drivers:
- Open Device Manager (
Windows key + X, then select Device Manager). - Expand the Bluetooth category.
- Right-click on your Bluetooth adapter (e.g., “Intel Wireless Bluetooth”) and select Update driver.
- Choose Search automatically for updated driver software. Windows will attempt to find and install the latest driver.
- If Windows doesn’t find a new driver, consider visiting your PC manufacturer’s website (e.g., Dell, HP, Lenovo) or the Bluetooth adapter manufacturer’s website (e.g., Intel, Realtek) directly. Download the latest Bluetooth driver specific to your model and Windows 10 version, then install it manually.
- Open Device Manager (
- Reinstall Bluetooth Drivers:
- If updating doesn’t work, or if your Bluetooth adapter has an error icon (yellow exclamation mark), try reinstalling the driver.
- In Device Manager, right-click your Bluetooth adapter and select Uninstall device.
- Important: If prompted, check the box that says “Delete the driver software for this device.” This ensures a clean slate.
- Restart your computer. Windows will typically automatically detect the Bluetooth hardware upon reboot and reinstall a generic or the most recently found driver. If it doesn’t, go back to Device Manager, click Action > Scan for hardware changes.
A fresh driver installation often resolves deep-seated connectivity issues.
Running the Bluetooth Troubleshooter
Windows 10 includes built-in troubleshooters designed to diagnose and fix common problems automatically.
- Access the Troubleshooter:
- Open Settings (
Windows key + I). - Go to Update & Security > Troubleshoot.
- Click Additional troubleshooters.
- Scroll down and select Bluetooth, then click Run the troubleshooter.
- Follow the on-screen instructions. The troubleshooter will attempt to identify and fix issues like services not running or incorrect settings.
- Open Settings (
While not always a definitive fix, the troubleshooter can often pinpoint simple configuration errors or suggest solutions.
Checking Bluetooth Support Service
Bluetooth functionality relies on a specific service running in the background of Windows. If this service is stopped or misconfigured, Bluetooth won’t work.
- Open Services:
- Press
Windows key + Rto open the Run dialog. - Type
services.mscand press Enter.
- Press
- Locate Bluetooth Support Service:
- In the Services window, scroll down and find Bluetooth Support Service.
- Check its “Startup type.” It should ideally be set to Automatic.
- Check its “Status.” It should say Running.
- Restart or Configure the Service:
- If the service isn’t running, right-click it and select Start.
- If the startup type is not Automatic, right-click, select Properties, change “Startup type” to Automatic, then click Apply and OK. Restart the service afterward.
Restarting this service can often kickstart dormant Bluetooth functionality.
Disabling and Re-enabling Bluetooth on Your PC
Sometimes, a simple toggle can refresh the Bluetooth module and resolve temporary glitches.
- You can do this via the Action Center or within Settings > Devices > Bluetooth & other devices. Simply switch the Bluetooth toggle to Off, wait a few seconds, and then switch it back On.
Removing and Re-pairing Devices
If a specific device is giving you trouble, removing it from your PC’s paired list and then re-pairing it can resolve persistent connection issues, especially after driver updates or Windows updates.
- Remove the Device:
- Go to Settings > Devices > Bluetooth & other devices.
- Under “Mouse, keyboard, & pen,” “Audio,” or “Other devices,” find the problematic device.
- Click on the device name and select Remove device. Confirm the removal.
- Re-pair the Device:
- Follow the steps outlined earlier in “Pairing a New Bluetooth Device.” Remember to put your device back into pairing mode.
Interference and Range Issues
Bluetooth operates on the 2.4 GHz frequency, which is also used by Wi-Fi, cordless phones, and other wireless devices. This can lead to interference.
- Reduce Interference: Try moving your Bluetooth device closer to your PC, or moving other wireless devices away. Avoid placing your PC or Bluetooth devices near large metal objects, microwaves, or dense walls.
- Check Range: Bluetooth has a limited range (typically up to 10 meters or 30 feet for Class 2 devices). Ensure your device is within this effective range.
Installing a Bluetooth Adapter (If Your PC Lacks Bluetooth)
For desktop PCs or older laptops that don’t come with integrated Bluetooth, a USB Bluetooth adapter (often called a dongle) is an inexpensive and effective solution.
Choosing the Right USB Bluetooth Dongle
When purchasing an adapter, consider these factors:
- Bluetooth Version: Aim for Bluetooth 4.0 (Bluetooth Low Energy – BLE) or newer (4.2, 5.0, 5.1, 5.2). Newer versions offer better power efficiency, faster speeds, and improved range. Bluetooth 5.0 and above are recommended for future-proofing and optimal performance with modern peripherals.
- Operating System Compatibility: Ensure the adapter explicitly states compatibility with Windows 10.
- Brand Reputation: Stick to reputable brands for better driver support and reliability.
- Size: Most dongles are very small (“nano” size), making them discreet and ideal for laptops.
Installation Steps for an External Adapter
Installing a USB Bluetooth adapter is usually a plug-and-play process.
- Plug in the Adapter:
- Simply insert the USB Bluetooth dongle into an available USB port on your Windows 10 PC.
- Automatic Driver Installation:
- Windows 10 will typically detect the new hardware and automatically install the necessary drivers. You might see a notification in the taskbar indicating “Setting up a device” or “Device driver software installed successfully.”
- Manual Driver Installation (If Needed):
- If Windows doesn’t install the drivers automatically, or if you encounter issues:
- Check the packaging or manufacturer’s website for a driver CD or a download link.
- Download and install the drivers manually.
- If Windows doesn’t install the drivers automatically, or if you encounter issues:
- Verify Installation:
- Once installed, open Device Manager and look for the “Bluetooth” category. Your new adapter should be listed there.
- Check Settings > Devices > Bluetooth & other devices. The Bluetooth toggle should now be present and enabled, allowing you to proceed with pairing devices as described earlier.
Most modern adapters are truly plug-and-play, making this an effortless way to add Bluetooth to any compatible Windows 10 machine.
Advanced Tips for Bluetooth Management and Security
Beyond basic setup and troubleshooting, a few advanced considerations can enhance your Bluetooth experience and maintain digital security.
Managing Bluetooth Devices from Settings
The Bluetooth & other devices section in Windows Settings is your control panel for all things Bluetooth.
- Device Status: Quickly see which devices are connected, paired, or in need of attention.
- Removing Devices: Easily disconnect and remove devices you no longer use, which can sometimes improve connection stability for other devices.
- Accessing Device-Specific Settings: For some devices, clicking on their entry might reveal additional options, such as battery status or specific sound output configurations.
Power Management Settings for Bluetooth
For desktop users, or if you’re experiencing intermittent Bluetooth disconnections, checking power management settings for your Bluetooth adapter can be helpful.
- Open Device Manager (
Windows key + X, then Device Manager). - Expand Bluetooth, right-click your Bluetooth adapter, and select Properties.
- Go to the Power Management tab.
- Uncheck the option that says “Allow the computer to turn off this device to save power.” While this might slightly increase power consumption (negligible for desktops, minimal for laptops), it can prevent Windows from cutting power to the adapter and causing disconnections, especially during periods of inactivity.
Security Considerations for Bluetooth
While convenient, Bluetooth connections can present potential security vulnerabilities if not managed carefully.
- Pairing Only with Trusted Devices: Only pair your PC with devices you own and trust. Avoid pairing in public places where unknown devices might attempt to connect.
- Disable Bluetooth When Not in Use: If you’re not actively using Bluetooth, consider turning it off (via Action Center or Settings). This reduces your device’s visibility and potential attack surface.
- Keep Drivers Updated: As mentioned, updated drivers often include security patches that protect against known vulnerabilities.
- Strong Passkeys: If a device requires a passkey for pairing, use a strong, unique one if possible, rather than default options like “0000” or “1234.”
By following these best practices, you can enjoy the convenience of Bluetooth without compromising your digital security.
Conclusion
Installing and managing Bluetooth on Windows 10 is a relatively straightforward process that opens up a world of wireless convenience. From confirming hardware presence and enabling the service to pairing new devices and tackling common troubleshooting scenarios, this guide has provided you with the necessary steps to achieve seamless connectivity. Remember that keeping your Windows 10 operating system and Bluetooth drivers updated is the cornerstone of a stable and reliable wireless experience. Embrace the freedom from wires and enhance your productivity and entertainment with a perfectly configured Bluetooth setup on your Windows 10 PC.
aViewFromTheCave is a participant in the Amazon Services LLC Associates Program, an affiliate advertising program designed to provide a means for sites to earn advertising fees by advertising and linking to Amazon.com. Amazon, the Amazon logo, AmazonSupply, and the AmazonSupply logo are trademarks of Amazon.com, Inc. or its affiliates. As an Amazon Associate we earn affiliate commissions from qualifying purchases.