
Upgrading your computer’s graphics card, often referred to as a GPU (Graphics Processing Unit), is one of the most impactful ways to boost your system’s performance, especially for gaming, video editing, and other graphically intensive tasks. While the idea might seem daunting to some, the process is remarkably straightforward with a bit of preparation and careful execution. This guide will walk you through everything you need to know, from understanding what a graphics card does to physically installing it and ensuring everything is running smoothly afterward.
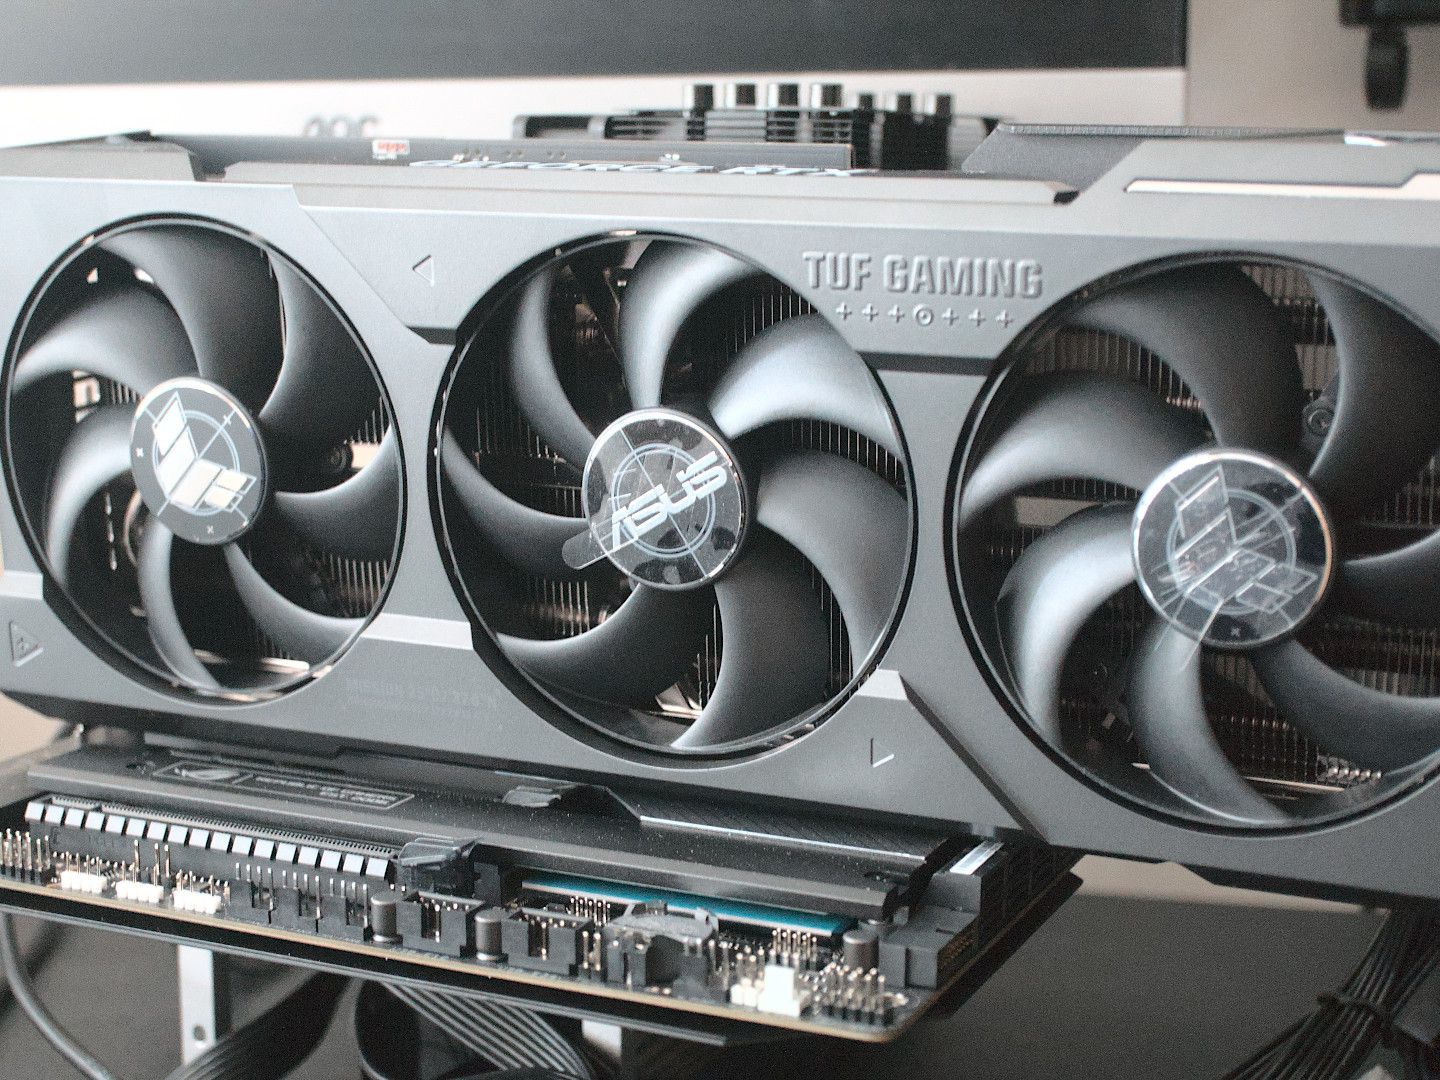
Understanding the Graphics Card’s Role in Your System
Before diving into the installation process, it’s crucial to understand why you’re installing a new graphics card and what benefits it brings. The graphics card is essentially the brain for your visual output. It takes the data processed by your CPU and translates it into the images you see on your monitor. Think of it as a specialized processor dedicated solely to rendering visuals.
Why Upgrade Your Graphics Card?
The primary motivation for upgrading a graphics card is almost always performance. This can manifest in several ways:
- Gaming: This is the most common reason. A more powerful GPU allows you to play games at higher resolutions (like 1440p or 4K), with higher frame rates (smoother motion), and with more detailed graphics settings (like ray tracing and ultra textures). This transforms the gaming experience from choppy and basic to fluid and immersive.
- Content Creation: For professionals and hobbyists alike, a good graphics card is indispensable for tasks like video editing, 3D rendering, graphic design, and even some AI development. These applications leverage the GPU’s parallel processing power to significantly speed up rendering times and handle complex visual computations.
- Virtual Reality (VR) and Augmented Reality (AR): These immersive technologies demand a substantial amount of graphical horsepower. A capable GPU is essential for a smooth and lag-free VR/AR experience.
- Multi-Monitor Setups: If you plan to run multiple high-resolution monitors, a stronger graphics card will ensure each display operates optimally without performance degradation.
- Future-Proofing: Even if your current needs don’t necessitate an upgrade, installing a more powerful GPU now can ensure your system remains capable for future software and game releases.
Key Components to Consider
When choosing a new graphics card, several factors come into play:
- Performance: This is measured by factors like core clock speed, number of CUDA cores (NVIDIA) or Stream Processors (AMD), and memory bandwidth. Benchmarks and reviews are your best friend here.
- VRAM (Video Random Access Memory): This is the dedicated memory on the graphics card. More VRAM is crucial for higher resolutions and complex textures. For modern gaming and content creation, 8GB is often considered a minimum, with 10GB, 12GB, or even more being desirable for demanding tasks.
- Power Consumption (TDP): Graphics cards can be power-hungry. You’ll need to ensure your power supply unit (PSU) has enough wattage and the necessary PCIe power connectors to support the new card.
- Physical Size: Graphics cards come in various lengths and widths. You need to ensure the card will physically fit inside your computer case. Check the dimensions of the card against your case’s specifications.
- Connectivity: Ensure the card has the display outputs you need (HDMI, DisplayPort) to connect to your monitor(s).
Preparing for Installation: What You Need and How to Get Ready
A smooth installation begins with thorough preparation. Rushing this stage can lead to mistakes or overlooking crucial compatibility checks.
Gathering Your Tools and Components
Before you even open your computer, make sure you have everything you need:
- The New Graphics Card: Your shiny new GPU!
- Phillips Head Screwdriver: This is the most common type of screw used in computer builds. A magnetic tip can be incredibly helpful.
- Anti-Static Wrist Strap (Recommended): Static electricity can damage sensitive computer components. Wearing a wrist strap connected to a grounded object (like the metal chassis of your PC) is a good safety measure.
- Your Computer’s User Manual (Optional but helpful): This can provide specific details about your motherboard and case.
- A Clear, Well-Lit Workspace: You’ll need space to work and good lighting to see what you’re doing.
- A Container for Screws: Keep track of any screws you remove to avoid losing them.
Checking Compatibility: The Crucial First Step
This is arguably the most important step. Don’t skip it!
Ensuring Motherboard and Slot Compatibility
Graphics cards connect to your motherboard via a PCI Express (PCIe) slot.
- PCIe Slot Type: Modern graphics cards use PCIe x16 slots. Most motherboards manufactured in the last decade will have at least one. Check your motherboard’s specifications to confirm it has a PCIe x16 slot. You’ll also want to ensure it’s a relatively modern generation (PCIe 3.0, 4.0, or 5.0) for optimal performance, though older cards will still work in newer slots and vice-versa.
- Physical Space: As mentioned earlier, verify the physical dimensions of the new card against the available space in your computer case. Pay attention to both length and the number of expansion slots the card occupies (usually 2 or 3).
Power Supply Unit (PSU) Requirements
This is a critical bottleneck for many upgrades.
- Wattage: Graphics cards have a recommended PSU wattage. This is often listed on the card’s specifications or packaging. It’s generally a good idea to have some headroom beyond the minimum recommendation to ensure stability and longevity of your PSU. A common guideline is to add at least 100-150W to the recommended GPU wattage, especially if you have other power-hungry components.
- PCIe Power Connectors: Graphics cards require supplemental power directly from the PSU. These connectors are usually 6-pin or 8-pin. Check how many and what type of connectors your new GPU requires and ensure your PSU has them. If your PSU doesn’t have the necessary connectors, you’ll need to replace the PSU as well.
Software Preparation: Drivers and Uninstallation
Before you physically swap out hardware, it’s wise to prepare your software.
- Download New Drivers: Visit the website of your new graphics card manufacturer (NVIDIA or AMD) and download the latest drivers for your specific card model and operating system. Store these drivers on your desktop or a readily accessible folder.
- Uninstall Old Drivers (Recommended): While Windows can sometimes handle driver changes automatically, it’s best practice to remove the old drivers to prevent potential conflicts. You can do this through the “Apps & features” section in Windows Settings, or more thoroughly using a tool like Display Driver Uninstaller (DDU) in Safe Mode. DDU is highly recommended for a clean sweep.
The Installation Process: Step-by-Step Hardware Replacement
With all the preparation done, it’s time to get your hands dirty. Always ensure your computer is powered off and unplugged from the wall outlet before opening the case.
Step 1: Opening Your Computer Case and Disconnecting Components
- Power Down and Unplug: Shut down your computer completely. Then, turn off the power switch on the back of your PSU and unplug the power cord from the wall.
- Discharge Static: If you’re not wearing an anti-static wrist strap, touch a grounded metal object (like the metal frame of your PC) to discharge any built-up static electricity.
- Open the Case: Most PC cases have side panels that are secured with thumbscrews or regular screws. Remove the necessary screws and carefully slide or swing open the main side panel to access the internal components.
- Identify the Current Graphics Card: Locate your current graphics card. It will be the largest component plugged into a long slot on your motherboard, with display outputs at the back of the case.
- Disconnect Power Cables: Your current graphics card likely has one or more PCIe power cables connected to it from the PSU. Carefully unlatch the clip on each connector and gently pull them out.
- Unlatch the PCIe Slot: Most PCIe slots have a small latch or clip at the end that secures the graphics card. You’ll need to press this latch down or sideways to release the card.
Step 2: Removing the Old Graphics Card
- Remove Securing Screws: The graphics card is usually secured to the back of the case with one or two screws that go through the metal bracket of the card into the case frame. Unscrew these.
- Gently Pull the Card: With the power cables disconnected, the PCIe slot latch released, and the securing screws removed, you should be able to gently and evenly pull the graphics card straight up and out of the PCIe slot. If it feels stuck, double-check that you’ve released all latches and screws. Avoid forcing it.
Step 3: Installing the New Graphics Card
- Prepare the Expansion Slot: On the back of your case, remove the metal expansion slot covers that align with where the new graphics card’s outputs will sit. Your new card might occupy two or three slots, so remove the corresponding covers.
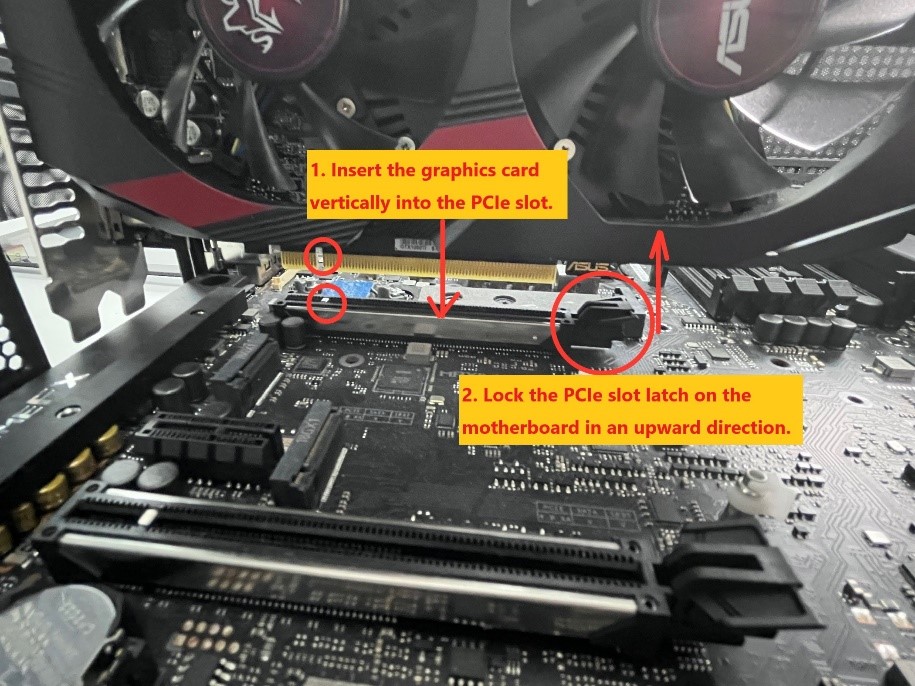
- Align the New Card: Carefully align the new graphics card with the PCIe x16 slot on your motherboard. Ensure the gold contacts on the card’s edge are positioned correctly over the slot.
- Seat the Card: Gently push the graphics card straight down into the PCIe slot until it clicks into place. You should feel it seat firmly. Make sure the latch on the PCIe slot engages.
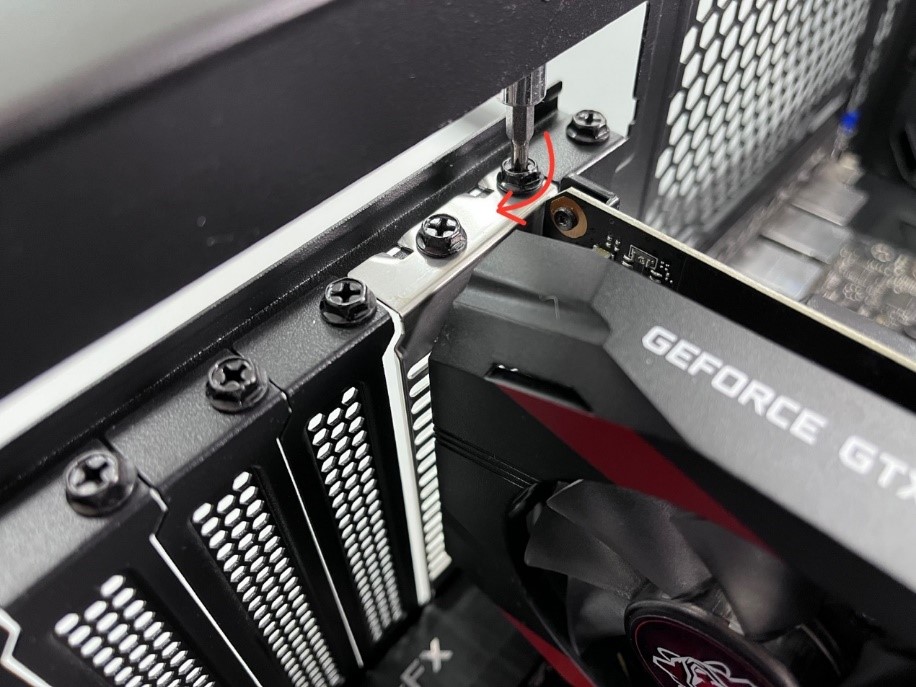
- Secure the Card: Reinsert and tighten the screws that secure the graphics card’s bracket to the back of your computer case.
- Connect Power Cables: Connect the necessary PCIe power cables from your PSU to the new graphics card. Ensure they are fully seated and latched.
Step 4: Closing the Case and Connecting Peripherals
- Double-Check Connections: Before closing the case, take a moment to visually inspect all connections: PCIe power cables, seating of the graphics card, and any other components you may have disturbed.
- Close the Case: Reattach the side panel of your computer case and secure it with the screws.
- Reconnect Peripherals: Plug in your monitor cable (connect it to the new graphics card’s output, not the motherboard’s integrated graphics ports), keyboard, mouse, and finally, the power cord.
Post-Installation: Drivers and Testing for Optimal Performance
The physical installation is complete, but the journey to a fully functional and enhanced system isn’t quite over. The next steps are crucial for unlocking the full potential of your new hardware.
Step 1: Initial Boot and Driver Installation
- Power On Your Computer: Turn on your PC. If all went well, you should see your operating system boot up, likely at a lower resolution than usual. This is normal as the basic display drivers are in use.
- Install the Drivers: Locate the graphics drivers you downloaded earlier. Run the installer and follow the on-screen prompts. You’ll typically have options for a “Express” (recommended) or “Custom” installation. The express installation usually handles everything automatically.
- Restart Your Computer: The driver installation process will almost always require a system restart. Do this to ensure the new drivers are fully loaded and active.
Step 2: Verifying Installation and Performance
Once your system has restarted with the new drivers:
- Check Display Settings: Right-click on your desktop and select “Display settings.” Ensure your monitor is recognized at its native resolution and refresh rate.
- Check Device Manager: In Windows, search for “Device Manager” and open it. Expand “Display adapters.” You should see your new graphics card listed there, with no error symbols (like a yellow exclamation mark).
- Run a Benchmark: To truly test the performance of your new card, run a graphics benchmark. Popular options include 3DMark, Unigine Heaven/Superposition, or even in-game benchmarks if you’re primarily focused on gaming. Compare your scores to online benchmarks for your specific card model to see if you’re achieving expected performance.
- Test Your Applications: Launch the games or applications you intend to use with the new GPU. Adjust the graphics settings to higher levels and observe the frame rates and overall smoothness of the experience.
Step 3: Troubleshooting Common Issues
Even with careful preparation, minor issues can arise. Here are a few common ones:
- No Display After Boot:
- Check Monitor Connection: Ensure the monitor is plugged into the new graphics card, not the motherboard.
- Reseat the Card: Power down, unplug, and carefully remove and reinsert the graphics card to ensure it’s fully seated in the PCIe slot.
- Check Power Cables: Verify that the PCIe power cables are securely connected to both the GPU and the PSU.
- System Doesn’t Boot:
- PSU Insufficient: This is the most likely culprit. Your PSU might not have enough wattage.
- Incorrectly Seated Card: Double-check that the card is properly seated and all securing screws are in place.
- Artifacts or Glitches on Screen:
- Driver Issue: Try uninstalling and reinstalling the drivers using DDU in Safe Mode.
- Overheating: Monitor GPU temperatures using software like MSI Afterburner or HWMonitor. Ensure your case has adequate airflow.
- Faulty Card: In rare cases, the card itself might be defective.
- Lower Than Expected Performance:
- Bottlenecking: Your CPU might be too old or slow to keep up with the new GPU.
- Incorrect Settings: Ensure you’ve configured game or application settings correctly.
- Outdated Drivers: Make sure you have the latest drivers installed.
By following these steps diligently, you can successfully install a new graphics card and unlock a significant boost in your computer’s visual capabilities, whether you’re a gamer, a content creator, or simply looking to enhance your overall computing experience. Enjoy the newfound performance!
aViewFromTheCave is a participant in the Amazon Services LLC Associates Program, an affiliate advertising program designed to provide a means for sites to earn advertising fees by advertising and linking to Amazon.com. Amazon, the Amazon logo, AmazonSupply, and the AmazonSupply logo are trademarks of Amazon.com, Inc. or its affiliates. As an Amazon Associate we earn affiliate commissions from qualifying purchases.