Installing an operating system (OS) onto your hard disk is a foundational skill for any computer user, a crucial step in setting up a new machine, upgrading an old one, or performing a clean reinstall to resolve persistent issues. The operating system is the very heart of your computer, the master program that manages all hardware and software resources, allowing you to interact with your device, run applications, and perform your daily digital tasks. Without an OS, your powerful hardware is little more than an expensive paperweight.
This comprehensive guide will walk you through the entire process, from initial preparation to the final post-installation steps, ensuring a smooth and successful OS deployment. Whether you’re setting up a new build, migrating to a different OS, or simply refreshing your current system, understanding these steps is vital for maintaining productivity, enhancing digital security, and optimizing your computer’s performance. We’ll delve into the necessary tools, configuration settings, and crucial troubleshooting tips, all tailored to provide you with a robust, reliable computing environment. Let’s embark on the journey of bringing your hardware to life.
Preparing for OS Installation: The Essential Pre-installation Checklist
Before you even think about inserting a USB drive or DVD, thorough preparation is paramount. Skipping these preliminary steps can lead to data loss, frustrating errors, or a compromised installation. This section outlines the critical actions you must take to ensure a seamless and successful OS setup.
Backing Up Your Data: Your Digital Safety Net
This is arguably the most critical step, especially if you’re reinstalling an OS on a drive that contains existing data. An operating system installation often involves formatting the hard drive, which permanently erases all data on it. To avoid irreversible data loss, you must back up any essential files, documents, photos, videos, and other personal data.
- Identify Critical Data: Go through your drives and identify everything you cannot afford to lose. This typically includes the “Documents,” “Pictures,” “Videos,” “Downloads,” and “Desktop” folders, as well as specific application data.
- Choose a Backup Method:
- External Hard Drive: This is a common and reliable method. Simply copy and paste your critical folders to the external drive.
- Cloud Storage: Services like Google Drive, OneDrive, Dropbox, or iCloud offer convenient online backup. Ensure you have enough storage space and a stable internet connection for large files.
- Network Attached Storage (NAS): If you have a home server, this can be an excellent option for large-scale backups.
- USB Flash Drives: Suitable for smaller sets of critical files, but generally not sufficient for an entire system backup.
- Verify Your Backup: After backing up, always double-check that your files are accessible and intact on the backup medium. Nothing is worse than discovering your backup is corrupted after wiping your drive.
Gathering Necessary Tools and Media
Having all your ducks in a row ensures you don’t hit a roadblock midway through the installation.
- Operating System Installation Media:
- ISO File: This is a disk image file containing the entire OS installation. You’ll typically download this from the official Microsoft (for Windows), Apple (for macOS, usually via App Store), or Linux distribution websites.
- Bootable USB Drive or DVD: You will need to “burn” the ISO file onto a USB flash drive (at least 8GB, often 16GB or more for modern OSes) or a blank DVD to create a bootable installation medium. Tools like Rufus (for Windows ISOs) or BalenaEtcher (cross-platform, good for Linux) are excellent for creating bootable USBs.
- Product Key/License: For commercial operating systems like Windows, you will need your product key. This might be on a sticker on your computer, in your purchase confirmation email, or linked to your Microsoft account. Keep it handy.
- Empty USB Drive (Optional for Drivers): After installation, you might not have internet access immediately due to missing network drivers. It’s wise to download your motherboard’s or Wi-Fi adapter’s drivers onto a separate USB drive beforehand.
- Stable Internet Connection: For downloading ISOs, updates, and additional software post-installation.
- Power Source: Ensure your computer (especially laptops) is plugged into a reliable power source to prevent unexpected shutdowns during installation.
Checking System Requirements
Every operating system has minimum hardware requirements. Installing an OS on hardware that doesn’t meet these specifications can lead to sluggish performance, compatibility issues, or even prevent installation altogether.
- Processor (CPU): Check the required clock speed and core count.
- RAM (Memory): Ensure you have at least the minimum amount of RAM specified. More is always better for performance.
- Storage Space: Verify you have enough free hard disk space for the OS and any essential applications.
- Graphics Card (GPU): While many OSes can run with basic integrated graphics, some features or games might require dedicated hardware.
- Network Adapter: Ensure your system has compatible Ethernet or Wi-Fi hardware.
- Firmware (BIOS/UEFI): Your system’s firmware should ideally be up-to-date, especially if you’re installing a newer OS version on older hardware.
Understanding BIOS/UEFI Settings
The BIOS (Basic Input/Output System) or its modern successor, UEFI (Unified Extensible Firmware Interface), is a firmware interface that initializes hardware components during startup and loads the operating system. You’ll need to access this to tell your computer to boot from your installation media instead of your existing hard drive.
- Accessing BIOS/UEFI: Typically, you press a specific key (e.g., Delete, F2, F10, F12, Esc) repeatedly right after powering on your computer. The exact key varies by motherboard manufacturer.
- Boot Order: Locate the “Boot Order,” “Boot Priority,” or “Boot Device” section. You’ll need to set your USB drive or DVD drive as the first boot device.
- Legacy vs. UEFI Mode: Modern OSes are optimized for UEFI mode, which offers faster boot times and supports larger hard drives (GPT partition scheme). Older systems or specific OSes might require “Legacy” (CSM) mode. It’s generally recommended to install in UEFI mode if your hardware and OS support it.
- Secure Boot: UEFI systems often have a “Secure Boot” feature. For some Linux distributions or specific hardware configurations, you might need to disable Secure Boot temporarily during installation.
Step-by-Step OS Installation Guide
With your preparations complete, it’s time to dive into the actual installation process. While specifics can vary slightly between operating systems (Windows, macOS, Linux distributions), the fundamental steps remain largely consistent.
Creating Bootable Installation Media
As mentioned, this is where your ISO file becomes a physical boot device.
- For Windows: Download the official “Media Creation Tool” from Microsoft’s website. This tool automates the process of downloading the Windows ISO and creating a bootable USB drive. Alternatively, use Rufus: select your USB drive, point it to the downloaded Windows ISO, and click “Start.”
- For Linux: Download the desired distribution’s ISO (e.g., Ubuntu, Fedora, Mint). Use BalenaEtcher (cross-platform and user-friendly) or Rufus to write the ISO to your USB drive.
- For macOS: This is a bit different. macOS installers are usually downloaded directly from the Mac App Store. You then use a command-line utility (createinstallmedia) in Terminal to make a bootable USB installer from within a working macOS environment.
Once your bootable media is ready, insert it into your target computer.
Configuring BIOS/UEFI for Boot
This is the critical step to make your computer start from the installation media.
- Restart Your Computer: With the bootable USB/DVD inserted, restart your machine.
- Access Firmware Settings: Immediately after the manufacturer’s logo appears (or even before), repeatedly press the designated key (e.g., F2, Del, F12) to enter BIOS/UEFI setup.
- Navigate to Boot Options: Find the “Boot” or “Boot Options” menu.
- Set Boot Priority: Change the boot order to prioritize your USB drive or DVD drive over your hard disk.
- Save and Exit: Save your changes (usually F10) and exit the BIOS/UEFI setup. Your computer should now restart and boot from the installation media.
Initiating the Installation Process
After successfully booting from your installation media, you’ll be greeted by the OS installer.
- Language and Keyboard Layout: The first prompts typically ask you to select your preferred language, time zone, and keyboard layout. Choose the settings appropriate for your region.
- Install Now/Try Live Mode (Linux):
- Windows: You’ll usually see an “Install Now” button.
- Linux: Many Linux distributions offer a “Try Live Mode” option. This lets you test the OS without installing it, which is great for checking hardware compatibility. If you’re ready, select “Install [Distribution Name]”.
- Accept License Terms: Read and accept the End-User License Agreement (EULA).
Partitioning Your Hard Disk
This is a crucial step where you define how your hard drive will be organized.
- Installation Type:
- Upgrade/Keep Files (Windows): If you’re upgrading an existing OS and want to keep your files, this option tries to preserve them. However, a clean install is generally recommended for optimal performance.
- Custom/Advanced (Windows) / Erase Disk and Install (Linux): This allows you to manage disk partitions.
- Drive Selection: You’ll see a list of available hard drives. Be extremely careful here. Select the correct drive where you want to install the OS. Installing on the wrong drive can erase valuable data.
- Partition Management:
- New Installation: If you’re installing on a brand-new drive or want to wipe an existing one, you’ll typically delete existing partitions (if any) and create a new one. The installer usually creates necessary system partitions (e.g., recovery, EFI system partition, primary partition) automatically.
- Dual-Booting: If you want to install a second OS alongside an existing one (e.g., Windows and Linux), you’ll need to shrink an existing partition to create unallocated space for the new OS.
- Format: Once you’ve created or selected the partition, the installer will format it to the appropriate file system (e.g., NTFS for Windows, Ext4 for Linux).
Following On-Screen Prompts
Once partitioning is complete, the installer will begin copying files and configuring the OS.
- File Copying: The system will copy all necessary OS files from the installation media to your hard disk. This can take some time.
- Reboots: The computer will likely restart multiple times during this phase. Do not remove the installation media until prompted, or until the first boot into the newly installed OS.
- Basic Setup: After the core installation, you’ll be prompted to:
- Create a user account, username, and password.
- Set up regional settings (time zone).
- Configure network settings (connect to Wi-Fi/Ethernet).
- Choose privacy settings and diagnostic data preferences.
- For Windows, you might link a Microsoft account; for Linux, typically a local user.
Post-Installation Setup: The First Boot
Congratulations! You should now be booting into your freshly installed operating system. Don’t stop here; there are a few more critical steps to ensure your system is fully functional and secure.
Essential Post-Installation Tasks
A bare-bones OS installation is just the beginning. To get the most out of your new system – ensuring stability, security, and peak performance – you need to perform several crucial post-installation tasks. These steps are vital for transitioning from a basic setup to a fully optimized and personalized computing environment.
Installing Device Drivers
Drivers are software components that allow your operating system to communicate with your computer’s hardware (graphics card, motherboard chipset, network adapter, sound card, etc.). Without the correct drivers, hardware might not function at all, or might perform poorly.
- Graphics Drivers: This is often the most important driver, impacting display quality, gaming performance, and video playback. Download the latest drivers directly from the manufacturer (NVIDIA, AMD, Intel).
- Chipset Drivers: Provided by your motherboard manufacturer (Intel, AMD). These optimize communication between various components on your motherboard.
- Network Drivers: If your internet isn’t working, you’ll need to install Wi-Fi or Ethernet drivers. This is where that separate USB drive with pre-downloaded drivers comes in handy.
- Sound Drivers: For optimal audio quality.
- Other Peripherals: If you have specialized hardware (printers, scanners, webcams), visit their manufacturers’ websites for the latest drivers.
- Driver Update Utilities: While some OSes (like Windows) have built-in driver management (Device Manager, Windows Update), relying solely on them might not always provide the latest or best-performing drivers.
Updating Your Operating System
Once drivers are in place and you have internet connectivity, the next crucial step is to download and install all available OS updates. These updates contain critical security patches, bug fixes, and performance improvements.
- Windows: Go to “Settings” > “Update & Security” > “Windows Update” and click “Check for updates.” Install all pending updates, and expect multiple reboots.
- macOS: Go to “System Settings” (or “System Preferences”) > “General” > “Software Update.”
- Linux: Use your distribution’s package manager (e.g.,
sudo apt update && sudo apt upgradefor Debian/Ubuntu-based systems, or your graphical software center).
Regularly updating your OS is a cornerstone of digital security and system stability, protecting you from newly discovered vulnerabilities.
Installing Essential Software and Applications
With the system base solid, it’s time to install the applications you need for productivity, communication, and entertainment.
- Web Browser: If not already included, install your preferred browser (Chrome, Firefox, Edge, Brave).
- Antivirus/Security Software: While Windows has Defender, a robust third-party antivirus can offer additional layers of protection. For Linux and macOS, while generally less targeted, security best practices are still key.
- Productivity Suite: Microsoft Office (Word, Excel, PowerPoint), LibreOffice (free and open-source alternative), Google Workspace apps (web-based).
- Media Players: VLC Media Player is a popular choice for its wide format support.
- Communication Tools: Zoom, Discord, Slack, Microsoft Teams, etc.
- Utilities: File compression tools (7-Zip, WinRAR), PDF readers, cloud sync clients (Google Drive, Dropbox, OneDrive).
- Specific Professional Software: Any specialized tools required for your work or hobbies (e.g., video editing software, CAD programs, development environments).
Restoring Your Data
If you backed up your data (which you should have done!), now is the time to restore it to your newly installed OS.
- Copy Back Files: Connect your external hard drive or access your cloud storage. Copy your backed-up files and folders to their respective locations on your new system (e.g., Pictures to the Pictures folder, Documents to Documents).
- Reconfigure Applications: Some applications might need to be reconfigured or have their settings re-imported if you backed those up.
Optimizing System Performance
A fresh OS generally runs fast, but a few tweaks can ensure it stays that way.
- Disable Unnecessary Startup Programs: Many applications automatically configure themselves to start with Windows, slowing down boot times. Manage these in Task Manager (Windows) or System Settings (macOS/Linux).
- Disk Cleanup/Defragmentation: Regularly clean temporary files (Windows Disk Cleanup) and, for traditional HDDs, defragment your drive (though SSDs do not require defragmentation).
- Power Settings: Adjust power plans for optimal performance or battery life.
- Appearance Settings: Reduce visual effects if you have an older or less powerful system to free up resources.
Common Issues and Troubleshooting Tips
Even with careful preparation, issues can arise during or after an OS installation. Knowing how to diagnose and address common problems can save you a lot of frustration.
Boot Errors
-
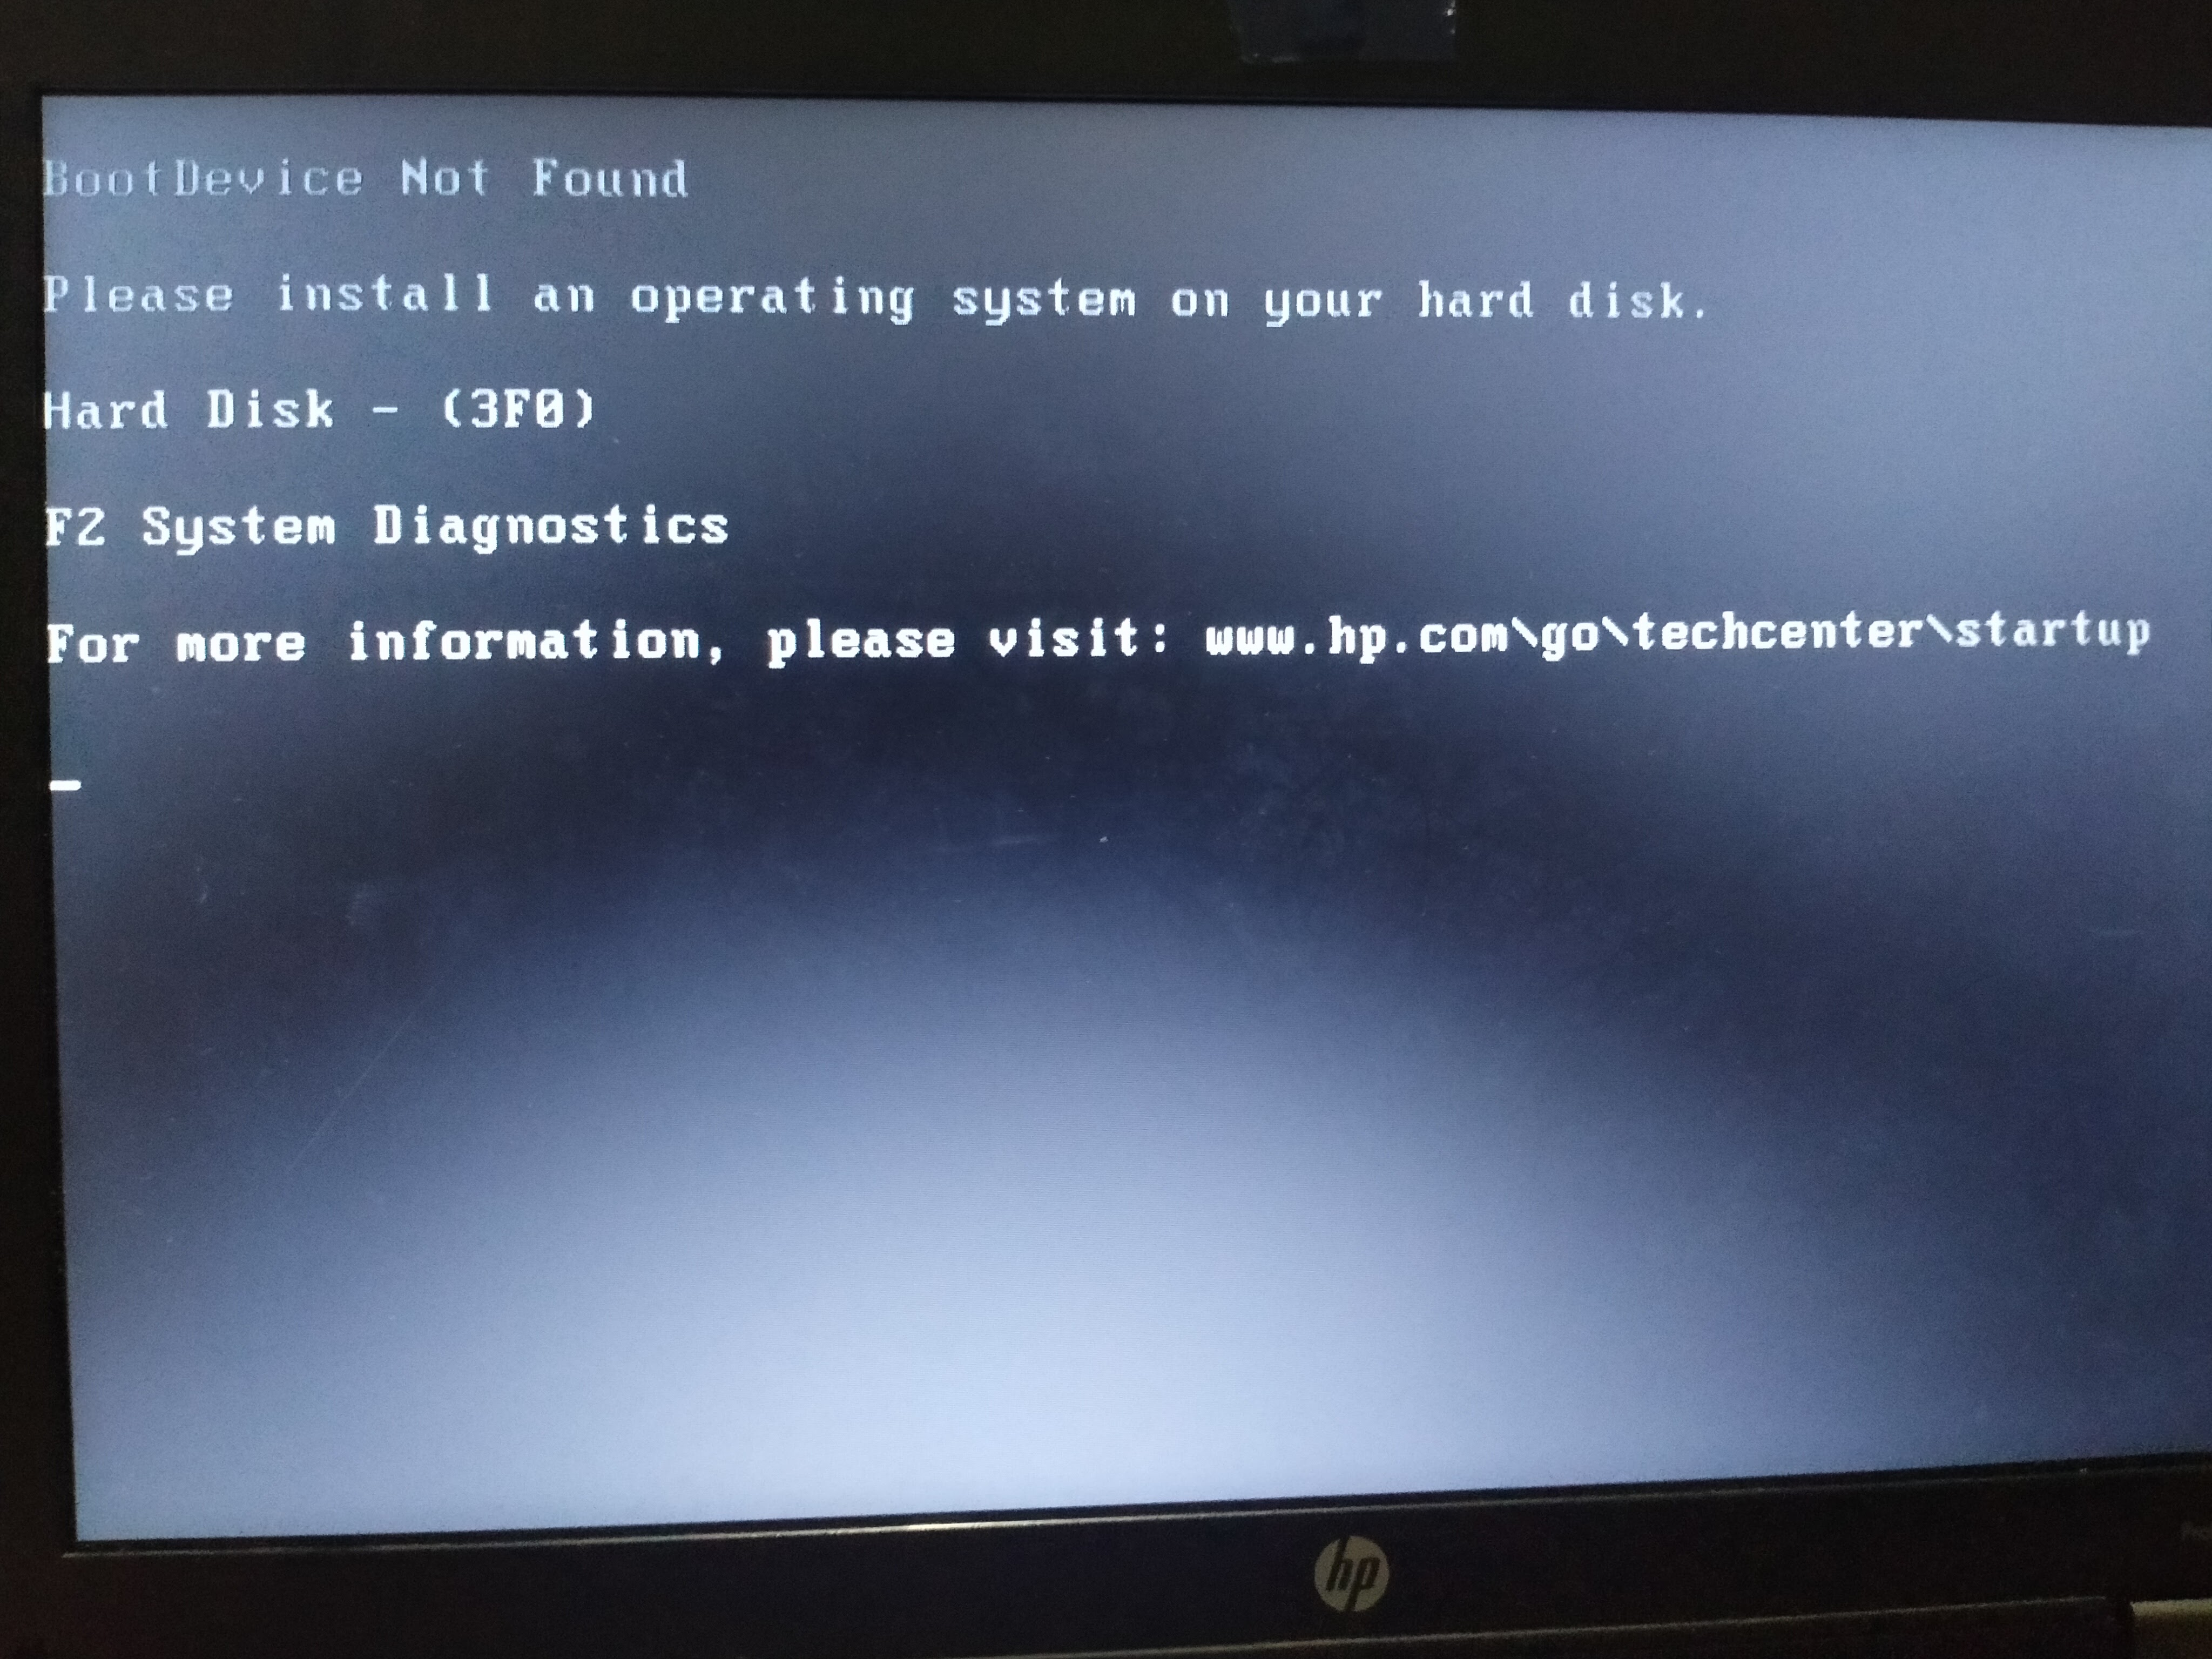
“No Bootable Device Found” / “Operating System Not Found”:
- Check Boot Order: Re-enter BIOS/UEFI and ensure your hard disk with the OS is set as the primary boot device.
- Remove Installation Media: If you forgot to remove the USB drive/DVD, the system might still be trying to boot from it, even if it’s no longer bootable.
- Verify Installation: If it’s a new installation, ensure the OS actually installed successfully on the drive you intended.
- Corrupt Bootloader: This can happen. For Windows, use the installation media to access “Repair your computer” and try “Startup Repair.” For Linux, a common fix involves using a live USB to reinstall/repair the GRUB bootloader.
-
Endless Reboot Loop:
- Safe Mode: Try booting into Safe Mode (usually by pressing F8 or Shift+F8 during boot, or via advanced startup options from installation media) to diagnose driver conflicts or problematic software.
- System Restore (Windows): If you created a restore point, try reverting to it.
- Driver Issues: A newly installed driver can sometimes cause this. Boot into Safe Mode and uninstall the problematic driver.
Driver Problems
- No Internet Connectivity:
- Install Network Drivers: This is the most common cause. Use the separate USB drive with pre-downloaded drivers, or connect via Ethernet if possible to download them.
- Check Device Manager (Windows): Look for devices with yellow exclamation marks. These indicate missing or problematic drivers.
- Poor Graphics / Low Resolution:
- Install Graphics Drivers: Ensure you have the correct and latest drivers from your GPU manufacturer.
- Monitor Settings: Check your display resolution settings in the OS.
- No Sound:
- Install Audio Drivers: Download from your motherboard or sound card manufacturer.
- Check Audio Mixer: Ensure volume isn’t muted and output device is correct.
Performance Slowdowns
- After a Fresh Install: This is unusual for a truly fresh install.
- Check Resource Monitor/Task Manager: Identify any processes consuming excessive CPU, RAM, or disk I/O.
- Driver Issues: Outdated or incorrect drivers can sometimes cause performance bottlenecks.
- Updates in Background: The OS might be downloading and installing large updates in the background, which can temporarily slow things down.
- Over Time:
- Too Many Startup Programs: Disable unnecessary programs from launching with the OS.
- Bloatware: Uninstall any unwanted pre-installed software.
- Malware: Run a full scan with your antivirus software.
- Fragmented HDD (Not SSDs): Defragment traditional hard drives.
- Insufficient RAM: If you frequently run multiple demanding applications, you might need more RAM.
In all troubleshooting scenarios, the internet is your best friend. A quick search for the exact error message you encounter will often lead you to forums or support articles with solutions. Don’t be afraid to experiment with solutions found online, but always exercise caution and ensure they come from reputable sources.
Conclusion
Installing an operating system on your hard disk is a fundamental computer skill that empowers you to take control of your hardware and build a personalized digital environment. From the meticulous preparation involved in backing up data and gathering tools, through the systematic steps of creating bootable media and navigating the installer, to the crucial post-installation tasks of updating drivers and installing essential software – each stage plays a vital role in ensuring a stable, secure, and high-performing system.
By following this guide, you’ve not only learned how to bring your computer to life but also gained an understanding of the underlying processes that govern your machine. A properly installed and maintained OS is the bedrock of productivity and digital security. Remember, the journey doesn’t end with installation; regular updates, driver maintenance, and mindful software choices will keep your system running optimally. As technology evolves with new operating systems and hardware, the core principles outlined here will remain invaluable, equipping you to adapt and conquer future computing challenges. Embrace the power of a fresh start and enjoy your newly configured machine!
aViewFromTheCave is a participant in the Amazon Services LLC Associates Program, an affiliate advertising program designed to provide a means for sites to earn advertising fees by advertising and linking to Amazon.com. Amazon, the Amazon logo, AmazonSupply, and the AmazonSupply logo are trademarks of Amazon.com, Inc. or its affiliates. As an Amazon Associate we earn affiliate commissions from qualifying purchases.