Minecraft, the blocky sandbox sensation, has transcended mere gaming to become a cultural phenomenon. Its enduring appeal lies not just in its foundational mechanics but in the vibrant, community-driven ecosystem of modifications, or “mods.” These user-created additions transform the game, introducing new biomes, creatures, items, and gameplay mechanics that extend its lifespan almost indefinitely. At the heart of this expansive modding universe lies Minecraft Forge – an essential API (Application Programming Interface) that simplifies the process of installing and running multiple mods simultaneously.
For anyone looking to move beyond the vanilla experience and unlock the full creative potential of Minecraft, installing Forge is the indispensable first step. This guide will walk you through the entire process, from understanding what Forge is and why it’s crucial, to step-by-step installation, troubleshooting, and best practices for diving into the exciting world of modded Minecraft. We’ll also touch upon the broader technological implications, digital security considerations, and the community-driven aspect that makes modding such a powerful facet of the game.

Understanding Minecraft Forge: The Gateway to Infinite Customization
Before we delve into the practical steps of installation, it’s vital to grasp what Minecraft Forge is and why it holds such a pivotal role in the modding community. This foundational understanding will empower you to navigate the modding landscape more effectively and appreciate the underlying technology that makes it all possible.
What is Minecraft Forge?
In its simplest form, Minecraft Forge is a free, open-source modding API for Minecraft: Java Edition. Think of it as a central framework or a set of tools that allows different mods to interact seamlessly with the base game without conflicting with each other. Without Forge, running multiple complex mods together would be an almost impossible task, often leading to crashes, compatibility issues, and a frustrating user experience.
Developed and maintained by a dedicated community, Forge provides mod developers with a standardized way to create their additions. This standardization ensures that a mod designed for Forge will generally work with other Forge-compatible mods, provided they target the same game version. It handles everything from loading textures and registering new items to managing events and communicating with the game engine. For end-users, Forge presents itself as a special profile within the Minecraft Launcher, making it straightforward to switch between vanilla and modded versions of the game. This elegant solution highlights a key aspect of Tech innovation: creating robust, extensible platforms that foster creativity and community development.
Why You Need Forge: Unlocking the World of Mods
The primary reason to install Minecraft Forge is to unlock the vast and imaginative world of Minecraft mods. While some simpler mods can be installed directly, the vast majority of significant content additions, especially those that alter core game mechanics or introduce new systems, require Forge to function. The sheer diversity of available mods is staggering, ranging from quality-of-life improvements to complete overhauls that transform Minecraft into an entirely different game.
Consider the various ways mods can enhance your gameplay:
- New Biomes and Dimensions: Explore alien landscapes, magical forests, or even other planets.
- Advanced Building Blocks and Tools: Access thousands of new decorative blocks, automated farming tools, and industrial machinery.
- RPG Elements: Introduce skill trees, quest systems, and new combat mechanics.
- Magic and Technology: Harness powerful spells or build intricate automated factories.
- Performance Optimization: Some mods, while not strictly “content” additions, work with Forge to improve game performance, especially for those running on less powerful hardware – a practical application of Tech for better user experience.
Without Forge, these experiences would remain largely inaccessible. It acts as the common ground where diverse creative endeavors converge, making it an indispensable tool for anyone serious about customizing their Minecraft journey. The ease with which users can transform their game also subtly boosts the “brand” of Minecraft itself, demonstrating its flexibility and community engagement.
Preparing for Installation: Essential Prerequisites and Best Practices
Before you embark on the Forge installation journey, a little preparation goes a long way. Ensuring your system meets the basic requirements and following a few best practices can prevent common issues and guarantee a smoother experience. This section focuses on the groundwork, setting you up for success.
Ensuring You Have Java Installed
Minecraft: Java Edition, as its name suggests, relies heavily on Java to run. Consequently, Minecraft Forge also requires a compatible version of Java to be installed on your system. While the official Minecraft Launcher now often bundles its own Java runtime, Forge installers typically depend on a system-wide Java installation.
Here’s how to check and ensure you have the correct Java version:
- Identify Your Minecraft Version: Different versions of Minecraft Forge are built for specific Minecraft versions, and these, in turn, often require specific Java versions.
- Minecraft 1.16.5 and older typically use Java 8.
- Minecraft 1.17.x and newer require Java 16 or later (e.g., Java 17 for Minecraft 1.18+).
- Check Your Installed Java Version:
- Windows: Open Command Prompt (type
cmdin the Start menu search), then typejava -versionand press Enter. - macOS/Linux: Open Terminal, then type
java -versionand press Enter.
- Windows: Open Command Prompt (type
- If You Don’t Have It or It’s Outdated: Download the appropriate Java Development Kit (JDK) from a reputable source like Oracle (for specific versions) or Adoptium (for open-source alternatives like Temurin). Always download the correct architecture (64-bit for most modern systems). Install it following the on-screen instructions. For security and compatibility, always ensure your Java environment is up-to-date, reflecting a core principle of Digital Security within the Tech domain.
Backing Up Your Minecraft World (Optional but Highly Recommended)
Modding, while exciting, can sometimes lead to unforeseen issues. A corrupted world save due to an incompatible mod or an incorrect installation can be devastating, especially if you’ve invested hundreds of hours into a build. Therefore, backing up your Minecraft worlds is a crucial best practice.
To back up your worlds:
- Locate Your Minecraft Saves Folder:
- Windows: Type
%appdata%.minecraftsavesinto the Start menu search bar and press Enter. - macOS: In Finder, click “Go” in the menu bar, hold down the Option key, then click “Library.” Navigate to
Application Support/minecraft/saves. - Linux: Go to
~/.minecraft/saves.
- Windows: Type
- Copy the Folder: Copy the entire
savesfolder to a safe location on your computer, such as an external hard drive, cloud storage, or a dedicated backup folder.
This simple step can save you immense frustration and is a testament to proactive Digital Security and data management, a fundamental aspect of responsible Tech usage.
Choosing the Right Forge Version
Minecraft is constantly evolving, and so is Forge. Each major version of Minecraft (e.g., 1.16, 1.17, 1.18, 1.19, 1.20) requires a specific, compatible version of Forge. You cannot use Forge for Minecraft 1.19 to run mods on Minecraft 1.16, and vice versa.
To select the correct Forge version:
- Decide Your Target Minecraft Version: Think about which version of Minecraft you primarily want to mod. Many popular mod packs are still on older versions (like 1.12.2 or 1.16.5) due to the extensive modding available for them. Newer versions continually gain more mod support.
- Match Forge to Minecraft: When you go to the official Forge download page (which we’ll cover next), you’ll see a list of Minecraft versions on the left sidebar. Select the exact Minecraft version you intend to play with. This precision is critical for seamless integration and reflects the careful version management inherent in Software development.
Step-by-Step Installation: Getting Forge Up and Running
With your system prepared and your chosen Forge version in mind, you’re ready for the core installation process. This section details the steps to download and install Forge, ensuring it integrates correctly with your Minecraft Launcher.
Downloading the Minecraft Forge Installer
The official source for Minecraft Forge is the only place you should download it from to ensure you get a legitimate and uncompromised version. Downloading from third-party sites can expose you to malware or outdated software, a significant Digital Security risk.
- Navigate to the Official Forge Website: Open your web browser and go to
files.minecraftforge.net. - Select Your Minecraft Version: On the left sidebar, locate and click on the specific Minecraft version you want to mod (e.g., “1.19.2” or “1.16.5”).
- Choose the Recommended Build: Once you’ve selected the Minecraft version, you’ll see a list of Forge builds. Always look for the “Recommended” build. This version has been tested more thoroughly and is generally the most stable. While there might be newer “Latest” builds, they can sometimes be less stable or have unresolved bugs.
- Download the Installer: Click on the “Installer” link next to the Recommended build. This will typically take you to an ad-focused page (like AdFoc.us or similar). Do not click on any ads. Wait for a few seconds for the “Skip” button to appear in the top right corner of the page. Click “Skip” to initiate the download of the Forge installer
.jarfile.- Security Note: Your browser or antivirus software might flag the
.jarfile as a potential threat because it’s an executable Java archive. This is common for Java applications. As long as you downloaded it from the official Forge website, it is safe to keep and run. This interaction highlights the ongoing balance between user convenience and Digital Security protocols within the Tech landscape.
- Security Note: Your browser or antivirus software might flag the
Running the Installer

Once the Forge installer .jar file has downloaded, you’re ready to execute it. This is where Forge integrates itself with your Minecraft installation.
- Locate the Downloaded File: Go to your computer’s “Downloads” folder or wherever you saved the
.jarfile. - Run the Installer:
- Windows/macOS: Double-click the
.jarfile. If Java is correctly installed, this should open the Forge Installer window. If it doesn’t open, right-click the file, choose “Open With,” and select “Java(TM) Platform SE Binary” or a similar Java option. - Linux: Open a terminal in the directory where you downloaded the file, then type
java -jar forge-*-installer.jar(replaceforge-*-installer.jarwith the actual filename) and press Enter.
- Windows/macOS: Double-click the
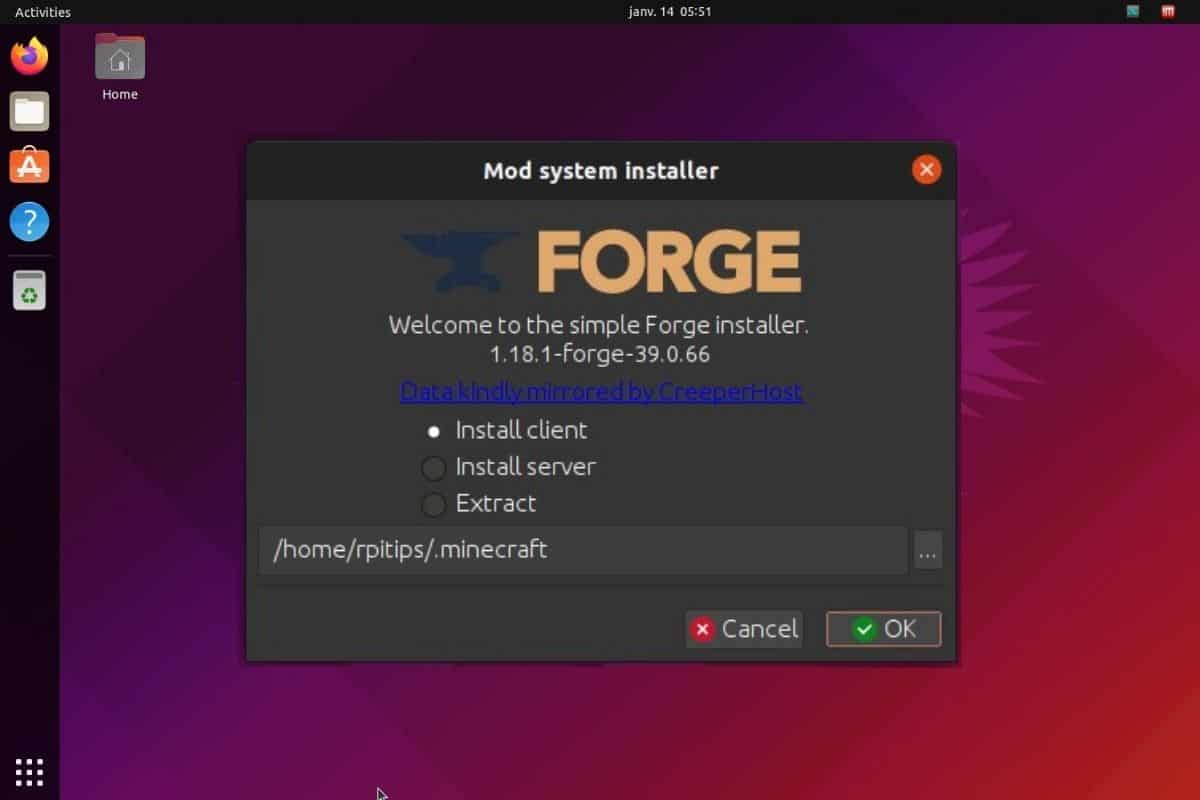
- Select “Install Client”: In the Forge Installer window, ensure “Install client” is selected. This is the default and correct option for installing Forge for single-player and client-side multiplayer modding. The “Install server” option is for setting up a dedicated modded server, which is a different process.
- Verify Installation Path: The installer will usually automatically detect your
.minecraftfolder. Double-check that the “Install directory” path is correct and points to your primary Minecraft installation (e.g.,C:UsersYourUsernameAppDataRoaming.minecrafton Windows). If it’s incorrect, you can click the “…” button to browse to the right location. - Click “OK”: Once everything looks correct, click the “OK” button. The installer will then download the necessary files and integrate Forge into your Minecraft Launcher. A success message will pop up once the installation is complete.
Verifying Your Forge Installation
After the installer reports success, it’s crucial to verify that Forge has been correctly installed and is accessible through your Minecraft Launcher.
- Open the Minecraft Launcher: Close and then reopen your official Minecraft Launcher. This ensures it refreshes and detects the new Forge profile.
- Check for the Forge Profile: On the left side of the launcher window, near the “Play” button, you should see a dropdown menu that displays your current selected profile (often “Latest Release” or “Vanilla”). Click this dropdown menu.
- Select the Forge Profile: You should now see an entry named “forge” or “Forge [Minecraft Version]” (e.g., “Forge 1.19.2”). Select this profile.
- Launch Minecraft: With the Forge profile selected, click the “Play” button.
- Look for the Forge Loading Screen: As Minecraft loads, you should see a new loading screen that displays “Minecraft Forge” or the Forge logo, along with information about the number of mods loaded (initially, it will show a small number like 3-4, which are Forge’s internal libraries).
- Check the Main Menu: Once the game loads to the main menu, you should typically see a “Mods” button or the Forge version displayed in the bottom-left corner of the screen. This confirms a successful installation.
If you encounter any issues during verification, double-check your Java installation, ensure you selected the correct Minecraft and Forge versions, and try reinstalling Forge. Many online communities and forums offer valuable troubleshooting advice, showcasing the collaborative nature of Tech support.
Diving Deeper: Installing and Managing Mods with Forge
With Forge successfully installed, the real fun begins: adding mods! This section guides you through the process of finding, downloading, and integrating mods into your Forge-powered Minecraft client, truly unlocking the customization potential.
Finding and Downloading Compatible Mods
The quality and compatibility of mods are paramount for a stable modded experience. Just like downloading Forge, always prioritize official or highly reputable sources for mods to ensure Digital Security and minimize the risk of malware or broken files.
- Reputable Modding Websites:
- CurseForge (www.curseforge.com): This is by far the largest and most reputable repository for Minecraft mods. It’s well-organized, allows filtering by Minecraft version and modloader (Forge or Fabric), and generally hosts safe and updated mods.
- Modrinth (modrinth.com): Another excellent, growing platform with a focus on open-source and ethical mod distribution, also offering filters for Minecraft versions and modloaders.
- Filtering by Minecraft Version and Modloader: On these sites, always use the filters to select:
- Your specific Minecraft version (e.g., 1.19.2).
- “Forge” as the modloader.
- Only download mods that explicitly state they are for Forge and your Minecraft version. Trying to load a Fabric mod on Forge, or a 1.16.5 mod on 1.19.2, will cause crashes.
- Review Mod Information: Before downloading, always check the mod’s page for:
- Requirements: Some mods might have “dependencies” – other mods that must also be installed for them to work (e.g., library mods like “JEI” or “CoFH Core”). Download these dependencies first.
- Compatibility: Read user comments or the mod description for any known conflicts or issues with other popular mods.
- Updates: Look for recently updated mods, as these are generally better maintained.
- Download the Mod File: Click the “Download” button on the mod’s page. Again, be wary of any ad-related pop-ups and ensure you’re downloading the actual mod
.jarfile, not an ad or a malicious executable.
Placing Mods into Your Minecraft Directory
Once you have your desired mod .jar files (and any dependencies), placing them in the correct folder is a straightforward process.
- Locate Your
modsFolder:- Option 1 (Recommended): Open your Minecraft Launcher, select your Forge profile, and click the “Installations” tab. Hover over your Forge profile and click the folder icon that appears. This will open your
.minecraftdirectory. Inside this directory, you should see a folder namedmods. If it doesn’t exist, create it manually (ensure the spelling ismodsand all lowercase). - Option 2 (Manual Path):
- Windows: Type
%appdata%.minecraftmodsinto the Start menu search bar and press Enter. - macOS: In Finder, click “Go” in the menu bar, hold down the Option key, then click “Library.” Navigate to
Application Support/minecraft/mods. - Linux: Go to
~/.minecraft/mods.
- Windows: Type
- Option 1 (Recommended): Open your Minecraft Launcher, select your Forge profile, and click the “Installations” tab. Hover over your Forge profile and click the folder icon that appears. This will open your
- Move the Mod Files: Drag and drop or copy and paste all the downloaded mod
.jarfiles (and any dependency.jarfiles) directly into thismodsfolder. Do not extract the.jarfiles. They need to remain in their original.jarformat. - Launch Minecraft with Forge: Open your Minecraft Launcher, ensure the Forge profile is selected, and click “Play.” Forge will automatically detect and load the
.jarfiles found in yourmodsfolder. If successful, you should see the number of loaded mods increase on the Forge loading screen and in the main menu’s “Mods” section.
Troubleshooting Common Modding Issues
Modding can sometimes be a trial-and-error process, and encountering issues is not uncommon. Knowing how to diagnose and troubleshoot can save a lot of frustration, embodying a problem-solving approach central to Tech literacy.
- Game Crashes on Startup:
- Incompatible Mod Version: The most common cause. Double-check that every mod you installed is for your exact Minecraft and Forge version.
- Missing Dependencies: Ensure you’ve installed all required library mods for your content mods.
- Conflicting Mods: Two mods might not be designed to work together. This is harder to diagnose. Try removing mods one by one (or in small batches) to isolate the culprit.
- Outdated Forge: Make sure you’re using the recommended Forge build for your Minecraft version.
- Mod Not Loading/Functioning:
- Incorrect
modsFolder: Verify that the mod.jarfile is placed directly in the correctmodsfolder, not in a subfolder. - Corrupted Download: Re-download the mod from its official source.
- Forge Not Selected: Ensure you’ve launched Minecraft using the Forge profile in the launcher.
- Incorrect
- Low Performance/Lag:
- Too Many Mods: Large mod packs can be very demanding. Consider installing performance-enhancing mods like OptiFine (ensure it’s the Forge-compatible version) or Sodium/Lithium (for Fabric, so be careful if you only use Forge).
- Allocate More RAM: In your Minecraft Launcher, go to “Installations,” hover over your Forge profile, click the three dots, then “Edit.” Under “More Options,” you can adjust the JVM arguments. Look for
-Xmx2G(or similar) and change the number to4G,6G, or8Gdepending on your system’s total RAM (e.g.,-Xmx6G). Do not allocate more than half of your system’s RAM.
- Reading Crash Reports: When Minecraft crashes, it often generates a “crash-report” text file in your
.minecraftfolder. Open this file. The top few lines often pinpoint the mod or specific error that caused the crash. Copy and paste relevant sections into search engines or modding forums for solutions.
Remember, the modding community is vast and supportive. Don’t hesitate to consult forums, Reddit communities (like r/feedthebeast), or Discord servers for help. This collaborative aspect is a cornerstone of the open-source Tech movement.
Beyond Installation: Security, Performance, and the Future of Minecraft Modding
Installing Forge and your favorite mods is just the beginning. To truly master the modded Minecraft experience, it’s beneficial to consider aspects like long-term security, performance optimization, and staying abreast of the evolving modding landscape. These considerations touch upon broader themes of Digital Security, Productivity (through efficient gameplay), and Technology Trends.
Digital Security Best Practices for Modding
While modding offers immense creative freedom, it also introduces potential security vulnerabilities if not approached carefully. Safeguarding your system and data is paramount.
- Source Verification: As repeatedly emphasized, always download Forge and mods from official and reputable sources. Avoid direct downloads from obscure forums, YouTube links, or suspicious websites. Legitimate modding platforms like CurseForge and Modrinth have moderation processes to filter out malicious content.
- Antivirus Protection: Keep your antivirus software updated and active. While it might occasionally flag
.jarfiles (which are executable), it’s an essential layer of defense against genuinely malicious software that might masquerade as mods. - Read Reviews and Comments: Before installing a mod, take a moment to read user reviews and comments on its download page. Look for reports of bugs, malware, or compatibility issues. A mod with many positive reviews and active development is generally safer.
- Stay Updated: Regularly update your Minecraft Launcher, Forge (when new recommended versions are released), Java, and your operating system. Updates often include security patches that protect against newly discovered vulnerabilities.
- Be Wary of “Free Minecraft” or “Premium Mods”: Legitimate mods are almost always free. Be extremely cautious of sites or programs promising “free Minecraft” or requiring payment for mods, as these are often scams or vectors for malware. This relates to Online Income and Business Finance models in a cautionary way, highlighting illegitimate attempts to monetize user interest.
Optimizing Performance with Forge and Mods
A heavily modded Minecraft instance can be demanding on your computer’s resources. Even with powerful hardware, optimization is key to a smooth and enjoyable experience, linking directly to the “Productivity” aspect of the Tech category.
- Allocate Sufficient RAM: As mentioned in troubleshooting, allocating enough RAM to Minecraft through the launcher’s JVM arguments is crucial. For large modpacks, 6-8GB is often recommended, provided your system has 16GB or more total RAM.
- Use Performance Mods: While Forge itself isn’t primarily a performance booster, many mods work with Forge to enhance performance. OptiFine is the most popular, offering extensive graphics settings, shader support, and significant FPS improvements. Ensure you download the Forge-compatible version for your Minecraft version.
- Adjust Video Settings: Within Minecraft, reduce demanding video settings like render distance, graphics quality (Fast vs. Fancy), clouds, particle effects, and anti-aliasing. Experiment to find a balance between visual fidelity and frame rate.
- Update Graphics Drivers: Ensure your graphics card drivers are always up-to-date. Manufacturers frequently release updates that improve game performance and stability, a standard Tech maintenance practice.
- Monitor Your PC’s Resources: Use tools like Task Manager (Windows) or Activity Monitor (macOS) to see how much CPU, RAM, and GPU your game is using. This can help identify bottlenecks if you’re experiencing lag.
The Evolving Landscape of Minecraft Modding and Community Support
The world of Minecraft modding is dynamic, constantly evolving with new game updates, emerging technologies, and shifts in community preferences. Understanding this fluidity can help you stay engaged and adaptable.
- Fabric vs. Forge: While Forge is the veteran mod loader, Fabric has emerged as a popular alternative, especially for newer Minecraft versions. Fabric is generally lighter and updates faster after new Minecraft releases, making it attractive for performance-focused or highly bleeding-edge mods. Some mods are exclusive to one or the other, so be aware of which mod loader your chosen mods require. This highlights a Technology Trend in software development – the emergence of competing frameworks.
- AI Tools in Modding: While not mainstream yet, the future of modding might see the integration of AI Tools. Imagine AI-assisted mod generation, automated bug detection, or even AI-powered content creators that can expand worlds more intelligently. This is an exciting frontier for both developers and players.
- Community Platforms: Active participation in modding communities (Reddit, Discord, forums) is invaluable. They are sources of knowledge, support, and early access to new mods. They also represent a form of collaborative Brand Strategy where collective effort enhances the overall Minecraft experience. Mod developers, often passionate individuals, sometimes turn their efforts into Side Hustles or even sources of Online Income through donations or Patreon, further intertwining the Money aspect with the passion for game development.
In conclusion, installing Minecraft Forge is far more than just downloading a file; it’s an initiation into a vast, creative, and technologically rich ecosystem. By following these steps and embracing best practices, you empower yourself to customize your Minecraft experience infinitely, engage with a vibrant global community, and gain a deeper appreciation for the Tech that drives this beloved game. Happy modding!
aViewFromTheCave is a participant in the Amazon Services LLC Associates Program, an affiliate advertising program designed to provide a means for sites to earn advertising fees by advertising and linking to Amazon.com. Amazon, the Amazon logo, AmazonSupply, and the AmazonSupply logo are trademarks of Amazon.com, Inc. or its affiliates. As an Amazon Associate we earn affiliate commissions from qualifying purchases.