
In an increasingly digital world, where multitasking, demanding applications, and rich media consumption are the norm, a sluggish laptop can be a major productivity bottleneck. Before you contemplate shelling out for an entirely new machine, consider one of the most impactful and cost-effective upgrades you can make: installing more Random Access Memory (RAM). This comprehensive guide will walk you through the process, empowering you to breathe new life into your laptop and significantly enhance its performance. Whether you’re a casual user frustrated by slow browsing or a power user needing more muscle for creative work, a RAM upgrade is often the answer, offering a tangible return on investment.
Why Upgrade Your Laptop’s RAM?
Many users tolerate a slow computer, unaware that a simple, relatively inexpensive upgrade can dramatically transform their daily computing experience. Upgrading your laptop’s RAM is not just about adding more memory; it’s about unlocking a smoother, more responsive, and more efficient device, directly impacting your productivity and enjoyment.
Understanding the Role of RAM
RAM acts as your computer’s short-term memory. Unlike a hard drive or solid-state drive (SSD), which stores data permanently, RAM holds the data and instructions that your CPU is actively using right now. Every application you open, every browser tab, and every file you edit consumes a portion of this memory. When your RAM fills up, your operating system is forced to temporarily store data on your slower storage drive (a process called “paging” or “swapping”), leading to noticeable slowdowns, stuttering, and general unresponsiveness. More RAM means your laptop can keep more programs and data readily accessible for the CPU, leading to faster execution and a more fluid experience.
Performance Benefits of a RAM Upgrade
The benefits of increasing your laptop’s RAM are manifold and immediate. For starters, you’ll experience significantly faster multitasking. Imagine running multiple browser tabs, a video editor, and a communication app simultaneously without a hitch – that’s the power of sufficient RAM. Applications will launch quicker and perform more smoothly, especially resource-intensive software like graphic design suites, video editing tools, or modern gaming titles. Even basic tasks like browsing the web or opening documents will feel snappier. Beyond speed, more RAM contributes to overall system stability, reducing frustrating crashes and freezing, ensuring your workflow remains uninterrupted. For anyone interested in productivity and efficiency, this upgrade offers a direct pathway to a more capable machine.
Cost-Effectiveness vs. New Hardware
From a financial perspective, a RAM upgrade is often the most sensible choice for revitalizing an aging but otherwise functional laptop. The cost of new RAM modules is a mere fraction of the price of a brand-new laptop, yet the performance improvement can be substantial enough to postpone a costly replacement for several years. This isn’t just about saving money in the short term; it’s about smart asset management. By extending the usable life of your current device, you maximize your initial investment and reduce your overall technology expenditure. In an era where “money smart” decisions are paramount, upgrading RAM represents an excellent return on investment, allowing you to allocate funds to other critical areas, whether personal finance or business growth.
Essential Preparations Before You Begin
Before you even think about opening up your laptop, thorough preparation is crucial. This stage ensures you purchase the correct RAM, have the right tools, and take all necessary safety precautions. Rushing this step can lead to compatibility issues, damage to your laptop, or wasted money on incorrect parts.
Identifying Your Laptop’s RAM Requirements
The most critical step in preparation is understanding what type of RAM your laptop uses and how much it can support. Laptops typically use SODIMM (Small Outline Dual In-line Memory Module) RAM, but there are different generations (DDR3, DDR4, DDR5) and various speeds (e.g., 2400MHz, 3200MHz).
- Determine Current RAM Configuration:
- Windows: Press
Ctrl + Shift + Escto open Task Manager, go to the “Performance” tab, then click on “Memory.” It will show your current RAM amount, speed, and form factor (DDR type). You might also see how many “slots used.” - macOS: Click the Apple menu, select “About This Mac,” then “Memory.” This will show your current RAM. For more detailed slot information, you might need to use a third-party utility or consult your Mac’s specifications online.
- System Information Tools: Utilities like CPU-Z (Windows) or consulting your laptop manufacturer’s official documentation or support website by entering your model number can provide the most accurate and comprehensive details, including the maximum supported RAM capacity and the number of available slots.
- Windows: Press
- Compatibility:
- DDR Generation: You must match the DDR generation (e.g., DDR4 RAM will not work in a DDR3 slot).
- Speed (MHz): It’s best to match the speed of existing RAM if you’re adding modules, or buy modules at the maximum speed your laptop’s motherboard supports. While faster RAM will generally downclock to match the slowest module or the motherboard’s limit, mismatched speeds can sometimes lead to instability, though often it just runs at the lower common speed.
- Capacity: Determine if you’re replacing existing modules or adding to empty slots. Check your laptop’s maximum supported RAM capacity (e.g., 16GB, 32GB, 64GB). Don’t exceed this limit.
- Purchasing New RAM: Once you have these details, you can confidently purchase compatible RAM modules. Stick to reputable brands known for quality and reliability, such as Crucial, Kingston, Samsung, or G.Skill. This aligns with good brand strategy, ensuring you get a dependable product that won’t compromise your system’s stability. Often, “kit” RAM (two matched sticks) is recommended for optimal performance, especially in dual-channel configurations.
Gathering the Right Tools and New RAM Modules
Having the correct tools before you start will make the process much smoother and minimize the risk of damaging your laptop.
- Small Phillips-head Screwdriver: Most laptops use small Phillips-head screws for their back panels. A precision screwdriver set is highly recommended.
- Plastic Pry Tool (Spudger): Some laptop panels have clips in addition to screws. A plastic pry tool helps gently separate these without scratching or marring the casing. Avoid using metal objects like knives or flathead screwdrivers, as they can easily damage the plastic.
- Anti-Static Wrist Strap: While not strictly mandatory for every user, an anti-static wrist strap is a vital piece of equipment for safely handling sensitive electronic components. It connects you to a ground point, continuously discharging any static electricity from your body, preventing accidental damage to your new RAM or laptop components.
- Clean, Well-Lit Workspace: Choose a clean, uncluttered area to work, preferably on a non-conductive surface. Good lighting is essential for seeing small screws and intricate parts.
- Your New RAM Modules: Unopened in their anti-static packaging until you’re ready to install them.
Safety First: Power Down and Static Discharge
Handling electronic components requires care to prevent damage.
- Power Down Completely: This is non-negotiable. Shut down your laptop completely, not just put it to sleep.
- Disconnect Power Adapter: Unplug the power cord from the laptop and the wall.
- Remove Battery (if user-removable): For older laptops with external, user-removable batteries, take it out. For most modern laptops with internal batteries, you won’t be able to remove it easily. In such cases, if available, some laptops have a BIOS setting to temporarily disable the internal battery for servicing – consult your laptop’s manual. If not, proceed with extra caution.
- Discharge Static Electricity: Static electricity is the invisible enemy of computer components. Even a small static shock can permanently damage sensitive parts like RAM modules or the motherboard. Before touching any internal components, ground yourself. The best way is to wear an anti-static wrist strap connected to a grounded metal object (like a metal pipe or the unpainted part of a computer chassis). If you don’t have a strap, you can frequently touch an unpainted metal object like a radiator or the metal case of a desktop PC (while it’s unplugged) to discharge yourself. Avoid working on carpeted floors, as they generate static easily.

Step-by-Step Guide to RAM Installation
With all preparations complete, you’re ready for the actual installation. Take your time, follow each step carefully, and refer to your laptop’s specific service manual or an online tear-down video for your exact model if you feel unsure.
Accessing Your Laptop’s RAM Bay
The process of opening your laptop varies by manufacturer and model.
- Flip the Laptop: Gently place your laptop upside down on your clean, soft work surface.
- Locate Access Panels: Many older laptops have a dedicated, small access panel secured by one or two screws, specifically for RAM and storage. Modern laptops, however, often require you to remove the entire bottom panel.
- Remove Screws: Using your Phillips-head screwdriver, carefully remove all visible screws from the bottom case. Pay attention to screw lengths; some laptops use different lengths for different locations. It’s often helpful to lay them out in a pattern corresponding to their location on the laptop, or use a magnetic mat to keep them organized.
- Carefully Pry Open the Panel: Once all screws are removed, use your plastic pry tool (spudger) to gently unclip the bottom panel. Start at a corner or an edge and work your way around, carefully separating the panel from the main chassis. Listen for gentle clicks as clips release. Do not force anything; if it’s not coming loose, double-check for any missed screws or hidden clips. Some panels may be quite snug.
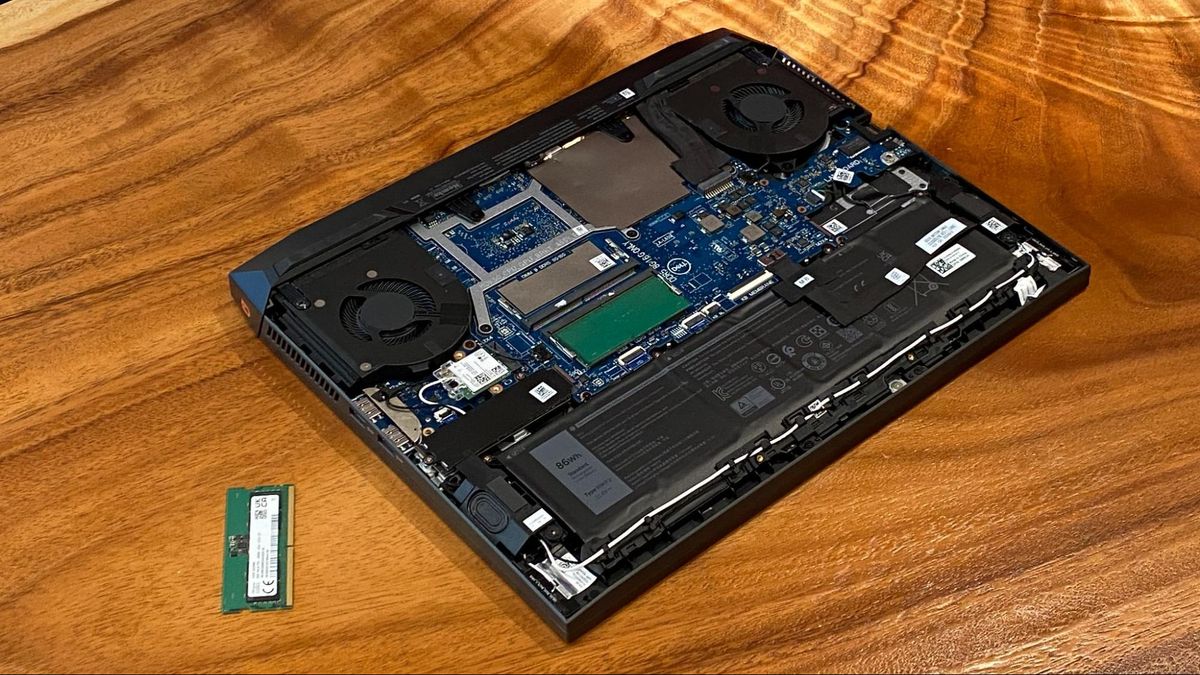
- Expose the Motherboard: With the bottom panel removed, you should now see the internal components of your laptop, including the battery, cooling fan, storage drive, and crucially, the RAM slots.
Removing Existing RAM Modules
If you’re replacing existing RAM modules, you’ll need to remove them first.
- Locate RAM Slots: The RAM modules are usually small, rectangular sticks plugged into slots. There are typically one or two slots, sometimes stacked on top of each other.
- Release the Clips: Each RAM module is held in place by two small metal or plastic clips on either side of the slot. Gently push these clips outwards away from the RAM module.
- Eject the Module: Once the clips are released, the RAM module will slightly spring upwards at an angle.
- Carefully Pull Out: Hold the RAM module by its edges and gently pull it straight out of the slot. Avoid touching the gold connectors at the bottom.
- Store Safely: Place the old RAM in an anti-static bag or a safe, clean place.
Inserting the New RAM
This is the moment of truth where your laptop gains its new memory.
- Orient the New RAM: Take your new RAM module out of its anti-static packaging. Hold it by the edges, avoiding touching the gold contacts. Observe the small notch on the gold connector edge of the RAM module. This notch needs to align with a corresponding key in the RAM slot. The module will only fit one way.
- Angle and Insert: Angle the RAM module at roughly a 30-45 degree angle into the empty slot. Gently push it in firmly but without excessive force. You should feel it slide into place.
- Snap Down: Once seated in the angled position, push the RAM module downwards until it lies flat and the two side clips snap into place, securing it firmly. You should hear a soft click on both sides. If it doesn’t click, gently push down again. Ensure both clips are fully engaged and the module is flush.
- Repeat for Second Slot (if applicable): If you have two new modules or are adding to a second empty slot, repeat the process. Ensure both modules are correctly seated. If your laptop supports dual-channel memory, it’s generally best practice to install matched pairs in specific slots (often labeled or indicated in your manual) for optimal performance.
Securing and Reassembling Your Laptop
Once the new RAM is securely in place, it’s time to close everything up.
- Inspect: Before closing, visually inspect all connections. Make sure the new RAM modules are fully seated and the clips are engaged. Check for any loose screws or displaced cables.
- Reattach Bottom Panel: Carefully align the bottom panel with the laptop chassis. Gently press down around the edges until you hear the clips snapping back into place. Ensure there are no gaps or raised areas, indicating that the panel isn’t correctly seated.
- Reinsert Screws: Put all the screws back into their original positions. Do not overtighten them, as this can strip the screw heads or damage the plastic casing. Just turn until snug.
- Reinstall Battery (if removed): If you removed an external battery, reinsert it now.
- Connect Power Adapter: Plug the power adapter back into your laptop and then into the wall outlet.
Post-Installation Checks and Troubleshooting
After reassembly, it’s time to power up your laptop and confirm the upgrade was successful. This final step is crucial to ensure everything is working as expected.
Verifying the New RAM
- Power On: Press the power button and boot up your laptop as usual. The initial boot might take a little longer than usual as the system recognizes the new hardware. Don’t panic if you see a blank screen for a few extra seconds.
- Check System Information:
- Windows: Once logged in, open Task Manager (Ctrl + Shift + Esc), navigate to the “Performance” tab, and click “Memory.” Verify that the total amount of RAM displayed matches the total you installed.
- macOS: Click the Apple menu, select “About This Mac,” and check the “Memory” section.
- Linux: Open a terminal and type
free -horhtopto see the total RAM.
If the correct amount of RAM is shown, congratulations! Your upgrade was successful.

Common Issues and Quick Fixes
Sometimes, things don’t go perfectly the first time. Here are some common issues and how to troubleshoot them:
- Laptop Doesn’t Boot / Blank Screen: This is the most common issue.
- Loose RAM: Power down, disconnect power, remove the bottom panel, and re-seat the RAM modules. Ensure they are pushed in firmly at an angle and then snapped down flat until the clips engage with an audible click.
- Incompatible RAM: Double-check the RAM’s DDR generation, speed, and capacity against your laptop’s specifications. Incorrect RAM won’t work.
- Static Damage: While rare with proper precautions, static discharge can damage components. If multiple re-seating attempts fail, and the old RAM works, the new modules might be faulty, or a component was damaged.
- Laptop Boots, But Only Recognizes Partial RAM:
- One of the modules might not be properly seated or is faulty. Re-seat each module individually and test.
- Your operating system (especially older 32-bit versions) might have a RAM limit (usually 4GB). Most modern laptops run 64-bit OS, so this is less common but worth checking.
- Your laptop’s motherboard might have a lower maximum RAM capacity than you installed.
- System Instability / Blue Screens (Windows) / Kernel Panics (macOS): This could indicate faulty RAM or a very subtle compatibility issue. Run a memory diagnostic tool (e.g., Windows Memory Diagnostic Tool, MemTest86 for a more thorough check) to identify problematic modules. If one module consistently fails, it might be defective.
If you’ve exhausted these troubleshooting steps and are still experiencing issues, or if the process feels too daunting, don’t hesitate to seek professional assistance. Local computer repair shops or the manufacturer’s service center can diagnose and resolve more complex problems, ensuring your investment in the upgrade is secured.
By following this detailed guide, you’ve not only performed a significant hardware upgrade but also gained valuable insight into the internal workings of your laptop. Enjoy the newfound speed and responsiveness, knowing you’ve made a smart, tech-savvy decision to extend your device’s life and enhance your digital experience.
aViewFromTheCave is a participant in the Amazon Services LLC Associates Program, an affiliate advertising program designed to provide a means for sites to earn advertising fees by advertising and linking to Amazon.com. Amazon, the Amazon logo, AmazonSupply, and the AmazonSupply logo are trademarks of Amazon.com, Inc. or its affiliates. As an Amazon Associate we earn affiliate commissions from qualifying purchases.