
FL Studio, developed by Image-Line, stands as one of the most versatile Digital Audio Workstations (DAWs) in the world today. While its native plugins—like Sytrus, Harmor, and Gross Beat—are industry-standard tools, the true power of the software lies in its ability to integrate third-party Virtual Studio Technology (VST) plugins. Whether you are adding a vintage analog compressor, a cutting-edge wavetable synthesizer, or a niche orchestral library, understanding the technical nuances of plugin installation is essential for any modern producer.
This guide provides a deep dive into the technical architecture of FL Studio’s plugin management system, ensuring that your software environment remains stable, organized, and optimized for performance.
Understanding Plugin Formats and Directory Management
Before initiating the installation process, it is critical to understand the different types of software architectures you will encounter. In the world of Windows-based production, the most common formats are VST2 and VST3.
VST2 vs. VST3: Technical Differences
VST2 plugins typically exist as individual .dll files. These files can technically be placed anywhere on your hard drive, which often leads to disorganized file structures if the user is not careful. In contrast, VST3 is the more modern standard. These files have a .vst3 extension and are almost always installed in a standardized directory: C:Program FilesCommon FilesVST3. VST3 plugins are more efficient; they only consume CPU cycles when audio is actually passing through them, and they offer better MIDI routing capabilities.
32-bit vs. 64-bit Architecture
Modern versions of FL Studio are primarily 64-bit. While FL Studio features a “bridge” that allows 32-bit plugins to run within a 64-bit environment, doing so consumes more CPU and can lead to stability issues. Whenever possible, always install the 64-bit version of a plugin. If you are using a 64-bit DAW, the plugin should ideally be installed in C:Program FilesVSTPlugins, while 32-bit versions are relegated to C:Program Files (x86)VSTPlugins.
Setting Up a Dedicated Plugin Folder
To maintain a professional workflow, it is highly recommended to establish a primary VST folder. Many installers will default to their own proprietary folders (e.g., C:Program FilesSteinbergVSTPlugins). To avoid a fragmented system, choose one or two primary paths and ensure all installers point to those locations. This makes it easier for FL Studio to index your library during a scan.
The Step-by-Step Installation Process in FL Studio
Once you have downloaded your desired plugin and run the installer provided by the developer, you must “introduce” the new software to FL Studio. This is handled through the Plugin Manager.
Step 1: Navigating to the Plugin Manager
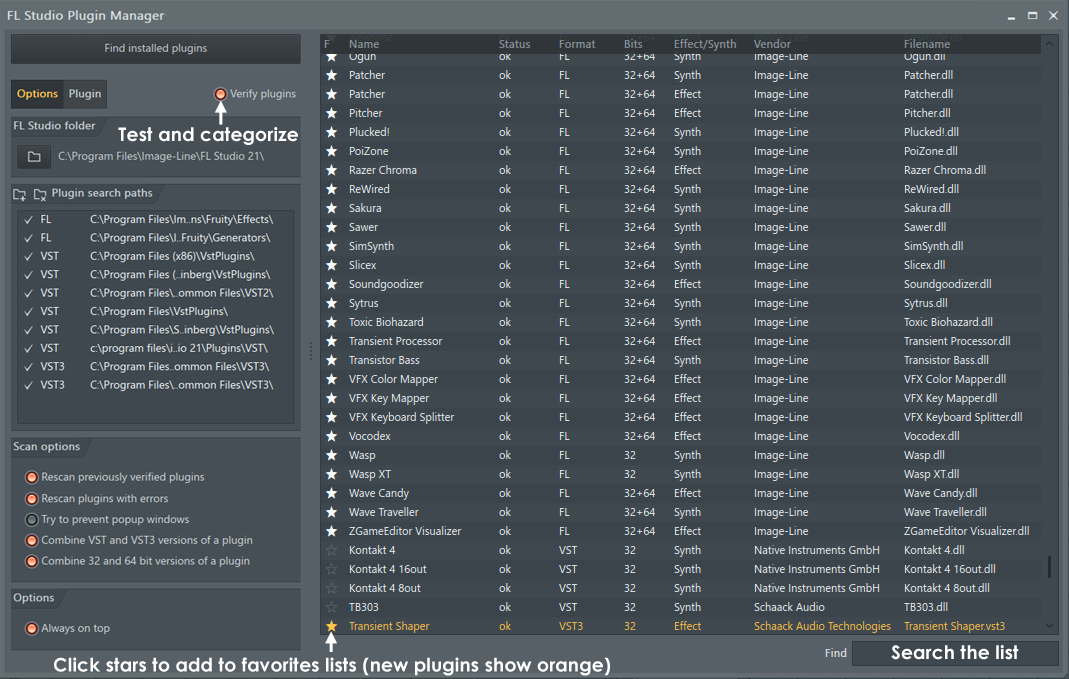
Open FL Studio and navigate to the top toolbar. Click on Options and then select Manage Plugins. This will open a standalone window that acts as the command center for your DAW’s software library. Here, you will see a list of all currently recognized plugins, their types (Effect or Generator), and their file paths.
Step 2: Configuring Search Paths
On the left-hand side of the Plugin Manager, you will see a section labeled Plugin search paths. If you installed your plugin to a custom folder that is not listed, click the “+” folder icon to add that directory to the list. FL Studio will only look for software in these specific locations. If your plugin is a VST3, the default path should already be present.
Step 3: Running the Scan (The Verify Method)
There are two ways to scan for plugins: a simple scan and a verified scan. For the most stable results, ensure the “Verify plugins” option is checked. This takes longer because FL Studio opens each plugin in the background to categorize it as either a “Synth” (Generator) or an “Effect.”
Click Find installed plugins at the top left. The software will begin scanning your directories. Newly discovered plugins will appear in the list highlighted in orange or yellow, signifying they are fresh additions to your library.

Step 4: Adding Plugins to the Browser and Mixer
Once the scan is complete, you need to make the plugins accessible within your project. In the Plugin Manager list, find your new plugin. You can click the star icon next to it to mark it as a “Favorite.” This adds the plugin to the quick-access menus found in the Channel Rack (for Generators) and the Mixer slots (for Effects).
Troubleshooting Common Plugin Issues in FL Studio
Even with a perfect installation process, technical hurdles can arise. These are often related to permissions, file path errors, or compatibility mismatches.
The Missing DLL Error
If you have performed a scan but the plugin does not appear, the most common culprit is an incorrect file path. Ensure that the .dll or .vst3 file is actually located within one of the folders listed in your “Plugin search paths.” Some plugins require you to manually move the .dll file after extraction if they do not come with a dedicated installer.
Admin Rights and Permissions
Certain high-end plugins require administrative privileges to write data to your drive (such as license keys or preset libraries). If a plugin crashes upon opening, try running FL Studio as an Administrator. Additionally, ensure that your antivirus software is not “quarantining” new plugins, as it may mistake a specialized VST bridge for a malicious process.
Resolving Plugin Scans That Freeze
Sometimes, the Plugin Manager may hang or crash during a scan. This usually happens when FL Studio encounters a corrupted plugin or a version mismatch. To fix this, look at the scanning status bar to see which plugin caused the freeze. You can then navigate to that folder, temporarily move the problematic plugin out of the directory, and restart the scan. Once the rest of your library is scanned, you can investigate the specific issue with the offending file.
Advanced Management and Performance Optimization
As your collection of tools grows from a dozen to hundreds, managing them efficiently becomes a technical necessity rather than a luxury.
Organizing the Plugin Database
FL Studio allows you to organize your plugins into custom categories through the “Plugin Database” in the Browser (usually on the left side of the screen). By navigating to Browser > Plugin database > Generators/Effects, you can create sub-folders such as “Compressors,” “Reverbs,” or “Bass Synths.” To add a plugin to a specific folder, open the plugin, go to its wrapper menu (the down arrow in the top left of the plugin window), and select “Flag as favorite.” It will be saved with a thumbnail in that specific browser category.
Managing CPU Load with “Smart Disable”
One of the most powerful technical features in FL Studio is Smart Disable. When you have dozens of heavy plugins (like Kontakt or Serum) running simultaneously, your CPU can struggle. By going to Tools > Macros > Switch smart disable for all plugins, you instruct FL Studio to turn off processing for any plugin that is not currently producing sound. This can significantly reduce the load on your processor, allowing you to run much larger projects without audio crackling or buffer underruns.
Using the Wrapper Settings
Every plugin in FL Studio is hosted inside a “Wrapper.” By clicking the gear icon in the top left of any plugin window, you access the Wrapper settings. Here, you can handle advanced technical tasks like:
- MIDI Input/Output Ports: Essential for routing hardware controllers or connecting plugins to one another.
- DPI Scaling: If a plugin looks too small on a 4K monitor, you can adjust the scaling settings here to make the interface readable.
- Fixed Size Buffers: Some older plugins expect a constant stream of data. If a plugin is behaving erratically or producing “clicks,” enabling fixed size buffers often solves the problem.

Conclusion
Mastering the technical side of plugin installation in FL Studio is a foundational skill that separates amateur setups from professional studio environments. By understanding the distinctions between VST formats, maintaining a clean directory structure, and utilizing the advanced features of the FL Studio Plugin Manager, you ensure that your creative process is never interrupted by technical failures.
A well-organized plugin library not only speeds up your workflow but also optimizes your hardware performance, allowing the technology to serve your musical vision rather than hinder it. Always remember to keep your plugins updated and periodically “Clean up” your plugin list to remove outdated or unused software, keeping your production environment lean and efficient.
aViewFromTheCave is a participant in the Amazon Services LLC Associates Program, an affiliate advertising program designed to provide a means for sites to earn advertising fees by advertising and linking to Amazon.com. Amazon, the Amazon logo, AmazonSupply, and the AmazonSupply logo are trademarks of Amazon.com, Inc. or its affiliates. As an Amazon Associate we earn affiliate commissions from qualifying purchases.