
In the intricate world of computing, where software meets hardware, device drivers act as the crucial translators, enabling your operating system to communicate effectively with the components that make up your machine. While modern operating systems like Windows have become remarkably adept at automatically detecting and installing most drivers, there are inevitable scenarios where this convenience falls short. Whether it’s for performance optimization, troubleshooting persistent issues, enabling new features on specific hardware, or simply working with older or highly specialized equipment, knowing how to manually install drivers is an indispensable skill for any tech-savvy individual. This guide will demystify the process, empowering you to take control of your system’s hardware configuration and ensure peak performance and stability.

Understanding Drivers and Why Manual Installation Matters
Before diving into the “how-to,” it’s essential to grasp the fundamental role drivers play and why you might need to step in where automated systems fail.
What Are Device Drivers?
At its core, a device driver is a piece of software that allows your computer’s operating system (like Windows, macOS, or Linux) to interact with a specific hardware device (such as a graphics card, printer, sound card, network adapter, or USB controller). Imagine a universal translator: without it, your OS and hardware would speak different languages, making communication impossible. Drivers facilitate this communication, sending commands from the OS to the hardware and relaying data back, ensuring everything functions as intended. Each hardware component requires its specific driver, optimized for its unique architecture and features.
When Automatic Updates Fall Short
While Windows Update and manufacturer-provided utilities often handle driver installations seamlessly, there are several common situations where manual intervention becomes necessary:
- New Hardware Not Automatically Recognized: Especially with cutting-edge or niche hardware, the operating system might not have the latest drivers in its default repository.
- Troubleshooting Performance Issues: Sometimes, a generic driver installed by Windows might work, but it won’t unlock the full potential of your hardware. Manual installation of the official, performance-optimized driver from the manufacturer can significantly boost performance (e.g., in gaming GPUs).
- Resolving Device Conflicts or Errors: A faulty or corrupted driver can cause a device to malfunction, display error codes (like “Code 43” in Device Manager), or even lead to system instability (e.g., Blue Screen of Death). Reinstalling a clean driver manually is often the fix.
- Downgrading Drivers for Stability: A new driver version, while seemingly an upgrade, might introduce bugs or compatibility issues with your specific system or software. Manually installing an older, stable version can restore functionality.
- Offline Systems or Limited Internet Access: If you’re setting up a computer without internet access, or if the network adapter driver itself is missing, you’ll need to manually install drivers that you’ve downloaded elsewhere.
- Specific Software Requirements: Certain professional applications or games might require a particular driver version to function correctly, necessitating a manual installation even if a newer one exists.
- Legacy Hardware Support: Older devices might no longer receive automatic updates, or their drivers might not be readily available through modern OS update channels, requiring a manual search and installation.
The Risks of Outdated or Incorrect Drivers
Running with outdated or incorrect drivers isn’t just an inconvenience; it can pose significant risks to your system’s performance, stability, and even security:
- Performance Degradation: Generic drivers often lack optimizations, leading to slower performance, reduced features, and higher power consumption compared to manufacturer-specific drivers.
- System Instability and Crashes: Incompatible or corrupted drivers are a leading cause of system freezes, random restarts, and the dreaded Blue Screen of Death (BSOD), as they can cause conflicts within the operating system kernel.
- Security Vulnerabilities: Like any software, drivers can have vulnerabilities. Manufacturers regularly release updates that patch these security holes. Running outdated drivers leaves your system exposed to potential exploits, which attackers could leverage to gain unauthorized access or cause damage. This is a critical consideration in digital security.
- Hardware Malfunctions: Without the correct driver, a device might not function at all, or it might exhibit erratic behavior, preventing you from using it effectively. For instance, a graphics card might only display basic video, or a printer might refuse to print.
Understanding these points underscores why mastering manual driver installation is more than just a technical chore; it’s about maintaining control, optimizing performance, and safeguarding your digital environment.
Essential Preparations Before You Begin
Embarking on a manual driver installation without proper preparation can lead to frustration or, worse, system instability. These preliminary steps are crucial for a smooth and safe process.
Identifying Your Hardware
The absolute first step is to accurately identify the hardware component for which you need a driver. Installing the wrong driver can cause more problems than it solves.
- Check Device Manager: The most reliable method on Windows is through the Device Manager.
- Press
Windows Key + Xand select “Device Manager.” - Look for devices with a yellow exclamation mark (indicating a problem) or an unknown device.
- Expand categories (e.g., “Display adapters,” “Network adapters”) to find your device.
- Right-click the device, select “Properties,” then navigate to the “Details” tab.
- From the “Property” dropdown, select “Hardware IDs.” The values displayed here (e.g.,
PCIVEN_8086&DEV_A131) contain crucial vendor (VEN) and device (DEV) IDs that can help you identify the exact model. You can often search these IDs online to find the corresponding hardware name.
- Press
- Use System Information: For a general overview of your system’s hardware, type “msinfo32” into the Run dialog (
Windows Key + R) or Windows Search. This provides detailed information on system components, although it might not always give the precise model numbers needed for driver downloads. - Physical Inspection (Laptops/Pre-builts): For laptops or pre-built desktops, check the manufacturer’s label, the original packaging, or the underside of the device for model numbers. This is especially useful for finding network adapter or chipset drivers specific to your laptop model.
- Third-Party Tools: Utilities like Speccy or CPU-Z can provide comprehensive details about your hardware, including exact model numbers for components like graphics cards, motherboards, and memory.
Sourcing the Right Drivers
Once you know what hardware you have, the next critical step is to find the correct driver. Always prioritize these sources:
- Manufacturer’s Official Website: This is the gold standard. For graphics cards, go to NVIDIA, AMD, or Intel’s website. For motherboards, visit ASUS, Gigabyte, MSI, etc. For peripherals, go to Logitech, Canon, HP, etc.
- Navigate to the “Support,” “Downloads,” or “Drivers” section.
- Search for your exact device model. Be precise; even a slight difference in model number can mean a different driver.
- Crucially, select the correct operating system version (e.g., Windows 10 64-bit) and architecture (32-bit or 64-bit).
- PC/Laptop Manufacturer’s Support Page: If you have a pre-built PC or a laptop (e.g., Dell, HP, Lenovo), their support website will often host all the necessary drivers for your specific model, pre-tested for compatibility with your system. This is often the best approach for pre-built systems as they sometimes use customized drivers.
- Avoid Third-Party Driver Websites: While tempting, these sites often host outdated, incorrect, or even malicious drivers. Stick to official sources to ensure digital security and system integrity.
Creating a System Restore Point
This is a non-negotiable safety net. Before making any significant system changes, especially installing drivers, create a system restore point. If the new driver causes problems, you can easily revert your system to its previous, stable state without losing personal files.
- Type “Create a restore point” into Windows Search and open the System Properties window.
- Under the “System Protection” tab, ensure protection is “On” for your primary drive (usually C:).
- Click “Create…”
- Give the restore point a descriptive name (e.g., “Before installing GPU driver”).
- Click “Create” and wait for the process to complete.
Unpacking Driver Files
Many drivers are downloaded as compressed archive files (e.g., .zip, .rar). You’ll need to extract them before installation.
- Locate the downloaded file.
- Right-click the file.
- For
.zipfiles, select “Extract All…” and choose a destination folder (e.g., a new folder on your Desktop). - For other formats like
.rar, you might need a third-party tool like 7-Zip or WinRAR. - Remember the location where you extracted the files, as you’ll need it during the installation process.
Step-by-Step: The Manual Installation Process
There are typically two main methods for manual driver installation: using the Device Manager for individual components or running an executable installer provided by the manufacturer.
Method 1: Installing via Device Manager (The Primary Method)
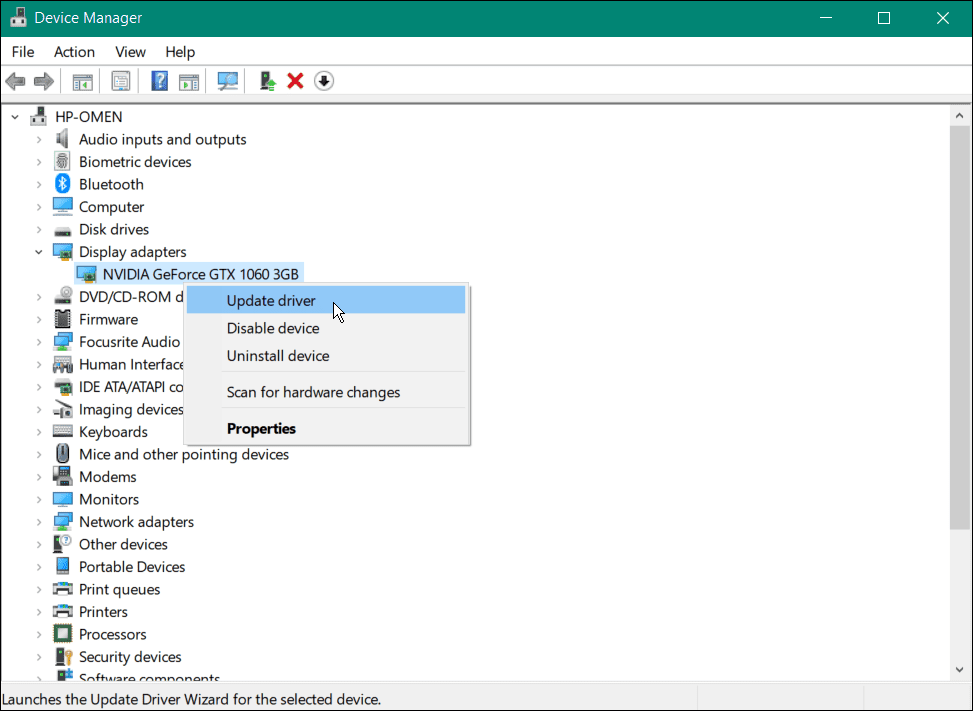
This method is ideal when you have specific driver files (often ending in .inf, .sys, .cat, .dll) but no setup program, or when troubleshooting an already installed but faulty device.
- Open Device Manager: Press
Windows Key + Xand select “Device Manager.” - Locate the Device:
- Find the hardware component you want to update. It might appear with a yellow exclamation mark if it’s not working correctly or as an “Unknown device.”
- Right-click on the device.
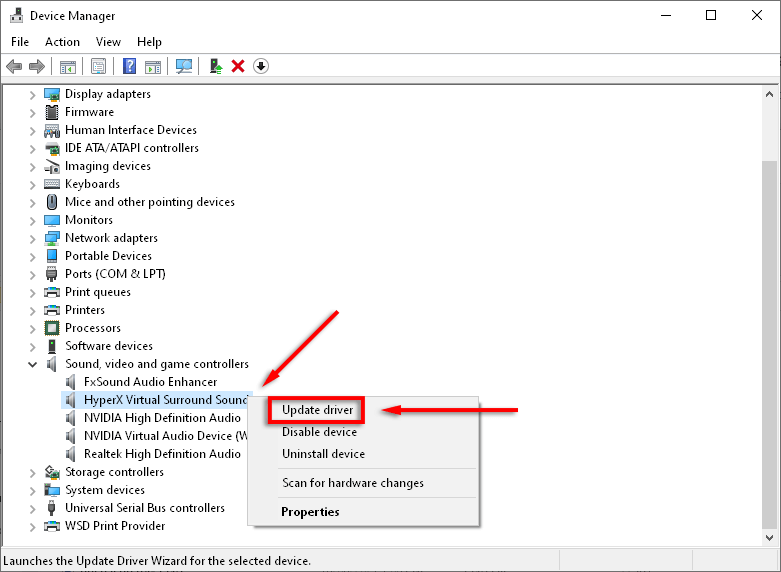
- Initiate Driver Update: Select “Update driver.”
- Choose Manual Search: In the next window, select “Browse my computer for driver software.” This tells Windows you have the driver files locally.
- Specify the Path:
- Click “Browse…”
- Navigate to the folder where you extracted your driver files in the preparation step. It’s often sufficient to point to the main folder; Windows will search subfolders automatically if you check “Include subfolders.”
- Click “OK.”
- Complete Installation:
- Click “Next.” Windows will now search the specified location for compatible driver files.
- If it finds a suitable driver, it will begin the installation process. You might see a progress bar.
- If Windows prompts you about installing unsigned drivers (less common with official drivers but can happen with specialized hardware or beta drivers), click “Install this driver software anyway” only if you are absolutely sure of the driver’s legitimacy and origin.
- Restart Your Computer: After the installation completes, it’s almost always recommended to restart your computer to ensure the new driver is fully loaded and applied correctly.
Method 2: Using an Executable Installer
Many manufacturers provide their drivers packaged with an executable setup.exe or .msi file. This is generally the easiest method if available.
- Locate the Setup File: After extracting your downloaded driver package, look for a file named
setup.exe,install.exe, or a similar executable. It might be within a subfolder (e.g.,Drivers,Utility). - Run the Installer: Double-click the executable file to start the installation wizard.
- Follow On-Screen Prompts:
- The installer will guide you through the process, which typically involves accepting license agreements, choosing an installation location (usually best to stick with default), and confirming the installation.
- Pay attention to any custom installation options, especially if you want to avoid installing bundled software you don’t need.
- The installer might prompt you to uninstall previous driver versions automatically.
- Restart Your Computer: Just as with the Device Manager method, a restart is almost always necessary to finalize the installation and ensure the new driver is fully active.
Handling Legacy Hardware and Unsigned Drivers
For very old or specialized hardware, you might encounter situations where Windows warns you about unsigned drivers. A driver is “signed” when Microsoft or the hardware vendor has digitally verified its authenticity and integrity. While it’s generally best to use signed drivers for security and stability, sometimes with legacy or niche equipment, unsigned drivers are the only option. Proceed with caution and only if you trust the source. In some extreme cases, you might need to temporarily disable driver signature enforcement in Windows startup settings (an advanced troubleshooting step not recommended for general use).
Troubleshooting Common Driver Installation Issues
Even with careful preparation, problems can arise. Here’s how to tackle common issues you might encounter.
Driver Not Found or Incompatible Errors
- Double-Check Hardware ID and OS Version: Revisit the hardware identification step and ensure you downloaded the exact driver for your device and operating system (including 32-bit vs. 64-bit). This is the most common reason for incompatibility.
- Search Subfolders: When using Device Manager, ensure you’ve checked the “Include subfolders” option when browsing for the driver.
- Try Older Versions: If the latest driver isn’t working, an older, more stable version might be compatible.
- Consult Manufacturer Support: If you’re certain about the hardware and OS but can’t find a working driver, contact the hardware manufacturer’s support.
Device Malfunctions After Installation
- Check Device Manager Status: After a restart, open Device Manager again. Does the device still have a yellow exclamation mark? Check its properties for an error code (e.g., Code 43, Code 10). These codes often provide clues.
- Run System File Checker: Corrupted system files can interfere with driver loading. Open Command Prompt as administrator and run
sfc /scannow. - Driver Conflicts: Sometimes, a newly installed driver can conflict with an existing one. Identifying these can be tricky, but rolling back or uninstalling the problematic driver is the usual solution.
Rolling Back a Driver
If a newly installed driver causes issues, Windows allows you to revert to the previous version.
- Open Device Manager.
- Right-click the problematic device and select “Properties.”
- Go to the “Driver” tab.
- If available, click “Roll Back Driver.” Follow the prompts. This option is only available if a previous driver was installed and Windows has a backup.
- Restart your computer.
Utilizing System Restore
If rolling back the driver isn’t an option or if the system is too unstable to access Device Manager, use the system restore point you created.
- Type “Create a restore point” into Windows Search and open the System Properties window.
- Under the “System Protection” tab, click “System Restore…”
- Click “Next” and choose the restore point you created before installing the driver.
- Follow the instructions. Your system will restart and revert to the state it was in when the restore point was created, effectively undoing the driver installation and any other changes made since then.
Best Practices for Driver Management and System Health
Manual driver installation is a powerful tool, but like any powerful tool, it requires responsible use. Adhering to these best practices will contribute significantly to your system’s stability, performance, and digital security.
Prioritizing Official Sources
Never download drivers from unofficial or unverified websites. Malware distributors frequently package malicious software with seemingly legitimate drivers. Always go directly to the hardware manufacturer’s website (e.g., Intel, NVIDIA, AMD, HP, Dell, Canon) or your PC/laptop manufacturer’s support page. These sources ensure the drivers are authentic, compatible, and free from malicious code, safeguarding your system against security threats.
The Balance of Updates: When to Update, When to Wait
While keeping drivers updated is generally good practice for performance and security, it’s not always wise to immediately install every new driver release.
- If It Ain’t Broke, Don’t Fix It (Sometimes): If your system is stable and performing well, and you’re not experiencing any issues with a particular device, you don’t necessarily need to rush to update its driver immediately. New drivers can sometimes introduce unforeseen bugs or compatibility problems.
- Prioritize Critical Updates: Always prioritize driver updates that address known security vulnerabilities, critical bug fixes, or significant performance improvements, especially for core components like graphics cards, chipsets, and network adapters.
- Read Release Notes: Before updating, quickly review the driver’s release notes on the manufacturer’s website. This will tell you what has changed, what issues have been fixed, and if there are any known problems with the new version.
- Monitor Tech Forums: For critical components like graphics cards, it can be beneficial to check relevant tech forums or communities after a new driver release. Users often report early experiences, good or bad, which can inform your decision to update.
Regular System Maintenance and Digital Security
Driver management is an integral part of overall system maintenance and digital security:
- Schedule Regular Checks: Periodically check your Device Manager for any flagged devices. While Windows Update handles many drivers, a quick manual check can catch issues.
- Backup Your System: Beyond restore points, consider creating full system image backups, especially before major driver overhauls or operating system upgrades. This provides a complete safety net.
- Understand Driver Security: As mentioned, outdated drivers can be entry points for malware. By keeping critical drivers up-to-date from official sources, you close potential security gaps, contributing to a more robust digital security posture for your system.
- Productivity Benefits: Correctly installed and updated drivers ensure your hardware operates at its peak, directly impacting your productivity. Slow performance, crashes, or malfunctioning peripherals waste time and hinder workflow. Proactive driver management minimizes these interruptions.
By understanding the intricacies of driver installation and adopting these best practices, you move beyond being a passive user of technology to becoming an active manager of your computing environment. This control not only resolves current issues but also preempts future problems, ensuring your technology serves you reliably and efficiently. Mastering manual driver installation is a fundamental step in optimizing your tech experience, making it an invaluable skill in today’s interconnected digital landscape.
aViewFromTheCave is a participant in the Amazon Services LLC Associates Program, an affiliate advertising program designed to provide a means for sites to earn advertising fees by advertising and linking to Amazon.com. Amazon, the Amazon logo, AmazonSupply, and the AmazonSupply logo are trademarks of Amazon.com, Inc. or its affiliates. As an Amazon Associate we earn affiliate commissions from qualifying purchases.