In today’s digitally driven world, the ability to seamlessly connect and utilize peripherals is paramount. While many of us rely on cloud services and digital documents, the humble printer remains an indispensable tool for many tasks, whether it’s printing important documents, creative projects, or even just a recipe. For MacBook Air users, the process of installing a printer is generally straightforward, thanks to macOS’s intuitive design and robust built-in features. This guide will walk you through everything you need to know to get your printer up and running with your MacBook Air, covering various scenarios and troubleshooting common issues.
Understanding Printer Connection Types and Mac Compatibility
Before diving into the installation process, it’s helpful to understand the different ways printers connect and how they typically interact with macOS.
Wired Connections: USB and Ethernet
The most traditional method of connecting a printer to a computer is via a USB cable. Most modern printers offer a USB port, and your MacBook Air will recognize it almost immediately once plugged in. This is often the simplest and most reliable connection method.
- USB-A to USB-B: This is the classic printer cable. Your MacBook Air, depending on its model, might require a USB-C to USB-A adapter if it only has USB-C ports. These adapters are widely available and inexpensive.
- Direct Ethernet: Some network printers can be connected directly to your router or network switch via an Ethernet cable. This allows multiple devices on your network to access the printer without needing a direct physical connection to any single computer.
Wireless Connections: Wi-Fi and Bluetooth
Wireless printing offers greater flexibility, allowing you to print from anywhere within your network without being tethered by cables.
- Wi-Fi: This is the most common wireless connection method for printers. Your printer connects to your home or office Wi-Fi network, and your MacBook Air, also connected to the same network, can then discover and print to it. Most modern printers have built-in Wi-Fi capabilities, often requiring an initial setup process on the printer itself to join your network.
- Bluetooth: While less common for printers, some specialized or portable printers might utilize Bluetooth for direct, short-range connections. macOS supports Bluetooth devices, so if your printer uses this technology, the pairing process will be similar to connecting other Bluetooth accessories.
AirPrint: The Apple Ecosystem Advantage
For the smoothest wireless printing experience on a Mac, especially if you own other Apple devices, look for printers that support AirPrint. AirPrint is Apple’s proprietary wireless printing solution. It allows you to print directly from your Mac, iPhone, or iPad to an AirPrint-enabled printer without needing to download any drivers or software. As long as your printer is on the same Wi-Fi network as your MacBook Air, AirPrint should automatically detect and enable it for printing. This is a significant convenience factor, simplifying the installation process immensely.
Step-by-Step Installation Guide for Your MacBook Air
Now that you understand the connection types, let’s get your printer installed. macOS is designed to make this process as intuitive as possible.
Method 1: Automatic Detection (The Easiest Way)
In most cases, especially with AirPrint-enabled printers or printers with standard USB connections, macOS will automatically detect your printer once it’s connected and powered on.
-
Connect Your Printer:
- For USB: Plug one end of the USB cable into your printer and the other into an available USB port on your MacBook Air (or through a USB-C adapter if needed).
- For Wi-Fi: Ensure your printer is powered on and connected to the same Wi-Fi network as your MacBook Air. The initial setup for connecting a printer to Wi-Fi is usually done via the printer’s control panel or a setup utility provided by the manufacturer. Refer to your printer’s manual for specific instructions.
- For Ethernet: Connect your printer to your router or network switch using an Ethernet cable.
-
Open System Settings (or System Preferences):
- Click on the Apple logo in the top-left corner of your screen.
- Select System Settings (on macOS Ventura and later) or System Preferences (on older macOS versions).
-
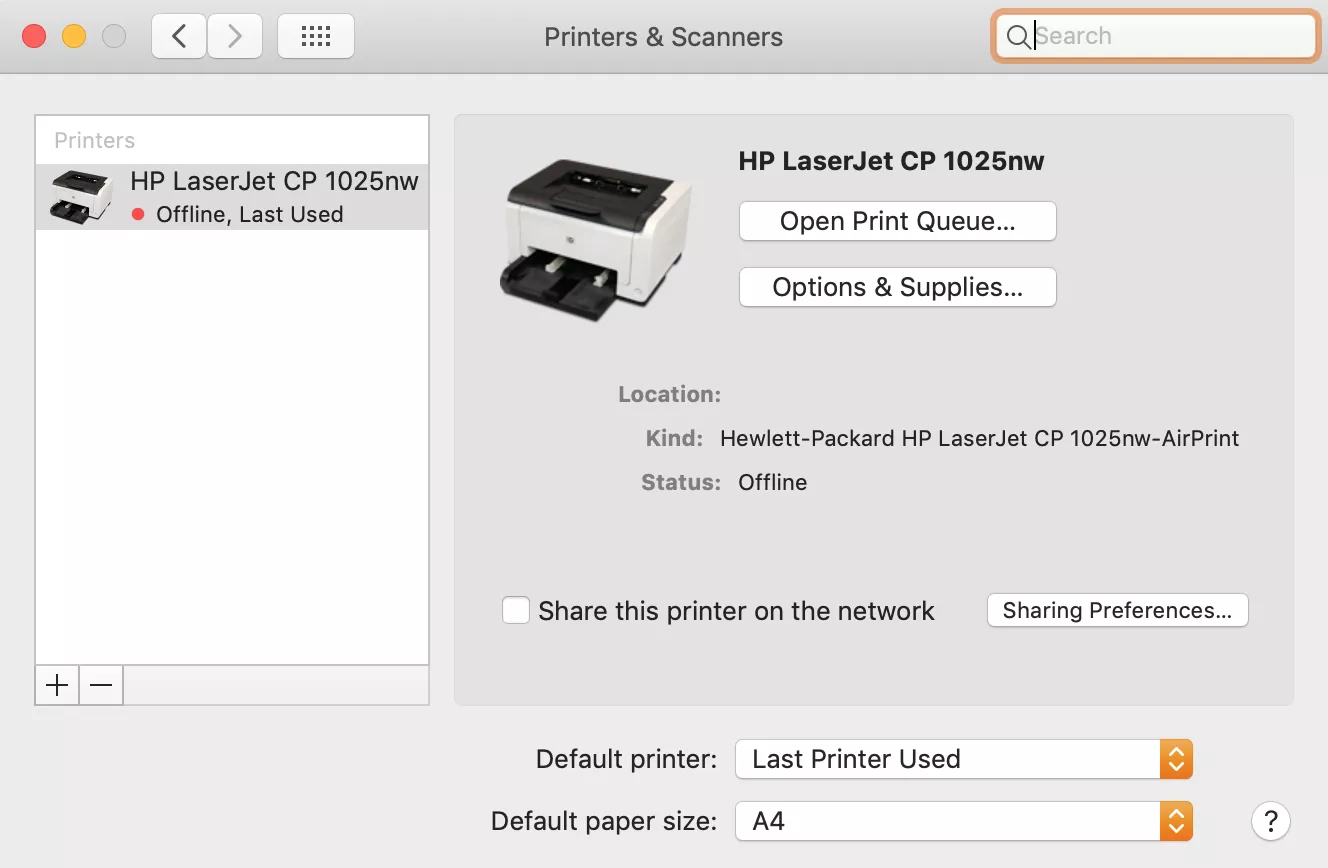
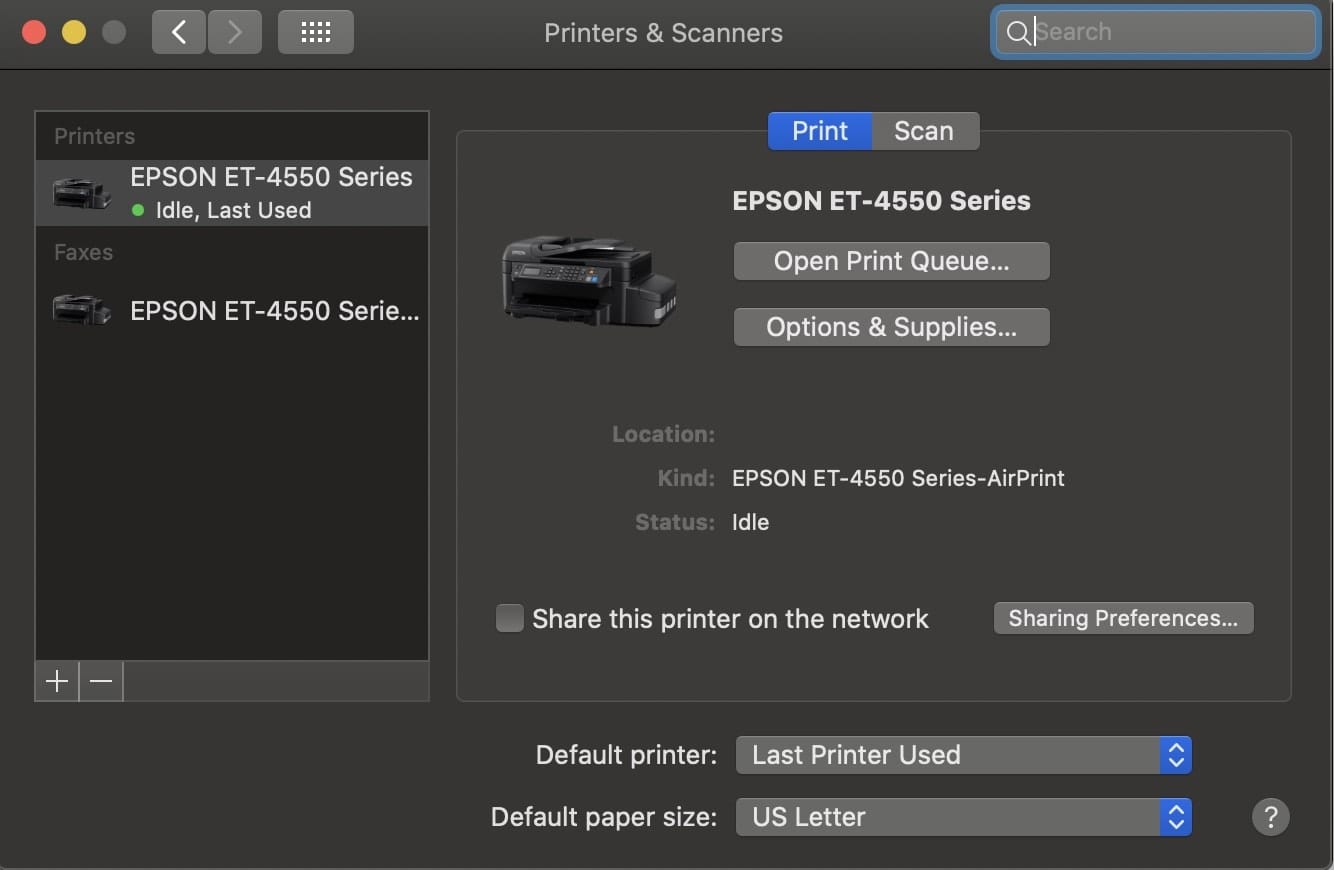
Navigate to Printers & Scanners:
- In System Settings, scroll down the sidebar and click on Printers & Scanners.
- In System Preferences, click on the Printers & Scanners icon.
-
Add a Printer:
- Click the Add Printer, Scanner, or Fax… button (or the “+” button in older versions).
-
Wait for Detection:
- Your MacBook Air will now scan for available printers on your network or connected via USB.
- If your printer is detected, it will appear in the list. You should see its name, often including the manufacturer and model. If it’s an AirPrint-enabled printer, it will likely be labeled as such.
-
Select Your Printer and Add:
- Click on your printer’s name in the list.
- macOS will typically automatically select the correct driver. You’ll see options for “Use” or “Driver” which should default to the appropriate software. If it doesn’t, you might see a dropdown menu where you can choose the driver. For AirPrint printers, it will usually say “AirPrint.”
- Click the Add button.
Your printer should now be installed and ready to use. You’ll see it listed in your Printers & Scanners preferences.
Method 2: Manual Installation (When Automatic Detection Fails)
If your printer isn’t automatically detected, you may need to manually install it using the manufacturer’s drivers. This is more common for older printers or those with proprietary features.
-
Download the Latest Drivers:
- Visit the support or download section of your printer manufacturer’s official website (e.g., HP, Canon, Epson, Brother).
- Search for your specific printer model.
- Download the latest macOS compatible driver software or package. Be sure to select the correct version of macOS you are running.
-
Run the Installer:
- Locate the downloaded file (usually in your Downloads folder) and double-click it.
- Follow the on-screen instructions to install the printer software. This process can vary greatly between manufacturers. It might involve agreeing to license agreements, choosing installation types, and potentially connecting your printer during the setup.
-
Add the Printer in System Settings:
- Once the driver installation is complete, return to System Settings > Printers & Scanners.
- Click Add Printer, Scanner, or Fax…
- Your printer should now appear in the list, or you may need to select it via an IP address or by browsing for it on your network, depending on the driver’s setup.
- Select your printer, ensure the correct driver is chosen under the “Use” dropdown, and click Add.
Method 3: Adding a Printer via IP Address
This method is useful for network printers where direct discovery might be problematic, or for printers configured with a static IP address.
-
Find Your Printer’s IP Address:
- This information can usually be found on the printer’s control panel under network settings, or by printing a network configuration page from the printer itself.
- If your printer is connected via Wi-Fi or Ethernet to your router, you might also be able to find its IP address by logging into your router’s administration page.
-
Open System Settings and Add Printer:
- Go to System Settings > Printers & Scanners.
- Click Add Printer, Scanner, or Fax…
-
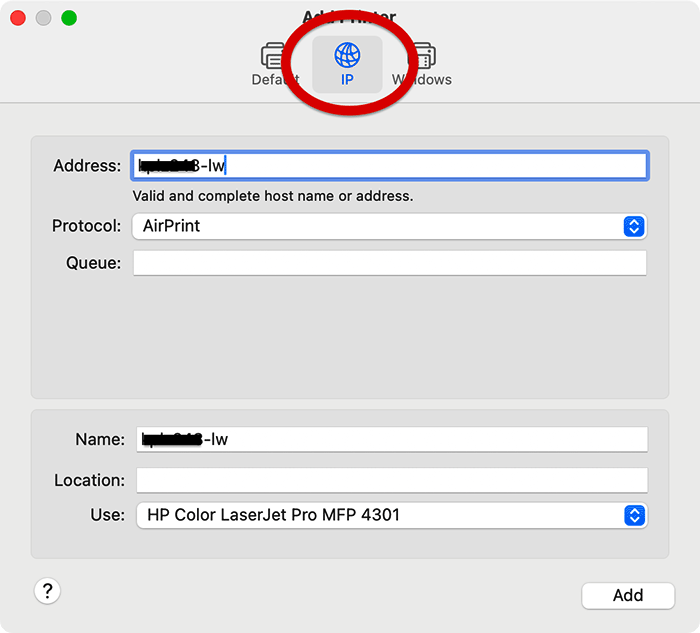
Select the IP Tab:
- At the top of the “Add Printer” window, click on the IP tab.
-
Enter Printer Information:
- Address: Enter the IP address of your printer.
- Protocol: macOS will try to automatically detect the protocol (e.g., LPD, IPP, HP Jetdirect). You can often leave this on auto-detect, or select a specific protocol if you know it.
- Queue: This field is often left blank for most common printer types, but some older protocols might require it.
- Name: macOS will usually populate this field automatically based on the IP address. You can change it to something more descriptive if you wish.
- Location: Optionally, you can add a location for the printer.
- Use: This is the most critical part. macOS will attempt to guess the correct driver. If it doesn’t, click the dropdown menu and select “Select Software…”. Browse for your printer model or manufacturer. If you’ve already installed the official drivers from the manufacturer’s website, they should appear here. If not, you might need to download and install them first (as described in Method 2).
-
Add the Printer:
- Once all the information is entered and the correct driver is selected, click the Add button.
Troubleshooting Common Printer Installation Issues
Even with straightforward processes, you might encounter hiccups. Here are some common issues and how to resolve them.
Printer Not Detected
- Check Connections: Ensure all cables are securely plugged in, both at the printer and the MacBook Air. For Wi-Fi, confirm the printer is on and connected to the same network as your Mac.
- Restart Devices: Try restarting your printer, your MacBook Air, and your router. This can resolve temporary network glitches.
- Verify Network: If using Wi-Fi, ensure your MacBook Air is connected to the correct network. Sometimes, devices get inadvertently connected to guest networks or different Wi-Fi bands.
- Firewall Issues: In rare cases, your macOS firewall might be blocking the printer discovery. You can temporarily disable the firewall (System Settings > Network > Firewall) to test, but remember to re-enable it afterward. If the firewall was the issue, you might need to configure it to allow printer communication.
- Printer IP Address: If adding via IP, double-check the IP address for any typos.
Incorrect Drivers Selected or Printer Not Functioning Correctly
- Re-add Printer: Remove the printer from your Printers & Scanners list (select it and click the “-” or “Remove Printer” button) and try adding it again.
- Manual Driver Selection: When adding the printer, ensure you’ve selected the correct driver. If macOS auto-selected “AirPrint,” and your printer is AirPrint-enabled, this is usually ideal. If it selected a generic driver, try to find and install the specific driver from the manufacturer’s website.
- Update macOS: Ensure your macOS is up to date. Apple often includes updated printer drivers with macOS updates.
- Manufacturer Support: Consult your printer manufacturer’s support website for specific macOS troubleshooting guides or utility software.
“Filter Failed” or Printing Errors
This error often indicates a problem with the printer driver or communication.
- Reset Printing System: This is a powerful troubleshooting step that removes all printers and scanners from your Mac and resets their settings.
- Go to System Settings > Printers & Scanners.
- Right-click (or Control-click) in the blank space of the printer list on the left.
- Select Reset printing system…
- Click Reset to confirm.
- After the reset, try adding your printer again from scratch.
AirPrint Issues
- Ensure Printer is AirPrint Certified: Not all Wi-Fi printers are AirPrint compatible. Check your printer’s specifications.
- Same Network: Both your Mac and printer must be on the same Wi-Fi network.
- Restart Router and Printer: This is often the simplest fix for AirPrint connectivity issues.
Conclusion
Installing a printer on your MacBook Air is typically a smooth and hassle-free experience, especially with the advent of AirPrint. By following the automatic detection steps, you’ll likely have your printer up and running in minutes. Should you encounter any issues, the manual driver installation and IP address methods, along with the “Reset printing system” utility, provide robust solutions. Remember to always refer to your printer’s manual for specific setup instructions and consult the manufacturer’s website for the latest drivers. With this guide, you’re well-equipped to conquer any printer installation challenge on your MacBook Air and enjoy the convenience of physical copies whenever you need them.
aViewFromTheCave is a participant in the Amazon Services LLC Associates Program, an affiliate advertising program designed to provide a means for sites to earn advertising fees by advertising and linking to Amazon.com. Amazon, the Amazon logo, AmazonSupply, and the AmazonSupply logo are trademarks of Amazon.com, Inc. or its affiliates. As an Amazon Associate we earn affiliate commissions from qualifying purchases.