In the rapidly evolving world of consumer electronics, we are constantly bombarded with technical specifications. Whether you are shopping for a high-performance gaming mouse, a professional-grade printer, or a high-resolution smartphone, the term “DPI” is almost certain to appear on the spec sheet. But despite its ubiquity, DPI remains one of the most misunderstood metrics in the tech industry.
At its core, DPI stands for Dots Per Inch. Historically, it was a term rooted in the printing industry, but today it has permeated every corner of digital technology, from the optical sensors in our peripherals to the pixel density of our displays. Understanding DPI is not just a matter of semantics; it is essential for optimizing hardware performance, enhancing creative workflows, and improving the overall user experience in a digital-first world.
Decoding the Mechanics: What DPI Actually Measures
To understand DPI, we must first distinguish between the physical and the digital. While the acronym suggests a physical measurement—how many “dots” fit into a linear inch—its application varies significantly depending on the hardware in question.
The Distinction Between DPI and PPI
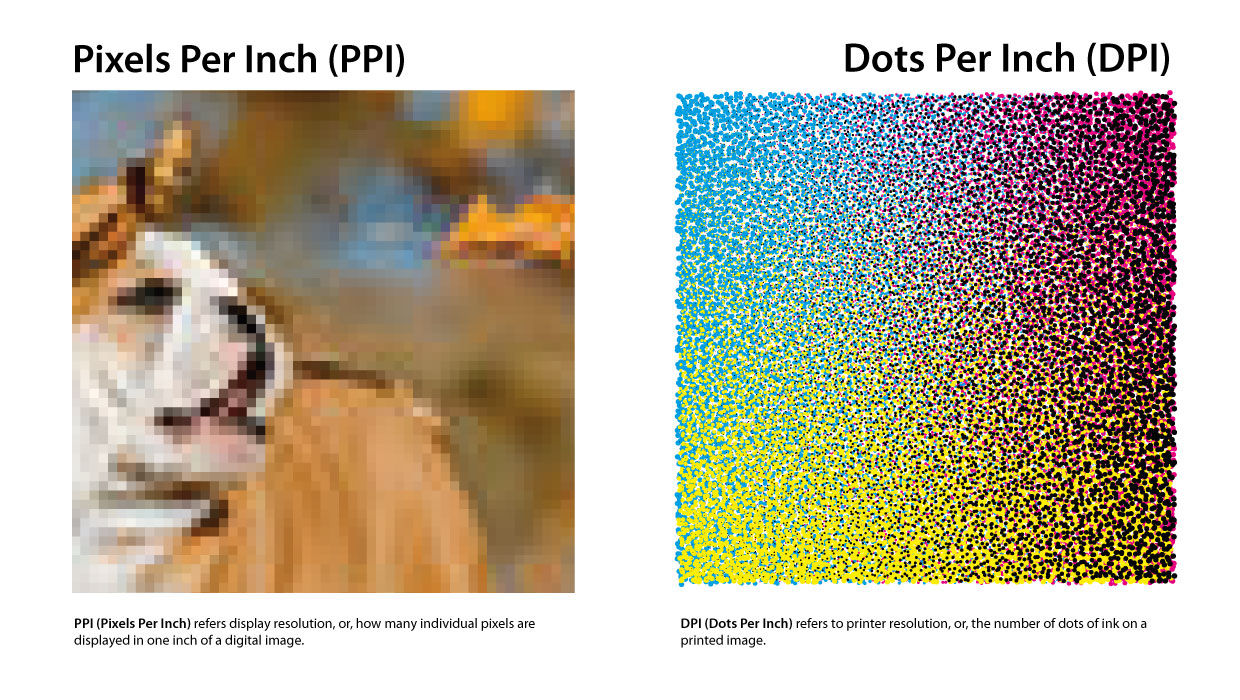
In the realm of display technology, DPI is often used interchangeably with PPI (Pixels Per Inch). While they are related, they are not the same. PPI refers to the number of individual pixels contained within one inch of a digital display. The higher the PPI, the sharper the image appears to the human eye because the individual “building blocks” of the image are smaller and more densely packed.
DPI, strictly speaking, refers to the physical output. When a printer places droplets of ink on a page, the DPI determines the detail of that physical reproduction. In the context of technology peripherals like mice, however, DPI takes on a third meaning: it refers to the sensitivity of an optical or laser sensor.
How Sensors Interpret DPI
When discussing a computer mouse, DPI refers to “counts per inch” (CPI), though most manufacturers stick to the term DPI for marketing purposes. If a mouse is set to 800 DPI, it means that for every inch you move the mouse physically on your desk, the on-screen cursor will move 800 pixels.
Modern tech utilizes sophisticated optical sensors that act like high-speed cameras. These sensors take thousands of “pictures” of your desk surface every second. By comparing these images, the mouse calculates distance and direction. A higher DPI setting increases the sensor’s granularity, allowing it to detect even the slightest micro-movements.
The Role of Interpolation in Tech Specs
It is important to note that not all high DPI numbers are created equal. Some budget tech brands use “software interpolation” to artificially inflate their DPI numbers. This involves the software “guessing” additional dots between real ones, which often leads to jitter and decreased accuracy. High-end tech, conversely, relies on “native DPI,” where the hardware sensor is physically capable of achieving that level of precision without digital manipulation.
DPI in Peripheral Performance: Precision, Gaming, and Productivity
For many tech enthusiasts, the first encounter with adjustable DPI settings happens through mouse software. Whether you are a competitive eSports athlete or a software developer, the way your input device translates physical motion to digital action is governed by DPI.
The High-DPI Myth in Gaming
There is a common misconception in the gaming world that a higher DPI is inherently better. While a mouse capable of 16,000 DPI sounds impressive, most professional gamers actually play at surprisingly low settings—typically between 400 and 800 DPI.
The reason lies in control. At extremely high DPI levels, the slightest tremor in your hand can send your cursor flying across the screen. In high-stakes environments, “low-DPI” gaming allows for large, sweeping arm movements that provide better muscle memory and finer aim. Tech companies continue to push DPI limits primarily to accommodate the rise of 4K and 8K monitors, where a cursor needs to travel across thousands of pixels quickly.
Sensitivity vs. DPI: The Software Layer
A crucial tech distinction to understand is the difference between hardware DPI and software sensitivity. Windows or macOS settings provide a “Sensitivity” slider, which is a multiplier applied to the hardware’s raw DPI data.

For the most accurate tech setup, experts recommend keeping your OS sensitivity at a “neutral” level (usually the 6th notch in Windows) and adjusting the hardware DPI via the manufacturer’s driver. This prevents “pixel skipping,” a technical glitch where the cursor jumps over pixels rather than gliding smoothly, which occurs when software attempts to stretch a low-DPI signal across a high-resolution screen.
Productivity and Multi-Monitor Workflows
For professionals using ultra-wide displays or multi-monitor setups, DPI becomes a tool for efficiency. Navigating across three 1440p monitors at 400 DPI would require significant physical effort and desk space. By utilizing a higher DPI setting (e.g., 1600–2400), a user can traverse their entire digital workspace with minimal wrist strain, demonstrating how DPI serves as a vital ergonomic factor in modern office tech.
From Screen to Paper: DPI in Digital Imaging and Output
While input devices use DPI to measure movement, output devices use it to measure clarity. This is where the “Tech” of DPI meets the “Art” of digital reproduction.
Why Printers Demand High DPI
If you look at a digital image on a standard 1080p monitor, it likely has a PPI of around 90 to 110. However, if you were to print that same image at “100 DPI,” it would look incredibly blurry and pixelated. This is because the human eye perceives ink on paper differently than light on a screen.
The industry standard for “high-quality” print is 300 DPI. At this density, the dots are small enough that the human eye cannot distinguish them, creating the illusion of a continuous, smooth image. Professional-grade photo printers often go much higher, reaching 1200 or 2400 DPI, to ensure perfect color gradients and sharpness. When tech reviewers discuss the “resolution” of a printer, they are essentially discussing its ability to place microscopic dots with extreme precision.
Designing for High-Density “Retina” Displays
With the advent of high-DPI displays (such as Apple’s Retina displays or Dell’s UltraSharp line), software developers and UI designers have had to change how they build tech interfaces. On a high-DPI screen, a standard icon might appear tiny because the pixels are so densely packed.
To solve this, modern operating systems use “DPI Scaling.” Instead of just making things bigger (which would make them blurry), the OS renders vector graphics and high-resolution assets to fill more pixels while maintaining the intended physical size. This ensures that text remains “print-sharp” on our laptops and smartphones, showcasing the synergy between hardware resolution and software intelligence.
The Impact of DPI on File Sizes and Hardware Resources
High-DPI workflows come with a technical cost. Working with 600 DPI images in software like Adobe Photoshop requires significantly more RAM and processing power than working at 72 DPI. As we move toward a future of 8K video and ultra-high-res digital assets, the “DPI” of our files directly dictates the hardware requirements of our workstations.
Optimizing Your Tech Ecosystem: Mastering DPI Settings
Understanding DPI is the first step; the second is knowing how to configure your hardware to work for you. Whether you are troubleshooting a blurry screen or a “twitchy” mouse, DPI settings are usually the culprit.
Adjusting Windows and macOS Scaling
If your monitor’s resolution is very high but the screen is small (like a 13-inch 4K laptop), your system’s DPI scaling is critical.
- In Windows: Go to Settings > System > Display > Scale and Layout. Here, you can adjust the percentage.
- In macOS: Go to System Settings > Displays. macOS handles this through “Scaled” resolutions that optimize for the display’s native DPI.
Setting this correctly ensures that your UI elements are legible without sacrificing the crispness that your high-tech hardware was designed to provide.
Driver Software and Profiles
Most modern tech peripherals—from Logitech, Razer, and Corsair to Wacom—come with dedicated software. These tools allow users to set “DPI stages.” This is a powerful feature for power users; for instance, you can set a button on your mouse to “DPI Shift,” instantly dropping the DPI from 1600 to 400 for precision work (like photo masking or sniping in a game), then returning to high speed for general navigation.

Future Trends: The Evolution of DPI
As we look toward the future of tech, DPI will continue to evolve. We are seeing the rise of 8K displays and sub-micron sensors. In the VR (Virtual Reality) and AR (Augmented Reality) space, DPI is being replaced by PPD (Pixels Per Degree), as the proximity of the screen to the eye changes the math of resolution entirely. However, the fundamental principle remains: DPI is our primary metric for bridge the gap between our physical movements and the digital world’s response.
In conclusion, DPI is far more than a marketing buzzword. It is a fundamental technical specification that governs how we interact with our computers, how our printers reproduce our work, and how sharp our digital world appears. By mastering DPI, you gain greater control over your technology, ensuring your tools are perfectly calibrated for your specific needs, whether those needs involve high-speed gaming, professional design, or seamless everyday productivity.
aViewFromTheCave is a participant in the Amazon Services LLC Associates Program, an affiliate advertising program designed to provide a means for sites to earn advertising fees by advertising and linking to Amazon.com. Amazon, the Amazon logo, AmazonSupply, and the AmazonSupply logo are trademarks of Amazon.com, Inc. or its affiliates. As an Amazon Associate we earn affiliate commissions from qualifying purchases.