
In the fast-paced world of technology, where whiteboards become canvases for groundbreaking ideas, device screens are our windows to innovation, and collaborative workspaces are hubs of creativity, an accidental permanent marker mishap can be a source of immediate frustration. Whether it’s a diagram mistakenly drawn on a monitor, notes scrawled on a plastic keyboard casing, or a forgotten mark on a cherished desk surface, understanding how to safely and effectively remove permanent marker is crucial for maintaining the integrity and aesthetics of your tech ecosystem. This guide delves into the science of ink removal and provides practical, professional solutions tailored for the delicate and diverse surfaces found in a typical tech setup.
Protecting Your Digital Workspace: Common Marker Mishaps
The ubiquitous nature of permanent markers means they are often within arm’s reach alongside our most valuable tech assets. Knowing where these incidents commonly occur helps in both prevention and targeted removal.
Whiteboards & Collaboration Screens
Whiteboards are indispensable tools in tech environments, used for brainstorming, agile sprint planning, and system architecture. A permanent marker used in haste instead of a dry-erase marker is a classic scenario. Increasingly, interactive digital whiteboards and large-format displays are integrating into these spaces, presenting even more sensitive surfaces susceptible to permanent ink. Accidental markings on these can impede readability, reduce professional appearance, and potentially damage the display layers if not handled correctly.
Desk Surfaces & Peripherals
Your desk is the immediate ecosystem surrounding your primary tech. From laminate surfaces and polished wood to plastic mousepads and keyboard trays, these areas often bear the brunt of accidental marks. Keyboards, mice, and other peripherals, typically made of various plastics, are also vulnerable. While not as critical as a screen, permanent marker on these surfaces can look unprofessional and feel unpleasant, impacting the overall user experience and workspace hygiene.
Device Casings & Housings
Laptops, desktop towers, monitors, and even smaller gadgets like external hard drives or charging stations all feature casings, often made of plastic, aluminum, or composite materials. Marking these can significantly diminish the device’s aesthetic value and professional presentation, especially for devices frequently transported or used in client-facing roles. The challenge here is ensuring the cleaning process doesn’t damage the finish, paint, or delicate internal components.
The Science of Stain Removal: Understanding Permanent Inks
To effectively combat permanent marker, it’s insightful to understand what makes it “permanent” and how various solvents interact with its components. Permanent markers typically use a solvent-based ink that contains three main elements: a colorant (pigment or dye), a resin (polymer that binds the colorant to the surface), and a solvent (that evaporates, leaving the resin and colorant behind).
Solvent-Based vs. Alcohol-Based Markers
While both are “permanent,” there’s a slight distinction. Traditional permanent markers rely on a variety of organic solvents like xylene, toluene, or ketones, which are powerful and allow the ink to penetrate and bond strongly with surfaces. Alcohol-based markers, often seen as a less aggressive alternative, use alcohols (like ethanol or propanol) as their primary solvent. Understanding this helps select the appropriate counter-solvent. The goal of removal is to re-solubilize the dried resin and colorant, allowing it to be wiped away.
Surface Permeability and Absorption
The success of removal largely depends on the surface material. Porous surfaces (like unsealed wood or some plastics) absorb the ink more deeply, making complete removal challenging as the pigment can migrate beneath the surface layer. Non-porous surfaces (like glass, metal, glazed ceramic, or smooth plastic) hold the ink on the surface, making removal generally easier. For tech, we deal with a mix: screens are non-porous but delicate, while plastic casings can range from smooth to slightly textured, affecting ink penetration.
Proven Methods for Safe Marker Removal on Tech-Related Surfaces
Approaching permanent marker removal on tech should always prioritize safety and surface integrity. Here are methods, ordered by general safety and effectiveness for various tech-related materials.
Isopropyl Alcohol: The Go-To Solvent
Why it works: Isopropyl alcohol (IPA), commonly available as rubbing alcohol (70% or 90%+ concentration), is a highly effective solvent for the resins and colorants used in permanent markers. It evaporates quickly, leaving minimal residue.
Application for tech:
- Whiteboards & non-porous desk surfaces: Apply a small amount to a clean microfiber cloth. Gently rub the marked area in small circles. The ink should start to lift. Change to a clean section of the cloth frequently to avoid spreading the ink.
- Plastic casings (laptops, peripherals): Apply sparingly to a microfiber cloth, not directly to the device. Test on an inconspicuous area first to ensure it doesn’t dull the finish or remove any printed labels. Wipe gently.
- Glass screens (monitors, smart displays): Use 70% IPA on a very slightly damp microfiber cloth. Wring out any excess thoroughly. Do not spray directly onto the screen. Wipe gently and immediately follow with a dry section of the cloth. Avoid excessive rubbing or pressure. IPA can strip anti-reflective coatings if used too aggressively or frequently. Never use on LCD/LED TV screens or laptop screens unless specifically indicated safe by the manufacturer, as it can damage delicate screen layers.

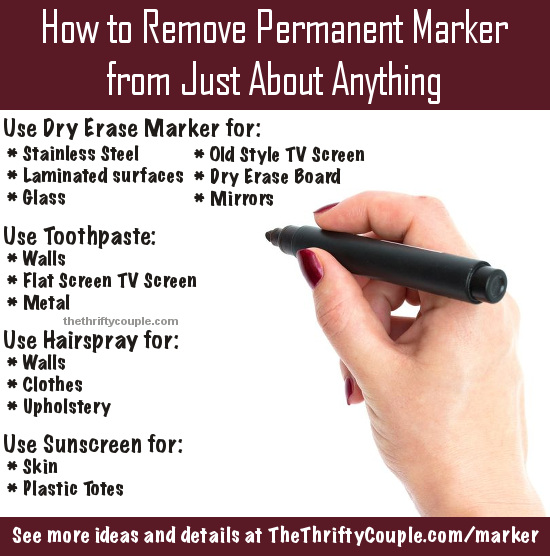
Dry Erase Markers: A Surprising Ally
Why it works: Dry-erase markers contain solvents that are designed to prevent the ink from bonding permanently to non-porous surfaces, and these solvents can sometimes re-solubilize the permanent marker ink.
Application for tech (non-porous surfaces only):
- Whiteboards: Simply trace over the permanent marker lines with a dry-erase marker. Let it sit for a few seconds, then wipe away both inks with a dry-erase eraser or a clean cloth. Repeat if necessary.
- Glass & smooth metal: Similar to whiteboards, this can work on very smooth, non-porous surfaces. Test a small area first. This method is generally safer for delicate surfaces than aggressive solvents.
Melamine Foam Erasers (Magic Erasers): Caution and Application
Why it works: These erasers are essentially very fine abrasive sponges. They work by micro-abrasion, gently sanding away the top layer of the surface along with the ink.
Application for tech:
- Use with extreme caution. Melamine foam can scratch glossy surfaces, dull finishes, and even remove screen coatings.
- Best for: Tougher, non-delicate plastics (e.g., some keyboard undersides, robust desk organizers) where other methods have failed, and where a slight abrasion is acceptable.
- How to use: Dampen very slightly with water, squeeze out all excess. Gently rub the mark with minimal pressure. Never use on screens, painted surfaces, or anything with a delicate finish.
Household Staples: Toothpaste & Baking Soda Pastes (for specific, non-sensitive surfaces)
Why it works: These act as mild abrasives and can sometimes lift ink. Toothpaste often contains mild abrasives (silica) and detergents. Baking soda forms a gentle abrasive paste when mixed with water.
Application for tech (very limited scope):
- Use with extreme caution and only on robust, non-porous surfaces like laminate desk tops or heavy-duty plastic without a delicate finish.
- Avoid on: Screens, painted surfaces, polished metals, or anything easily scratched.
- How to use: Apply a small dab of non-gel toothpaste or a baking soda paste (baking soda + a few drops of water) to a microfiber cloth. Rub gently in small circles. Wipe clean with a damp cloth and then dry.
Specialized Cleaners: Screen Wipes & Electronics Cleaners
Why it works: These products are formulated with mild, screen-safe solvents and anti-static properties. They are designed not to damage delicate coatings or leave streaks.
Application for tech:
- Ideal for: Laptop screens, monitor displays, smartphone and tablet screens, and delicate plastic surfaces where other methods might be too aggressive.
- How to use: Follow product instructions. Typically, you’ll wipe gently with the provided wipe or a microfiber cloth dampened with the spray. These are best for very light or fresh marks, as their solvent strength is intentionally low.
Best Practices for Tech Surface Maintenance and Prevention
Prevention and proper technique are paramount when dealing with sensitive electronics.
Always Test in an Inconspicuous Area
Before applying any cleaning agent or method, always test it on a small, hidden part of the material. This ensures there’s no adverse reaction, such as discoloration, dulling, or damage to coatings.
Use Microfiber Cloths and Gentle Application
Microfiber cloths are non-abrasive and highly effective at trapping dust and lifted ink without scratching. Avoid paper towels, which can be abrasive and leave lint. Apply cleaning solutions to the cloth, not directly to the device, to prevent liquid ingress. Use minimal pressure and gentle, circular motions.
The Importance of Immediate Action
Fresh permanent marker stains are significantly easier to remove than old, dried-on ones. The longer the ink sits, the more it bonds with the surface and potentially permeates it, making removal more challenging.
Protective Measures: Screen Protectors & Desk Mats
Consider using screen protectors for frequently touched or vulnerable displays. Desk mats can also provide a protective layer for your main workspace, catching accidental marks before they reach the underlying desk surface. Clearly label markers (e.g., “DRY ERASE ONLY”) near whiteboards to prevent mix-ups.
When to Call for Professional Help or Consider Replacement
Despite best efforts, some permanent marker incidents on tech may be beyond DIY repair.
Irreversible Damage to Sensitive Components
If a permanent marker has deeply permeated a screen coating, stained a sensitive electronic component, or if aggressive cleaning attempts have resulted in visible damage (scratches, delamination), it might be time to consult a professional repair service. Attempting further DIY solutions could void warranties or cause more harm.

The Value vs. Cost Equation
For severely stained peripherals or components that are relatively inexpensive to replace, weigh the time and potential risk of continued cleaning against the cost of a new item. Sometimes, replacing a heavily marked keyboard or mouse is more practical and cost-effective than investing significant effort into cleaning a deeply embedded stain, especially if its appearance is critical to your professional image.
By understanding the nature of permanent ink and employing these systematic, cautious approaches, you can effectively tackle permanent marker mishaps in your tech environment, preserving your tools and maintaining a pristine workspace.
aViewFromTheCave is a participant in the Amazon Services LLC Associates Program, an affiliate advertising program designed to provide a means for sites to earn advertising fees by advertising and linking to Amazon.com. Amazon, the Amazon logo, AmazonSupply, and the AmazonSupply logo are trademarks of Amazon.com, Inc. or its affiliates. As an Amazon Associate we earn affiliate commissions from qualifying purchases.