
In the intricate world of construction, precision in material selection is paramount. While seemingly minor components, fasteners play a critical role in the structural integrity and aesthetic finish of a project. For 1/2-inch drywall, understanding the optimal screw dimensions is not merely a matter of convenience but a fundamental aspect of engineering sound and durable wall and ceiling systems. This guide delves into the technical specifications, application mechanics, and best practices for selecting and utilizing drywall screws for standard 1/2-inch gypsum board, framed through a lens of performance optimization and system integration.
Understanding Drywall Fastener Technology
The humble drywall screw is a marvel of material science and design, engineered specifically for the unique characteristics of gypsum board and wood or metal framing. Its technical specifications are carefully calibrated to ensure proper embedment, minimize board damage, and provide lasting hold.
The Anatomy of a Drywall Screw
A standard drywall screw is distinguished by several key features:
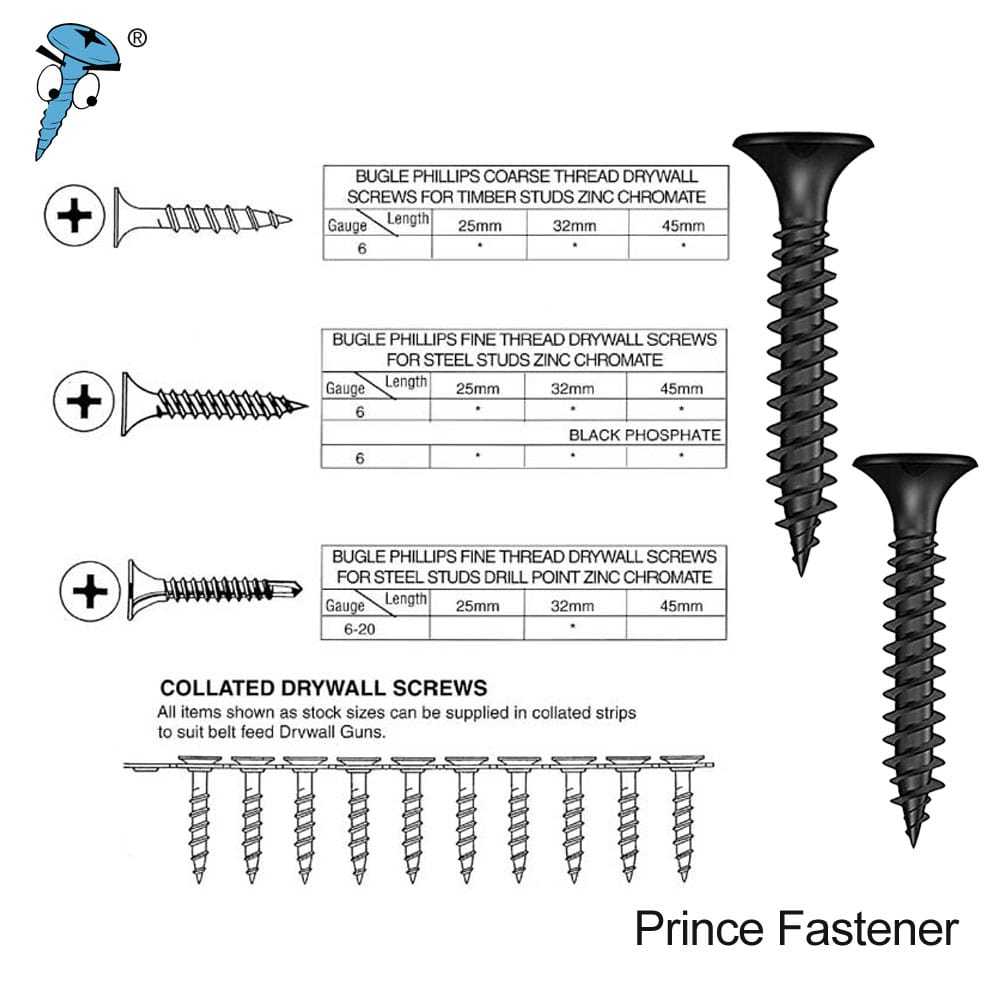
- Head: Typically a bugle head, designed to countersink cleanly into the drywall surface without tearing the paper facing, creating a smooth finish that can be easily spackled. The bugle shape distributes pressure evenly, preventing cratering.
- Drive Type: Phillips head is most common, but square (Robertson) and Torx (star) drives offer superior torque transfer, reducing cam-out, especially with power tools.
- Shank: Tapered just below the head to further facilitate countersinking.
- Threads: Sharp, coarse threads are optimized for gripping into framing materials (wood or light-gauge metal). The specific thread pitch varies slightly between wood and metal framing screws to maximize purchase.
- Point: A sharp, self-tapping point allows for quick penetration without pre-drilling. Some screws feature a drill point for heavier gauge metal studs, designed to drill through the metal before the threads engage.
Material Science and Coatings
The material composition and surface treatment of drywall screws are crucial for their performance and longevity. Most drywall screws are made from hardened steel, providing the necessary strength to resist shear forces and deformation during installation.
- Black Phosphate Coating: The most common finish, providing a degree of corrosion resistance suitable for interior, dry applications. This coating also aids in lubrication during driving, reducing friction and heat.
- Zinc Plating: Offers superior corrosion resistance compared to black phosphate, making these screws suitable for environments with slightly higher humidity.
- Ceramic Coatings: Advanced ceramic coatings provide exceptional corrosion resistance, often exceeding 1000 hours in salt spray tests, making them ideal for high-humidity areas, exterior sheathing, or treated lumber applications. These coatings also often reduce driving torque.
- Galvanized: Hot-dip galvanized screws offer robust corrosion protection, typically reserved for exterior applications or highly corrosive indoor environments.
Choosing the appropriate coating is a critical technical decision, directly impacting the screw’s lifespan and the long-term integrity of the drywall installation, particularly in challenging environmental conditions.
Precision Sizing for Optimal Performance
The primary consideration for 1/2-inch drywall is the length of the screw. A universally accepted principle guides this selection: sufficient penetration into the framing material.
The 1-inch Rule for 1/2-inch Drywall
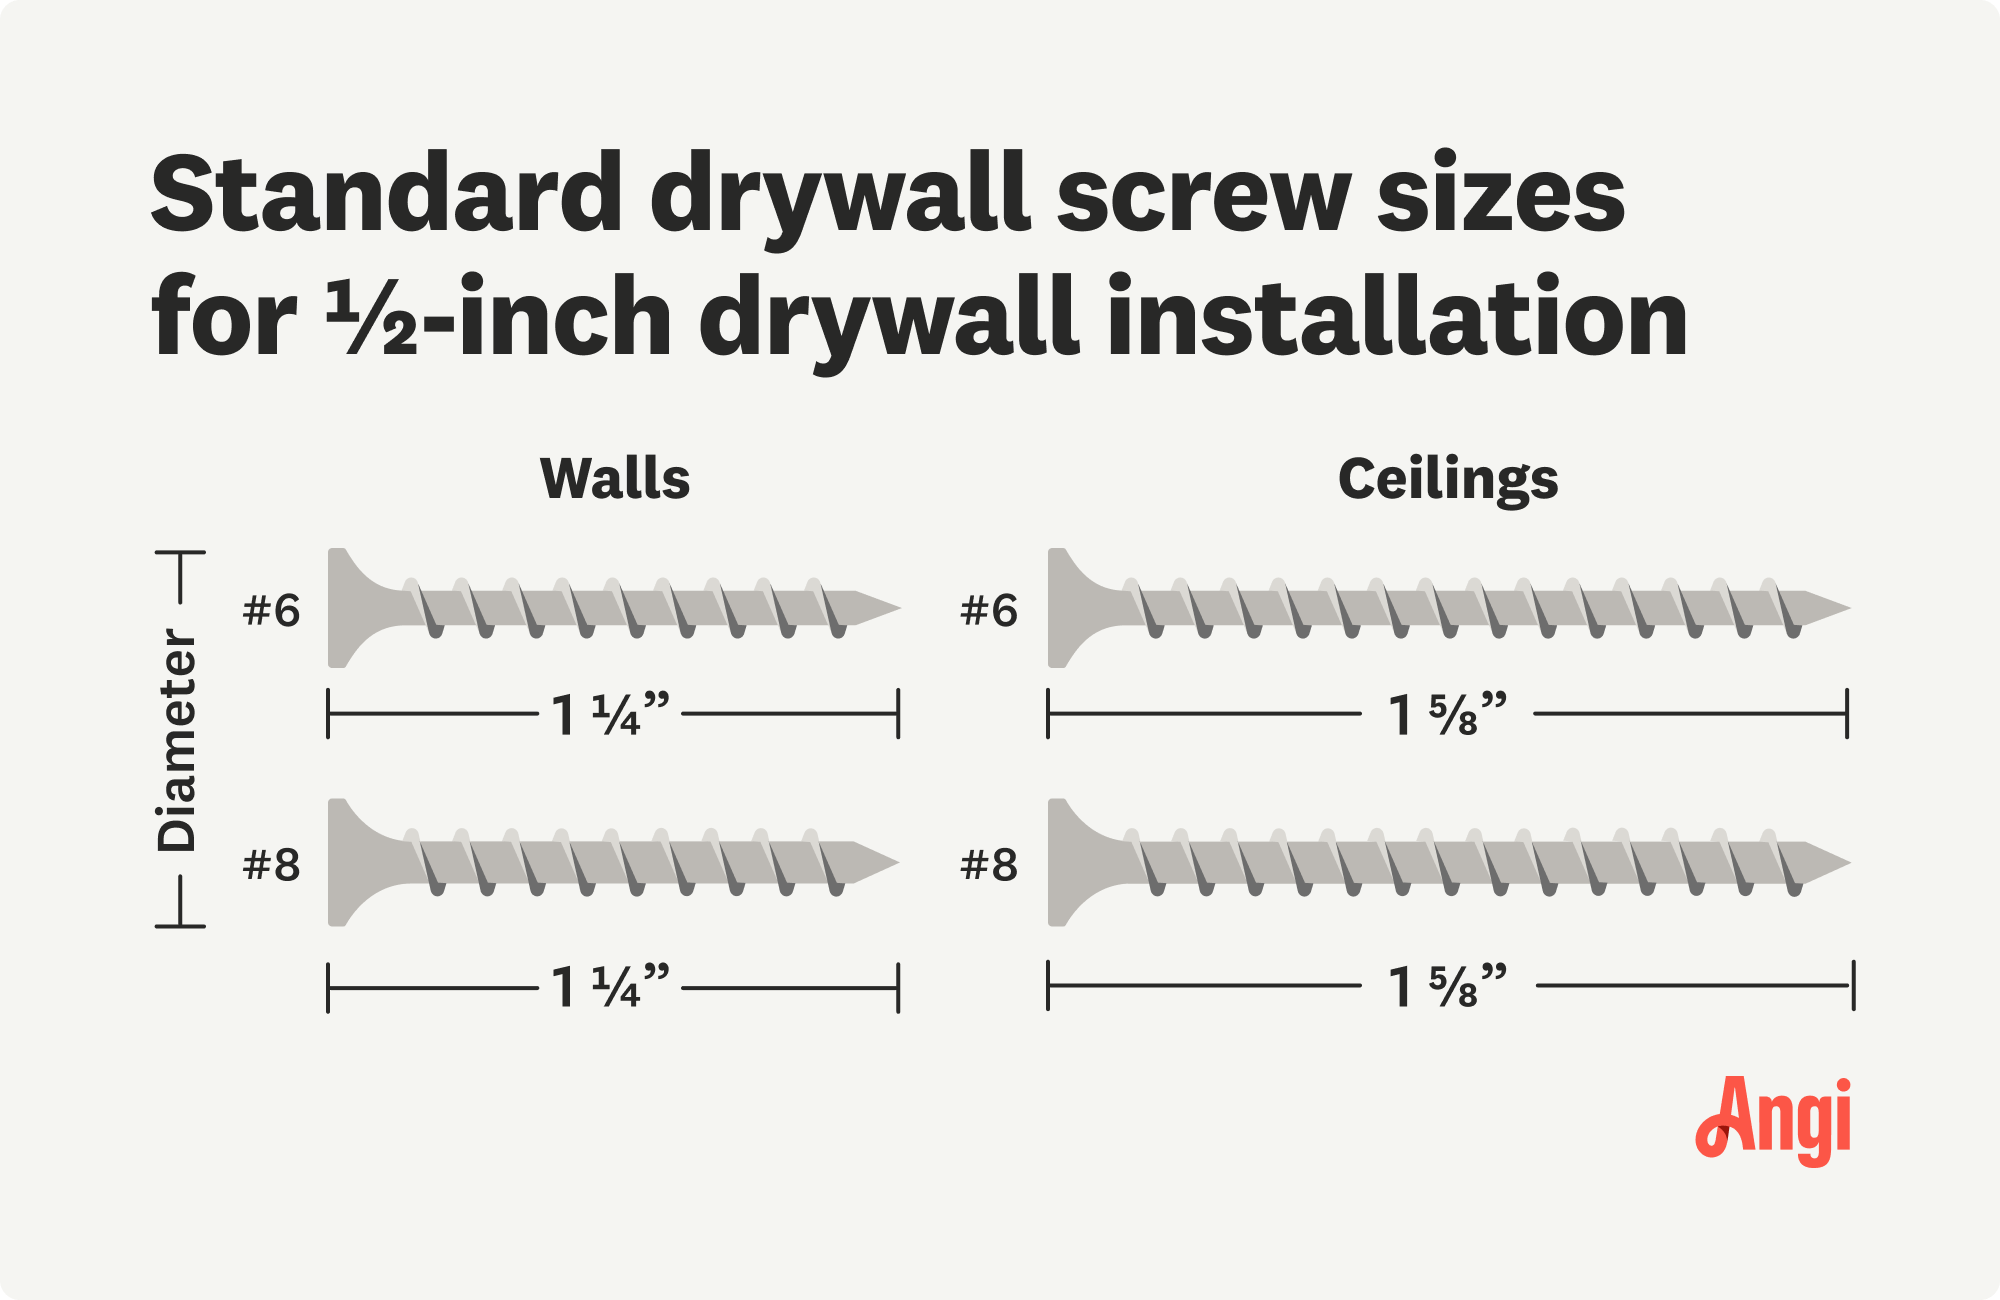
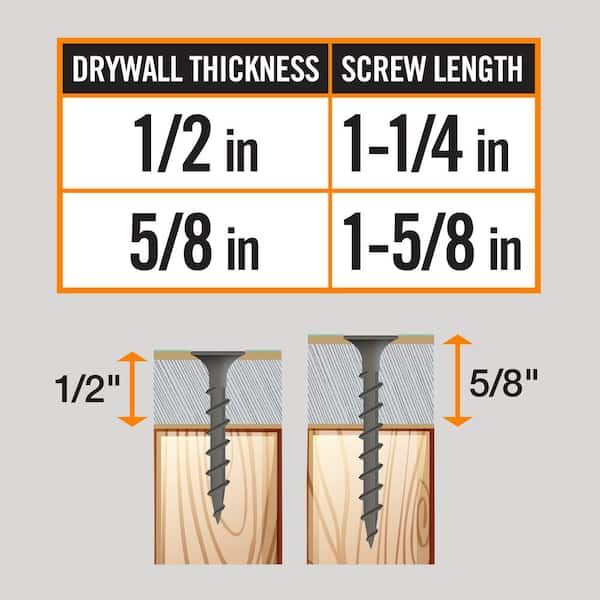
For 1/2-inch drywall, the standard recommendation is a 1-1/4 inch long screw. This length is derived from a core engineering requirement: the screw must penetrate at least 5/8 inch (16mm) into wood framing or 3/8 inch (9.5mm) into metal framing.
-
Calculation for 1-1/4 inch screw (wood framing):
- Drywall thickness: 1/2 inch (12.7mm)
- Screw length: 1-1/4 inch (31.75mm)
- Penetration into framing: 1-1/4 inch – 1/2 inch = 3/4 inch (19.05mm)
- This exceeds the minimum 5/8 inch (16mm) requirement, providing a secure hold.
-
Why not longer? While longer screws provide more embedment, excessively long screws offer diminishing returns in holding power and can become more prone to hitting hidden obstructions (pipes, wires) or protruding through the opposite side of thin framing. They also require more driving torque and can increase installation time.
-
Why not shorter? Shorter screws (e.g., 1-inch) will not achieve the minimum required penetration, leading to inadequate holding power, increased risk of pull-through, and potential fastener pops or drywall failure.
Gauging for Strength and Application
Beyond length, the gauge (diameter) of the screw is another critical specification. Drywall screws typically come in #6, #7, and #8 gauges.
- #6 Gauge: The most common and generally suitable for standard 1/2-inch drywall applications on wood or light-gauge metal studs. It offers a good balance of strength and ease of driving.
- #7 Gauge: A slightly thicker screw, providing increased shear strength and pull-out resistance. Often preferred for ceiling applications where gravity places more stress on fasteners, or in areas requiring enhanced structural integrity.
- #8 Gauge: The thickest of the common drywall screws, used for heavier-duty applications, attaching multiple layers of drywall, or securing specialized panels where maximum holding power is essential.
For typical 1/2-inch drywall walls, #6 gauge 1-1/4 inch screws are the industry standard. For ceilings, some professionals opt for #7 gauge for an added margin of safety.
Installation Mechanics and Tool Integration
The correct application of drywall screws is as important as their selection. Modern power tools and accessory systems significantly enhance the efficiency and precision of installation.
The Role of Drive Type and Bit Compatibility
The interaction between the screw’s drive type and the driver bit is crucial for efficient fastening and preventing cam-out (the driver bit slipping out of the screw head).
- Phillips Head (PH2): While common, it’s prone to cam-out if not properly aligned or if excessive torque is applied. Clutch-equipped screw guns or drills with depth stops are essential to manage this.
- Square Drive (Robertson): Offers excellent torque transfer and reduced cam-out, making it a popular choice among professional installers for speed and reliability.
- Torx Drive (Star): Provides the best torque transfer and virtually eliminates cam-out, especially beneficial in high-volume applications or when working with harder framing materials.
Using the correct bit size (e.g., PH2 for #6-#8 Phillips head screws) and ensuring it is in good condition is fundamental to preventing stripped screw heads and wasted material.
Automated vs. Manual Application Techniques
- Manual Driving (Drill/Driver): For smaller projects or repairs, a standard cordless drill/driver with a clutch setting and depth-stop attachment is sufficient. The clutch prevents over-driving, and the depth stop ensures the screw head is flush or slightly recessed without breaking the paper facing.
- Automated Driving (Collated Screw Guns): For large-scale installations, collated screw guns significantly increase efficiency. These tools automatically feed screws from a strip, allowing for rapid, continuous fastening. They feature adjustable depth settings to ensure consistent countersinking and often have higher RPMs for faster driving. Many models are cordless, enhancing mobility on job sites. The precision and speed offered by these “gadgets” are invaluable in modern construction.
Advanced Fastening Systems and Best Practices
Modern fastening systems go beyond individual screws. High-performance drywall screws may incorporate features like:
- High-Low Threads: For superior grip in light-gauge metal studs.
- Nibs under the head: To aid in reaming out a clean recess for the bugle head.
- Self-drilling points: For thicker metal studs, eliminating the need for a pilot hole.
Best practices for installation include:
- Spacing: Screws should be spaced 12 inches on ceilings and 16 inches on walls in the field, and 8 inches on edges for single-layer 1/2-inch drywall. Double-layer systems require tighter spacing.
- Edge Distance: Maintain at least 3/8 inch from the edge of the drywall to prevent crumbling.
- Perpendicular Driving: Drive screws straight into the framing to maximize holding power and minimize head damage.
- Depth Control: The screw head should be slightly recessed below the paper surface without tearing it. This prevents “fastener pops” caused by proud screw heads pushing through joint compound.
Addressing Common Technical Challenges
Even with the correct screws, installation errors can lead to common drywall issues. Understanding these challenges from a technical perspective helps in prevention.
Preventing Over-Driving and Under-Driving
- Over-driving: Occurs when a screw is driven too deep, tearing the paper face of the drywall and compromising the gypsum core. This drastically reduces the screw’s holding power and creates an unsightly crater that is difficult to finish properly. It’s a direct result of excessive torque or lack of a depth stop.
- Under-driving: Occurs when a screw is not driven deep enough, leaving the head proud of the surface. This creates bumps in the finished wall or ceiling, leading to “fastener pops” as movement or compound shrinkage exposes the screw head.
Precision depth control, often achieved with specialized drywall screw guns or drill attachments, is the technical solution to both issues.
Mitigating Fastener Pops and Structural Integrity
Fastener pops are a pervasive problem often misattributed solely to screws. They are typically a symptom of underlying issues:
- Framing Movement: Seasonal expansion and contraction of wood framing, or deflection in metal studs, can cause screws to move relative to the drywall.
- Improper Screw Embedment: As discussed, insufficient penetration or over-driving weakens the hold.
- Improper Joint Compound Application: Applying too thin a coat over screws can lead to early exposure.
From a technical standpoint, addressing fastener pops involves:
- Proper Curing and Acclimation: Ensuring wood framing is adequately cured and acclimated to ambient conditions before drywall installation.
- Secure Fastening Schedules: Adhering strictly to recommended screw spacing and edge distances.
- Using High-Quality Screws: Ensuring consistent manufacturing quality and appropriate coatings to prevent corrosion that could weaken the bond over time.
- Flexible Joint Compounds: In some cases, using flexible joint compounds can help accommodate minor structural movement.
Longevity and System Integration
The longevity of a drywall system is not just about the board itself but how all components, especially the fasteners, interact and withstand environmental factors over time.
Environmental Factors and Material Durability
- Humidity: High humidity environments can lead to corrosion of inadequately coated screws, causing discoloration (rust stains) and eventually compromising their integrity. This underlines the importance of selecting screws with appropriate corrosion resistance (zinc-plated, ceramic-coated, or galvanized) for specific areas like bathrooms, basements, or exterior soffits.
- Temperature Fluctuations: Extreme temperature swings can cause materials to expand and contract at different rates, leading to stress on fasteners. While minor, this cumulative stress can contribute to fastener pops or loosening over decades.
- Building Movement: All buildings experience some degree of movement. The flexibility and tensile strength of the screw, combined with proper installation, help the system absorb these forces without failure.
Future Trends in Drywall Fastening Technology
While traditional screws remain dominant, advancements in material science and construction technology continue to evolve fastening solutions.
- Advanced Coatings: Development of even more durable, environmentally friendly, and low-friction coatings to enhance corrosion resistance and driving efficiency.
- Automated Installation Robots: Though still nascent, robotics are beginning to make inroads in construction, potentially leading to fully automated drywall installation systems that use precise sensor data to ensure perfect screw placement and depth.
- Smart Fasteners: The concept of “smart” building materials could extend to fasteners that incorporate sensors to monitor structural load, moisture intrusion, or even temperature, feeding data into building management systems. While speculative for drywall screws, the broader trend in construction technology points towards increased data integration.
For 1/2-inch drywall, the 1-1/4 inch #6 or #7 gauge screw is the meticulously engineered choice that balances material characteristics, installation efficiency, and long-term performance. Adherence to these technical specifications and best practices ensures a resilient, high-quality finish that stands the test of time, reflecting a deeper understanding of construction science and material integration.
aViewFromTheCave is a participant in the Amazon Services LLC Associates Program, an affiliate advertising program designed to provide a means for sites to earn advertising fees by advertising and linking to Amazon.com. Amazon, the Amazon logo, AmazonSupply, and the AmazonSupply logo are trademarks of Amazon.com, Inc. or its affiliates. As an Amazon Associate we earn affiliate commissions from qualifying purchases.