
Creating strong, reliable threaded holes is a fundamental skill in countless technical disciplines, from intricate electronics enclosures to robust machinery fabrication. The 6-32 tap is a common size, frequently encountered by hobbyists, engineers, and machinists alike. However, the success of a tapped hole hinges critically on one primary factor: selecting the correct drill bit size for the pilot hole. An improperly sized pilot hole can lead to stripped threads, broken taps, or weak fastener connections, undermining the integrity of your entire project.
Understanding the 6-32 Tap and Threading Basics
Before delving into specific drill bit recommendations, it’s crucial to grasp what the “6-32” designation signifies and why the tapping process is so vital. This understanding forms the bedrock for achieving precision in your work.
What “6-32” Means
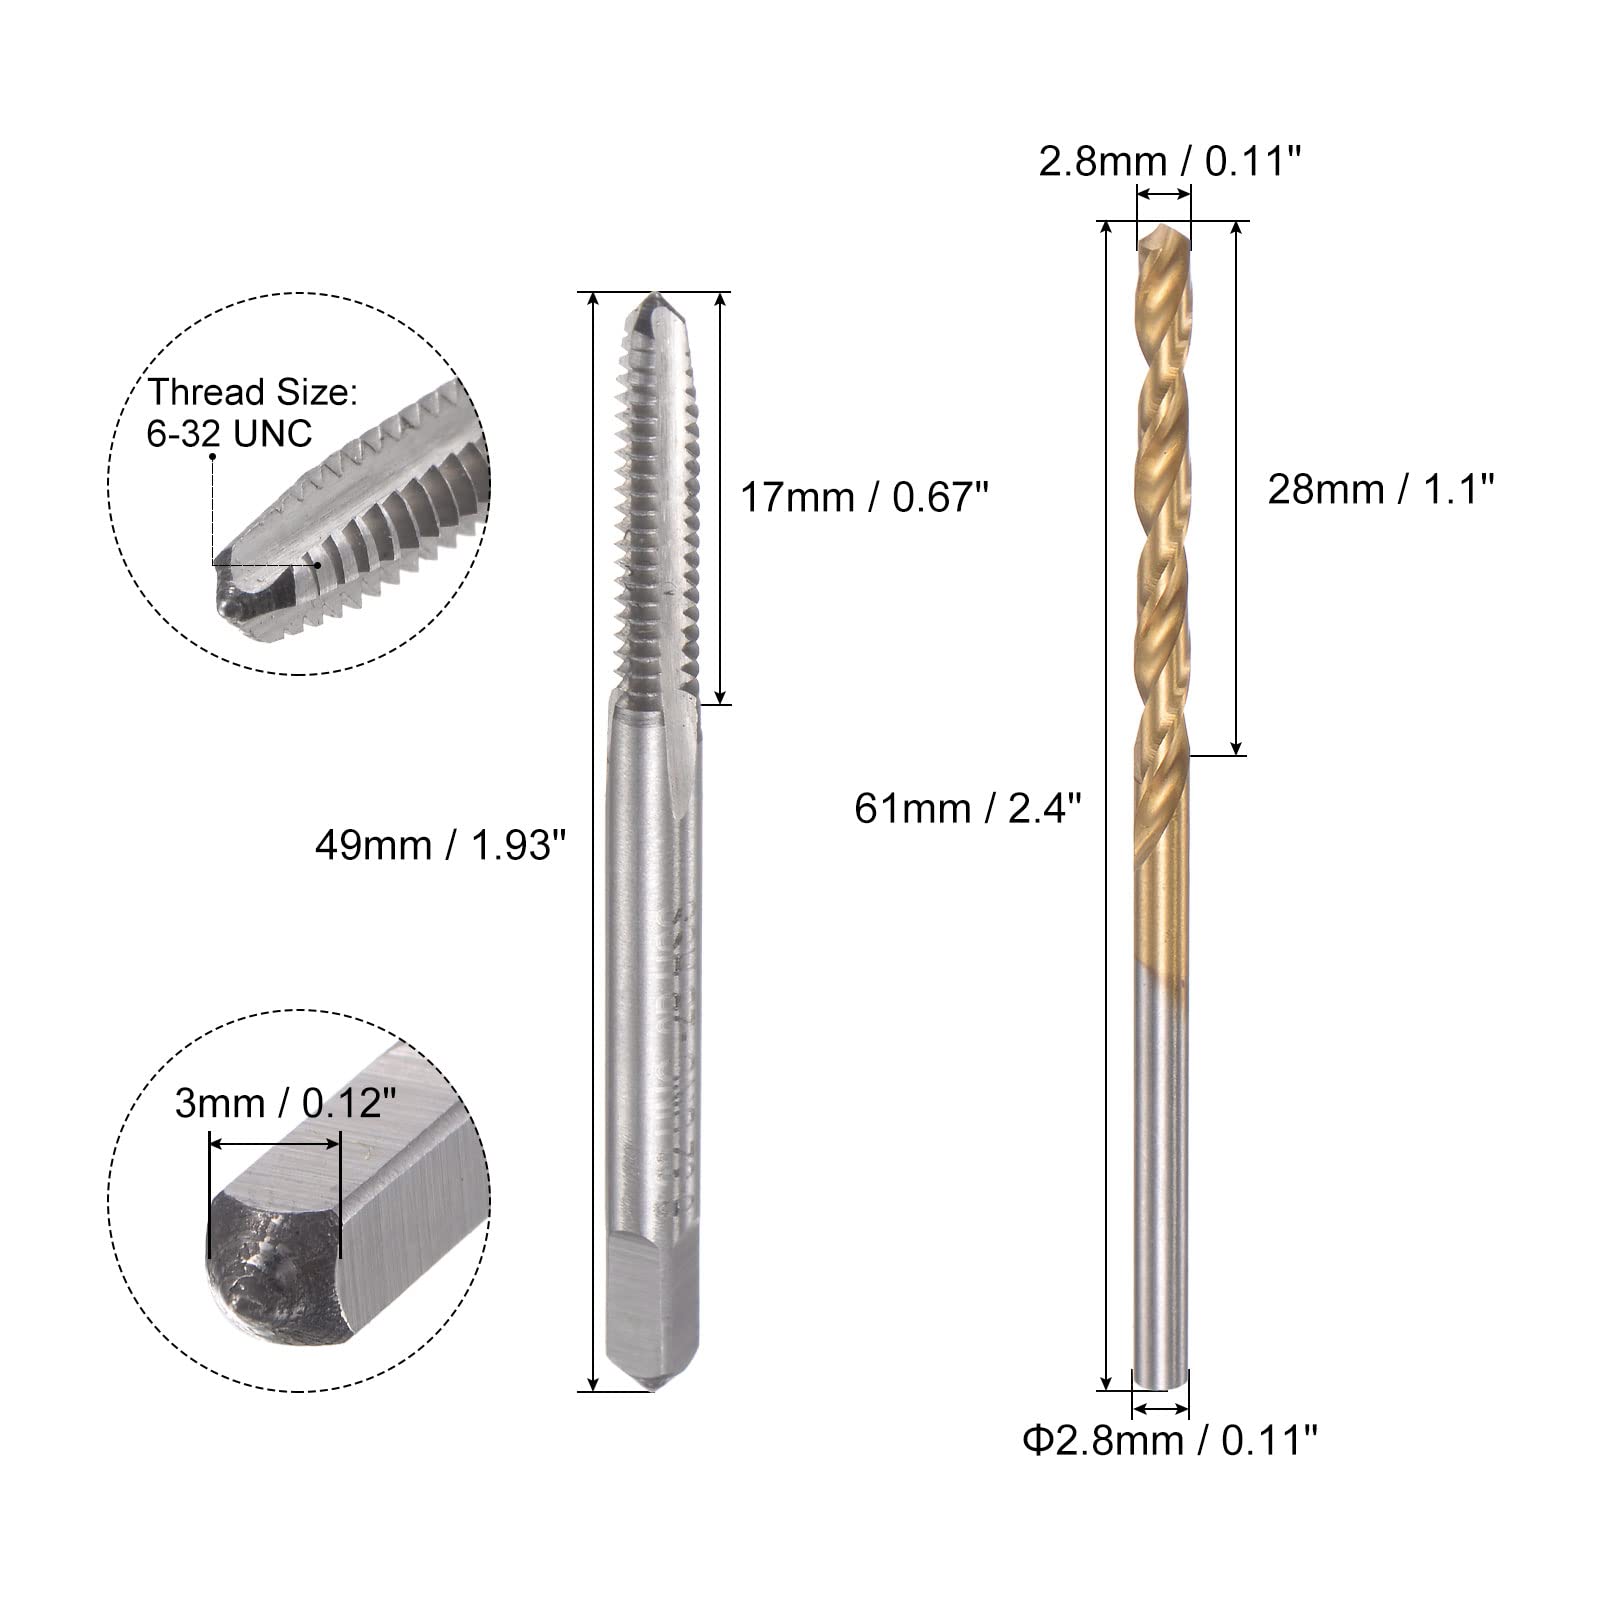
The “6-32” designation is a standard United States National Coarse (UNC) thread specification.
- “6”: This refers to the nominal diameter of the screw, which in the UNC standard is not a direct measurement in inches but rather a gauge number. For a #6 screw, the major diameter is approximately 0.138 inches (3.505 mm).
- “32”: This indicates the number of threads per inch (TPI). In this case, there are 32 threads for every inch of the screw’s length.
This combination dictates the precise dimensions of the thread profile that the tap is designed to cut. The tap itself is a cutting tool with a specific thread pattern, designed to cut internal threads into a pre-drilled hole.
Why Tapping is Essential in Manufacturing and DIY
Tapping is the process of cutting internal threads into a hole, creating a mating surface for a screw or bolt. This process is indispensable for several reasons:
- Secure Fastening: Tapped holes allow for the use of threaded fasteners, which provide strong, repeatable, and often removable connections between components.
- Adjustability: Threaded connections enable precise adjustments and tensioning.
- Assembly and Disassembly: Unlike permanent fastening methods like welding or riveting, threaded connections allow for easy assembly, maintenance, and disassembly.
- Material Versatility: Tapping can be performed on a wide range of materials, including various metals, plastics, and composites, making it suitable for diverse applications.
The Principle of Thread Creation
When a tap is driven into a pilot hole, its cutting edges progressively remove material, forming the helical grooves that constitute the internal thread. The pilot hole’s diameter is crucial because it must be large enough to allow the tap to enter and cut, but small enough to leave sufficient material for the tap to form the full thread profile. If the hole is too large, the threads will be shallow and weak; if too small, the tap will bind, requiring excessive force, and likely break.
The Critical Role of the Tap Drill Size
The selection of the tap drill size is arguably the most critical step in the tapping process. It directly influences the percentage of thread engagement, which in turn dictates the strength and integrity of the tapped hole.
Perfect Fit vs. Too Loose vs. Too Tight
- Perfect Fit (Optimal Thread Engagement): The ideal tap drill size leaves enough material for approximately 75% thread engagement. This percentage offers a balance between maximum strength and ease of tapping, minimizing the risk of tap breakage. While 100% thread engagement sounds ideal, it’s practically impossible to achieve without significant tap stress and increased risk of breaking. Furthermore, studies show that increasing thread engagement beyond 75% offers diminishing returns in terms of strength, while significantly increasing the torque required for tapping.
- Too Loose (Oversized Hole): If the pilot hole is too large, the tap will cut shallow threads. This reduces the surface area of contact between the fastener and the tapped hole, leading to weak connections that are prone to stripping under load. The screw might feel loose even when fully tightened.
- Too Tight (Undersized Hole): An undersized pilot hole leaves too much material for the tap to cut. This dramatically increases the cutting force required, puts immense stress on the tap, and significantly increases the likelihood of the tap breaking inside the workpiece. Removing a broken tap can be an extremely difficult and time-consuming process, often ruining the part.
Calculating the Tap Drill Size (Briefly)
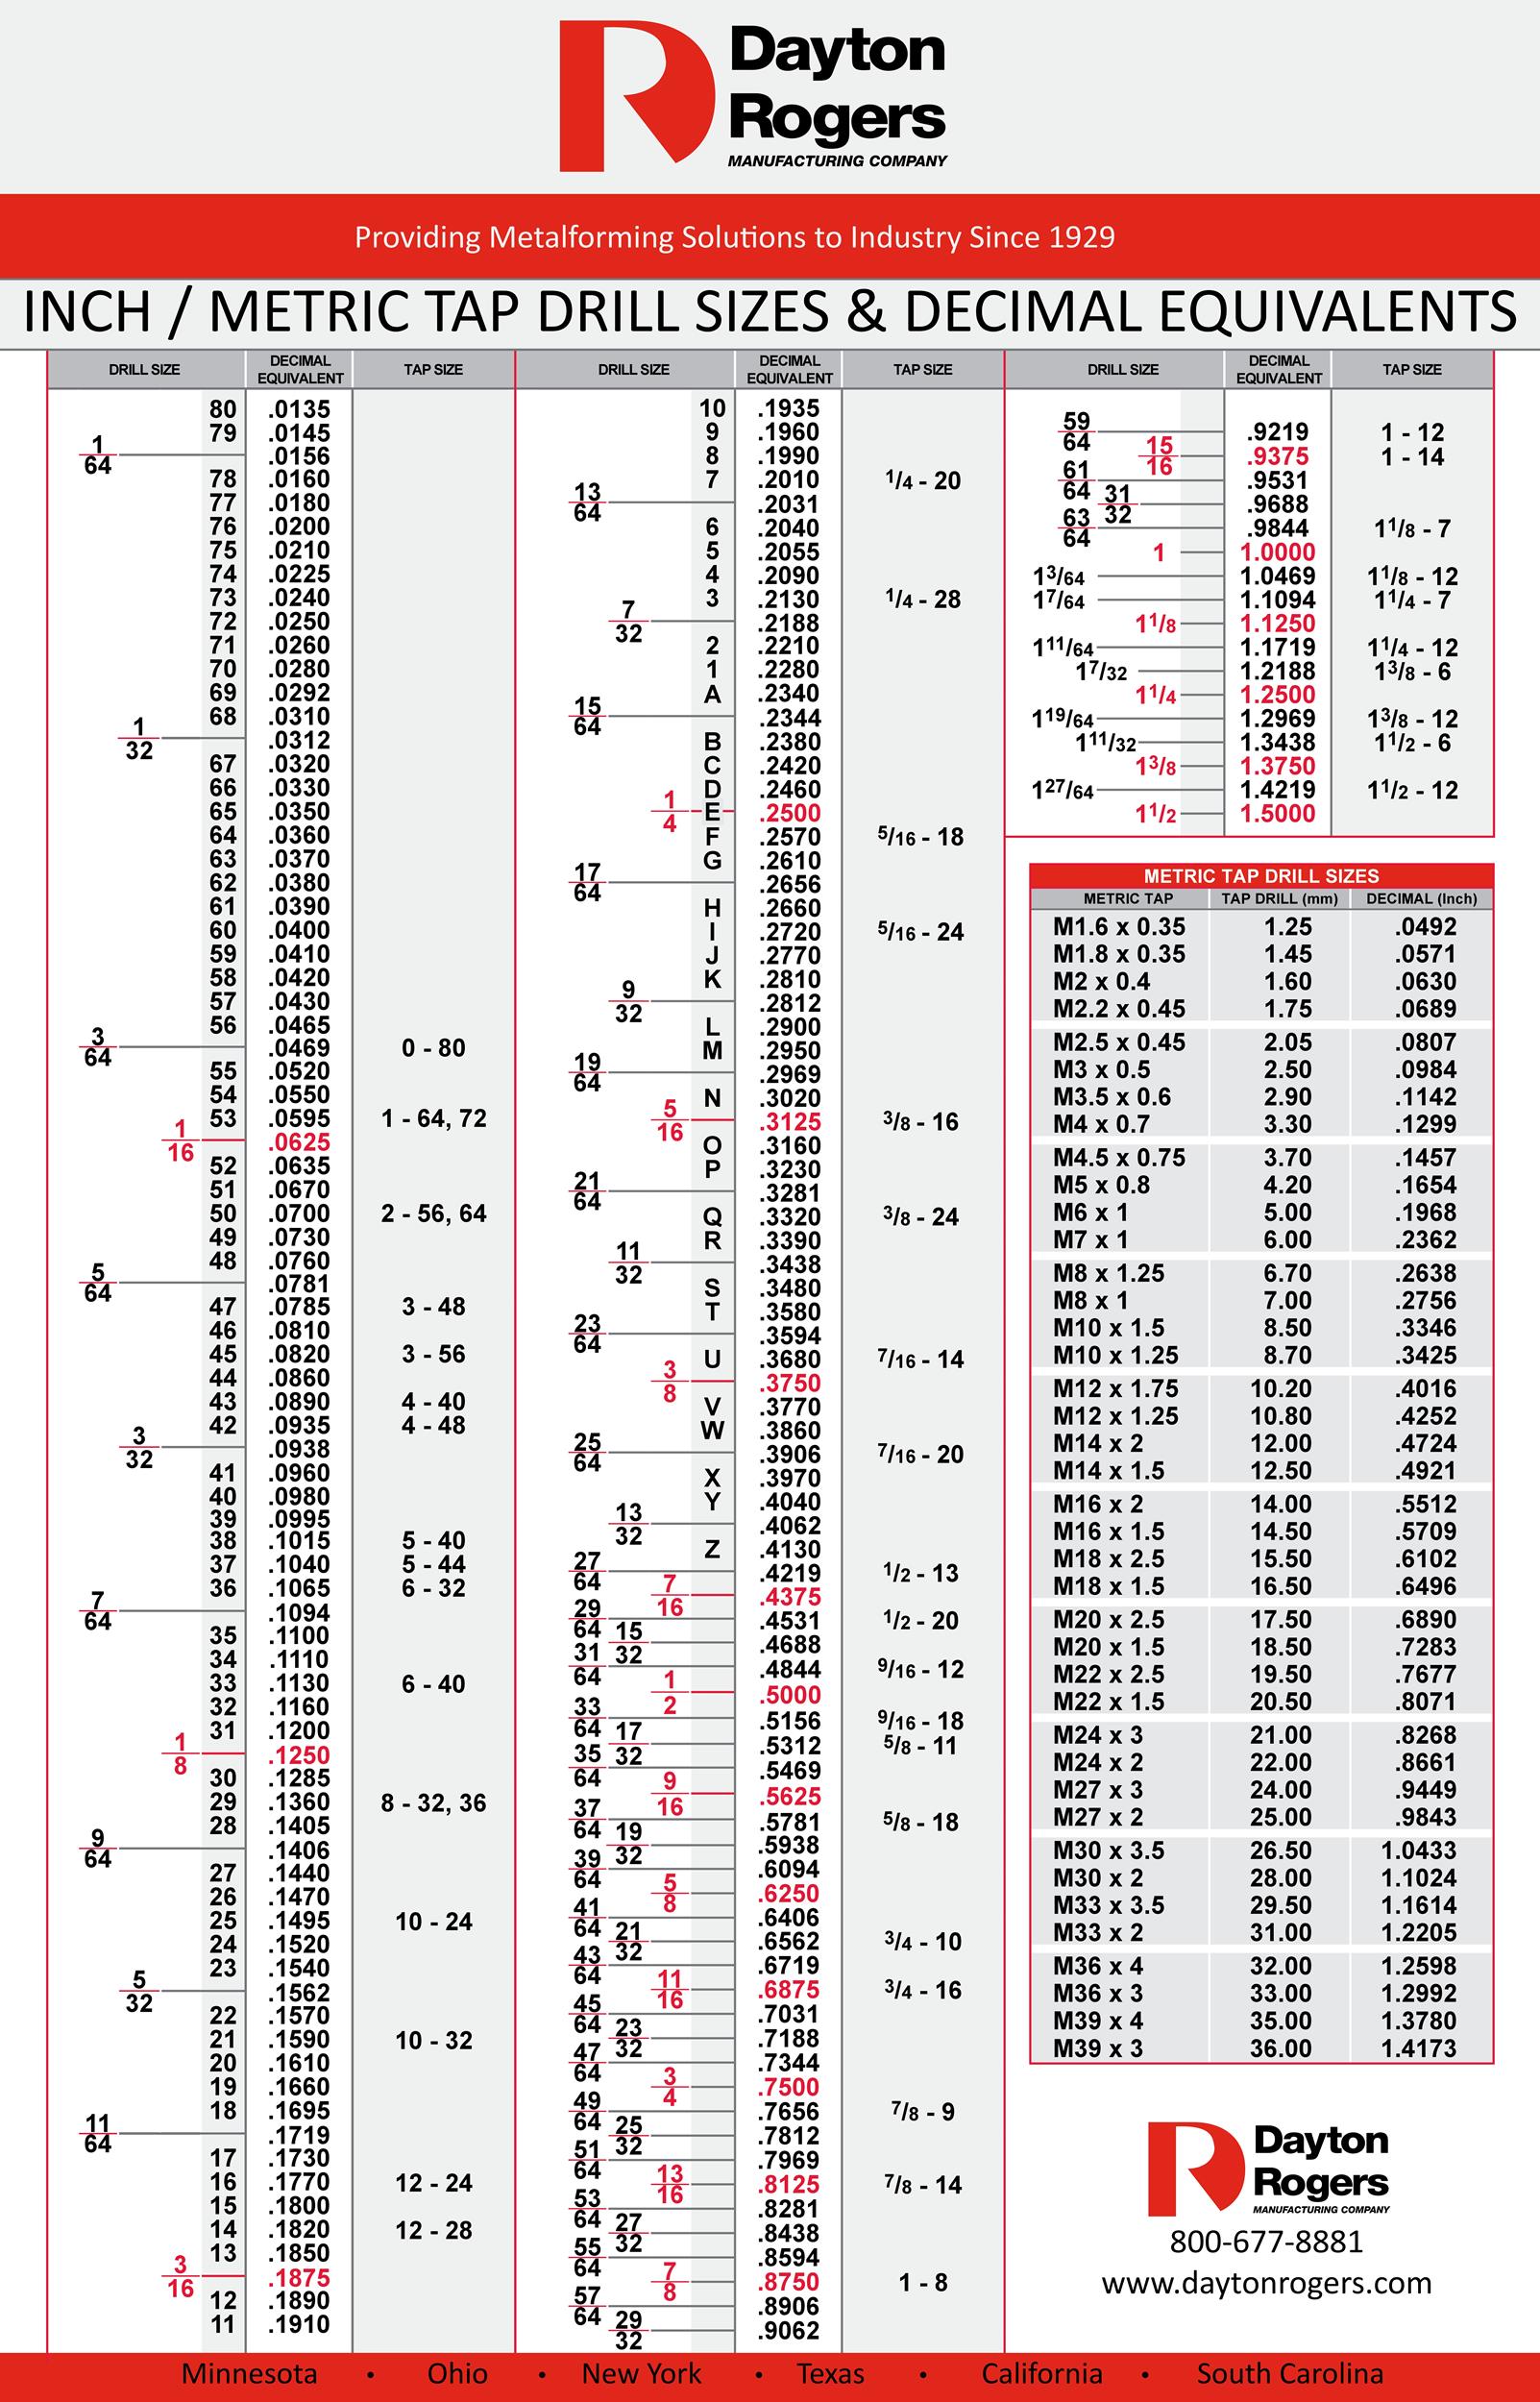
While there are formulas to calculate tap drill sizes (often involving the major diameter and the pitch of the thread), most users rely on standardized charts. These charts are readily available and provide the empirically determined optimal drill bit size for various taps, including adjustments for different materials or desired thread percentages. For standard applications, these charts are highly reliable and simplify the process considerably.
The Standard Recommendation for 6-32
For a 6-32 UNC tap, the universally recommended and standard tap drill size for approximately 75% thread engagement is a #36 drill bit.
- #36 Drill Bit: This drill bit has a diameter of 0.1065 inches (2.705 mm).
Using a #36 drill bit will provide a robust and durable thread in most common materials like steel, aluminum, and brass, without unduly stressing the tap.
Beyond the Basic Recommendation: Factors Influencing Drill Bit Choice
While the #36 drill bit is the go-to choice for a 6-32 tap, several factors can influence your decision or require slight adjustments for optimal results in specific scenarios. Understanding these nuances can significantly improve your tapping success rate.
Material Type and Hardness
The material you are tapping into plays a critical role:
- Softer Materials (e.g., Aluminum, Brass, Plastics): In very soft materials, you might be able to use a slightly larger drill bit (e.g., #35 or even #34) to reduce tapping torque without significantly compromising thread strength. This is because softer materials are more prone to deformation and can still form adequate threads even with slightly less material. Conversely, in some very soft plastics, a slightly smaller drill might be chosen to compensate for material “pushing” rather than clean cutting.
- Harder Materials (e.g., Stainless Steel, Tool Steel): For harder materials, it’s often advisable to stick precisely to the #36 or even consider a slightly larger drill bit (e.g., #35, 0.1100 inches) to reduce the tapping torque and prevent tap breakage. The material’s resistance to cutting means a smaller hole would significantly increase stress on the tap. When working with very hard or abrasive materials, prioritize tap preservation.
Thread Engagement Percentage
While 75% is the standard, sometimes you might aim for a different percentage:
- Higher Engagement (e.g., 80-85%): This would require a slightly smaller drill bit than #36. This is rarely recommended for general tapping due to the increased risk of tap breakage, especially in harder materials. It offers minimal strength gain.
- Lower Engagement (e.g., 50-60%): This would require a slightly larger drill bit. This might be considered in very soft materials to make tapping easier, or if the tapped hole is merely for alignment purposes and not critical for structural strength. However, it compromises thread integrity.
Always consult a reliable tap and drill chart for precise drill sizes corresponding to different thread engagement percentages if a non-standard engagement is desired.
Through Hole vs. Blind Hole
- Through Hole: The drill bit passes completely through the workpiece. This is generally easier as chips can escape freely, and there’s no risk of the tap bottoming out prematurely.
- Blind Hole: The drill bit creates a hole that does not go all the way through the workpiece. Tapping blind holes requires more care. Ensure the drill bit creates a hole deep enough for the tap to cut the required threads, plus some clearance for chips at the bottom. Taps designed for blind holes often have a “bottoming” or “plug” profile. Chip evacuation is critical in blind holes; frequently back out the tap to clear chips.
Lubrication and Chip Clearance
Regardless of the drill bit size, proper lubrication is essential during both drilling and tapping, especially in metals.
- Drilling: Use a suitable cutting fluid for the material to reduce friction, dissipate heat, and improve chip evacuation.
- Tapping: Tapping fluid is even more critical. It lubricates the cutting edges of the tap, allowing it to cut more smoothly and reducing the risk of galling and breakage. It also aids in flushing chips from the flutes. For hard materials, high-quality tapping fluid is non-negotiable. For plastics, sometimes no lubricant or water/alcohol is preferred.
Drill Bit Material and Sharpness
The quality and sharpness of your drill bit directly impact the pilot hole’s accuracy and finish.
- High-Speed Steel (HSS): Standard for most general-purpose drilling.
- Cobalt (HSS-Co): Better for harder materials and higher temperatures.
- Carbide: Offers superior hardness and heat resistance for very hard or abrasive materials, but is more brittle.
Ensure your drill bit is sharp. A dull drill bit will wander, create an oversized or egg-shaped hole, generate excessive heat, and make the subsequent tapping process much harder and riskier.
The Tapping Process: A Step-by-Step Guide
Once you’ve selected the correct #36 drill bit, the actual tapping process requires precision and careful execution to ensure a clean, strong thread.
Marking and Center Punching
- Mark the Hole Location: Use a ruler, calipers, or a template to precisely mark where the hole needs to be drilled.
- Center Punch: Use an automatic or manual center punch to create a small indentation at the marked location. This divot prevents the drill bit from “walking” or drifting when you start drilling, ensuring the hole is precisely where intended.
Drilling the Pilot Hole (with the correct size)
- Secure the Workpiece: Clamp your material firmly to a workbench or drill press table. Movement during drilling is dangerous and leads to inaccurate holes.
- Select the #36 Drill Bit: Insert the #36 drill bit into your drill chuck.
- Set Drill Speed: For most metals, a moderate to slow drill speed is preferred for the #36 bit. Faster speeds generate more heat and can dull the bit quickly.
- Drill Straight: Ensure the drill is perfectly perpendicular to the workpiece. A drill press is highly recommended for achieving straight holes. If using a hand drill, use a drilling guide or be extra careful to maintain perpendicularity.
- Use Lubrication: Apply cutting fluid as you drill, especially for metals, to reduce friction and clear chips.
- Clear Chips: For deeper holes, periodically withdraw the drill bit to clear chips from the flutes.
Chamfering (Countersinking)
After drilling, use a countersink bit or a larger drill bit (held gently by hand) to create a slight chamfer or bevel around the top edge of the drilled hole. This serves several purposes:
- Guides the Tap: Helps the tap start straight and reduces the chance of misthreading.
- Removes Burrs: Eliminates sharp edges that can scratch the fastener or user.
- Prevents Stress Concentration: Provides a smoother entry for the screw.
Preparing the Tap
- Select the 6-32 Tap: Ensure you have the correct tap for the job.
- Choose a Tap Handle: Select a tap wrench that fits the tap squarely and securely. For machine tapping, ensure the tap is properly chucked.
- Apply Tapping Fluid: Generously apply tapping fluid to the tap and into the pilot hole.
Actual Tapping Technique (Half-Turn Forward, Quarter-Turn Back)
This is a critical technique for preventing tap breakage and creating clean threads:
- Start Straight: Insert the tap into the chamfered hole, ensuring it is perfectly perpendicular to the workpiece. This is paramount for straight threads. A tap guide or a drill press (with the machine off, using the chuck to guide the tap) can help.
- Initial Engagement: Apply light downward pressure and slowly turn the tap wrench clockwise (for right-hand threads). Feel the tap begin to cut.
- The “Half-Turn Forward, Quarter-Turn Back” Rule: Once the tap is engaged, turn it forward (clockwise) approximately half to three-quarters of a turn. Then, turn it backward (counter-clockwise) about a quarter to half a turn.
- Forward Turn: Cuts new material and advances the tap.
- Backward Turn: Breaks the chips that have formed, preventing them from binding in the flutes and reducing friction. This also helps to clear the chips.
- Repeat: Continue this forward-and-back motion, reapplying tapping fluid as needed, until the desired thread depth is reached.
- Remove the Tap: Once complete, carefully turn the tap counter-clockwise to back it out of the newly cut threads. Do not force it.
Post-Tapping Inspection
After removing the tap, inspect the threads visually. They should be clean, uniform, and free of burrs or deformities. Test the threads with a corresponding 6-32 screw to ensure smooth engagement.
Common Pitfalls and Troubleshooting
Even with the correct drill bit and technique, issues can arise. Knowing how to identify and address them is key to successful tapping.
Tap Breakage
- Cause: Most often due to an undersized pilot hole, insufficient lubrication, dull tap, improper alignment, or excessive force without chip clearance. Hard materials exacerbate these issues.
- Prevention: Use the correct #36 drill bit, plenty of tapping fluid, a sharp tap, and maintain strict perpendicularity. Follow the half-turn forward, quarter-turn back technique diligently.
- Troubleshooting: Removing a broken tap is challenging. Specialized tap extractors, EDM (Electrical Discharge Machining), or careful drilling with carbide bits may be required. Prevention is always better.
Stripped Threads
- Cause: Primarily an oversized pilot hole, but also possible from overtightening the fastener, using a dull tap that doesn’t cut a full thread, or tapping in very soft materials without proper technique.
- Prevention: Always use the #36 drill bit. Avoid excessive torque when tightening fasteners. Ensure your tap is sharp.
- Troubleshooting: For minor stripping, a helicoil or other thread repair insert can be used to restore the thread. For severe stripping, the hole may need to be drilled out, retapped to a larger size, or patched and redrilled.
Incorrect Hole Size
- Cause: Using the wrong drill bit size (too large or too small), a dull drill bit that cuts an oversized hole, or incorrect drill press settings leading to deflection.
- Prevention: Double-check the drill bit size against the tap drill chart. Ensure drill bits are sharp. Use a drill press for accuracy.
- Troubleshooting: If the hole is too small, it can be re-drilled with the correct size (but be careful not to introduce wobble). If it’s too large, it may lead to stripped threads, requiring repair or scrapping the part.
Dull Tools
- Cause: Prolonged use without sharpening, drilling/tapping hard materials without proper lubrication or speed, or using poor quality tools.
- Prevention: Use high-quality drill bits and taps. Sharpen or replace tools as needed. Use appropriate cutting speeds and lubrication.
- Troubleshooting: Dull tools will lead to poor results, increased effort, and higher risk of breakage. Always use sharp tools for precision work.
By adhering to these guidelines, especially the fundamental choice of a #36 drill bit for your 6-32 tap, you equip yourself with the knowledge and technique to produce strong, accurate, and reliable threaded holes in your technical projects.
aViewFromTheCave is a participant in the Amazon Services LLC Associates Program, an affiliate advertising program designed to provide a means for sites to earn advertising fees by advertising and linking to Amazon.com. Amazon, the Amazon logo, AmazonSupply, and the AmazonSupply logo are trademarks of Amazon.com, Inc. or its affiliates. As an Amazon Associate we earn affiliate commissions from qualifying purchases.