
Microscopes are quintessential tools, bridging the gap between the visible and the invisible, allowing us to delve into the intricate complexities of the micro-world. From the early crude lenses to today’s advanced digital imaging systems, the fundamental purpose of magnifying minute specimens remains. Understanding the various components of a microscope is crucial not only for its proper operation but also for appreciating the engineering marvel behind its capacity to reveal hidden details. Each part plays a specific, integral role in the overall functionality, working in concert to deliver clear, magnified images.
The Optical System: Illuminating the Unseen
At the heart of any microscope lies its optical system, a sophisticated arrangement of lenses and light sources designed to gather light, magnify the specimen, and project a clear image to the observer. This system dictates the quality and characteristics of the resulting image.

Eyepieces (Oculars): Your Window to Magnification
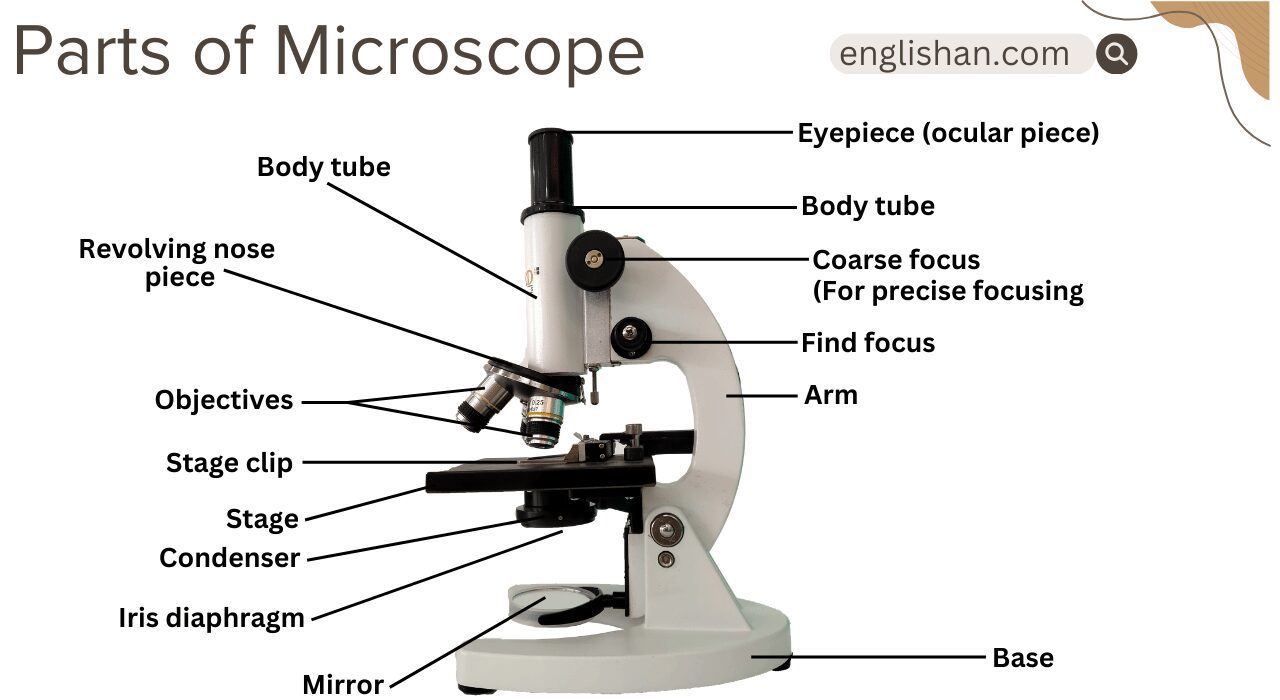
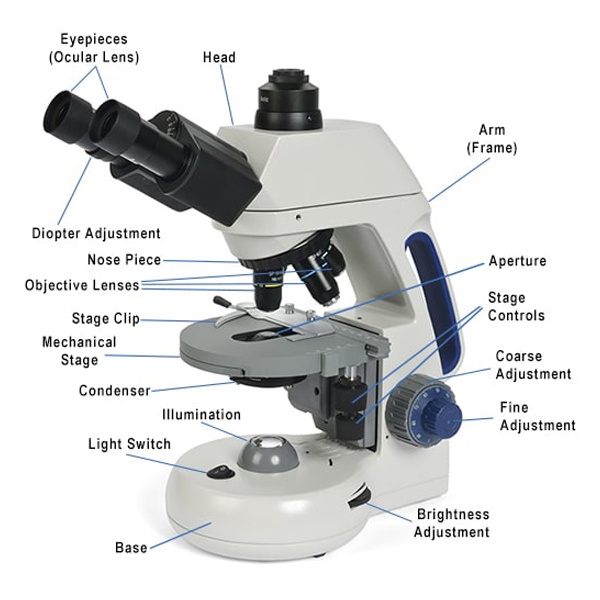
The eyepieces, also known as oculars, are the first point of contact for the observer. These lenses provide the final stage of magnification, typically ranging from 10x to 15x, though other magnifications exist. They sit at the top of the body tube and are responsible for further enlarging the image already magnified by the objective lenses. Modern microscopes often feature binocular eyepieces, allowing for comfortable, two-eyed viewing, with adjustable interpupillary distance to match the user’s eye spacing. Some eyepieces also incorporate reticles for measurement or counting.
Objective Lenses: The Primary Magnifiers
Positioned on a revolving nosepiece (turret) beneath the body tube, objective lenses are perhaps the most critical components for initial magnification. A typical compound microscope includes multiple objectives, offering various magnifications such as 4x (scanning), 10x (low power), 40x (high dry), and 100x (oil immersion). Each objective is a complex lens system designed to gather light from the specimen and produce a real, inverted, and magnified image within the body tube.
- Magnification and Numerical Aperture (NA): The magnification factor is stamped on the side of each objective. Equally important is the numerical aperture (NA), which indicates the lens’s ability to gather light and resolve fine detail. Higher NA values generally lead to better resolution and a brighter image, but often come with a shorter working distance (the space between the objective and the specimen).
- Types of Objectives: Objectives can be categorized by their optical corrections:
- Achromatic objectives correct for two colors (red and blue) and are the most basic.
- Semi-plan objectives offer a flatter field of view than achromatic.
- Plan achromatic objectives provide an excellent flat field of view across 90-95% of the image, crucial for photography.
- Fluorite (semi-apochromatic) and Apochromatic objectives offer even higher levels of color correction and resolution, often used in research-grade instruments.
- Oil Immersion Lenses: The 100x objective almost universally requires immersion oil. This special oil has a refractive index similar to glass, reducing light refraction as it passes from the slide to the objective lens, thereby increasing the numerical aperture and resolution significantly.
The Illumination Source: Bringing Light to Life
Located in the base of the microscope, the illumination source provides the light that passes through the specimen. Historically, mirrors were used to reflect ambient light, but modern microscopes use built-in lamps.
- Halogen Lamps: Traditional halogen bulbs offer bright, warm light, but generate heat and have a limited lifespan.
- LED Illumination: Light-emitting diodes (LEDs) are increasingly common due to their longevity, cool operation, energy efficiency, and consistent color temperature, which is beneficial for digital imaging.
- Brightness Control: A rheostat or dimmer switch allows the user to adjust the intensity of the light, optimizing visibility and reducing eye strain.
Condenser and Diaphragm: Directing the Light Path
Beneath the stage, the condenser system is crucial for focusing the light from the illuminator precisely onto the specimen.
- Condenser Lens: This lens collects the scattered light rays from the illuminator and concentrates them into a cone that passes through the specimen. Different types exist, such as Abbe condensers (most common), aplanatic condensers (better spherical aberration correction), and achromatic condensers (best color correction).
- Iris Diaphragm (Aperture Diaphragm): Integrated within the condenser, the iris diaphragm is an adjustable aperture that controls the angle and amount of light reaching the specimen. Closing the diaphragm increases contrast but reduces resolution and brightness, while opening it reduces contrast but increases resolution and brightness. Proper adjustment is vital for achieving optimal image quality.
The Mechanical System: Structure and Control
Beyond the intricate optics, the mechanical framework of a microscope provides stability, supports the optical components, and allows for precise manipulation of both the specimen and the focus.
The Head (Body Tube): Connecting the Optics
The head, or body tube, houses the optical components at the upper end of the microscope. It holds the eyepieces and connects them to the objective lenses via prisms and mirrors that redirect the light path. Microscope heads can be:
- Monocular: A single eyepiece for one-eyed viewing.
- Binocular: Two eyepieces for more comfortable, two-eyed viewing.
- Trinocular: Features two eyepieces for viewing and a third port specifically for attaching a camera or digital imaging system, allowing for simultaneous observation and documentation.
The Arm: The Backbone of the Microscope
The arm is the robust structural component that connects the head and body tube to the base. It also serves as a convenient handle for safely carrying the microscope from one location to another, ensuring the delicate optical parts are not mishandled.
The Stage: Where the Specimen Resides
The stage is the flat platform where the microscope slide containing the specimen is placed. Most modern microscopes feature a mechanical stage, equipped with spring-loaded stage clips to hold the slide securely.
- X-Y Axis Movement: Control knobs, usually located below or beside the stage, allow for precise movement of the slide along the X (left-right) and Y (forward-backward) axes. This precise control is essential for systematically scanning a specimen and locating specific areas of interest under high magnification.
- Light Aperture: A central opening in the stage allows light from the condenser to pass through the specimen.
Focusing Knobs: Precision in Clarity
The ability to bring a specimen into sharp focus is paramount, and this is achieved through the coarse and fine adjustment knobs.
- Coarse Adjustment Knob: This larger knob facilitates rapid, large movements of the stage (or body tube) up and down. It is primarily used with low-power objective lenses (4x, 10x) to quickly bring the specimen into approximate focus. It should never be used with high-power objectives, as it risks crashing the objective into the slide.
- Fine Adjustment Knob: This smaller knob provides minute, precise adjustments to the focus. It is used to achieve critical sharpness, particularly when using high-power (40x) and oil immersion (100x) objectives, where even slight movements can significantly alter focus.
The Base: Stability and Support
The base is the foundational element of the microscope, providing a stable platform for the entire instrument. It typically houses the illuminator and the power supply, ensuring the microscope remains steady and balanced during operation.
Specialized Components and Digital Integration
Beyond the core mechanical and optical systems, many microscopes incorporate specialized components to enhance imaging capabilities or integrate with digital technologies.
Filters: Enhancing Contrast and Reducing Glare
Various filters can be placed in the light path (often in a filter holder beneath the condenser or directly over the illuminator) to modify the light and improve image quality.
- Blue Filter: Commonly used with halogen lamps to make the light more closely resemble daylight, which can be more comfortable for the eyes.
- Neutral Density Filters: Reduce light intensity without altering color, useful for preventing over-illumination.
- Polarizing Filters: Used in pairs to analyze birefringent materials by controlling the polarization of light.
- Color Filters: Enhance contrast for specific stains or unstained specimens.
Digital Cameras and Adapters: Bridging Analog to Digital
The integration of digital cameras has revolutionized microscopy, transforming a purely observational tool into a powerful documentation and analysis system.
- Camera Ports: Trinocular heads are designed with a dedicated port for attaching C-mount digital microscope cameras. Adapters are also available to fit cameras into standard eyepiece tubes for binocular microscopes.
- Live View and Image Capture: Digital cameras allow for live viewing of the magnified image on a monitor, making it easier for groups to observe simultaneously. They can capture high-resolution still images and video, providing invaluable records for research, education, and diagnostic purposes.
- Measurement and Analysis Software: Accompanying software often enables precise measurements (length, area, angle) directly on the captured images, annotation, and advanced image processing techniques. This digital integration facilitates collaboration, remote teaching, and quantitative analysis, extending the utility of the microscope far beyond simple viewing.
Advanced Illumination Techniques
For specific applications, standard brightfield illumination may not suffice, leading to specialized illumination methods.
- Phase Contrast Microscopy: Ideal for observing unstained, transparent specimens (like living cells) by converting subtle phase shifts in light passing through the specimen into variations in brightness.
- Darkfield Microscopy: Illuminates the specimen with oblique light, causing only scattered light from the specimen to enter the objective. This makes the specimen appear bright against a dark background, excellent for visualizing highly scattering particles or thin filaments that are otherwise invisible.
- Fluorescence Microscopy: Uses specific wavelengths of light to excite fluorophores (fluorescent dyes) in the specimen, which then emit light at longer wavelengths. This technique is indispensable in biological and medical research for visualizing specific molecules, organelles, or cell types.
Essential Maintenance and Optimal Performance
To ensure the longevity and peak performance of a microscope, proper care and maintenance of its various components are crucial.
Cleaning Optics: Preserving Clarity
The delicate lenses of a microscope are susceptible to dust, smudges, and oil, which can severely degrade image quality.
- Lens Paper and Cleaning Solution: Only specialized lens paper or cotton swabs designed for optics should be used, along with approved lens cleaning solutions (e.g., pure alcohol or commercial lens cleaner).
- Cleaning Technique: Always blow off loose dust first, then gently wipe with lens paper in a circular motion. Avoid abrasive materials or harsh chemicals. Oil immersion objectives should be cleaned immediately after use to prevent oil from drying and hardening on the lens.
Handling and Storage: Protecting Your Investment
Correct handling prevents damage, while proper storage protects the instrument from environmental factors.
- Proper Carrying: Always carry the microscope with one hand firmly grasping the arm and the other supporting the base, distributing the weight evenly.
- Dust Cover: When not in use, the microscope should be covered with a dust jacket to protect it from dust and debris, which can scratch lenses or clog moving parts.
- Environmental Control: Store the microscope in a clean, dry, and temperature-stable environment to prevent mold growth on lenses and corrosion of mechanical parts.
Calibration and Alignment: Ensuring Accuracy
Regular checks and adjustments help maintain the microscope’s optical alignment and precision.
- Koehler Illumination: Proper illumination alignment, often achieved through Koehler illumination, ensures even and optimal lighting across the field of view, maximizing resolution and contrast.
- Focus Calibration: Over time, the coarse and fine focus mechanisms may require adjustment to maintain smooth and precise movement, particularly critical for accurate depth perception and focus stacking in digital imaging.
Understanding each part of the microscope and its function is not merely an academic exercise; it empowers users to operate the instrument effectively, troubleshoot common issues, and achieve the best possible results from this remarkable piece of technological equipment.
aViewFromTheCave is a participant in the Amazon Services LLC Associates Program, an affiliate advertising program designed to provide a means for sites to earn advertising fees by advertising and linking to Amazon.com. Amazon, the Amazon logo, AmazonSupply, and the AmazonSupply logo are trademarks of Amazon.com, Inc. or its affiliates. As an Amazon Associate we earn affiliate commissions from qualifying purchases.