Identifying the unique identity of your computer is a fundamental skill for any user, whether you are managing a home network, troubleshooting technical issues, or connecting to a workplace server. Your PC’s name—officially known as the “hostname”—is the label that identifies your machine on a network. Knowing how to find, change, and manage this name is essential for maintaining digital organization and ensuring seamless connectivity.
Understanding the Role of Your PC’s Name
The hostname acts as a digital fingerprint within a local or wide-area network. When devices communicate with one another, they do not rely on your aesthetic preferences or user profile names; they rely on this unique identifier to route data packets correctly.

Why Hostnames Matter
In a household or office setting, identifying your PC is the first step toward remote access. If you utilize remote desktop software, print to a network-shared printer, or manage a file server, you will frequently be asked to input the “Computer Name.” Without this label, your network would be a chaotic sea of anonymous devices, making it nearly impossible to distinguish between a laptop, a desktop, or a media center.
Distinction Between Computer Name and User Account Name
It is a common point of confusion to conflate your PC name with your user account name. Your user account name is the identity you use to log into your Windows or macOS profile. Your computer name, by contrast, is the name of the physical or virtual machine itself. While your user name defines who you are, the PC name defines the device you are operating.
How to Find Your PC Name on Windows
Windows offers multiple pathways to discover your computer’s identity, ranging from simple graphical interfaces to command-line utilities for the more technically inclined.
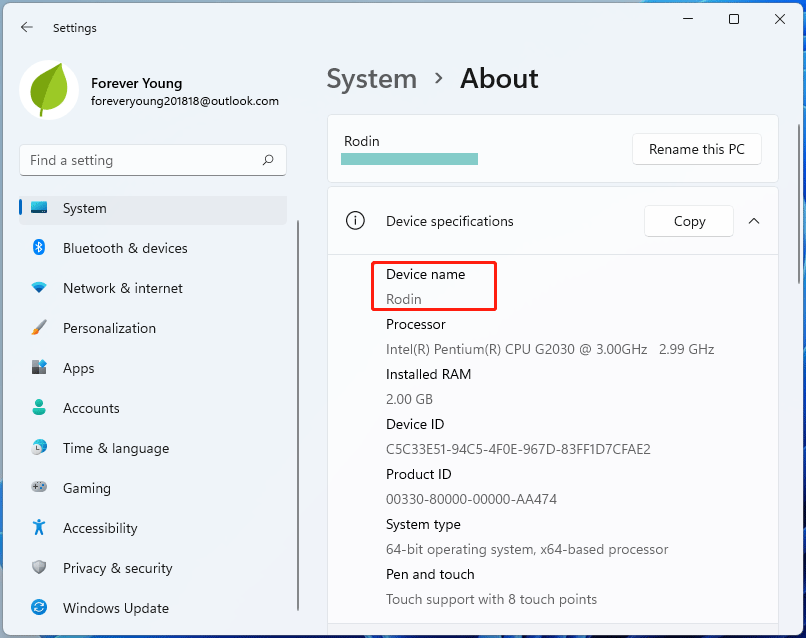
Using the Settings Menu
The most accessible method for the average user is through the Windows Settings app.
- Click the Start button and select the Settings (gear) icon.
- Navigate to System.
- Scroll down the left-hand sidebar or the main list to find About.
- Within the “Device specifications” section, look for the field labeled Device name. This is your PC’s identity on the network.
Using the Command Prompt
For power users or those performing batch updates, the Command Prompt provides a quick way to extract this information without navigating menus.
- Press the Windows Key + R, type
cmd, and press Enter. - In the black terminal window, type
hostnameand press Enter. - The command will return a single line of text, which is the current name of your PC.
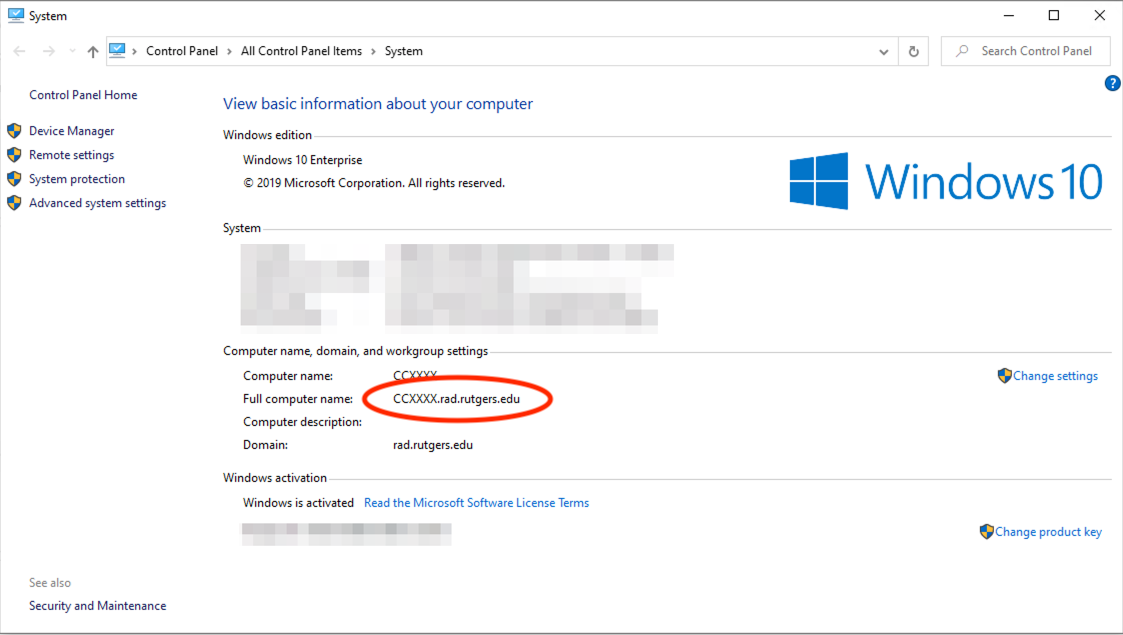
The System Properties Method
If you require more granular control or are working on an older version of Windows, the classic System Properties dialog remains highly effective.
- Press the Windows Key + Pause/Break key simultaneously.
- If your keyboard lacks these keys, search for “View your PC name” in the Start menu.
- This will open the legacy Control Panel interface, providing the full computer name alongside its workgroup or domain membership.
Discovering Your PC Name on macOS
Apple devices operate with a slightly different architecture, emphasizing user-friendly settings that make identifying your machine simple and intuitive.
Using System Settings
- Click the Apple Menu in the top left corner of your screen.
- Select System Settings (or System Preferences on older versions of macOS).
- Navigate to General > Sharing.
- The field labeled Computer Name will be prominently displayed at the top. This is the name your Mac broadcasts to other devices on the network.
Using the Terminal
Mac users can also utilize the Unix-based Terminal for a swift identification.
- Open Terminal via Spotlight search (Command + Space) or through the Utilities folder.
- Type
scutil --get ComputerNameand press Enter. - The terminal will output the specific string assigned to your machine.
Managing and Changing Your PC Name
Perhaps your PC name is currently a cryptic string of random characters like “DESKTOP-8K2J9L1.” If you find this difficult to remember, changing it to something meaningful—like “LivingRoom-PC” or “WorkStation-Main”—can significantly improve your workflow efficiency.
Best Practices for Naming
When choosing a new name, keep the following guidelines in mind:
- Avoid Special Characters: Stick to alphanumeric characters. Many network protocols struggle with symbols, spaces, or emojis, which can lead to connectivity errors.
- Keep It Short and Descriptive: A concise name is easier to type when mapping network drives or configuring remote desktop protocols.
- Maintain Uniqueness: If you have multiple devices, ensure each name is unique to avoid network conflicts. Having two computers named “MyPC” on the same router will inevitably lead to IP conflicts and communication failures.
How to Modify the Name on Windows
- Go to Settings > System > About.
- Click the button labeled Rename this PC.
- Enter your desired name in the dialog box.
- Click Next and ensure you restart your computer to apply the changes fully. Note that while some changes take effect immediately, a restart is often required to register the new hostname with your local DNS cache.
How to Modify the Name on macOS
- Open System Settings > General > Sharing.
- Click the Edit button located next to the Computer Name field.
- Type in your new desired name and save the changes.
- macOS typically updates this name instantly across your local network.
Troubleshooting Common Connectivity Issues
If you have changed your PC name but still cannot see it on your network, or if other devices fail to connect to it using the new name, consider the following troubleshooting steps.
DNS and Network Cache
Sometimes, your router or other devices on the network hold onto the “old” hostname due to cached DNS (Domain Name System) information. If this occurs, try restarting your router, as this forces the network to refresh its list of active hostnames and their associated IP addresses.
Workgroup and Domain Membership
In corporate environments, your PC name is often governed by an IT department. If you find you cannot change your PC name, it is likely because your computer is joined to a Windows Domain. In such cases, the hostname is managed by an Active Directory server. If you attempt to change this manually, you may lose connectivity to enterprise resources, such as shared mail servers or internal databases. Always consult with your network administrator before renaming a company-issued device.
VPN and Firewall Settings
If you are connected to a Virtual Private Network (VPN) or have an aggressive firewall enabled, your computer may appear “invisible” to others on the local network. Firewalls often block the discovery protocols that broadcast your PC name to nearby devices. If you need to be identifiable for file sharing or local access, ensure your network profile is set to “Private” rather than “Public,” as the latter automatically hides your PC from discovery to enhance security.
Mastering the identity of your machine is a foundational aspect of digital literacy. Whether you are streamlining your home network or managing a professional workstation, knowing exactly what your computer is called—and how to refine that name—ensures that you remain the master of your digital environment. By following these steps, you can move away from obscure, machine-generated identifiers and adopt a naming convention that brings order and clarity to your computing life.
aViewFromTheCave is a participant in the Amazon Services LLC Associates Program, an affiliate advertising program designed to provide a means for sites to earn advertising fees by advertising and linking to Amazon.com. Amazon, the Amazon logo, AmazonSupply, and the AmazonSupply logo are trademarks of Amazon.com, Inc. or its affiliates. As an Amazon Associate we earn affiliate commissions from qualifying purchases.