In the realm of digital interaction, particularly within the vibrant landscape of video gaming, the humble controller serves as the primary conduit between human intention and digital action. While advancements in haptic feedback, ergonomic design, and wireless technology have revolutionized how we interface with our games, a fundamental concept often dictates the precision and responsiveness of our inputs: the controller’s deadzone. Far from being an obscure technical jargon, understanding controller deadzone is crucial for anyone seeking to optimize their gaming experience, troubleshoot input issues, or even delve into the technical underpinnings of modern gaming hardware.
The term “deadzone” refers to a specific area around the center of an analog stick’s travel where no input is registered by the game or system. Imagine a perfectly calibrated analog stick. When you release it, it snaps back to a neutral, centered position. If you were to tilt it ever so slightly, the game would register a small movement. A deadzone, however, creates a small “dead” area in this center where even these minute movements are ignored. This is a deliberate design choice, often implemented to prevent unwanted drift or jitter from the analog stick when it’s not being actively manipulated. Without a deadzone, even the slightest imperfection in the stick’s centering mechanism or minor vibrations could cause unintended actions in the game, leading to a frustrating and imprecise experience.
The Crucial Role of Deadzone in Controller Performance
The deadzone is not merely a passive attribute of a controller; it actively influences how accurately and responsively a player can interact with the virtual world. Its presence, or the way it’s configured, directly impacts the fidelity of movement, aiming, and other analog inputs that are fundamental to most modern gaming experiences.
Preventing Unintended Input: The Necessity of a Neutral Zone
At its core, the primary function of a deadzone is to act as a buffer against the inherent imperfections of physical analog sticks. Over time, and through consistent use, the internal components of an analog stick can experience wear and tear. This can lead to a phenomenon known as “stick drift” or “jitter,” where the analog stick is not perfectly centered even when the user’s hand is completely removed.
Imagine playing a first-person shooter. If your aim-assist is finely tuned to respond to minuscule stick movements, even the slightest unintended movement caused by stick drift could send your crosshair wildly off target. This would make precise aiming nearly impossible and lead to a highly frustrating gameplay experience. The deadzone effectively creates a margin of error. It defines a small radius around the true center where the system will interpret the stick’s position as “neutral,” effectively ignoring any minor deviations that could be attributed to drift or natural resting fluctuations. This allows players to rest their thumbs on the sticks without initiating unwanted movement, ensuring that actions only occur when deliberate force is applied.
The Spectrum of Deadzone: From Minimal to Maximal
The size of the deadzone can vary significantly between different controllers and is often adjustable within game settings or through third-party software. A smaller deadzone means that the analog stick becomes more sensitive; a tiny movement off-center will register as an input. This can be desirable for players who demand absolute precision and quick reactions, as it allows for finer control over actions. However, a very small deadzone also increases the risk of experiencing unintended inputs due to minor stick imperfections or user tremors.
Conversely, a larger deadzone requires a more significant movement of the analog stick before any input is registered. This can make the controller feel less sensitive and might be preferred by players who experience significant stick drift or who find very sensitive controls difficult to manage. While a larger deadzone can mitigate drift issues, it can also introduce a noticeable lag between the physical movement of the stick and the corresponding action in the game, potentially hindering rapid or nuanced maneuvers.
Understanding Deadzone in the Context of Game Design
Game developers play a critical role in how controller deadzones are perceived and implemented. They must strike a delicate balance between catering to a wide range of hardware with varying degrees of calibration and ensuring that their game offers a responsive and enjoyable experience for all players.
Developer-Defined Deadzones: The Default Experience
When you first pick up a new controller and launch a game, you are experiencing the deadzone as defined by the game’s developers. These default settings are typically designed to be a safe bet for the majority of users, aiming to provide a generally comfortable experience across a broad spectrum of controller hardware. Developers often conduct extensive testing with various controllers to arrive at these default values.
The challenge for developers lies in the sheer diversity of analog stick technology and the inevitable aging of hardware. A deadzone that feels perfect on a brand-new, high-end controller might feel sluggish on an older, well-used one. Conversely, a deadzone set to accommodate older controllers might feel overly sensitive and prone to drift on newer models. This is why many modern games offer in-game options to adjust the deadzone, empowering players to fine-tune their experience.
Customization Options: Tailoring Input to Your Preferences
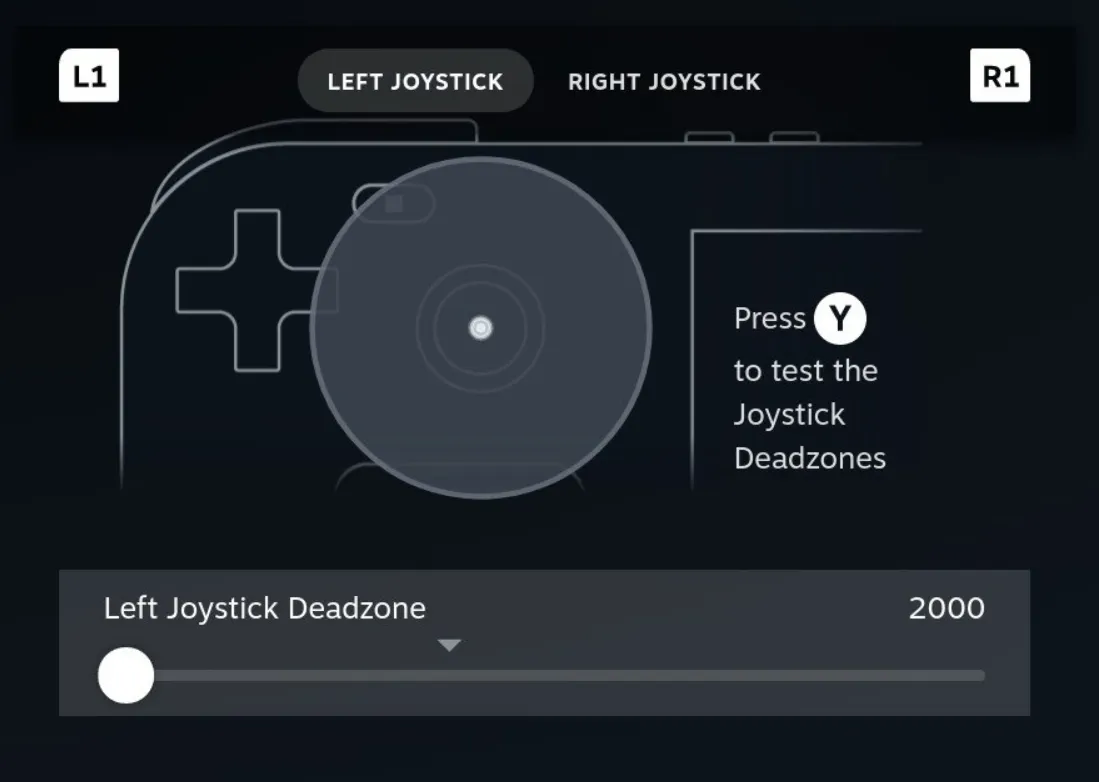
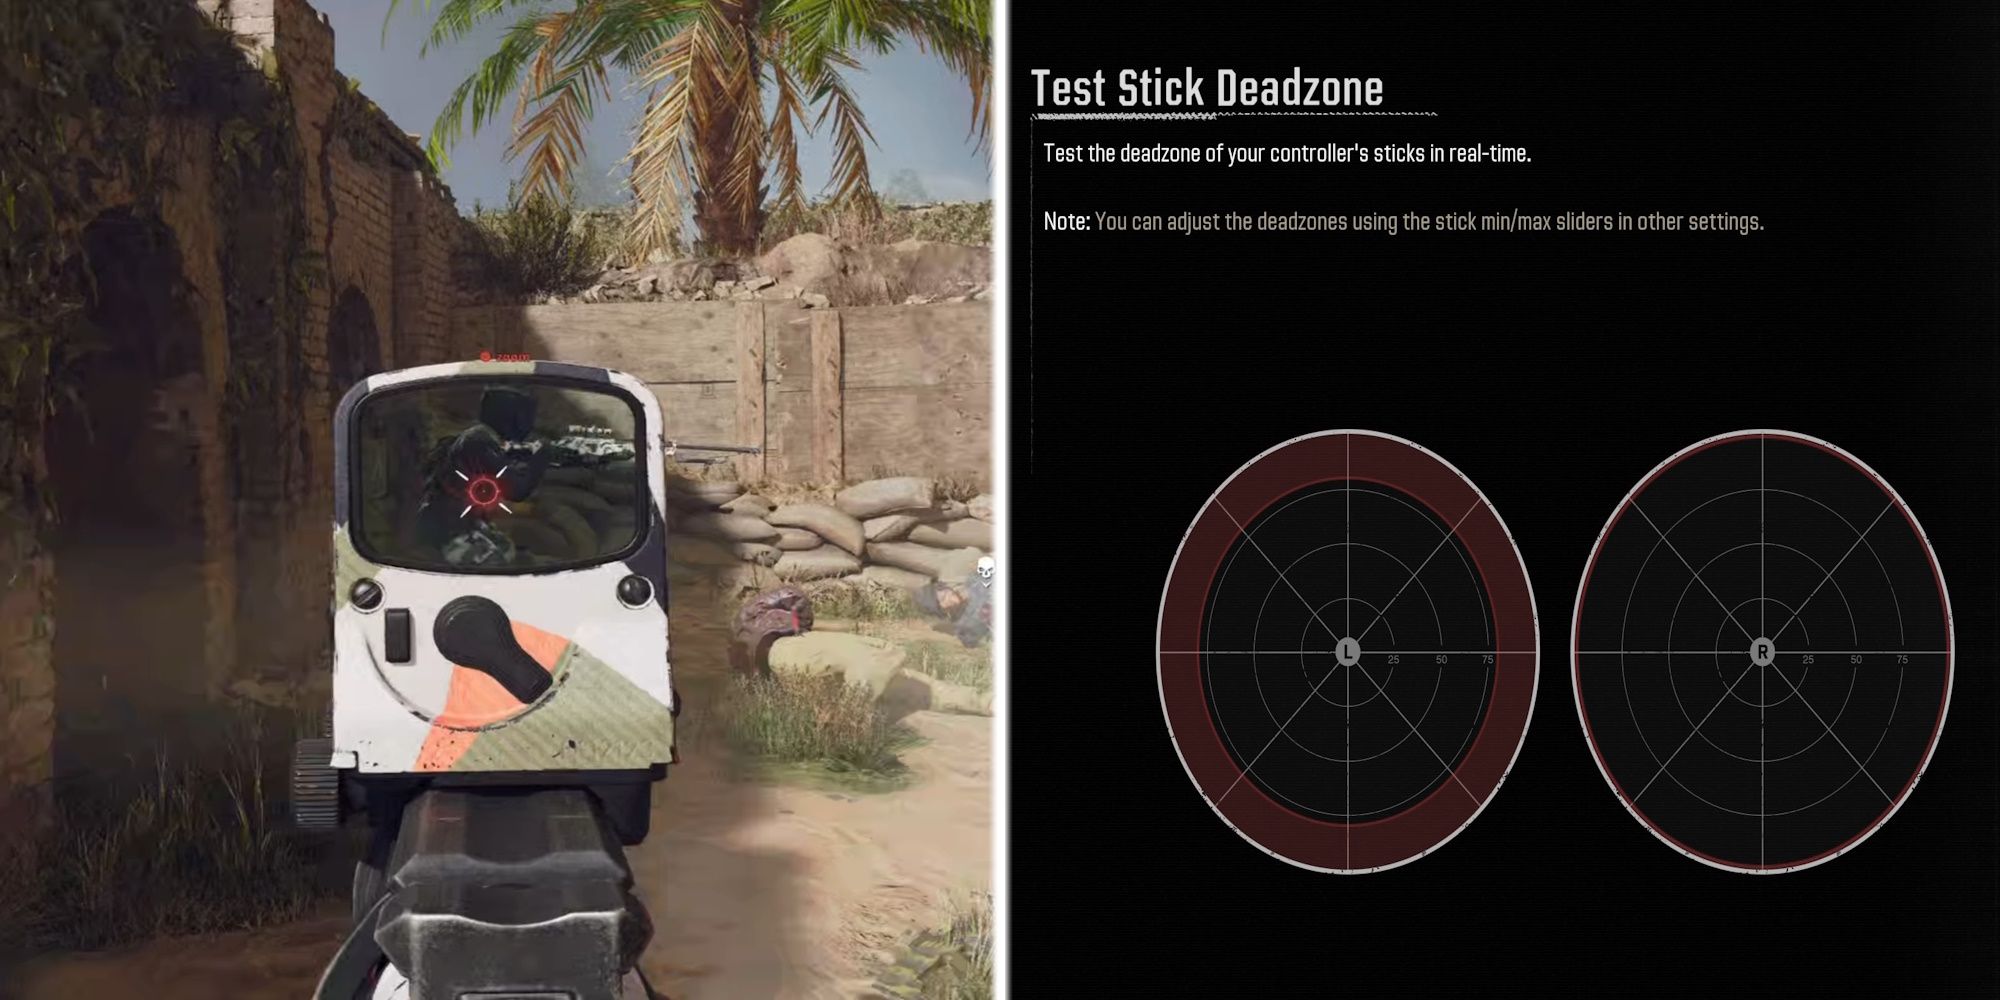
The advent of customizable deadzones in game settings has been a significant boon for gamers. This feature allows players to deviate from the default settings and adjust the deadzone to their specific needs and preferences. For example, a player experiencing slight stick drift on their aging controller might increase the deadzone to eliminate unwanted cursor movement. Conversely, a competitive player seeking maximum responsiveness might decrease the deadzone to ensure their actions are registered with the slightest touch.
These customization options are typically found within the game’s control or input settings menu. They often present a slider or a numerical value that players can adjust. Experimenting with these settings is key. It’s a process of trial and error, where players adjust the deadzone in small increments and then test the results in gameplay. The goal is to find the sweet spot: a deadzone that is small enough to feel responsive and precise but large enough to prevent unintended inputs and mitigate any issues with stick drift. This level of control empowers players to overcome hardware limitations and truly personalize their gaming interaction.
Technical Underpinnings: How Deadzone is Implemented
The concept of a deadzone, while impacting the user experience, is rooted in specific technical implementations within the controller and the software that reads its input. Understanding these mechanics can offer deeper insight into why certain settings behave as they do.
Analog Stick Mechanics and Potentiometers
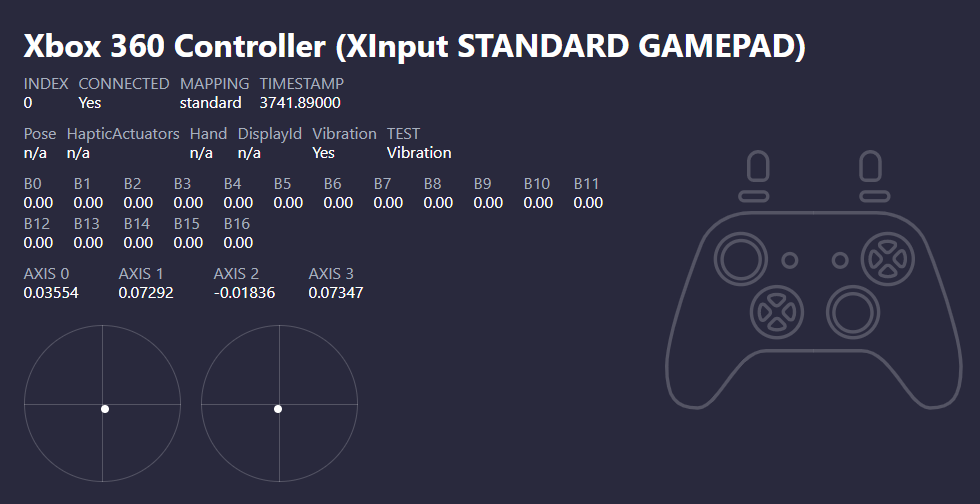
At the heart of every analog stick are potentiometers – variable resistors. When you move the analog stick, you are essentially changing the resistance of these potentiometers. This change in resistance is converted into an electrical signal that represents the stick’s position along its X and Y axes. A perfect, centered stick would ideally produce a neutral electrical signal.
However, due to manufacturing tolerances and wear, the potentiometers may not always return to their absolute perfect neutral point when the stick is released. The deadzone setting acts as a software filter. The system reads the electrical signal from the potentiometers, but it only begins to register a movement as an input once the signal exceeds a certain threshold, which defines the radius of the deadzone. This threshold is intentionally set above the typical “noise” or minor fluctuations generated by a stick at rest.
Software vs. Hardware Deadzones
It’s important to distinguish between hardware and software implementations of the deadzone. Some controllers might have a very small, almost imperceptible, hardware-level deadzone built into their internal mechanisms to provide a baseline level of stability. However, the most significant and adjustable deadzones are typically implemented in software.
This software deadzone can be managed at different levels:
- Operating System Level: Some operating systems, like Windows, offer a global deadzone setting for connected gamepads, which affects all applications that utilize the OS’s gamepad input.
- Game Engine Level: As discussed, most games implement their own deadzone adjustments within their input handling systems. This is the most common place players will find and adjust deadzone settings.
- Third-Party Software: For PC gamers, specialized software utilities can often provide more granular control over controller input, including advanced deadzone configurations that go beyond what individual games might offer.
Understanding this distinction is crucial for troubleshooting. If you are experiencing issues, it’s worth checking if the problem stems from the game’s settings, the operating system’s configuration, or potentially a hardware issue with the controller itself.
Troubleshooting and Optimizing Controller Input with Deadzone Adjustments
A well-configured deadzone can transform a frustrating gaming experience into a smooth and precise one. Conversely, an improperly set deadzone can lead to a myriad of input-related problems.
Identifying and Addressing Stick Drift
Stick drift is perhaps the most common issue that players attempt to resolve by adjusting the deadzone. If your character in a game is constantly walking or your aim is subtly moving without you touching the analog stick, you are likely experiencing stick drift.
The first line of defense is often increasing the deadzone in your game’s settings. By making the “neutral” area larger, you instruct the game to ignore those minor, unintentional movements. If increasing the deadzone sufficiently resolves the drift, it might be a viable workaround. However, it’s important to note that this doesn’t fix the underlying hardware issue. If the drift is severe, a very large deadzone might be required, which can negatively impact responsiveness. In such cases, recalibrating the controller (if the system supports it) or considering controller repair or replacement might be necessary.
Finding the Perfect Sensitivity Balance
Adjusting the deadzone is intrinsically linked to fine-tuning the overall sensitivity of your controller inputs. A smaller deadzone, as mentioned, leads to increased sensitivity. This means that even slight movements will register, allowing for very precise control. However, this also requires a steadier hand and can make quick, sweeping movements feel less fluid if not accompanied by appropriate sensitivity settings.
Conversely, a larger deadzone necessitates more physical movement of the analog stick to register an input, making the controller feel less sensitive. Players often find themselves adjusting both the deadzone and a separate “sensitivity” slider in games to achieve their desired balance. The optimal setting will vary greatly depending on the game genre, the player’s personal preference, and the specific controller being used. For instance, a fast-paced shooter might benefit from a lower deadzone and higher sensitivity, while a simulation game might require a larger deadzone and more deliberate, lower sensitivity inputs.
Advanced Techniques and Tools
For PC gamers, the options for deadzone manipulation extend beyond in-game settings. Software like “x360ce” or “DS4Windows” can emulate different controller types and offer advanced configuration options, including detailed deadzone adjustments for each axis of the analog sticks. These tools can be invaluable for older games that lack robust controller support or for users who want to customize their input experience at a deeper level.
These advanced tools allow for more intricate control, such as setting asymmetrical deadzones (different values for outward and inward stick travel) or applying smoothing filters to analog input. While these offer a high degree of customization, they also require a greater understanding of the underlying mechanics and can sometimes lead to unintended consequences if not configured carefully. The pursuit of the perfect input experience often involves a journey of experimentation, and understanding the role of deadzone is a fundamental step in that process.
aViewFromTheCave is a participant in the Amazon Services LLC Associates Program, an affiliate advertising program designed to provide a means for sites to earn advertising fees by advertising and linking to Amazon.com. Amazon, the Amazon logo, AmazonSupply, and the AmazonSupply logo are trademarks of Amazon.com, Inc. or its affiliates. As an Amazon Associate we earn affiliate commissions from qualifying purchases.