
The Financial Case for DIY Gel Nails
Venturing into the world of at-home gel nails isn’t just a beauty choice; it’s a strategic financial decision for many. The allure of salon-perfect manicures often comes with a recurring expense that, over time, can significantly impact a personal budget. Understanding the financial implications of transitioning from professional salon services to a do-it-yourself (DIY) approach is the first step towards smarter beauty spending.
Initial Investment vs. Long-Term Savings
The primary financial consideration for anyone contemplating at-home gel nails is the upfront investment required to purchase the necessary tools and products. Unlike a single salon visit, which entails no initial capital outlay beyond the service fee, setting up a home gel nail station demands a foundational expenditure. This investment typically includes a UV/LED lamp, a selection of gel polishes, base and top coats, prep solutions, and various tools. While this sum can initially seem daunting, it’s crucial to view it through the lens of long-term savings.

Consider the average cost of a professional gel manicure, which can range anywhere from $35 to $75 or more, depending on location, salon prestige, and added services. If one gets manicures bi-weekly or monthly, these costs quickly accumulate. For example, a monthly $50 manicure totals $600 annually. A DIY kit costing, say, $150-$250, could effectively pay for itself within four to six months. Beyond this break-even point, every subsequent at-home manicure represents direct savings. This shift redefines a recurring expense into a depreciating asset that generates continuous financial returns in the form of avoided costs.
Breaking Down Salon Costs
To fully appreciate the financial benefits of DIY gel nails, it’s helpful to itemize what you’re typically paying for at a salon. The price of a salon gel manicure isn’t just for the product applied to your nails; it encompasses a broader range of overheads and services:
- Labor: The technician’s skill, time, and experience.
- Rent/Utilities: The salon’s operational expenses for its physical location.
- Product Cost & Inventory Management: Salons purchase products in bulk, but their pricing reflects the cost of maintaining a diverse inventory and avoiding stockouts.
- Equipment Depreciation & Maintenance: Professional-grade lamps, drills, and sanitation equipment require significant investment and ongoing upkeep.
- Sanitation & Safety Protocols: Strict hygiene standards, including disposable tools and sterilization processes, contribute to operational costs.
- Marketing & Branding: The cost of attracting and retaining clients.
- Profit Margin: Essential for any business to sustain and grow.
By performing gel nails at home, you effectively internalize most of these costs or eliminate them entirely. You become your own labor, manage your own inventory (often purchasing only what you need), and amortize the cost of equipment over many uses. This direct cost reduction is the cornerstone of the financial argument for DIY.
Essential Tools and Their Economic Value
Equipping your home gel nail station requires careful selection of tools and products, each with its own cost and contribution to the overall financial viability of your DIY project. Smart purchasing here means understanding the balance between initial outlay, quality, and longevity.
UV/LED Lamp: A Core Investment
The UV/LED curing lamp is arguably the most significant initial investment for at-home gel nails. These lamps use specific light wavelengths to cure (harden) gel polish. Prices for home-use lamps can range from $20 for basic models to over $100 for more powerful, feature-rich devices.
From an economic perspective, this lamp is an essential capital asset. Its value isn’t just in its functionality but in its projected lifespan and the number of uses it will provide. A good quality lamp, properly cared for, can last for years, making the cost per use negligible over time. When selecting a lamp, consider models that offer both UV and LED capabilities, as this provides versatility for different gel polish formulations and can extend the lamp’s relevance as product technologies evolve. Investing a little more upfront in a reputable brand with good reviews can often prevent the need for early replacement, thereby maximizing its return on investment (ROI). Avoid overly cheap models that may have inconsistent curing power, leading to wasted polish and frustrating results, ultimately increasing your cost per application.
Gel Polishes and Base/Top Coats: Managing Your Inventory
Gel polishes, along with their indispensable base and top coat counterparts, represent the ongoing consumable costs of at-home gel nails. While a one-time purchase of a starter kit may include a few colors, the desire for variety will lead to additional purchases.
Economically, approaching gel polish acquisition requires a strategic mindset:
- Starter Kits: Often offer the best value for initial setup, bundling essential base, top, and a few color polishes at a reduced price compared to buying individually.
- Color Selection: Prioritize classic, versatile colors that you’ll use frequently. Impulse purchases of trendy or unique shades that are rarely used can be a drain on your beauty budget. Consider investing in a neutral palette first, then gradually expanding.
- Brand Value: While high-end brands might offer superior quality or longevity, many reputable mid-range brands provide excellent performance at a fraction of the cost. Researching reviews for chip-resistance and longevity can help you find cost-effective options that don’t compromise quality.
- Expiration Dates: Be mindful that gel polishes, though long-lasting, do have a shelf life once opened. Purchasing too many colors that you won’t use within their effective period can lead to waste, impacting your cost efficiency.
Base and top coats are fundamental and should be high-quality, as they are crucial for adhesion and durability. These are staple items, and it’s generally not advisable to skimp on them, as poor performance here can ruin an entire manicure, leading to wasted time and product.
Prep and Removal Supplies: The Hidden Costs
Often overlooked in the initial budgeting are the various prep and removal supplies, which, while individually inexpensive, add up to a notable ongoing cost. These include:
- Nail Files and Buffers: Essential for shaping and preparing the nail plate. Multi-packs offer better value.
- Cuticle Pusher and Nippers: Important for nail health and a clean application. These are one-time purchases that last indefinitely if maintained.
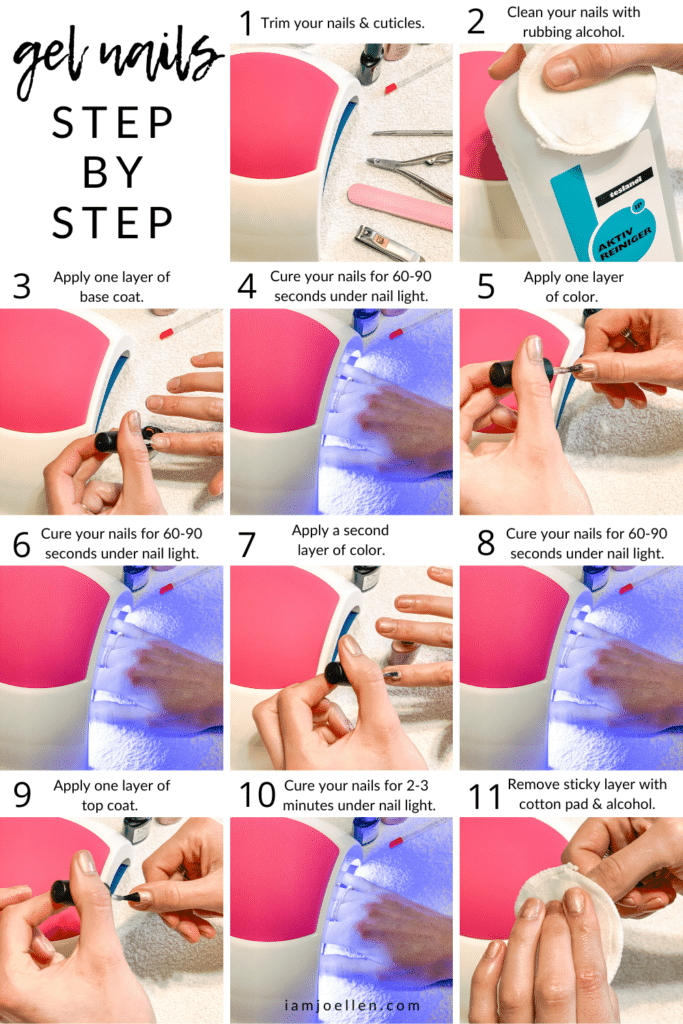
- Isopropyl Alcohol (Rubbing Alcohol): Used for dehydrating the nail plate and wiping off the tacky inhibition layer after curing. A large bottle is cost-effective.
- Lint-Free Wipes: Crucial for precise cleaning without leaving fibers. Buying in bulk minimizes cost per wipe.
- Acetone (100%): The solvent for gel polish removal. Large bottles are more economical.
- Foil Wraps/Clips: For soaking off gel polish. Reusable clips can be a good long-term investment over single-use foil.
- Nail Oil/Moisturizer: Post-removal and ongoing care product. Not strictly for the application process but vital for nail health and appearance, making it a worthy recurring expense.
While each item seems minor, collectively they represent a recurring operational cost. Smart purchasing here involves buying in bulk where appropriate (alcohol, wipes, acetone), choosing reusable options (clips, glass files), and comparing unit prices across different retailers. Neglecting proper prep and removal can lead to poor manicure longevity or nail damage, which in turn leads to more frequent applications or expensive repair treatments, ultimately increasing your overall cost.
Smart Shopping Strategies for Your At-Home Gel Nail Kit
Maximizing the financial benefits of at-home gel nails isn’t just about avoiding salon fees; it’s also about strategic purchasing of your supplies. Intelligent shopping can significantly reduce your initial outlay and ongoing expenses.
Budgeting for Quality
When assembling your gel nail kit, a common pitfall is to prioritize the lowest price point, potentially sacrificing quality. While frugality is key, certain items benefit from a slightly higher investment for superior performance and longevity. For instance, a well-regarded UV/LED lamp from a known brand, while more expensive than a generic alternative, might offer more consistent curing, a longer lifespan, and better safety features. This reduces the risk of having to repurchase due to failure or poor performance, thereby saving money in the long run. Similarly, higher-quality base and top coats often provide better adhesion and chip resistance, extending the life of your manicure and reducing the frequency of application, saving both product and time. Establish a budget for each core component and allocate a larger portion to items that impact performance and durability.

Leveraging Sales and Bundles
One of the most effective strategies for cost reduction is to capitalize on sales, promotions, and bundle deals. Many online retailers and beauty supply stores frequently offer discounts on gel polish kits, individual polishes, and lamps.
- Seasonal Sales: Black Friday, Cyber Monday, and holiday sales are excellent times to stock up on more expensive items or build your color collection.
- Starter Kits: As mentioned, these are often designed to provide an economical entry point, bundling a lamp with essential polishes and tools at a significant discount compared to purchasing items separately.
- Subscription Boxes/Loyalty Programs: Some brands or retailers offer subscription services or loyalty points that can translate into discounts on future purchases. While not always directly applicable to a one-time kit purchase, they can be valuable for ongoing polish replenishment.
- Bulk Purchases: For consumables like isopropyl alcohol, acetone, and lint-free wipes, buying larger quantities often results in a lower unit price.
Patience and proactive research can yield substantial savings. Sign up for newsletters from your preferred beauty suppliers to receive notifications about upcoming sales.
Understanding Product Lifespan and ROI
Every item in your gel nail kit has an expected lifespan, which directly impacts its long-term cost-effectiveness or return on investment (ROI).
- Lamps: A durable lamp with a long warranty offers a high ROI because its cost is spread over hundreds, if not thousands, of uses.
- Polishes: While colors may fade from trendiness, quality gel polishes maintain their usability for a significant period (typically 1-2 years once opened, longer unopened). Buying smaller bottles of trendy colors and larger, more versatile shades can optimize your inventory and reduce waste.
- Tools: Reusable tools like cuticle pushers, nippers, and high-quality files represent a near-infinite ROI if properly cleaned and maintained, requiring only a single initial purchase. Conversely, disposable items like cotton pads or basic files need to be factored into ongoing costs.
Calculating the “cost per application” for your tools and consumables provides a clear financial metric. Divide the total cost of an item by its expected number of uses. This perspective reveals that a slightly more expensive, durable item often has a lower cost per use than a cheaper, less robust alternative.
Beyond Savings: Monetizing Your New Skill
While the primary motivation for doing gel nails at home is often cost savings, the acquisition of this skill and equipment can open doors to unexpected income opportunities, transforming a personal finance strategy into a potential side hustle.
Offering Services to Friends and Family
Once you’ve mastered the art of at-home gel manicures, your new skill can generate modest income by offering services to friends and family. This informal arrangement serves multiple financial purposes:
- Recouping Investment: Charging a nominal fee (e.g., $15-$25 per manicure) can help you quickly recoup your initial investment in the lamp and polishes.
- Offsetting Consumables: These fees can also cover the ongoing cost of polishes, base/top coats, and prep/removal supplies, effectively making your own manicures free.
- Building Confidence and Speed: Providing services to a trusted circle allows you to hone your technique in a low-pressure environment, building the speed and precision necessary for more formal opportunities.
- Word-of-Mouth Marketing: Satisfied “clients” among friends and family can become informal marketers, spreading positive feedback and potentially expanding your client base.
It’s important to clearly communicate your pricing and manage expectations regarding your skill level compared to a professional salon.
Exploring Local Side Hustle Opportunities
With growing proficiency, you might consider expanding beyond your immediate social circle. Several avenues can be explored for monetizing your gel nail skills:
- Mobile Nail Tech: Offer home visits to clients. This often appeals to individuals who prefer the convenience or have mobility issues. You would need to factor in travel time and expenses (gas, mileage, wear and tear on your vehicle) when setting your prices.
- Pop-Up Services: Partner with local boutiques, salons (as a contractor), or event organizers to offer express gel manicures at events, markets, or in shared spaces. This can expose you to a wider clientele without the overhead of renting a permanent space.
- Online Presence: Utilize social media platforms (Instagram, Facebook Marketplace, local community groups) to showcase your work and advertise your services. Professional photos of your manicures are crucial for attracting clients. Clearly state your service offerings, pricing, and availability.
- Special Occasions: Market your services for bridal parties, proms, or other events where multiple people might want manicures. Offering package deals for groups can be an attractive incentive.
When transitioning to a more formal side hustle, consider the financial implications of licensing requirements (which vary by location), insurance, and accurate income tracking for tax purposes. Pricing should reflect not just your product costs, but also your time, skill, and any overheads (travel, marketing).
Tracking Your Earnings and Expenses
To truly understand the profitability of your gel nail side hustle, meticulous financial tracking is essential.
- Income Log: Keep a detailed record of every service provided, the client’s name, the date, and the amount charged.
- Expense Tracker: Document all expenditures related to your gel nail business. This includes initial equipment purchases (lamp, core tools), ongoing consumables (polishes, prep solutions), marketing materials, and any travel costs.
- Profit & Loss Calculation: Regularly review your income versus your expenses. This will show your net profit, allowing you to assess the financial health of your side hustle. This data is also crucial for tax preparation.
- Pricing Adjustments: Based on your profit analysis, you can make informed decisions about adjusting your pricing to ensure your time and skill are adequately compensated and that your venture remains financially viable.
By approaching your gel nail skills with a business mindset, you can transform a personal interest into a valuable stream of supplemental income, further enhancing the financial benefits of your initial DIY investment.
Financial Discipline in Your DIY Beauty Routine
Maintaining financial discipline is key to sustaining the economic advantages of at-home gel nails. Without careful management, the initial savings can be eroded by impulse buys, poor maintenance, or inefficient practices.
Preventing Impulse Buys
The vast array of gel polish colors, glitters, and nail art accessories can be incredibly tempting. Just like any other consumer spending, impulse purchases in the beauty sector can quickly derail your budget. To prevent this:
- Create a “Want” List: Instead of buying immediately, add desired items to a list. Revisit it after a week or two; often, the initial urge will have passed, or you might realize you already have something similar.
- Set a Budget for New Polishes/Accessories: Allocate a specific monthly or quarterly budget for new additions. Once that budget is spent, resist further purchases until the next cycle.
- Focus on Versatility: Prioritize polishes and accessories that can be mixed, matched, or used in multiple ways to get more value from each item.
- Shop Your Stash: Before buying a new color, look through your existing collection. You might rediscover forgotten shades or realize a new purchase isn’t truly necessary.
Maintaining Equipment to Avoid Replacement Costs
Your gel nail equipment, particularly the UV/LED lamp and reusable tools, represents a significant portion of your initial investment. Proper maintenance directly translates to extended lifespan and avoided replacement costs.
- Cleanliness: Regularly clean your lamp and tools. Dust and polish residue can affect the lamp’s efficiency and the lifespan of your tools.
- Storage: Store polishes in a cool, dark place away from direct sunlight and the curing lamp to preserve their consistency and prevent premature curing. Store tools in a clean, dry container to prevent rust or damage.
- Gentle Handling: Treat your lamp and tools with care to prevent accidental damage, especially drops or impacts that can break bulbs or delicate components.
- Power Cord Care: Ensure the lamp’s power cord is not bent or frayed, as this can lead to electrical issues and necessitate replacement.
By being diligent with maintenance, you maximize the utility and lifespan of your assets, ensuring your initial investment continues to pay dividends over many years.
Calculating True Cost Per Application
To truly grasp the ongoing financial benefit, regularly calculate your “true cost per application.” This involves summing up the cost of consumables (polishes, base/top, alcohol, acetone, wipes, files used) for a single manicure and adding a small depreciated value for your lamp and reusable tools.
For example:
- Consumables: Estimate the amount of each product used per application (e.g., 1/20th of a bottle of polish, 2 cotton pads, 5ml acetone).
- Depreciation: Divide the cost of your lamp by its estimated total number of uses (e.g., $80 lamp / 200 uses = $0.40 per use). Do the same for long-lasting tools if you wish, though their cost per use is often negligible.
By monitoring this metric, you gain a clear picture of your ongoing savings compared to salon prices. If your cost per application starts creeping up, it’s an indicator to re-evaluate your purchasing habits or product efficiency. This financial mindfulness ensures that at-home gel nails remain a truly cost-effective and financially rewarding beauty choice.
aViewFromTheCave is a participant in the Amazon Services LLC Associates Program, an affiliate advertising program designed to provide a means for sites to earn advertising fees by advertising and linking to Amazon.com. Amazon, the Amazon logo, AmazonSupply, and the AmazonSupply logo are trademarks of Amazon.com, Inc. or its affiliates. As an Amazon Associate we earn affiliate commissions from qualifying purchases.