
In an increasingly digital financial landscape, the act of writing a physical check might seem antiquated to some. Yet, for various reasons, including specific payment scenarios, personal preference, or a desire for tangible record-keeping, millions of Americans still choose to pay their taxes to the Internal Revenue Service (IRS) via check. While seemingly straightforward, ensuring your payment reaches the IRS correctly and is processed without issue requires precision and adherence to specific guidelines. This comprehensive guide will demystify the process, offering a professional, insightful, and engaging walkthrough to ensure your tax payment is handled flawlessly.

The Enduring Relevance of Check Payments in a Digital Age
While the IRS offers numerous modern payment methods, including direct debit, credit card payments, and electronic funds transfers, the paper check remains a legitimate and often necessary option. Understanding when and why to use a check can be crucial for effective financial management and compliance.
When a Check is Your Best Option
There are several scenarios where writing a check to the IRS might be your preferred or only viable method:
- No Bank Account Access for Electronic Payments: If you don’t have a checking or savings account set up for online payments or direct debit, a physical check is a practical alternative.
- Avoiding Processing Fees: While some electronic payments (like credit card payments) can incur processing fees from third-party providers, paying by check directly to the IRS does not.
- Specific Tax Situations: For certain types of tax payments, such as those made with an amended return, or if you prefer a tangible record before mailing, a check can offer a sense of security and control.
- Technological Discomfort or Limitations: Not everyone is comfortable with or has access to online payment portals. For these individuals, a traditional check provides a familiar and reliable method.
- Mailing a Payment with a Return: If you are mailing a paper tax return and owe money, it’s often most convenient to include your check directly with the return and the required payment voucher.
Understanding IRS Payment Policies
The IRS is particular about how payments are made and recorded. Incorrectly addressed or formatted checks can lead to delays, misapplication of payments, or even penalties. The key is to understand that your check is not just a piece of paper but a financial instrument that must precisely communicate your intent and identity to the tax agency. This includes how the check is made out, what information is included, and how it is submitted. Ignoring these specifics can turn a simple payment into a complex bureaucratic headache.
Deconstructing the Check: Key Components for IRS Payments
Before you put pen to paper, it’s essential to understand each field on a standard check and how it specifically relates to an IRS payment. Every element plays a critical role in ensuring your payment is correctly attributed to your tax account.
Your Information: The Foundation of the Check
At the top left of your check, you’ll typically find your name and address. This information, along with the routing and account numbers printed at the bottom, identifies you as the payer. Ensure this information is current and accurate. If you’ve recently moved or changed your name, verify that your checks reflect these updates.
The Date: Timeliness is Crucial
Always enter the current date when you write the check. For tax payments, the “postmark rule” generally applies, meaning your payment is considered on time if it’s postmarked by the due date, even if the IRS receives it later. However, using the actual date you write the check is standard practice. Avoid post-dating the check, as this can sometimes cause processing issues.
The Payee: Precisely “United States Treasury”
This is perhaps the most critical field. When paying the IRS, the “Pay to the Order of” line must read: “United States Treasury”. Do not write “IRS,” “Internal Revenue Service,” or any variation thereof. The U.S. Treasury is the ultimate recipient of federal tax dollars, and this exact phrasing is required for proper processing.
The Amount: Words and Numbers Must Match
You’ll write the payment amount twice: once numerically in the box on the right-hand side, and once in words on the line below the payee name.
- Numerical Amount: Write the exact dollar and cent amount (e.g., “$1,234.56”). Start close to the dollar sign to prevent anyone from altering the amount.
- Written Amount: Spell out the dollar amount clearly, followed by “and XX/100” for the cents (e.g., “One thousand two hundred thirty-four and 56/100”). Draw a line from the end of your written amount to the word “Dollars” to prevent any additions. If there are no cents, write “00/100” or “no/100.”
It is paramount that the numerical amount and the written amount match exactly. Any discrepancy will likely lead to your check being returned or delayed.
The Memo Line: Your IRS Identifier
The memo line (or “For” line) is vital for ensuring your payment is correctly applied to your specific tax liability. For IRS payments, you must include three pieces of information here:
- Your Taxpayer Identification Number (TIN): This is usually your Social Security Number (SSN) if you are an individual filer, or your Employer Identification Number (EIN) if you are a business. If it’s a joint return, use the SSN of the first person listed on the return.
- The Tax Year: Specify the tax year for which the payment is intended (e.g., “2023 Tax Year”).
- The Related Form/Purpose: Indicate the form the payment is associated with (e.g., “Form 1040,” “Form 1040-ES” for estimated taxes, “Form 941” for employer taxes). If it’s for an installment agreement, note “Installment Agreement.”
An example memo line for an individual might look like: “SSN XXX-XX-XXXX, 2023 Form 1040.”
Your Signature: The Authorization
Finally, sign your check exactly as your signature appears on your bank’s records. For joint accounts, either account holder can typically sign, but if you are filing a joint tax return, it’s often best for the primary taxpayer (whose SSN is listed first) to sign the check. Your signature legally authorizes your bank to release the funds.
Step-by-Step Guide to Writing Your IRS Check
With a clear understanding of each component, here’s a methodical approach to writing your check to the IRS. Following these steps systematically minimizes the risk of errors.
Step 1: Gather Necessary Information
Before you start writing, have all the required details at hand:
- The exact amount you owe.
- Your SSN or EIN.
- The tax year for which the payment applies.
- The relevant tax form number (e.g., Form 1040, Form 1040-ES).
- Your checkbook.
- A pen (preferably one that uses indelible ink, like black or blue ballpoint).
Step 2: Fill in the Date
Locate the “Date” line (usually top right) and write the current date clearly.
Step 3: Enter the Payee
On the “Pay to the Order of” line, write “United States Treasury” precisely.
Step 4: Write the Numerical Amount
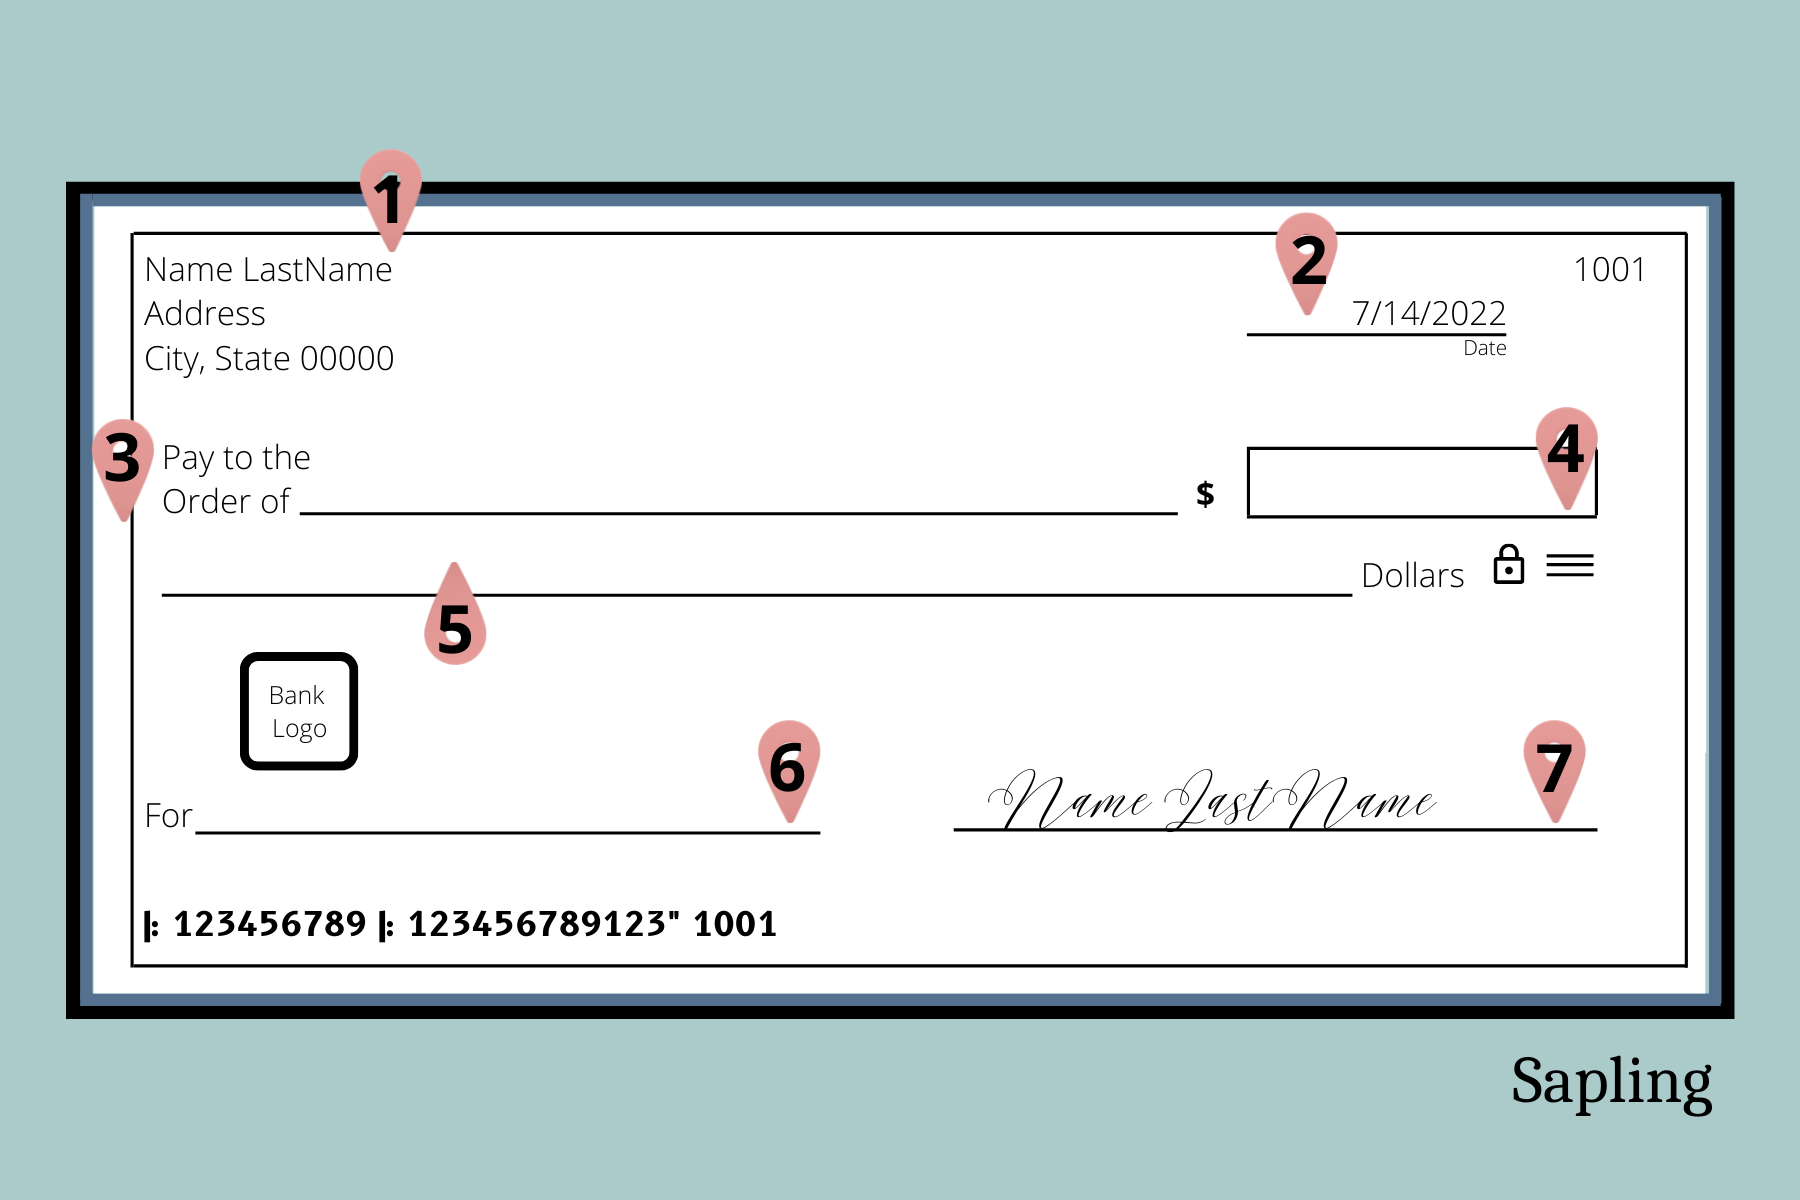
In the dollar box (usually to the right of the payee line, with a “$”), write the exact amount of your payment, starting close to the dollar sign. For example, “1234.56”.
Step 5: Write the Written Amount
On the line below the payee, spell out the dollar amount in words. For example, “One thousand two hundred thirty-four and 56/100.” Draw a line to the “Dollars” mark to prevent additions.
Step 6: Complete the Memo Line
On the “Memo” or “For” line, write your SSN/EIN, the tax year, and the related form or purpose. For example, “SSN XXX-XX-XXXX, 2023 Form 1040.”
Step 7: Sign Your Check
In the bottom right corner, sign your name legibly and exactly as it appears on your bank’s records.
Beyond the Check: The Crucial IRS Payment Voucher (Form 1040-V)
Writing the check is only half the battle. When mailing a payment with your income tax return (Form 1040, 1040-SR, or 1040-NR), you must also include an IRS payment voucher, Form 1040-V. This seemingly small piece of paper is incredibly important for ensuring your payment is correctly associated with your tax return and processed efficiently.
What is Form 1040-V and Why is it Necessary?
Form 1040-V, Payment Voucher, serves as a coversheet for your check. It provides key information in a standardized, machine-readable format that helps the IRS apply your payment correctly. Without it, your payment could be delayed, misapplied, or even returned, potentially leading to unnecessary interest or penalties. It acts as a bridge between your physical check and your digital tax account.
Completing Form 1040-V Accurately
You can usually generate Form 1040-V when preparing your tax return using tax software, or you can download it from the IRS website (IRS.gov) and fill it out manually. The form requires:
- Your Social Security Number (SSN) (and spouse’s if filing jointly).
- Your name (and spouse’s name if filing jointly).
- Your address.
- The tax year.
- The amount of your payment.
Ensure the information on Form 1040-V precisely matches the details on your Form 1040 and your check. Attach your check loosely to the front of Form 1040-V (do not staple or tape the check to your tax return or to the voucher itself, as this can damage the check during processing).
Sending Your Payment: Precision and Security
Once your check is written and, if applicable, your Form 1040-V is prepared, the final step is to mail it. This process also requires attention to detail to prevent issues.
Packaging Your Payment
- For paper returns with payment: Place your check and Form 1040-V (loosely attached to the check) on top of the first page of your Form 1040 or other tax return. Do not staple them to the return or to each other.
- For estimated tax payments (without a return): Use the appropriate estimated tax payment voucher (e.g., Form 1040-ES) and include your check.
- For other tax payments (e.g., amended returns, audit payments): Follow the specific instructions provided for that payment type. Often, it will involve including a relevant form or statement with your check.
Use a sturdy envelope and ensure it is properly sealed.
Choosing the Right Mailing Address
The mailing address for the IRS depends on several factors:
- The type of form you are filing: Form 1040, Form 1040-ES, Form 941, etc.
- The state you live in: Different states often have different IRS service centers.
- Whether you are including a payment or not.
It is absolutely crucial to consult the instructions for the specific tax form you are filing to find the correct mailing address. This information is typically found in a table titled “Where To File” or similar. Mailing to the wrong address can significantly delay your payment’s processing.
The Importance of Proof of Mailing
For important documents like tax payments, especially as the deadline approaches, consider using a mailing service that provides proof of mailing. Options include:
- Certified Mail: Provides a mailing receipt and electronic verification that an article was delivered or that a delivery attempt was made. You can also request a return receipt for an additional fee.
- Priority Mail Express: Offers guaranteed delivery within 1-2 days and includes tracking.
- Private Delivery Services: The IRS also designates certain private delivery services (e.g., FedEx, UPS) as “designated delivery services.” If you use one of these, ensure you use an IRS-approved service and method, and keep detailed records.
While regular first-class mail is sufficient, proof of mailing offers peace of mind and can be invaluable if there’s ever a dispute about whether your payment was sent on time.
Common Pitfalls and Best Practices
Avoiding common mistakes can save you a significant amount of stress and potential financial penalties.
Double-Checking for Errors
Before sealing the envelope, take a moment to review everything:
- Check amount: Does the numerical amount match the written amount? Is it the correct payment owed?
- Payee: Is it “United States Treasury”?
- Memo line: Are your SSN/EIN, tax year, and form correct and legible?
- Signature: Is the check signed?
- Form 1040-V: If required, is it filled out correctly and included?
- Mailing address: Is it the exact, correct address for your specific form and state?
The Significance of Record-Keeping
Maintain meticulous records of your tax payments. This includes:
- A copy of the check (either a physical photocopy or a photo).
- The check number.
- The date the check was written and mailed.
- Any tracking numbers or proof of mailing receipts.
- A copy of your tax return and Form 1040-V.
These records are invaluable for your personal financial history and as proof in case of any IRS inquiries or discrepancies. Financial experts generally recommend keeping tax records for at least three years, and sometimes longer, depending on the specifics.

Exploring Other IRS Payment Options
While this guide focuses on checks, it’s worth noting that the IRS offers several convenient electronic payment options that may be preferable for some taxpayers:
- IRS Direct Pay: Allows you to pay directly from your checking or savings account for free.
- Electronic Federal Tax Payment System (EFTPS): A free service for individuals and businesses, allowing payments to be scheduled up to 365 days in advance.
- Debit/Credit Card: Payments can be made through third-party processors, often incurring a convenience fee.
Understanding all available options allows you to choose the method that best suits your financial habits and specific tax situation. However, for those instances where a check is necessary or preferred, following the detailed steps outlined here will ensure a smooth and accurate transaction with the Internal Revenue Service. Paying your taxes correctly is not just a civic duty; it’s a critical component of sound personal finance.
aViewFromTheCave is a participant in the Amazon Services LLC Associates Program, an affiliate advertising program designed to provide a means for sites to earn advertising fees by advertising and linking to Amazon.com. Amazon, the Amazon logo, AmazonSupply, and the AmazonSupply logo are trademarks of Amazon.com, Inc. or its affiliates. As an Amazon Associate we earn affiliate commissions from qualifying purchases.