
In an increasingly digital financial world, the humble paper check might seem like a relic. Yet, for many transactions—from paying rent to sending a thoughtful gift, or even managing certain business expenses—knowing how to properly write a check remains an essential financial literacy skill. Specifically, understanding how to fill out a Chase Bank check correctly ensures your payments are processed smoothly, securely, and without delay. This guide will walk you through every detail, demystifying the process and empowering you with the knowledge to handle your financial transactions with confidence.
While Chase, like many financial institutions, strongly promotes digital banking and electronic payments, the ability to issue a physical check still serves crucial functions. It provides a tangible record, offers a universal method of payment, and sometimes, it’s simply the preferred or only option for certain recipients. Mastering this skill isn’t just about putting pen to paper; it’s about safeguarding your funds, maintaining accurate records, and ensuring your financial intentions are clearly communicated.
The Anatomy of a Chase Bank Check
Before diving into the mechanics of writing, it’s beneficial to understand the various components of a check. Each element serves a specific purpose, contributing to the check’s validity and your financial security. While the design may vary slightly, the core elements on every Chase Bank check are consistent.
Identifying Key Components
- Bank Logo and Name: Typically found at the top, confirming the issuing bank (in this case, Chase Bank).
- Your Name and Address: Printed in the upper left corner, identifying the account holder.
- Check Number: Usually located in the upper right corner and also at the bottom of the check. This sequential number helps you keep track of your transactions.
- Date Line: An empty line in the upper right, where you’ll write the current date.
- Payee Line: Labeled “Pay to the Order of” or similar, this is where you write the name of the person or entity receiving the payment.
- Numeric Amount Box: A small box with a dollar sign ($) next to it, where you write the payment amount in figures.
- Written Amount Line: An empty line below the payee line, where you write the payment amount in words. This line often ends with “Dollars.”
- Memo/For Line: A small line at the bottom left, optional but useful for noting the purpose of the payment (e.g., “Rent,” “Utilities,” “Invoice #123”).
- Signature Line: A prominent line at the bottom right, where you must sign to authorize the payment.
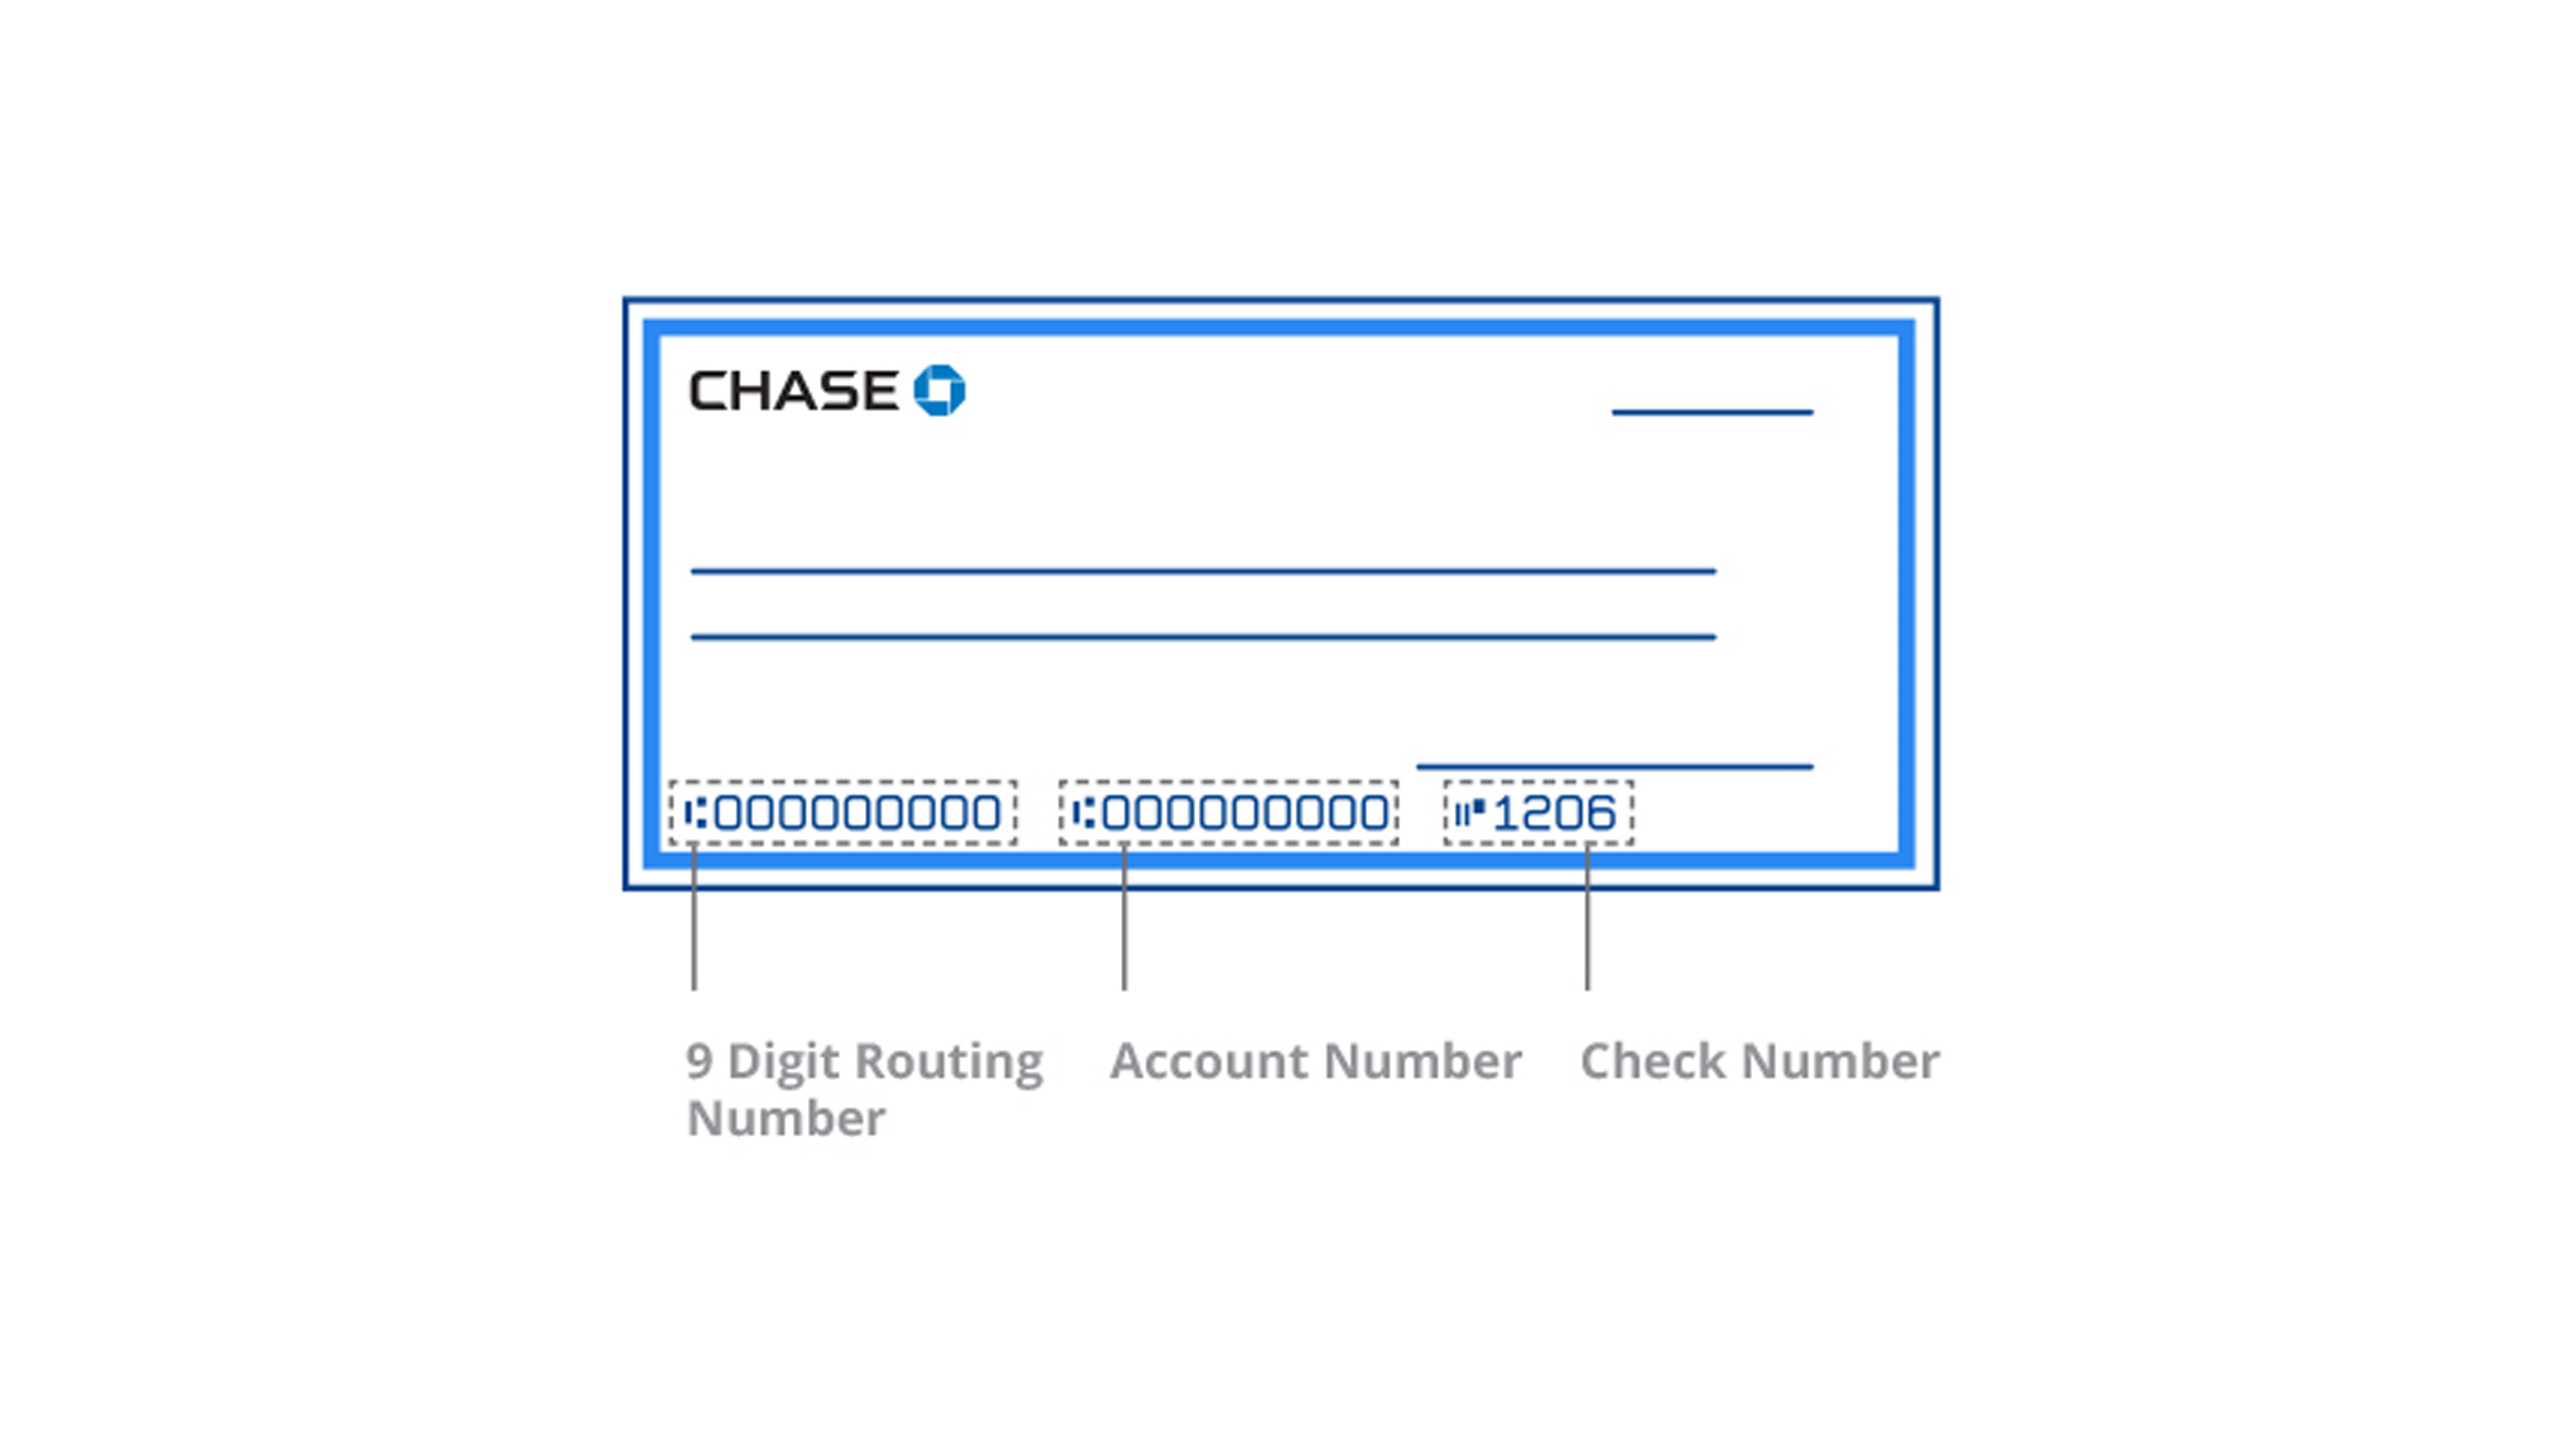
- Routing Number: A nine-digit number at the bottom left, identifying your bank for electronic transfers.
- Account Number: Located next to the routing number, identifying your specific Chase checking account.
- Check Number (MICR): The final number in the MICR line, matching the one in the upper right.
Understanding the MICR Line
The Magnetic Ink Character Recognition (MICR) line at the bottom of your Chase check is critical for automated processing. It contains three sets of numbers printed in a special magnetic ink: the routing number, your account number, and the check number. These numbers are read by machines, ensuring efficient and accurate processing of your checks. Understanding their sequence and purpose reinforces the importance of keeping your checks secure, as these numbers are vital for accessing your account.
A Step-by-Step Guide to Filling Out Your Chase Check
Now that you’re familiar with the components, let’s go through the process of writing a Chase check, step by step. Accuracy and legibility are paramount to prevent delays or potential fraud. Always use a pen with dark ink (blue or black) that won’t smudge or fade.
Date (When the Check is Written)
Begin by writing the current date on the “Date” line, typically located in the upper right-hand corner. You can use various formats, such as MM/DD/YYYY (e.g., 01/15/2024) or spell out the month (e.g., January 15, 2024). Post-dating a check (writing a future date) means the check cannot be cashed or deposited before that date. However, this is not always legally binding and checks can sometimes be processed early, so exercise caution if post-dating.
Payee (Who Receives the Money)
On the line marked “Pay to the Order of,” write the full and correct legal name of the person or organization you are paying. For individuals, use their first and last name. For businesses, use their official company name. It’s crucial to be precise here, as any ambiguity can lead to the check being returned or delays in payment. Avoid abbreviations unless they are part of the official name.
Numeric Amount (The Dollar Value in Figures)
In the small box to the right of the payee line, next to the dollar sign ($), write the exact amount of money in numbers. For example, if you’re paying one hundred fifty dollars and fifty cents, you would write “150.50”. Always include the cents, even if it’s “.00”. It’s a good practice to start writing the numbers as far to the left as possible to prevent anyone from altering the amount by adding digits.
Written Amount (The Dollar Value in Words)
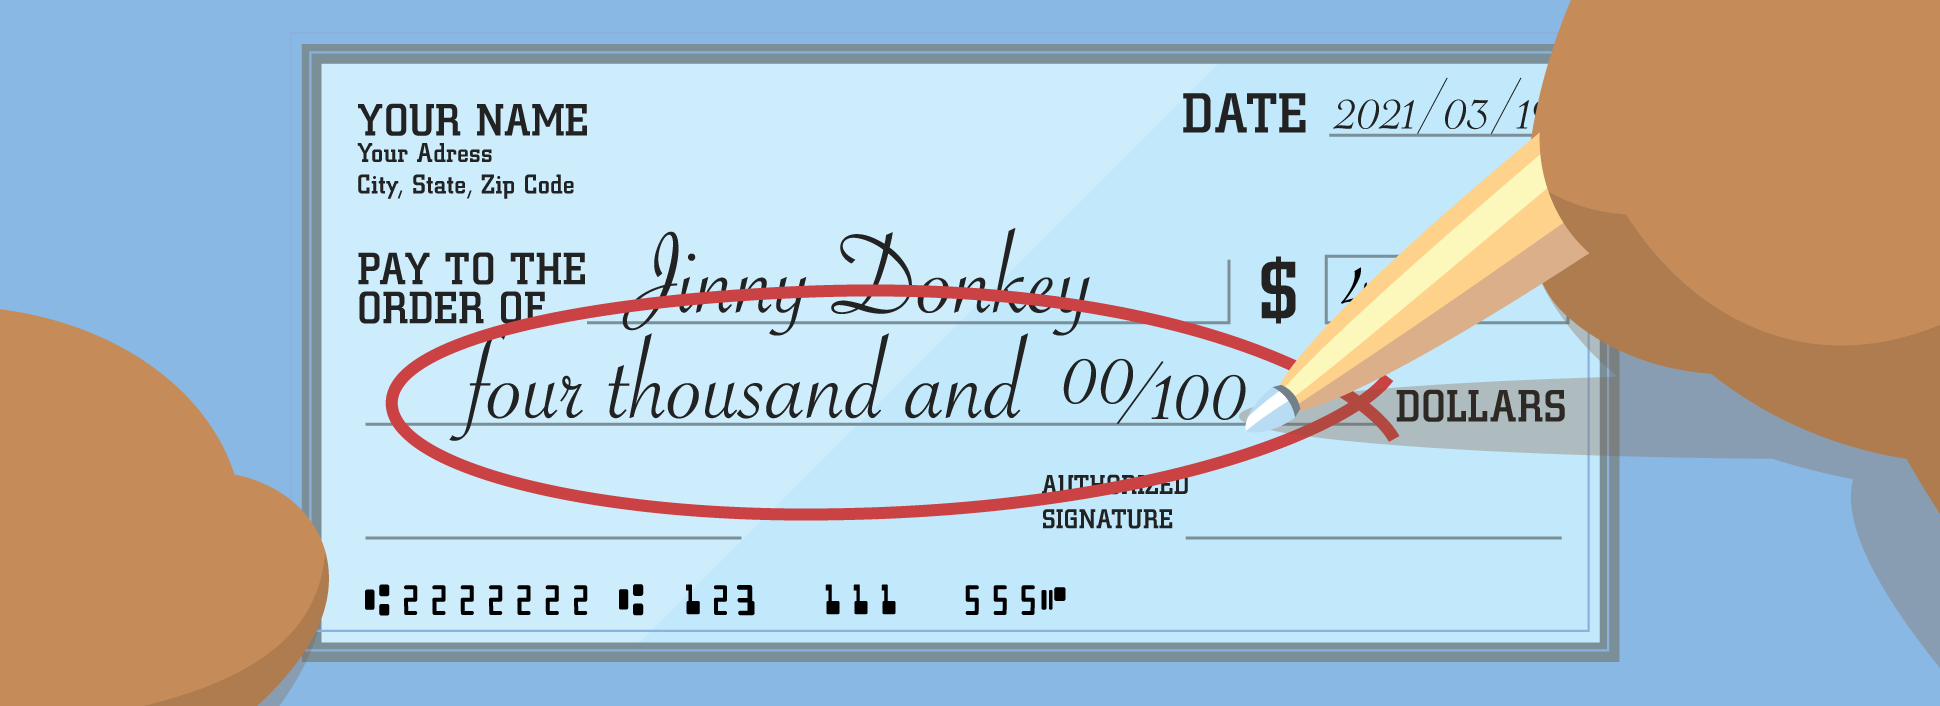
This is a critical step for security. On the long line below the payee line, write out the dollar amount in words. This acts as a safeguard; if there’s a discrepancy between the numeric and written amounts, the bank typically honors the written amount.
For $150.50, you would write: “One Hundred Fifty and 50/100 Dollars”.
- Start writing at the far left of the line to prevent alterations.
- Spell out the dollar amount fully.
- Use “and” to separate the dollars from the cents.
- Represent cents as a fraction over 100 (e.g., “50/100”).
- If the amount is a whole dollar amount, you can write “00/100” or “No/100” after the dollar amount (e.g., “One Hundred Fifty and 00/100 Dollars”).
- Draw a line from the end of the written amount to the word “Dollars” or the end of the line to prevent additions.
Memo Line (For Your Records)
The “Memo” or “For” line is optional but highly recommended. Use it to briefly describe the purpose of the payment (e.g., “Rent – January,” “Invoice #4567,” “Birthday Gift”). This helps you, and potentially the payee, remember what the payment was for, making reconciliation easier. When writing a check for a bill, include the account number if applicable.
Signature (Authorizing the Payment)
Finally, and most importantly, sign your name on the signature line in the bottom right corner. Your signature authorizes Chase Bank to release the funds from your account. The signature should match the one on file with your bank to avoid any issues. Without a signature, the check is invalid and cannot be cashed or deposited.
Ensuring Security and Avoiding Common Mistakes
Writing a check, even a Chase Bank check, comes with inherent responsibilities regarding security and accuracy. A small oversight can lead to significant headaches, from returned checks to potential fraud.
Preventing Fraud: Key Security Measures
- Use a Pen, Not a Pencil: Always use a non-erasable pen (blue or black ink is best) to prevent alterations.
- Fill All Fields: Don’t leave any blanks. If a field isn’t applicable, draw a line through it (e.g., the unused portion of the written amount line) to prevent additions.
- Keep Checks Secure: Treat blank checks like cash. Store them in a safe place where they cannot be easily stolen or accessed.
- Shred Old Checks: When checks are no longer needed (e.g., from a closed account), shred them to protect your account information.
- Monitor Your Account: Regularly review your Chase bank statements and online banking activity to spot any unauthorized transactions immediately.
- Never Sign a Blank Check: This is an open invitation for fraud. Only sign a check after all other fields have been accurately filled out.
- Be Wary of Overpayment Scams: If someone sends you a check for more than you’re owed and asks you to send back the difference, it’s almost certainly a scam.
Common Errors to Sidestep
- Missing or Incorrect Date: An incorrect date can lead to processing delays or issues with post-dated checks.
- Illegible Handwriting: Banks process thousands of checks daily; clear handwriting ensures your check is read correctly.
- Mismatching Amounts: Ensure the numeric and written amounts match perfectly. If they don’t, the bank will typically defer to the written amount, which might not be your intention.
- Missing Signature: A check without a signature is void.
- Incorrect Payee Name: If the payee’s name is misspelled or incorrect, they may have trouble cashing or depositing the check.
- Overwriting or Erasing: If you make a mistake, it’s often better to void the check and write a new one rather than trying to erase or heavily cross out. Erasures can raise red flags for fraud.
What to Do If You Make a Mistake
If you make a minor, correctable mistake (e.g., a slight smudge), you might be able to initial next to the correction. However, for significant errors, especially involving the amount or payee, it’s safest to void the check. To void a check, write the word “VOID” in large letters across the front of the check and tear off the signature line, making it clear it cannot be used. Always record the voided check in your check register. Then, simply write a new check with the correct information.
Beyond the Basics: When and Why to Use a Check
While digital payments have surged, checks still hold a valuable place in the financial ecosystem. Understanding when and why to use them can help you manage your finances more effectively.
Scenarios Where Checks Remain Relevant
- Paying Rent or Mortgage: Many landlords, especially private ones, still prefer or require checks.
- Paying Small Businesses/Service Providers: Local businesses, contractors, or individual service providers (like gardeners or babysitters) often prefer checks to avoid transaction fees associated with credit cards or digital platforms.
- Gifting Money: A check enclosed in a card is a traditional and personal way to give money for birthdays, weddings, or holidays.
- Making Charitable Donations: Checks provide a clear paper trail for tax purposes and can sometimes be preferred by non-profits to avoid processing fees.
- Transactions Requiring a Paper Trail: For large purchases or specific agreements, a physical check offers a tangible record of payment, which can be beneficial for legal or accounting purposes.
- Lack of Digital Access: Not everyone has access to or prefers digital payment methods. Checks offer an inclusive alternative.
Understanding Check Clearing and Funds Availability
When you write a check, the funds don’t immediately leave your Chase account. The check must “clear.” This process involves the payee depositing the check, their bank sending it to the Federal Reserve or a clearinghouse, which then forwards it to Chase for verification and fund transfer. This can take anywhere from one to several business days. It’s crucial to ensure you have sufficient funds in your account when you write the check and maintain them until it clears to avoid overdraft fees or a returned check.
Keeping a Record: The Check Register
Your checkbook typically comes with a check register – a small ledger to record every check you write. This is an indispensable tool for tracking your spending and reconciling your Chase bank statements. For each check, record:
- The check number
- The date written
- The payee
- The amount
- A brief memo
- Your current balance
This practice provides an ongoing record of your transactions, helps prevent overdrafts, and aids in budgeting and financial planning. Even if you manage your finances mostly online, updating your check register immediately after writing a check is a fundamental discipline.
The Evolving Landscape of Payments: Checks vs. Digital Alternatives
The financial world is dynamic, with new payment methods constantly emerging. Understanding the place of checks within this landscape is key to informed financial decision-making.
Pros and Cons of Using Checks Today
Pros:
- Tangible Record: A physical paper trail for both sender and receiver.
- No Transaction Fees: Generally, writing a check doesn’t incur fees for the writer or the receiver (unlike credit card processing).
- Universal Acceptance: Still widely accepted in many situations where digital payments might not be.
- Security for Large Amounts: For very large payments, some people prefer the traceable nature of a check over carrying large sums of cash.
- Budgeting Aid: Writing checks can feel more deliberate than swiping a card, potentially encouraging more thoughtful spending.
Cons:
- Slower Processing: Funds take longer to clear compared to electronic transfers.
- Risk of Fraud/Theft: Physical checks can be stolen, leading to potential access to bank account information.
- Manual Tracking: Requires diligent record-keeping in a check register.
- Inconvenience: Requires physical checks, a pen, and mailing if not delivered in person.
- Potential for Errors: Human error in writing can lead to returned checks or delays.
Modern Payment Methods and Their Role
Chase Bank, like most financial institutions, offers a suite of digital payment options that often complement or replace checks:
- Online Bill Pay: Pay bills directly from your Chase online banking account, often with guaranteed payment dates.
- Zelle®: A fast, free, and easy way to send and receive money with friends, family, and others you trust, directly from the Chase Mobile® app. Funds typically move within minutes between enrolled users.
- Wire Transfers: For larger, urgent international or domestic transfers, though often incurring fees.
- Debit and Credit Cards: Ubiquitous for everyday purchases, offering convenience and fraud protection.
- ACH Transfers: Automated Clearing House transfers for direct deposits, recurring bill payments, and interbank transfers.
These digital alternatives offer speed, convenience, and often enhanced security features that paper checks simply cannot match. However, they don’t entirely eliminate the need for checks.

Maintaining Financial Prudence in a Hybrid World
The savvy financial manager uses a combination of payment methods, choosing the most appropriate tool for each transaction. Knowing how to write a Chase Bank check correctly is part of a broader financial literacy that involves:
- Understanding your options: Being aware of when a check is necessary or preferable versus when a digital payment is more efficient.
- Prioritizing security: Regardless of the method, always protect your financial information.
- Diligent record-keeping: Whether through a check register or digital transaction histories, keeping track of your money is crucial.
- Regular reconciliation: Comparing your personal records with your Chase bank statements to ensure accuracy.
In conclusion, while the world moves towards digital, the skill of writing a check for your Chase Bank account remains a fundamental aspect of personal finance. It provides a secure, traditional, and often necessary method of payment. By understanding its components, following the step-by-step instructions, and adhering to best security practices, you can confidently navigate this aspect of your financial life, ensuring your payments are always accurate and effective.
aViewFromTheCave is a participant in the Amazon Services LLC Associates Program, an affiliate advertising program designed to provide a means for sites to earn advertising fees by advertising and linking to Amazon.com. Amazon, the Amazon logo, AmazonSupply, and the AmazonSupply logo are trademarks of Amazon.com, Inc. or its affiliates. As an Amazon Associate we earn affiliate commissions from qualifying purchases.