In the ecosystem of a personal computer, the Central Processing Unit (CPU) is often lauded as the “brain,” while the Graphics Processing Unit (GPU) is celebrated as the “muscle” behind visual fidelity. However, there is a third, often overlooked component that acts as the “nervous system” of the entire operation: the chipset. The chipset is a collection of integrated circuits on the motherboard that manages the data flow between the processor, memory, and peripherals.
Maintaining the software that governs this hardware—the chipset drivers—is crucial for ensuring that your system operates at peak efficiency. Unlike a simple app update, chipset drivers sit at a low level of the operating system, facilitating communication between the hardware and Windows or Linux. In this guide, we will explore why these updates are necessary, how to identify your hardware, and the precise steps required to keep your system optimized.

Understanding the Role of the Chipset in Modern Computing
To appreciate why updating chipset drivers is vital, one must first understand what the chipset actually does. In contemporary motherboard architecture, the chipset (often referred to by names like Intel’s Z790 or AMD’s X670) controls the high-speed communication lanes, such as PCIe slots, USB ports, SATA connections, and the integration of onboard audio and networking.
What is a Chipset?
The chipset is essentially the gatekeeper of the motherboard. Historically, this was split into a “Northbridge” (handling high-speed communication with the RAM and GPU) and a “Southbridge” (handling slower I/O like USB and BIOS). In modern systems, most Northbridge functions have been integrated directly into the CPU, while the remaining duties are handled by a single Platform Controller Hub (PCH) or a Unified Chipset. When you update your chipset drivers, you are essentially providing the operating system with an updated map of how to interact with these physical pathways.
Why Drivers Matter for the Motherboard
Without functional drivers, the operating system might resort to “generic” drivers provided by Microsoft. While these allow the computer to boot, they often lack optimization for power management, thermal throttling, and maximum data throughput. Updating chipset drivers can resolve a variety of issues, including:
- System Latency: Reducing “micro-stutters” during heavy workloads.
- Peripheral Compatibility: Ensuring new USB 3.2 or Thunderbolt devices are recognized and operate at full speed.
- Power Efficiency: Allowing the CPU to enter deeper sleep states, which is particularly beneficial for laptop battery life.
- Bus Stability: Preventing crashes or Blue Screen of Death (BSOD) errors related to PCIe timing or memory controller communication.
Identifying Your Chipset and Hardware Specifications
Before downloading any files, you must accurately identify the hardware inside your machine. Installing the wrong chipset drivers can, at best, fail to install and, at worst, cause system instability that requires a Windows recovery.
Using Windows Device Manager and System Information
The most direct way to see what your system is running is through built-in Windows tools.
- Device Manager: Right-click the Start button and select “Device Manager.” Look under “System devices.” Here, you will see entries like “Intel(R) Management Engine Interface” or “AMD PCI Hub.” This gives you a hint of the manufacturer.
- System Information (msinfo32): Press
Win + R, typemsinfo32, and hit Enter. Look for “BaseBoard Product” and “BaseBoard Manufacturer.” This tells you exactly which motherboard you have (e.g., ASUS ROG STRIX Z690-E). Knowing the motherboard model is often easier than searching for the chipset model alone, as motherboard manufacturers provide curated driver packages.
Utilizing Third-Party Identification Tools
For enthusiasts who want more granular data, third-party utilities like CPU-Z or HWiNFO are invaluable. These tools provide a dedicated “Mainboard” tab that lists the chipset vendor (Intel or AMD), the specific model (e.g., B550, X570, H610), and the current BIOS version. This data is critical because sometimes a chipset driver update requires a specific BIOS version to be installed first to ensure compatibility with new silicon features.
Step-by-Step Guide to Updating Chipset Drivers
There are three primary methods to update your drivers, ranging from the fully automated to the manual “pro” approach.
Method 1: Windows Update (The Automated Route)
Windows 10 and 11 are designed to handle driver updates automatically. While this is the most convenient method, it is often the slowest to receive the latest optimizations.
- Go to Settings > Windows Update.
- Click “Check for updates.”
- Look for “Advanced options” > “Optional updates.” Chipset drivers are frequently tucked away in the “Driver updates” sub-menu rather than the main critical update list.
- Note: If your system is running smoothly, the Windows Update version is usually “good enough.” However, for gaming or professional workstations, Method 2 is preferred.
Method 2: Manufacturer Direct (Intel and AMD Tools)
The two titans of the chipset world, Intel and AMD, provide automated tools that scan your system and install the latest drivers directly from the source.
- Intel Driver & Support Assistant (Intel DSA): This web-based tool identifies your Intel components and notifies you when a new chipset, Wi-Fi, or Bluetooth driver is available. It is highly reliable and ensures you are using Intel’s latest reference drivers.
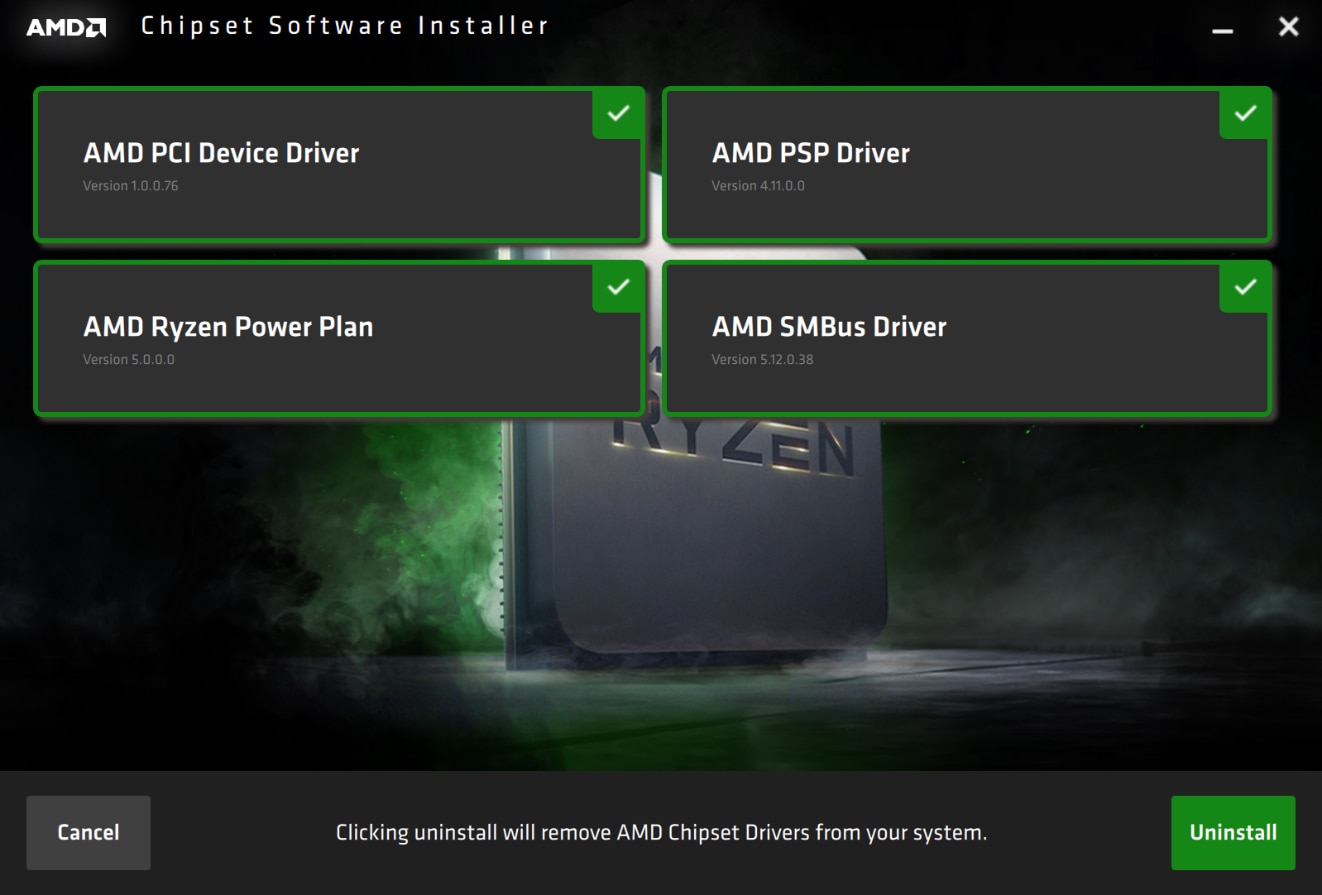
- AMD Auto-Detect and Install: For Ryzen users, AMD provides a small executable that detects your chipset (e.g., B450, X670E) and offers a “Chipset Software” package. This package is essential for Ryzen processors because it includes the “AMD Ryzen Power Plans,” which optimize how the Windows scheduler handles the CPU’s unique core architecture.
Method 3: Motherboard Vendor Portals
If you have a custom-built PC or a high-end gaming laptop, your motherboard manufacturer (ASUS, MSI, Gigabyte, ASRock) often “tunes” the chipset drivers for their specific hardware.
- Visit the manufacturer’s official support website.
- Search for your specific motherboard model.
- Navigate to the “Drivers & Tools” or “Downloads” section.
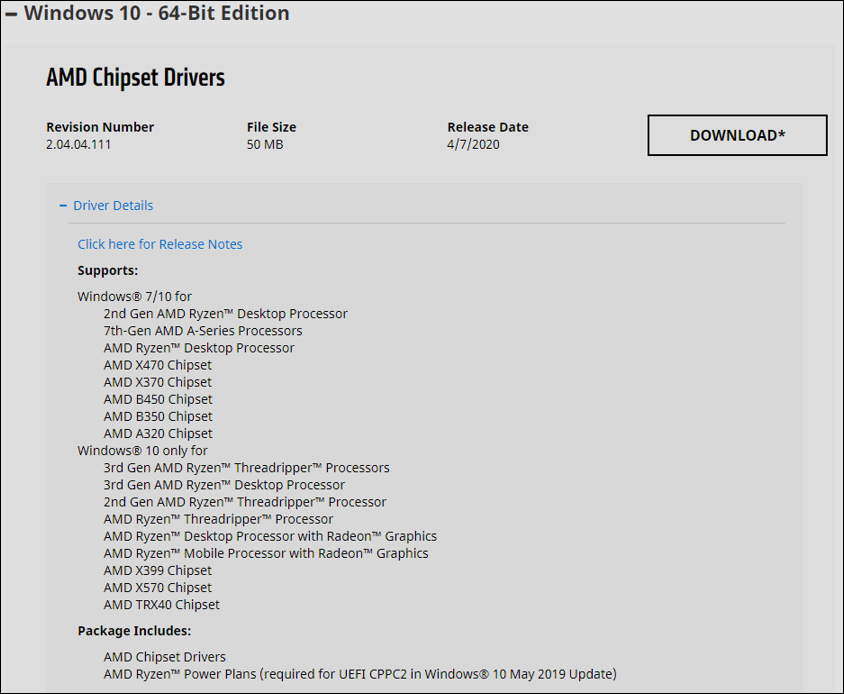
- Select your Operating System (e.g., Windows 11 64-bit).
- Download the “Chipset” package. This is often a ZIP file. Extract it and run the
Setup.exeas an Administrator.
Post-Installation Best Practices and Troubleshooting
Updating low-level drivers carries a small risk. Following a disciplined post-installation routine can save hours of frustration.
Verifying the Installation and System Restore
Before running any driver update, it is a “best practice” to create a System Restore Point. If the new driver causes a boot loop or disables your USB ports, you can easily roll back to a functional state.
Once the update is complete and you have rebooted your PC:
- Return to Device Manager.
- Right-click the chipset components and select “Properties.”
- Check the Driver Date and Driver Version. If they match the version number of the package you downloaded, the installation was successful.
Dealing with Installation Errors
Occasionally, a chipset driver will fail to install, citing “Hardware not detected” or “Access denied.”
- Clean Uninstall: Sometimes, old driver fragments interfere with new ones. While chipset drivers don’t usually require a “Display Driver Uninstaller” (DDU) like GPUs do, running a “Disk Cleanup” or using the “Uninstall” feature in the manufacturer’s installer can help.
- BIOS Prerequisites: If you are moving to a much newer driver (for example, preparing a motherboard for a newer generation of CPU), ensure your BIOS is updated. The chipset driver acts as the bridge between the OS and the BIOS; if the BIOS doesn’t support the instructions the driver is sending, the system will fail.
The Impact of Chipset Updates on Security and Longevity
Beyond performance, chipset updates are a critical component of digital hygiene and hardware longevity. In an era of sophisticated cyber-attacks, security is no longer just about your antivirus software; it starts at the silicon level.
Patching Vulnerabilities at the Silicon Level
Modern chipsets include specialized sub-processors, such as the Intel Management Engine (ME) or the AMD Secure Processor (PSP). These handle security tasks, encryption, and system boot integrity. Over the years, researchers have found vulnerabilities in these sub-processors (like the famous Spectre and Meltdown variants). Chipset driver updates often include patches for these low-level security flaws that cannot be fixed by standard software updates.
Optimizing Power Management and Thermal Efficiency
Thermal management is a key factor in the lifespan of your components. A chipset driver update can refine how the motherboard manages voltage regulation modules (VRMs) and how it communicates thermal data to the fans. By optimizing the “handshake” between the CPU and the motherboard’s power delivery system, these updates can reduce unnecessary heat generation during idle periods. This not only extends the life of the motherboard’s capacitors but also contributes to a quieter computing environment by reducing fan noise.
In conclusion, while chipset drivers may not offer the flashy performance gains of a new GPU driver, they are the foundation upon which a stable and secure system is built. By identifying your hardware accurately and sourcing your drivers from reputable manufacturer portals, you ensure that your PC remains responsive, efficient, and ready for the demands of modern software. Whether you are a casual user or a power user, a bi-annual check for chipset updates is a small investment of time that pays significant dividends in system health.
aViewFromTheCave is a participant in the Amazon Services LLC Associates Program, an affiliate advertising program designed to provide a means for sites to earn advertising fees by advertising and linking to Amazon.com. Amazon, the Amazon logo, AmazonSupply, and the AmazonSupply logo are trademarks of Amazon.com, Inc. or its affiliates. As an Amazon Associate we earn affiliate commissions from qualifying purchases.