Windows 11 represents the latest evolution of Microsoft’s operating system, bringing with it a refreshed user interface, enhanced productivity features, and a stronger focus on security and gaming. For many, the upgrade is an exciting prospect, offering a glimpse into the future of computing. However, for a significant number of users, the automatic or persistent prompting to install Windows 11 can be an unwelcome intrusion. Whether it’s due to compatibility concerns with critical software, a preference for the familiar stability of Windows 10, or simply a desire to maintain control over system changes, there are legitimate reasons why you might want to stop Windows 11 from installing on your computer.
Microsoft’s update mechanisms are designed to keep systems secure and up-to-date, often pushing the latest OS versions as recommended upgrades. While this approach benefits many, it can disrupt workflows for businesses and individuals who rely on specific configurations or legacy applications. This comprehensive guide will walk you through various methods, from simple settings adjustments to more advanced system configurations, to help you regain control and prevent an unwanted Windows 11 installation. We’ll cover strategies for Windows Home and Pro users alike, ensuring you can manage your operating system upgrade path on your terms.
Understanding Why You Might Want to Delay or Block Windows 11
Before diving into the technical steps, it’s crucial to understand the common motivations behind wanting to halt a Windows 11 installation. This context not only validates your decision but also helps in choosing the most appropriate method for your situation.
Compatibility Concerns with Hardware or Software
One of the primary reasons users hesitate to upgrade is the potential for compatibility issues. While Windows 11 is designed to be broadly compatible, certain hardware components (especially older peripherals or specialized internal cards) might not have updated drivers. More critically, specific professional software, legacy applications, or custom-built enterprise tools might not function correctly or at all on Windows 11. Testing and validation can be a lengthy process, and an unexpected upgrade could lead to significant downtime or loss of functionality. Businesses, in particular, often need to ensure their entire ecosystem of applications and devices functions flawlessly before committing to a new OS, making a forced upgrade a serious concern.
Preference for Windows 10’s Stability and Interface
Many users have grown accustomed to Windows 10’s interface, workflow, and overall stability. Its mature ecosystem of drivers, patches, and feature updates has ironed out most major bugs, offering a reliable computing experience. Windows 11 introduces a redesigned Start menu, a centered taskbar, new widget panels, and significant changes to system settings. While visually appealing, these changes can disrupt muscle memory and require a new learning curve. Some users simply prefer the tried-and-true Windows 10, finding its design more efficient or its current state more stable for their daily tasks, and don’t wish to adapt to a new paradigm just yet.
Avoiding Potential Bugs and Early-Adopter Issues
Every major operating system release, regardless of rigorous testing, inevitably comes with its share of bugs, performance quirks, and unforeseen issues in real-world scenarios. Early adopters often serve as an extended beta testing group, identifying problems that are later addressed in subsequent patches and updates. For users who prioritize uninterrupted productivity and system reliability, waiting for Windows 11 to mature—allowing Microsoft to release several cumulative updates that resolve initial issues—is a sensible strategy. Preventing an early installation helps avoid potential frustrations with new bugs, driver conflicts, or performance bottlenecks that might arise in the initial versions of the OS.
Managing Specific System Requirements
Windows 11 has stricter minimum system requirements than its predecessor, notably requiring a Trusted Platform Module (TPM) version 2.0 and Secure Boot enabled. While most modern PCs meet these criteria, older systems or those with specific hardware configurations might not. Even if a system barely meets the requirements, users might worry about potential performance degradation after the upgrade. Preventing the installation allows users to stay on a known-good configuration for their hardware, rather than risking a sluggish or unsupported system after an OS change. Furthermore, for some, the additional security features like TPM 2.0 and Secure Boot, while beneficial, might introduce complications with certain specialized boot setups or virtual machine environments.
Proactive Measures: Preventing the Upgrade Before It Starts
Stopping Windows 11 from installing requires a proactive approach. Microsoft’s update service is designed to be persistent, so you’ll need to implement specific settings to halt the upgrade process effectively. These methods range from simple toggle switches to more advanced system configurations.
Postponing Updates via Windows Update Settings
The simplest and most straightforward method to delay Windows 11 is by managing your Windows Update settings. This won’t permanently block the update, but it can buy you significant time.
- Open Windows Update Settings:
- Go to Start > Settings > Update & Security (on Windows 10) or Windows Update (on Windows 11, if you’re already there and looking to revert or manage).
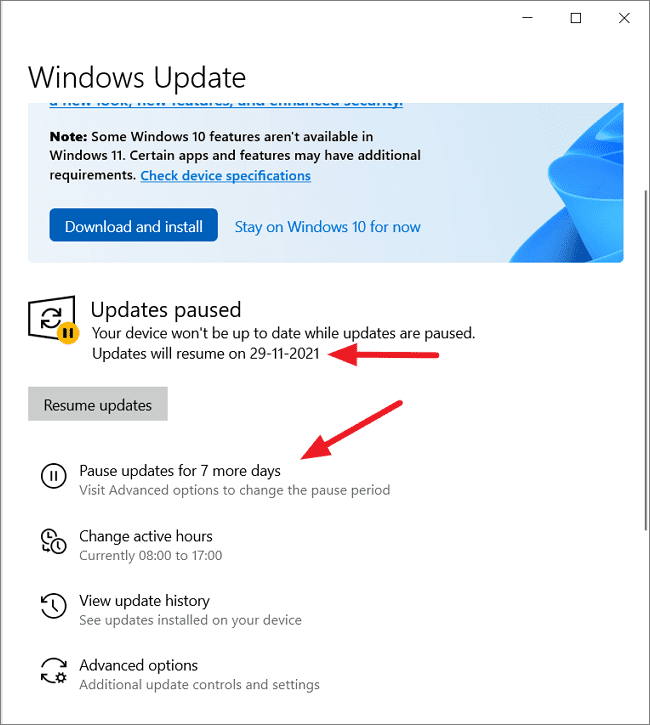
- Pause Updates:
- On Windows 10, look for the “Pause updates for 7 days” option. You can click this multiple times to extend the pause for several weeks.
- Alternatively, click on “Advanced options.” Here, you’ll find a dropdown menu under “Pause updates” where you can select a specific date up to 35 days in the future.
- Delay Feature Updates (Windows 10 Pro, Enterprise, Education):
- In “Advanced options,” scroll down to “Choose when updates are installed.” You can select to defer feature updates (which include new OS versions like Windows 11) for up to 365 days. Set the number of days you wish to defer. This is a powerful tool for longer-term prevention.
- You can also choose a “Targeted Feature Release” here, which essentially tells Windows not to update beyond a certain version until you’re ready.
This method is effective for temporary delays, giving you time to prepare, back up, or wait for more stable versions of Windows 11 to be released. However, after the deferral period expires, Windows will attempt to install the update again.
Leveraging Group Policy Editor (Windows Pro, Enterprise, Education)
For users with Windows 10 Pro, Enterprise, or Education editions, the Group Policy Editor (GPEdit.msc) offers a robust way to prevent the Windows 11 upgrade by targeting specific feature update versions. This method provides more granular control than basic Windows Update settings.
- Open Group Policy Editor:
- Press
Win + Rto open the Run dialog. - Type
gpedit.mscand press Enter.
- Press
- Navigate to Windows Update Policy:
- In the Group Policy Editor, navigate to:
Computer Configuration > Administrative Templates > Windows Components > Windows Update > Manage updates offered from Windows Update - Alternatively, in some versions, it might be under:
Computer Configuration > Administrative Templates > Windows Components > Windows Update > Windows Update for Business
- In the Group Policy Editor, navigate to:
- Configure “Select the target Feature Update version”:
- Double-click on the policy setting named “Select the target Feature Update version.”
- Select “Enabled.”
- In the “Options” section:
- Product Version: Type
Windows 10(this ensures you stay on the Windows 10 branch). - Target Feature Update Version: Enter
22H2(or the latest stable Windows 10 version number, e.g., 21H2, 20H2). This tells your system to not install any feature updates beyond this specific Windows 10 version.
- Product Version: Type
- Click “Apply” and then “OK.”
- Force Policy Update:
- Open Command Prompt as an administrator.
- Type
gpupdate /forceand press Enter to apply the new policy immediately.
This method effectively “freezes” your system on a specific Windows 10 feature update, preventing Windows 11 from being offered or installed. It’s a powerful tool for long-term control, particularly in managed environments.
Modifying the Registry Editor (Windows Home and Advanced Users)
For Windows 10 Home users who don’t have access to the Group Policy Editor, or for advanced users seeking an alternative, modifying the Windows Registry offers a similar level of control. Caution: Editing the Registry incorrectly can cause serious system instability or render your PC unbootable. Always back up your Registry before making changes.
- Backup Your Registry (Crucial Step):
- Press
Win + R, typeregedit, and press Enter. - Go to
File > Export, choose a location, name the file, and save it. This creates a backup.
- Press
- Navigate to the Windows Update Key:
- In the Registry Editor, navigate to:
HKEY_LOCAL_MACHINESOFTWAREPoliciesMicrosoftWindowsWindowsUpdate - If the
WindowsUpdatekey doesn’t exist, right-click onWindows, selectNew > Key, and name itWindowsUpdate.
- In the Registry Editor, navigate to:
- Create or Modify Relevant Values:
- Right-click on the
WindowsUpdatekey, selectNew > DWORD (32-bit) Value. - Name the new value
TargetReleaseVersion. Double-click it and set itsValue datato1. - Create another
New > String Value. - Name this value
TargetReleaseVersionInfo. Double-click it and set itsValue datato22H2(or the desired Windows 10 feature update version, e.g.,21H2).
- Right-click on the
- Restart Your PC:
- After making these changes, restart your computer for them to take effect.
This registry modification instructs Windows Update to only offer feature updates up to the specified Windows 10 version, effectively blocking the Windows 11 upgrade. Remember to revert these changes if you decide to upgrade in the future.
Disabling the “PC Health Check” App and Related Notifications
Microsoft often uses the “PC Health Check” app and persistent notifications to encourage users to upgrade to Windows 11. While uninstalling the app might seem trivial, it’s part of a broader strategy to manage these prompts.
- Uninstall PC Health Check:
- Go to Start > Settings > Apps > Apps & features.
- Search for “PC Health Check” in the list.
- Click on it and select “Uninstall.”
- This won’t stop the upgrade itself but will remove a primary source of nagging notifications and make it harder for the system to actively push the upgrade prompt based on compatibility checks.
- Manage Notification Settings:
- Go to Start > Settings > System > Notifications & actions.
- Review the list of apps and sources that can send notifications. You might find system-level notifications related to Windows updates. While you can’t typically disable all update notifications without affecting critical security updates, you can often mute or prioritize specific app notifications if they become overly intrusive.
- Adjusting Telemetry (Advanced Users):
- While not directly stopping the installation, reducing diagnostic data can sometimes lessen the frequency of upgrade prompts, as Microsoft uses this data to target updates. Go to Settings > Privacy > Diagnostics & feedback and set “Diagnostic data” to “Required diagnostic data” or “Basic.” This might not be foolproof but can be part of a broader strategy to minimize Microsoft’s proactive upgrade efforts.
By removing the PC Health Check app and managing notification settings, you reduce the direct encouragement and prompts for the Windows 11 upgrade, making it a more passive process rather than an active push from Microsoft.
Advanced Techniques for Persistent Prevention
For those who require a more robust or longer-term solution, especially in environments where strict control over OS versions is paramount, these advanced techniques can provide further safeguards.
Blocking Specific Update KBs (Caution Advised)
Windows updates are identified by a Knowledge Base (KB) article number. Theoretically, you could identify the specific KB number for the Windows 11 upgrade and block it. However, this is generally not recommended for the average user for several reasons:
- Difficulty in Identification: The specific KB number for a full OS upgrade like Windows 11 might change, or it might be bundled with other essential security updates.
- Risk of Blocking Critical Updates: Accidentally blocking security or other important updates can leave your system vulnerable.
- Microsoft’s Persistence: Microsoft often re-releases or re-bundles updates, making a single KB block a temporary fix at best.

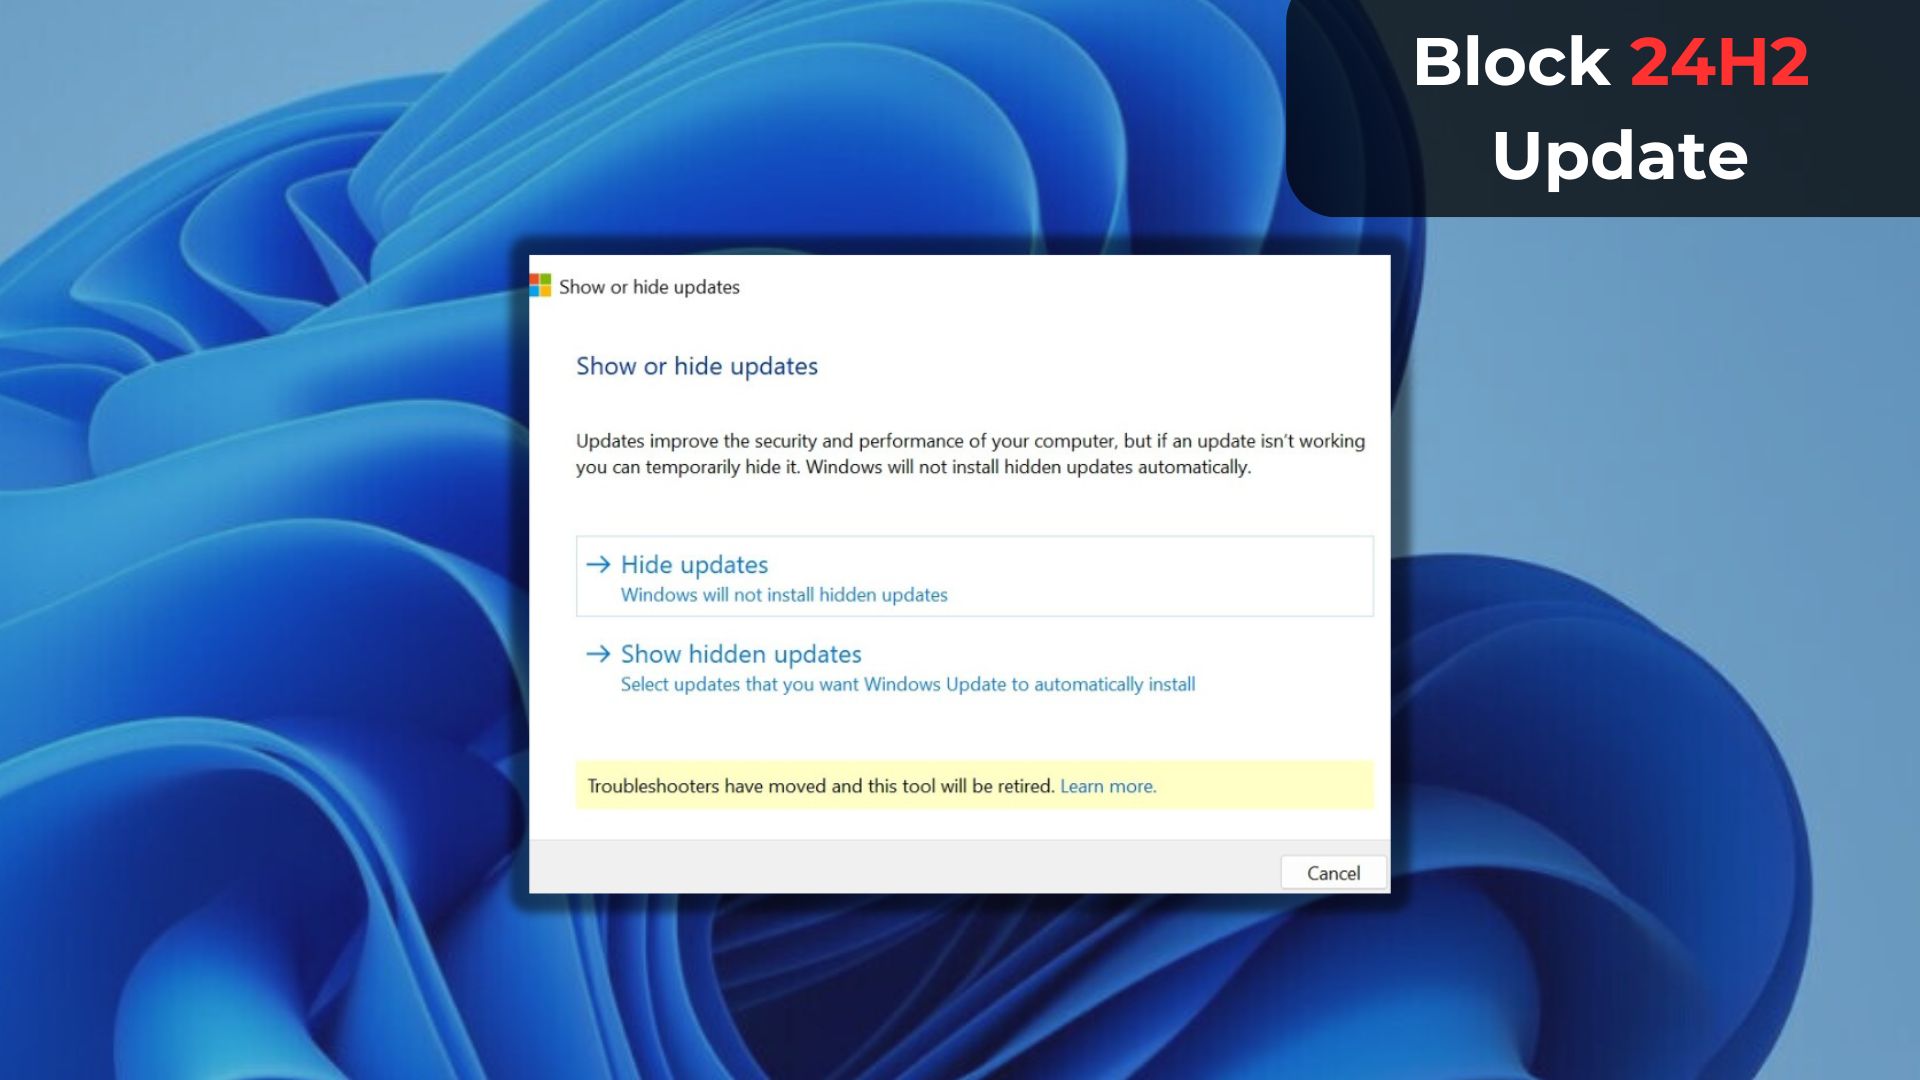
If you absolutely must pursue this, you would typically use tools like wushowhide.diagcab (Microsoft’s Show or hide updates troubleshooter, if still available and compatible) or a PowerShell script to block specific updates. However, this is a highly technical solution with significant risks and should only be considered by IT professionals in controlled environments. The Group Policy and Registry methods mentioned earlier are far safer and more effective for blocking feature upgrades.
Using Specialized Third-Party Tools (Use with Discretion)
There are some third-party utilities designed to manage Windows updates and prevent unwanted upgrades. Tools like “Windows Update Blocker” or “StopUpdates10” claim to offer more comprehensive control over the update process.
- How they generally work: These tools often manipulate Windows services or registry entries to disable or severely restrict Windows Update functionality.
- Pros: Can be effective in completely stopping updates, including OS upgrades.
- Cons:
- Security Risks: Completely disabling Windows Update means you won’t receive critical security patches, leaving your system vulnerable to exploits. This is a significant risk.
- Reliability: Third-party tools might not always be compatible with future Windows updates, leading to system instability.
- Trust: You are entrusting a third-party application with control over a critical system component. Ensure the source is reputable.
Recommendation: While these tools exist, their use should be approached with extreme caution. For most users, the built-in Group Policy or Registry methods offer a safer and sufficiently effective way to manage Windows 11 upgrades without compromising overall system security. If you do choose this route, ensure you periodically re-enable updates to install security patches.
Disconnecting from the Internet During Key Update Periods
This is a somewhat rudimentary but effective method for preventing an installation that has already been downloaded or is attempting to download. If you notice the system is preparing for an upgrade and you want to prevent it immediately, disconnecting from the internet can halt the download process and, in some cases, even prevent the installation stage from proceeding if it requires online validation.
- When to use: If you see “Preparing to install Windows 11” or similar messages and have not yet restarted your PC for the upgrade.
- How to do it:
- Physically unplug your Ethernet cable.
- Turn off Wi-Fi on your laptop or desktop.
- Limitations: This is a temporary measure. Once you reconnect to the internet, Windows Update will likely resume its efforts. It’s more of an emergency stopgap than a long-term solution and doesn’t address the underlying update settings. It also prevents any other internet-dependent activity.
This method should be combined with the more permanent solutions like Group Policy or Registry edits to be truly effective in the long run.
What to Do If Windows 11 Starts or Completes Installation Accidentally
Despite your best efforts, sometimes an unwanted Windows 11 installation might slip through. Perhaps a setting was overlooked, or the system proceeded with an upgrade during a reboot. Fortunately, Windows provides mechanisms to revert to your previous operating system, though these are time-sensitive.
Reverting to Windows 10 Within the Grace Period
Microsoft understands that users might change their minds or encounter issues after an upgrade. Therefore, Windows 11 includes a built-in rollback feature that allows you to return to Windows 10 within a specific timeframe, typically 10 days (though sometimes extended to 60 days on specific builds or in certain scenarios).
- Access Recovery Options:
- Go to Start > Settings > System > Recovery.
- Initiate “Go back” (or “Previous version of Windows”):
- Under the “Recovery options” section, look for “Go back” or “Previous version of Windows.”
- Click the “Go back” button.
- Follow the On-Screen Prompts:
- Windows will ask for your reason for reverting. Provide feedback if you wish.
- The system will then begin the rollback process, which can take some time. Your PC will restart multiple times.
- Important Considerations:
- Time Limit: This option is only available for 10 (or up to 60) days after the upgrade. After this period, the necessary files for rollback are automatically removed to free up disk space.
- Data Integrity: While generally safe, it’s always recommended to back up your important files before any major OS change or rollback, just in case.
- User Profiles: If you’ve created new user accounts on Windows 11, they might not be preserved after the rollback.
This is the easiest and least disruptive way to return to Windows 10 if you’ve accidentally upgraded.
Performing a Clean Reinstall of Windows 10
If the 10-day grace period has passed, or if the rollback process fails for any reason, your only recourse to return to Windows 10 is a clean reinstall. This is a more drastic measure but ensures a fresh, stable installation of your preferred OS.
- Back Up All Your Data: This is absolutely critical, as a clean reinstall will erase everything on your system drive. Back up documents, photos, videos, music, and any other important files to an external drive or cloud storage.
- Create Windows 10 Installation Media:
- Visit the official Microsoft Windows 10 download page on another PC.
- Download the Media Creation Tool.
- Use the tool to create a bootable USB drive (at least 8GB) or burn an ISO to a DVD.
- Boot from Installation Media:
- Insert the USB drive or DVD into your PC.
- Restart your PC and enter your BIOS/UEFI settings (usually by pressing F2, Del, F10, or F12 during startup).
- Change the boot order to prioritize booting from the USB drive or DVD.
- Follow Windows 10 Installation Steps:
- Once the Windows 10 installer loads, follow the on-screen prompts.
- When prompted to choose an installation type, select “Custom: Install Windows only (advanced).”
- Delete all partitions on your primary drive (the one where Windows 11 is installed).
- Select the unallocated space and click “Next” to install Windows 10.
- Reinstall Drivers and Software:
- After installation, you’ll need to reinstall all your drivers, applications, and restore your backed-up data.
A clean reinstall is a time-consuming process but provides the most thorough way to get back to a stable Windows 10 environment, completely free of any residual Windows 11 components.
Maintaining Control and Future Considerations
Successfully preventing an unwanted Windows 11 installation is just one part of effective system management. To ensure continued stability and security, it’s important to adopt practices that maintain your control over the operating system’s evolution.
Regularly Reviewing Windows Update Settings
Even after implementing prevention methods, it’s a good habit to periodically review your Windows Update settings. Microsoft occasionally changes its update policies or releases new tools that might bypass previous configurations.
- Check Deferral Periods: Ensure your feature update deferrals (if using Group Policy or advanced settings) are still active and haven’t expired.
- Monitor for Prompts: Be vigilant for any new or persistent prompts from Windows Update that suggest an impending Windows 11 upgrade, as this could indicate your blocking methods need re-evaluation.
- Apply Security Updates: While blocking feature updates like Windows 11, ensure that critical security updates for your current Windows 10 version are still being applied. Most methods discussed here only defer feature updates, not critical security patches. If you used a third-party tool that indiscriminately blocks all updates, you must periodically enable updates to protect your system from vulnerabilities.
Backing Up Your Data Before Any Major OS Change
This cannot be stressed enough: always back up your data. Whether you are contemplating an OS upgrade, actively blocking one, or considering a rollback, a comprehensive backup is your ultimate safety net.
- Regular Backups: Implement a routine for backing up your important files to an external hard drive, network-attached storage (NAS), or a reputable cloud service (like OneDrive, Google Drive, Dropbox, or Backblaze).
- System Image Backups: For an even higher level of preparedness, consider creating a full system image backup using Windows’ built-in tools (Backup and Restore (Windows 7) in Windows 10) or third-party imaging software. This allows you to restore your entire system, including the operating system, applications, and data, to a previous working state.
Having a current backup protects you not only from unwanted OS upgrades but also from hardware failures, malware attacks, or accidental data deletion.
Understanding Microsoft’s Support Lifecycle for Windows 10
While you might be successfully preventing Windows 11, it’s crucial to be aware of the long-term implications for Windows 10. Microsoft operates on a defined support lifecycle for its operating systems.
- End of Support: Windows 10 will eventually reach its end-of-life, meaning Microsoft will cease providing free security updates, non-security updates, and assisted support. For most editions of Windows 10, this date is October 14, 2025.
- Implications: Running an unsupported operating system leaves your PC vulnerable to new security threats as patches will no longer be issued.
- Future Planning: While you can prevent Windows 11 now, you will eventually need to plan your transition to a supported operating system (likely Windows 11 or a future iteration) before the Windows 10 end-of-support date. This gives you ample time to upgrade your hardware if necessary, test software compatibility, and prepare for the change on your own terms.
By staying informed about the support lifecycle, you can make an educated decision about when and how to eventually move to a newer OS, rather than being forced into an immediate upgrade.
Conclusion
Taking control of your operating system’s upgrade path is a fundamental aspect of effective PC management, especially in today’s fast-evolving digital landscape. Whether your reasons stem from compatibility concerns, a preference for Windows 10’s stability, or simply a desire to manage system changes on your own schedule, the methods outlined in this guide empower you to stop Windows 11 from installing on your PC.
From straightforward Windows Update settings adjustments to more advanced Group Policy and Registry modifications, there are viable solutions for every user. Remember the importance of caution, particularly when editing the Registry or considering third-party tools, and always prioritize backing up your data before making significant system changes.
Ultimately, while Windows 11 offers a compelling vision for the future, the decision to upgrade should rest firmly with the user. By understanding and applying these techniques, you can ensure your system remains configured exactly how you need it, maintaining your productivity and peace of mind until you are ready to embrace the next generation of Windows. Stay informed, stay secure, and keep your technology working for you, on your terms.
aViewFromTheCave is a participant in the Amazon Services LLC Associates Program, an affiliate advertising program designed to provide a means for sites to earn advertising fees by advertising and linking to Amazon.com. Amazon, the Amazon logo, AmazonSupply, and the AmazonSupply logo are trademarks of Amazon.com, Inc. or its affiliates. As an Amazon Associate we earn affiliate commissions from qualifying purchases.