
The 2×2 Rubik’s Cube, often known as the Pocket Cube, stands as an intriguing entry point into the world of mechanical puzzles and algorithmic thinking. While seemingly simpler than its larger 3×3 sibling, the 2×2 demands precision, pattern recognition, and the systematic application of algorithms to achieve its solved state. Far from being a mere child’s toy, mastering the 2×2 hones spatial reasoning, problem-solving skills, and introduces fundamental concepts applicable across various fields, from software engineering to complex logistics. This tutorial delves into the methodical approach to conquering the 2×2, transforming a scrambled cube into a perfectly aligned masterpiece, one logical step at a time.

The Allure of the Pocket Cube: A Gateway to Algorithmic Mastery
The 2×2 cube, despite its fewer pieces, presents a surprisingly rich challenge that captivates beginners and seasoned solvers alike. Its appeal lies in its condensed complexity, serving as an excellent platform for understanding the core mechanics of cube solving without the overwhelming piece count of larger puzzles. For anyone venturing into the realm of computational logic, systems thinking, or even just brain-training, the 2×2 offers an accessible yet profound introduction.
Beyond the 3×3: Understanding the 2×2’s Unique Appeal
Unlike the 3×3, which features center pieces, edge pieces, and corner pieces, the 2×2 consists solely of corner pieces. This simplification means there are no fixed centers to orient by, adding a layer of perceived freedom that can initially confuse. However, this also streamlines the solving process, reducing the number of algorithms required and allowing for a more intuitive grasp of piece manipulation. The lack of edge pieces means that the solver only needs to concern themselves with correctly positioning and orienting the eight corner pieces. This focused approach makes the 2×2 an ideal “mini-project” for understanding basic block-building and layer-by-layer methodologies, which are foundational to solving more complex puzzles. It teaches patience, the importance of iterative improvement, and the satisfaction of breaking down a large problem into smaller, manageable chunks.
The Foundational Principles of Cube Solving
At its heart, solving any Rubik’s Cube, including the 2×2, is an exercise in applied algorithms. An algorithm, in this context, is a specific sequence of moves (rotations of faces) designed to achieve a desired state change without disrupting other already-solved parts of the cube. The process typically involves a layer-by-layer approach: first solving one layer, then orienting the pieces of the final layer, and finally permuting them into their correct positions.
Before diving into the specifics, it’s crucial to understand the basic notation for cube moves. Each face is represented by a letter:
- R (Right): The right face
- L (Left): The left face
- U (Up): The top face
- D (Down): The bottom face
- F (Front): The face directly facing you
- B (Back): The face opposite the front
A letter by itself (e.g., R) denotes a clockwise turn of that face 90 degrees. A letter followed by an apostrophe (e.g., R') denotes a counter-clockwise turn of that face 90 degrees. A letter followed by a ‘2’ (e.g., R2) means turning that face 180 degrees in either direction. Familiarity with this notation is the first step towards effectively communicating and executing algorithms.
Phase 1: Building the First Layer – The Intuitive Start
The initial phase of solving the 2×2 involves constructing one complete layer, typically the white layer. This stage is largely intuitive and serves as an excellent warm-up for the more algorithmic steps that follow. The goal is to gather all four white-faced corner pieces and position them correctly, ensuring their adjacent colors also align.
Selecting Your Starting Face and Corner
While you can start with any color, beginning with white is a common convention due to its high contrast and easy visibility against other colors. Pick any white-faced corner piece as your anchor. For example, let’s say you choose a white, blue, and red corner. This piece will be the reference point for the entire first layer. Hold the cube so this chosen corner is in the bottom-front-right position, with the white face pointing downwards.
Mastering the White Layer: Positioning the First Four Corners
The task is now to bring the remaining three white-faced corner pieces to the bottom layer and correctly orient them. Each corner piece has three colors. When solving the white layer, you’re not just looking for white, but for the specific combination of white and its two adjacent colors that matches the piece already in place. For instance, if your anchor is white-blue-red, you’ll need to find the white-orange-blue corner, the white-green-orange corner, and the white-red-green corner.
Intuitive Placement: The Right-Hand Algorithm and Its Variants
To bring a white-faced corner piece from the top layer down to its correct position in the bottom layer, you’ll primarily use a simple sequence of moves. Let’s say you’re looking to insert a specific white-faced corner piece. Find it in the top layer. Position it directly above its target slot in the bottom layer. There are typically three scenarios for how the white sticker on this piece is oriented:
- White sticker facing left:
Hold the cube so the piece is atUFL(Up-Front-Left) and its target slot isDFL(Down-Front-Left).- Algorithm:
L' U' L
- Algorithm:
- White sticker facing right:
Hold the cube so the piece is atUFR(Up-Front-Right) and its target slot isDFR(Down-Front-Right).- Algorithm:
R U R'
- Algorithm:
- White sticker facing forward:
Hold the cube so the piece is atUFRand its target slot isDFR.- Algorithm:
U R U' R'(Repeat this sequence until the piece is correctly inserted, usually 3 times)
- Algorithm:
If a white-faced corner is stuck in the bottom layer but in the wrong position or orientation, you can extract it by performing R U R' (or L' U' L if on the left side) with that piece at the DFR (or DFL) position. This will move it to the top layer, from where you can re-insert it correctly. Repeat this process for all four white-faced corners until your entire bottom layer is complete and all adjacent colors match. This layer will serve as your stable base for the remaining steps.
Phase 2: Orienting the Last Layer (OLL) – Unlocking the Yellow Face
With the first layer solved, the next objective is to orient the pieces of the top (yellow) layer so that all yellow stickers are facing upwards. This phase is known as Orienting the Last Layer (OLL). At this stage, you are not concerned with the correct position of the top layer corners, only their orientation.
Recognizing OLL Cases: Patterns and Orientations
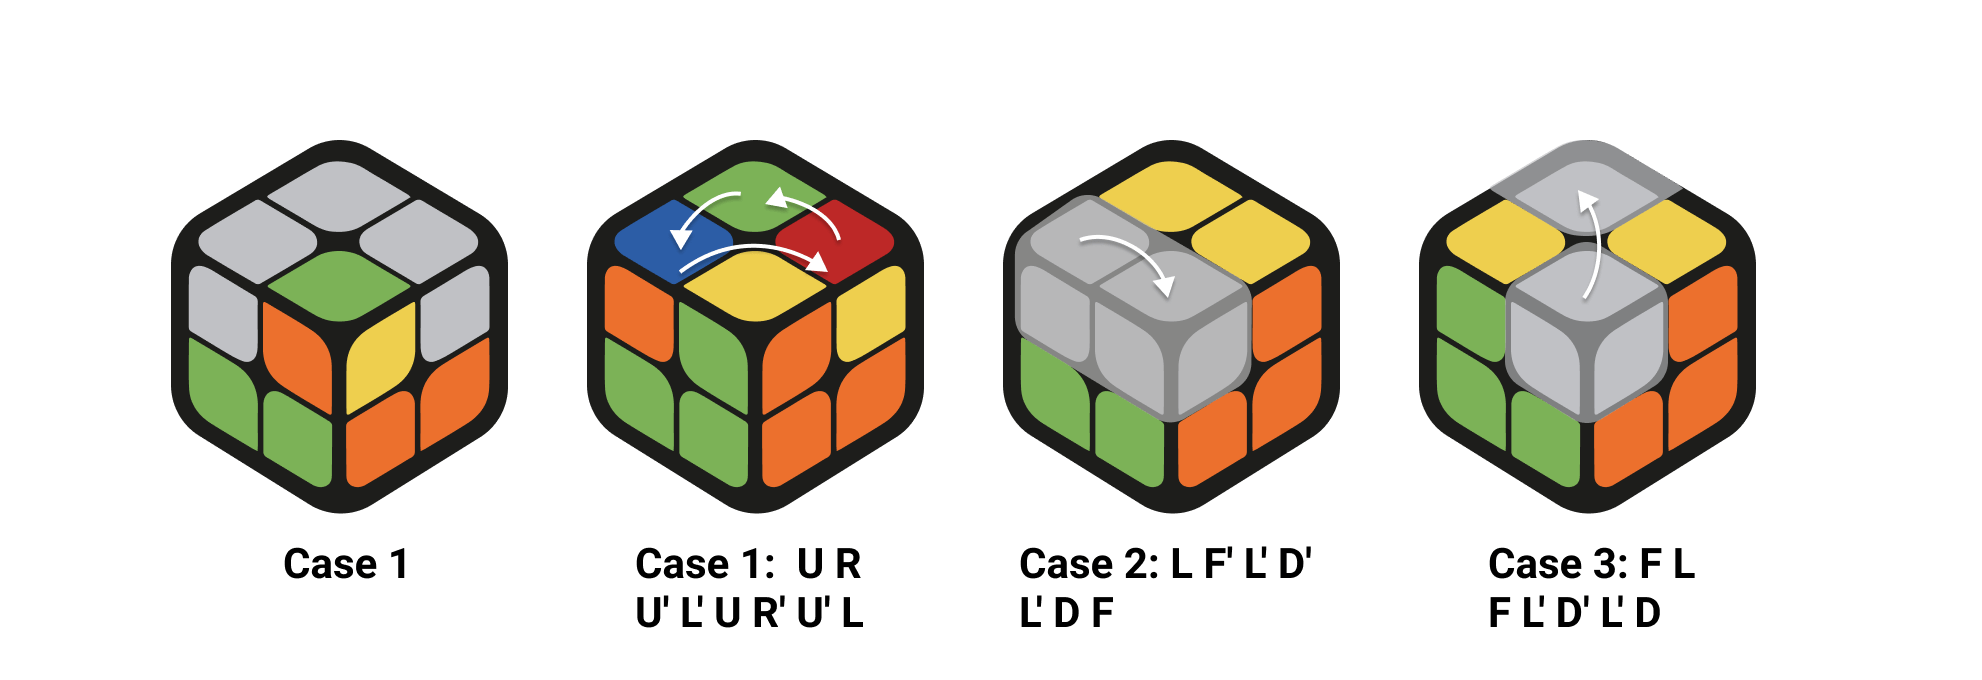
There are seven distinct patterns (plus the solved state) for the yellow faces on the top layer that you might encounter. Each pattern requires a specific algorithm to orient all yellow stickers upwards. It’s crucial to hold the cube consistently, usually with the solved white layer at the bottom, and to identify the pattern on the top face.
Some common OLL cases include:
- No yellow stickers up: All four yellow stickers are on the side faces.
- One yellow sticker up: One corner already has its yellow face oriented.
- Two adjacent yellow stickers up: Two yellow stickers are oriented, and they are next to each other.
- Two diagonal yellow stickers up: Two yellow stickers are oriented, and they are diagonal from each other.
Learning to quickly identify these patterns is key to speeding up your solves. Focus on the number and arrangement of yellow stickers currently facing upwards.
Essential OLL Algorithms for the 2×2
While there are 7 OLL algorithms, some are more common than others. Here are a couple of fundamental ones that, with slight rotations, can cover many situations:
-
“Sune” Algorithm (Often leads to one yellow facing up):
If you have one yellow sticker facing up, hold the cube so that this yellow sticker is at theUBL(Up-Back-Left) position.- Algorithm:
R U R' U R U2 R'
This algorithm is a cornerstone of 3×3 OLL as well and is incredibly versatile. After executing it, you might reach a fully oriented yellow layer, or another OLL case that you can solve.
- Algorithm:
-
“Anti-Sune” Algorithm (Opposite of Sune, sometimes used if Sune isn’t quite right):
If you have one yellow sticker facing up, but the other three are oriented in a way that feels like the mirror image of the Sune setup, you might use this. Hold the cube with the solved yellow sticker atUFR.- Algorithm:
R U2 R' U' R U' R'
(Note: Many solvers prefer to use the Sune algorithm and rotate the cube, rather than learning an anti-sune, especially for beginners.)
- Algorithm:
-
“Headlights” (Two adjacent yellow stickers up):
If you have two adjacent yellow stickers facing up, hold the cube so these “headlights” are on the back face (i.e.,UBRandUBLhave yellow stickers up).- Algorithm:
R2 U R' U' R U' R U R'
- Algorithm:
Strategic Setup Moves: Preparing for the Algorithm
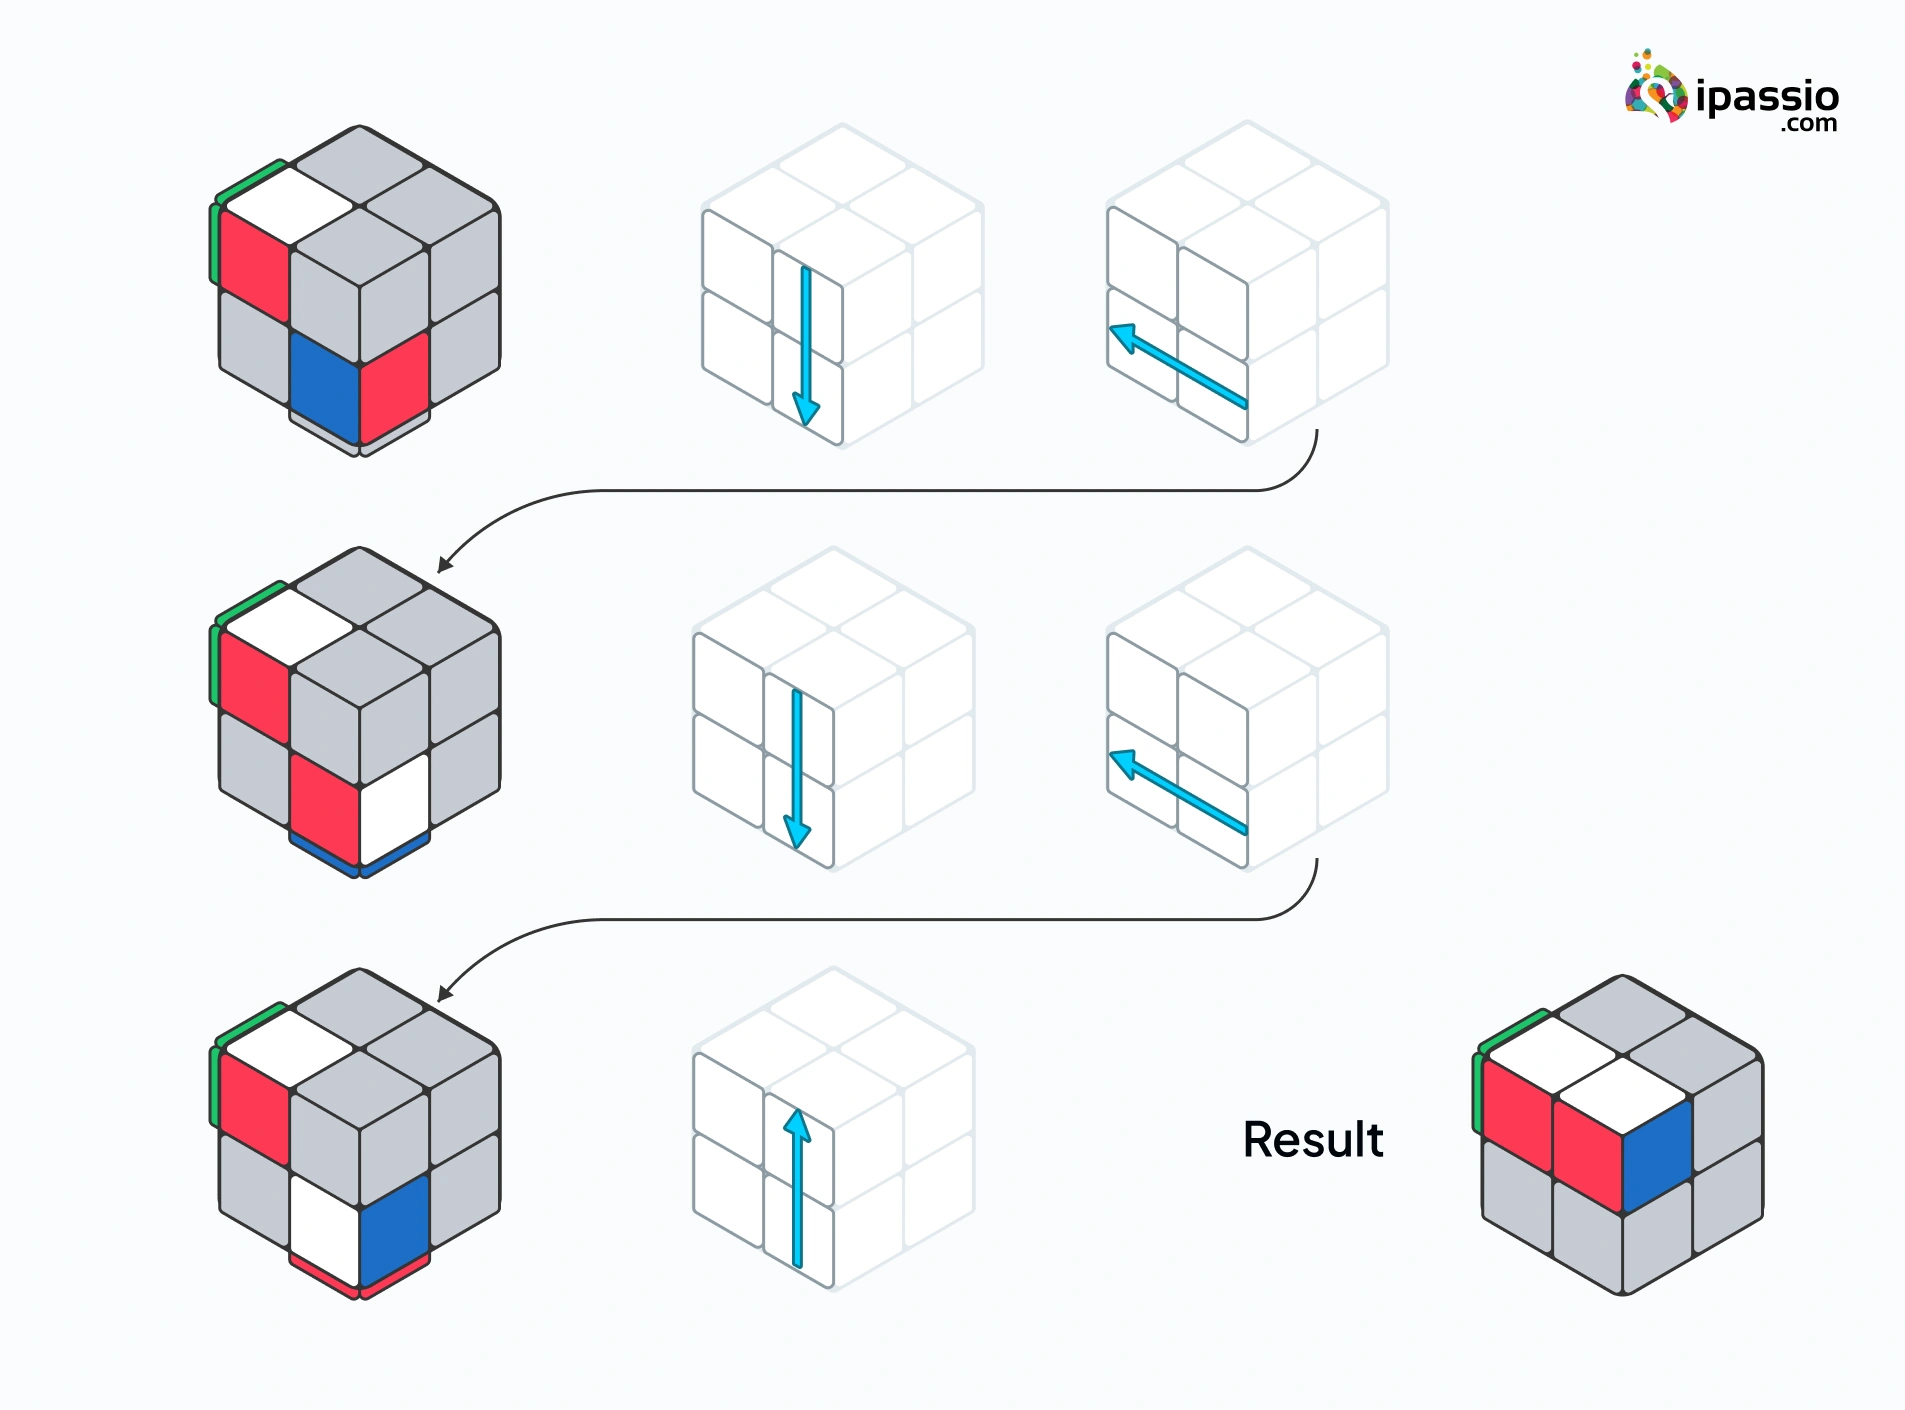
Sometimes, the initial OLL pattern doesn’t perfectly match one of your learned algorithms. In such cases, a simple U or U' turn of the top layer might rotate the cube into a recognizable state. Don’t be afraid to perform a U turn to see if it makes the pattern clearer or aligns it with an algorithm you know. The goal is to minimize the number of algorithms you need to memorize by leveraging cube rotations. Practice recognizing patterns from different angles and mentally rotating the top layer to match known setups.
Phase 3: Permuting the Last Layer (PLL) – Bringing It All Home
With all yellow stickers oriented upwards, the final stage is to position the top layer corners correctly. This is known as Permuting the Last Layer (PLL). At this point, your cube will have the white layer solved, the yellow layer fully oriented, but the side colors of the top layer may not be aligned.
Identifying PLL Cases: Correcting Corner Positions
There are only two main PLL cases you’ll encounter on a 2×2, plus the fully solved state. You’ll need to identify if any two adjacent corners in the top layer are already correctly placed relative to each other (i.e., their side colors match the corresponding center colors, even if the centers aren’t explicitly there).
- Two Adjacent Corners Solved (“Headlights”):
You might find two adjacent corners on the top layer that are already correctly permuted (their side colors match up). If you have these “headlights,” rotate the top layer (UorU') until these two matched corners are on the back face (UBRandUBL). - No Adjacent Corners Solved:
If no two adjacent corners are correctly permuted, it means either all corners are in the wrong place, or all are in the right place but swapped diagonally. In this scenario, pick any side as your front face.
The Core PLL Algorithms: Swapping Corners
The beauty of the 2×2’s PLL is that a single, versatile algorithm can solve nearly all cases, or set you up for a second application of the same algorithm.
-
The T-Perm Algorithm (for “Headlights” case):
If you have two adjacent corners correctly permuted (your “headlights”), hold the cube with these two matching corners on the back (e.g., the UBR and UBL pieces are aligned correctly).- Algorithm:
R U R' U' R' F R2 U' R' U' R U R' F'
This algorithm effectively swaps two adjacent corners. If you set it up correctly with “headlights” in the back, it should solve the entire cube.
- Algorithm:
-
Handling “No Adjacent Corners Solved” Case:
If you find no adjacent corners are solved, it means you’re in a state where either two pairs of diagonal corners need to be swapped, or all four corners are in the wrong place. Simply perform the T-Perm algorithm once from any orientation (holding the cube with any side as front). After performing it, you will undoubtedly create a “headlights” situation. Then, rotate the top layer (UorU') to bring these “headlights” to the back face, and perform the T-Perm algorithm a second time to solve the cube.
From Scramble to Solved: The Final Moves
Once the PLL algorithm is executed and all corners are correctly permuted, your 2×2 cube should be completely solved! The journey from a chaotic scramble to a perfectly aligned cube is a testament to the power of structured problem-solving and the elegance of algorithms.
Beyond the Basics: Speed, Practice, and Community
Solving the 2×2 for the first time is a significant accomplishment. However, the world of cubing extends far beyond simply solving it. For many, the next challenge is to solve it faster, more efficiently, and with greater intuition. This pursuit often mirrors the optimization challenges in software development or the refinement processes in engineering.
Optimizing Your Solves: Finger Tricks and Look-Ahead
Speedcubing involves more than just memorizing algorithms; it’s about efficient execution. “Finger tricks” are specific ways to manipulate the cube’s faces quickly and smoothly, minimizing hand movements and increasing turn speed. Learning to “look-ahead” – anticipating the next step or algorithm while executing the current one – is another advanced technique that drastically reduces solve times. These skills require dedicated practice and a deep understanding of the cube’s mechanics.
The Role of Practice: Developing Muscle Memory and Intuition
Like any complex skill, proficiency in cubing comes from consistent practice. Repeatedly performing algorithms builds muscle memory, allowing you to execute moves without conscious thought. This frees up your mind to focus on pattern recognition and look-ahead. Over time, you’ll develop an intuitive sense for the cube, often knowing which algorithm to apply without meticulously analyzing every sticker. This intuitive understanding is a hallmark of true mastery, applicable whether you’re debugging code, strategizing in business, or playing a musical instrument.
Engaging with the Cubing Community: Resources and Competition
The global cubing community is a vibrant network of enthusiasts, from casual solvers to world champions. Online forums, YouTube channels, and dedicated websites (like Speedsolving.com) offer a wealth of resources, including advanced algorithms (like full OLL and PLL for 3×3, which have equivalents for 2×2 for advanced solvers), tutorials, and discussions on new techniques. Participating in local or online competitions can be an exhilarating experience, pushing your limits and connecting you with like-minded individuals who share a passion for this unique blend of logic, dexterity, and speed. The journey of solving a 2×2 is more than just a puzzle; it’s an introduction to a systematic approach to problem-solving that transcends the physical object and offers valuable lessons for tackling challenges in the digital age and beyond.
aViewFromTheCave is a participant in the Amazon Services LLC Associates Program, an affiliate advertising program designed to provide a means for sites to earn advertising fees by advertising and linking to Amazon.com. Amazon, the Amazon logo, AmazonSupply, and the AmazonSupply logo are trademarks of Amazon.com, Inc. or its affiliates. As an Amazon Associate we earn affiliate commissions from qualifying purchases.