The motherboard is the silent protagonist of your computer system. Often referred to as the “central nervous system” or the “backbone” of a PC, it provides the electrical and logical connections that allow the CPU, RAM, GPU, and storage drives to communicate. Despite its critical role, the specific model and manufacturer of a motherboard are often unknown to the average user, primarily because the component is tucked away inside a chassis and lacks the clear outward branding found on monitors or laptops.
Understanding exactly what motherboard you have is not just a matter of technical curiosity; it is a fundamental requirement for system maintenance and upgrades. Whether you are looking to install more memory, upgrade your processor, or flash the BIOS to patch a security vulnerability, knowing your motherboard’s model, chipset, and revision number is the first step. In this guide, we will explore the most efficient ways to identify your hardware using native Windows tools, third-party software, and physical inspection.
Native Windows Utilities: Identifying Hardware Without Downloads
For most users, Windows provides several built-in tools that can extract hardware metadata without the need to download external software. These methods are preferred for their speed and security, as they utilize the Operating System’s direct communication with the Motherboard Management Controller.
Using System Information (msinfo32)
The most straightforward graphical method to find your motherboard details is through the System Information tool. This utility provides a comprehensive overview of your hardware environment.
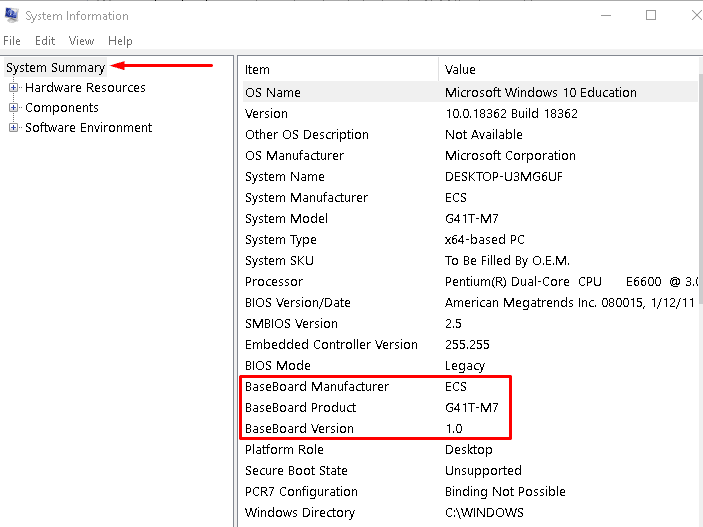
To access this, press the Windows Key + R, type msinfo32, and hit Enter. Once the window opens, ensure “System Summary” is selected in the left-hand pane. On the right, look for three specific entries:
- BaseBoard Manufacturer: This tells you who made the board (e.g., ASUS, Gigabyte, MSI).
- BaseBoard Product: This is the specific model name (e.g., ROG STRIX Z790-E).
- BaseBoard Version: This indicates the specific revision of the hardware.
In some cases, particularly with pre-built systems from manufacturers like Dell or HP, the “Product” field may simply list a proprietary string of numbers. In these instances, you are identifying a custom OEM board.
Command Prompt and WMIC
For those who prefer a more streamlined, text-based approach, the Windows Management Instrumentation Command-line (WMIC) is a powerful ally. By querying the “baseboard” class, you can pull specific data strings directly into the terminal.
Open the Command Prompt (cmd) and type the following command:
wmic baseboard get product,Manufacturer,version,serialnumber
This command forces the system to report back the exact identification tags stored in the BIOS. This method is particularly useful for remote troubleshooting or for users who are managing multiple machines and want to copy-paste the model names into a spreadsheet for inventory purposes.
Windows PowerShell Retrieval
PowerShell offers a more modern alternative to the Command Prompt with even more granular data retrieval. By using the Get-WmiObject cmdlet, you can extract the motherboard details in an organized list.
Enter the following into a PowerShell window:
Get-WmiObject -Class Win32_BaseBoard | Format-List Product, Manufacturer, Model, PartNumber, SerialNumber
PowerShell is often more successful at retrieving information on newer UEFI-based systems where the older WMIC commands might occasionally return “To Be Filled By O.E.M.”
Third-Party Hardware Diagnostic Tools: The Professional’s Choice
While native tools are convenient, they sometimes provide incomplete data, especially regarding chipset revisions or real-time sensor data. Professional technicians and PC enthusiasts often turn to specialized third-party software for a deeper dive into their hardware’s specifications.
CPU-Z: The Industry Standard
CPU-Z is perhaps the most iconic lightweight utility in the tech world. While its name suggests it only monitors the processor, it features a dedicated “Mainboard” tab that is incredibly reliable.
Upon opening CPU-Z, clicking the Mainboard tab will reveal the manufacturer, model name, and—crucially—the chipset (Southbridge) information. It also displays the BIOS version and date, which is essential information if you are planning to upgrade your CPU to a newer generation that requires a firmware update to function.
Speccy: A Visual Overview
Developed by Piriform (the creators of CCleaner), Speccy is designed for users who want a clean, aesthetic summary of their entire system. Speccy’s “Motherboard” section provides a detailed breakdown that includes not just the model, but also real-time temperature readings from the board’s thermistors.
Speccy is particularly useful for identifying the number of available expansion slots (PCI-Express) and their current lane speeds without having to open the PC case. It also lists the voltage levels being supplied to the board, which can be helpful in diagnosing a failing power supply unit (PSU).
HWiNFO: Comprehensive Data Logging
If you require the most technical data possible, HWiNFO is the gold standard. It provides an exhaustive list of every feature the motherboard supports, from the specific audio codec chip to the version of the TPM (Trusted Platform Module) installed. This is the tool of choice for users who need to know the specific VRM (Voltage Regulator Module) layout or the exact manufacturer of the Ethernet controller.
Physical Inspection and BIOS/UEFI Methods
There are scenarios where software methods are unavailable—for example, if you are building a PC from used parts that haven’t been assembled, or if the system fails to boot into the operating system. In these cases, you must rely on physical cues or the pre-boot environment.
Locating the Model Number on the PCB
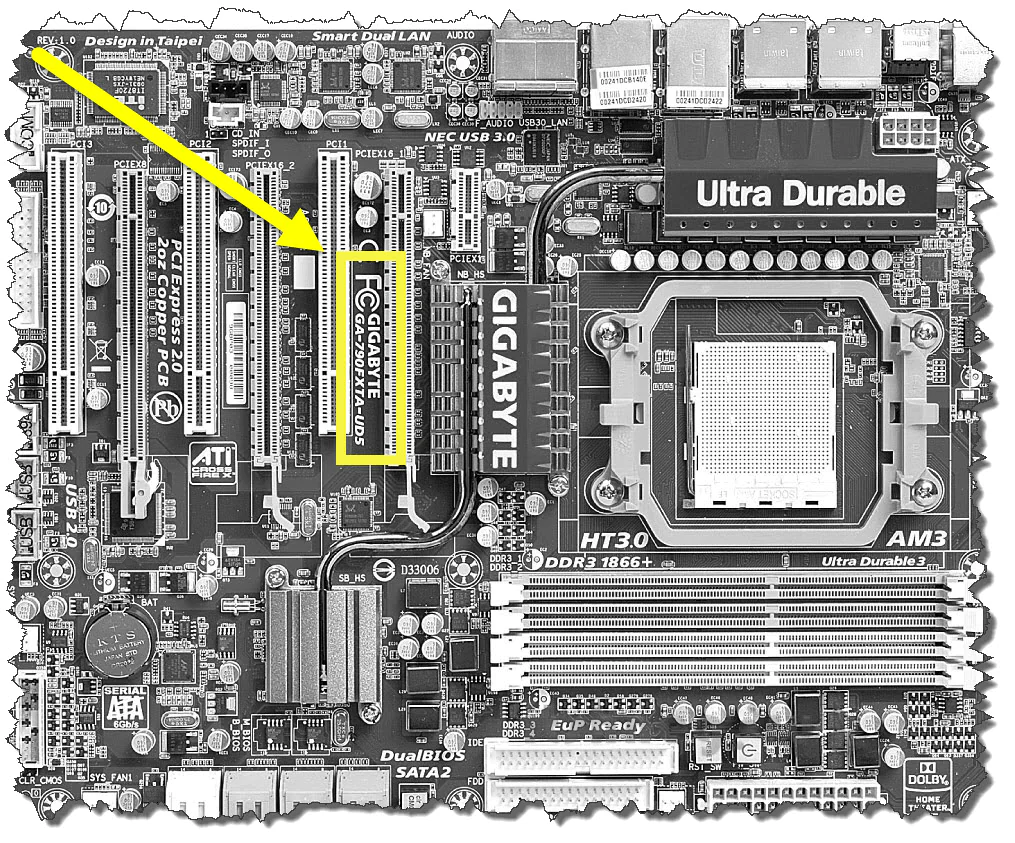
Motherboard manufacturers almost always silk-screen the model name directly onto the Printed Circuit Board (PCB). However, because of the density of modern components, these labels can be hidden. Common locations to check include:
- Between the CPU Socket and the RAM slots: Often printed in large white text.
- Between the PCIe Slots: Many manufacturers place the branding here, though it may be obscured by a large graphics card.
- Near the 24-pin Power Connector: A frequent spot for revision numbers (e.g., REV 1.0 or REV 2.1).
If you see a long string of characters that doesn’t look like a model name, look for a “Regulatory Model” number or a “P/N” (Part Number) and search for that string on the manufacturer’s support website.
Checking the BIOS/UEFI Menu
If the computer can turn on but cannot reach Windows, the BIOS (Basic Input/Output System) is the most reliable source of truth. By tapping a specific key during the initial boot sequence (usually Delete, F2, F10, or F12), you can enter the firmware interface.
Modern UEFI (Unified Extensible Firmware Interface) screens are high-resolution and mouse-driven. The motherboard model name and the current BIOS version are typically displayed prominently at the top of the “EZ Mode” or “Main” information page. This is the most accurate way to verify your hardware because the information is being read directly from the firmware chip itself, bypassing any potential OS-level reporting errors.
Why Knowing Your Motherboard Model is Critical for Success
In the tech world, compatibility is everything. Identifying your motherboard is the prerequisite for three major activities: upgrading, maintenance, and troubleshooting.
Ensuring Component Compatibility
Before buying a new CPU, you must verify that your motherboard’s socket (e.g., Intel LGA 1700 or AMD AM5) supports it. Furthermore, motherboards dictate what type of RAM you can use. Attempting to install DDR5 memory into a DDR4 motherboard is a common and expensive mistake that can be avoided by checking the motherboard specs first. Similarly, knowing the version of your PCIe slots (Gen 3, Gen 4, or Gen 5) helps you understand if a high-end NVMe SSD or GPU will be bottlenecked by older hardware.
Driver Management and Security
A motherboard is comprised of various sub-components, including LAN controllers, Wi-Fi chips, and audio chipsets. Each of these requires specific drivers to function optimally. If you experience “No Audio” or intermittent internet drops, the solution usually involves visiting the manufacturer’s support page for your specific motherboard model to download the latest drivers.
Additionally, BIOS updates are critical for security. Modern “Spectre” or “Meltdown” style vulnerabilities are often patched at the microcode level via BIOS updates. Without knowing your motherboard model, you cannot safely download these updates, as flashing the wrong firmware can “brick” the board, rendering it permanently unusable.
Troubleshooting Identification Discrepancies
Occasionally, different tools may report different names for the same motherboard. This is common in the world of “rebadged” hardware. For instance, a motherboard found in an HP Omen desktop might be identified by Speccy as an “HP 8704,” while CPU-Z might identify it as a “Z490” chipset board manufactured by Foxconn.
In these cases, the “Manufacturer” (HP) and the “Chipset” (Z490) are the two most important pieces of information. If you are looking for drivers, always prioritize the system builder’s website (HP, Dell, Lenovo) for pre-built machines. If you built the PC yourself using off-the-shelf parts, prioritize the component manufacturer’s website (ASUS, MSI, etc.).
By mastering these identification techniques, you move from being a passive user to an informed administrator of your own technology. Whether you use a simple command-line query or a deep-dive diagnostic tool, knowing your motherboard is the key to unlocking the full potential and longevity of your PC.
aViewFromTheCave is a participant in the Amazon Services LLC Associates Program, an affiliate advertising program designed to provide a means for sites to earn advertising fees by advertising and linking to Amazon.com. Amazon, the Amazon logo, AmazonSupply, and the AmazonSupply logo are trademarks of Amazon.com, Inc. or its affiliates. As an Amazon Associate we earn affiliate commissions from qualifying purchases.