
In the world of digital content creation, gaming, and professional software demonstrations, the demand for high-quality, low-latency screen recording has never been higher. While there are dozens of third-party software options available, NVIDIA users possess a significant advantage built directly into their hardware. By leveraging the power of the Graphics Processing Unit (GPU) rather than relying solely on the Central Processing Unit (CPU), NVIDIA’s recording solutions offer a seamless experience that minimizes performance drops.
This guide explores the intricacies of recording your screen using NVIDIA’s proprietary tools, specifically focusing on the legacy GeForce Experience (ShadowPlay) and the newly released, unified NVIDIA App. Whether you are a competitive gamer looking to save your best highlights or a professional needing to document a technical workflow, mastering NVIDIA’s ecosystem is essential for peak digital performance.
Understanding NVIDIA’s Screen Recording Ecosystem
Before diving into the “how-to,” it is crucial to understand the technology that makes NVIDIA’s recording so efficient. At the heart of this capability is the NVENC (NVIDIA Encoder). This is a physical section of the GPU dedicated solely to encoding video. Because it is a separate hardware block, it captures and compresses video with almost zero impact on your system’s overall performance, allowing for smooth frame rates even while recording in high resolutions.
ShadowPlay Technology: The Secret Sauce
For years, the term “ShadowPlay” was synonymous with NVIDIA screen recording. It refers to the underlying technology that allows for “Instant Replay” and manual recording. ShadowPlay’s primary strength is its ability to record in the background without stuttering. It supports up to 8K HDR recording at 30 FPS or 4K at 120 FPS on modern RTX cards, making it a professional-grade tool hidden within a consumer-grade driver suite.
GeForce Experience vs. the New NVIDIA App
NVIDIA is currently in a transition phase. For over a decade, the GeForce Experience (GFE) has been the primary interface for screen recording. However, NVIDIA recently introduced the “NVIDIA App,” a streamlined, faster, and more modern utility designed to eventually replace GFE and the NVIDIA Control Panel.
The NVIDIA App removes the login requirement that many users found tedious in GFE and offers a more responsive overlay. While the steps to record are similar in both, the NVIDIA App provides a more intuitive interface and better support for AV1 encoding—a newer, more efficient video codec that provides higher quality at lower bitrates.
Step-by-Step Guide to Setting Up Screen Recording
To begin recording, you must ensure your hardware is compatible. Generally, any NVIDIA GTX 600 series or newer GPU supports basic recording, while the more advanced features like AV1 encoding and 8K capture require an RTX 40-series card.
Initial Configuration and Overlay Setup
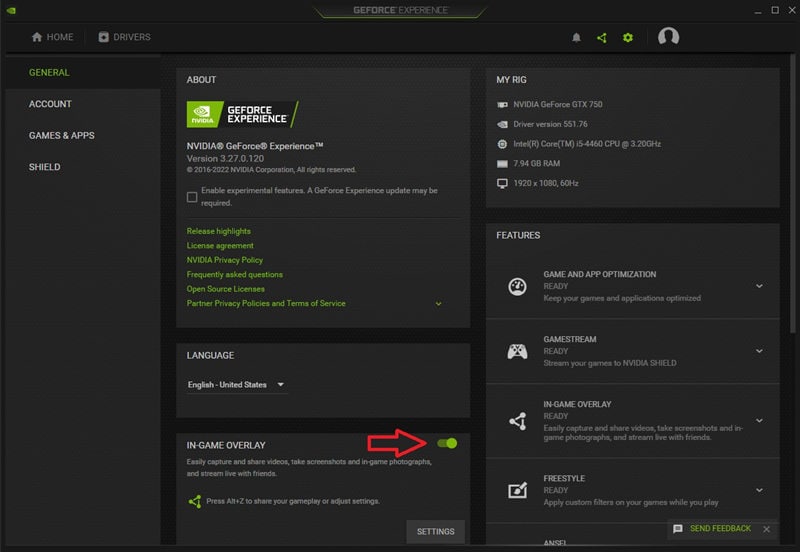
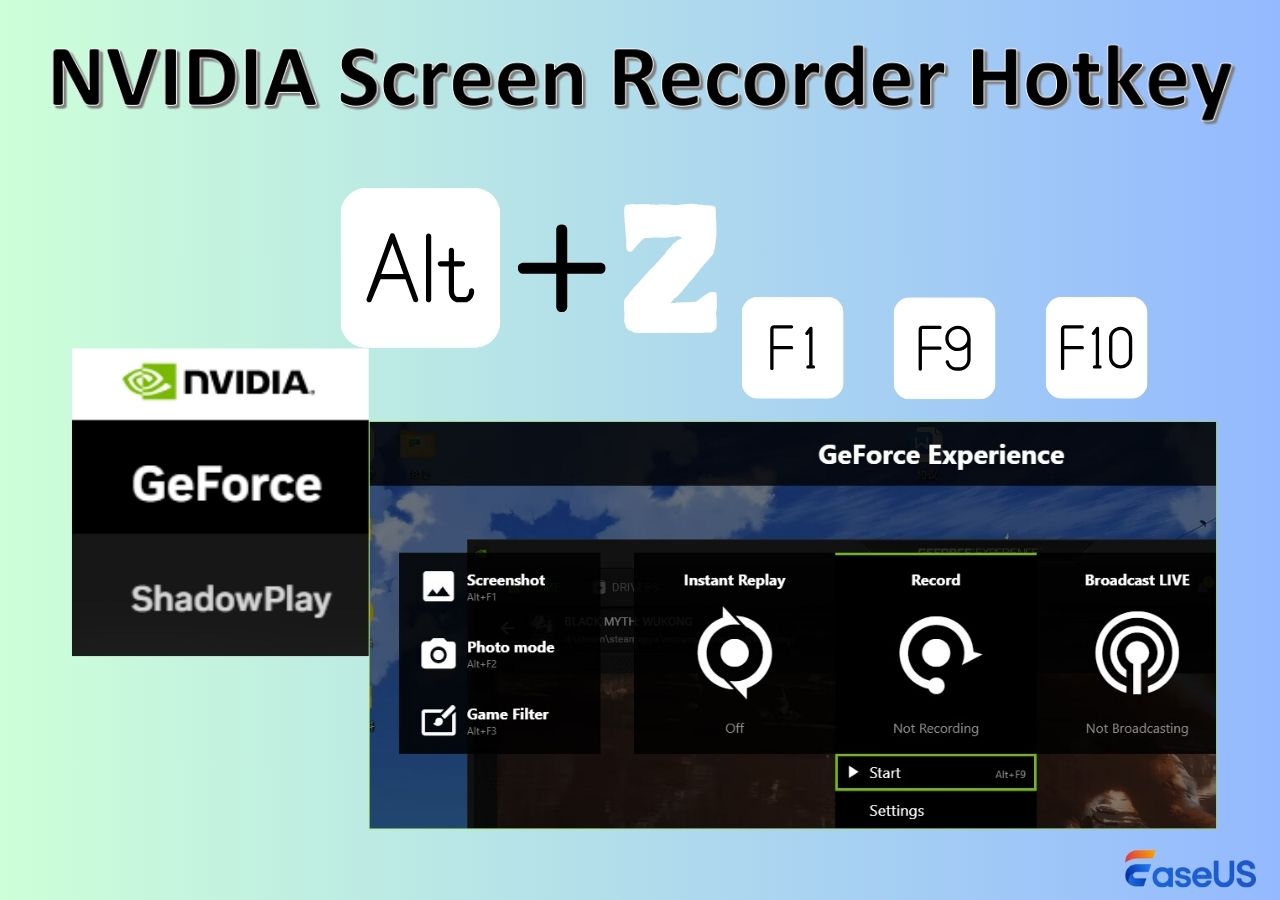
The gateway to recording is the NVIDIA Overlay. By default, this is accessed by pressing Alt + Z. If the overlay does not appear, you must ensure it is enabled in your settings.
-
In GeForce Experience: Open the application, click the “Settings” (gear icon), and toggle the “In-Game Overlay” switch to on.
-
In the NVIDIA App: Open the app, go to the “Settings” tab on the left, and ensure the “NVIDIA Overlay” is active.
Once the overlay is active, you will see a central dashboard with options for “Instant Replay,” “Record,” and “Broadcast Live.”
Customizing Video Quality and Frame Rates
Before hitting the record button, you should optimize your settings to balance quality and storage space. Clicking on the “Settings” icon (the cogwheel) within the Alt + Z overlay allows you to access “Video Capture” settings.
-
Resolution: You can choose “In-game” to match your monitor’s output or manually set it to 1080p, 1440p, or 4K.
-
Frame Rate: For standard tutorials, 30 FPS is sufficient, but for gaming or high-motion video, 60 FPS is the industry standard.
-
Bitrate: This determines the visual clarity. For 1080p 60 FPS, a bitrate of 15-20 Mbps is excellent. For 4K, you may want to move toward 50 Mbps or higher. Note that higher bitrates result in much larger file sizes.
Advanced Features for Creators and Streamers
NVIDIA’s software suite goes beyond simple “start and stop” recording. It includes sophisticated features designed to capture moments you might have otherwise missed and to enhance the quality of your audio.
Instant Replay: Never Miss a Moment
One of the most powerful features in the NVIDIA toolkit is “Instant Replay.” When enabled, the GPU constantly records your screen in the background but doesn’t save it to your hard drive unless you tell it to.
If something incredible happens—a software bug you need to report or a “clutch” moment in a game—you can press Alt + F10. The software will then save the last several minutes (customizable from 15 seconds up to 20 minutes) to your disk. This is a game-changer for creators who don’t want to sift through hours of raw footage to find a single 30-second highlight.
High Dynamic Range (HDR) Recording
With the advent of HDR monitors, recording content that retains the vibrant colors and deep contrasts of the original source has been a challenge. NVIDIA’s latest drivers allow users to record in HDR (using the HEVC or AV1 codecs). This ensures that the recorded video doesn’t look washed out when played back on HDR-supported screens, providing a much more professional look for high-end tech reviews and cinematic gameplay.
Utilizing NVIDIA Broadcast for Audio Clarity
While not strictly a part of the recording overlay, NVIDIA Broadcast is a vital companion app for anyone recording their screen with a microphone. It uses AI to remove background noise—such as mechanical keyboards, fans, or barking dogs—from your audio stream in real-time. By selecting the “NVIDIA Broadcast” microphone as your input source within the Alt + Z settings, you can achieve studio-quality audio in your screen captures without an expensive acoustic setup.
Optimizing Performance for Seamless Captures
Even with dedicated hardware, recording can occasionally run into bottlenecks. Understanding how to manage your system resources will ensure that your recordings are smooth and your system remains responsive.
NVENC Encoding Explained
The NVENC encoder is the reason NVIDIA’s recording is so efficient. When you select your recording codec, you generally have a choice between H.264 and H.265 (HEVC). H.264 is the most compatible across all platforms (YouTube, social media, older video players). However, H.265 and the newer AV1 offer better compression, meaning you get the same visual quality at a smaller file size. If you are recording long sessions, switching to HEVC or AV1 can save gigabytes of storage space.
Managing Storage and Bitrate
High-quality video files can consume a hard drive surprisingly quickly. A 4K 60 FPS recording at a high bitrate can easily exceed 1GB per minute. To manage this:
-
Dedicated Drive: If possible, save your recordings to a secondary SSD rather than your primary OS drive. This prevents the “write” process from slowing down your system’s core functions.
-
Variable Bitrate: NVIDIA’s encoder is smart enough to adjust bitrate based on the complexity of the scene. In static scenes (like a coding tutorial), the file size will naturally be smaller than in a high-action scene.
Troubleshooting Common Recording Issues
Sometimes, the overlay may fail to trigger, or the recording may come out as a black screen.
-
Desktop Capture: By default, NVIDIA may disable “Desktop Capture” for privacy reasons. If you are trying to record a windowed app and it isn’t working, go to the Overlay Settings > Privacy Control and toggle “Desktop Capture” to “Yes.”
-
HDCP Content: You cannot record protected content (like Netflix or Disney+) using NVIDIA’s tools due to Digital Rights Management (DRM) restrictions. This will often result in a black screen.
-
Driver Updates: Always ensure you are on the latest “Game Ready” or “Studio” driver, as NVIDIA frequently releases patches that improve recording stability and add support for new software.

The Future of NVIDIA Recording: AI and Cloud Integration
As we look toward the future of the Tech niche, NVIDIA is increasingly integrating Artificial Intelligence into its capture suite. We are already seeing the beginnings of this with “AI Eye Contact” and “Virtual Backgrounds” in the Broadcast app, but the implications for screen recording are even broader.
The transition to the unified NVIDIA App suggests a future where cloud integration and AI-assisted editing might become standard. Imagine a recording tool that automatically identifies the most important parts of your screen capture and highlights them using AI, or a tool that can automatically upscale a 1080p recording to 4K using DLSS-like technology during the encoding process.
Furthermore, the shift toward the AV1 codec is perhaps the most significant technical leap in recent years. As platforms like YouTube and Twitch begin to fully support AV1, NVIDIA users with 40-series cards will be able to stream and record at unprecedented levels of detail, effectively ending the era of “blocky” or pixelated video during high-motion scenes.
By mastering the tools provided by NVIDIA, you aren’t just “recording a screen”; you are utilizing one of the most sophisticated video processing pipelines available to consumers today. Whether you stick with the classic GeForce Experience or migrate to the sleek new NVIDIA App, the power of the GPU-driven capture ensures that your digital content is limited only by your creativity, not your hardware’s overhead.
aViewFromTheCave is a participant in the Amazon Services LLC Associates Program, an affiliate advertising program designed to provide a means for sites to earn advertising fees by advertising and linking to Amazon.com. Amazon, the Amazon logo, AmazonSupply, and the AmazonSupply logo are trademarks of Amazon.com, Inc. or its affiliates. As an Amazon Associate we earn affiliate commissions from qualifying purchases.