In today’s fast-paced digital landscape, establishing a robust online presence is no longer a luxury but a fundamental necessity for individuals and businesses alike. Whether you’re an aspiring blogger, a burgeoning entrepreneur, a seasoned marketer, or simply someone looking to share their passions with the world, a well-designed and functional website serves as your digital storefront, portfolio, and primary communication hub. And when it comes to creating such a site, one platform stands head and shoulders above the rest in terms of popularity, versatility, and ease of use: WordPress.
WordPress powers over 43% of all websites on the internet, ranging from small personal blogs to multinational corporate sites and thriving e-commerce platforms. Its open-source nature, extensive plugin ecosystem, and user-friendly interface make it an unparalleled choice for anyone looking to build a professional-grade website without needing deep coding knowledge. This comprehensive guide will walk you through the entire process of installing WordPress, ensuring you have a solid foundation for your digital endeavors. We’ll explore both the quick-and-easy one-click method and the more hands-on manual installation, equipping you with the knowledge to choose the best path for your specific needs. Understanding these methods is a crucial first step in leveraging cutting-edge technology to build your brand and even generate income online, aligning perfectly with our focus on Tech, Brand, and Money.
Setting the Stage: Essential Prerequisites Before Installation
Before we dive into the practical steps of installing WordPress, there are a few fundamental components you need to have in place. Think of these as the essential building blocks for your website. Without them, WordPress won’t have a stable home to reside in or a unique address for people to find it. These prerequisites are standard for almost any website you plan to host online and form the backbone of your digital infrastructure, illustrating the basic requirements of web Tech.
1. A Domain Name: Your Website’s Unique Address
A domain name is essentially your website’s address on the internet (e.g., yourwebsite.com). It’s what people type into their browser to find you. Choosing a memorable, relevant, and brand-appropriate domain name is a critical first step. It should clearly reflect your Brand identity, be easy to spell, and ideally, be concise. You can purchase domain names from various reputable registrars such as GoDaddy, Namecheap, Google Domains, or through your web hosting provider. This initial decision is intrinsically linked to your overall branding strategy, as your domain name is often the first impression users will have of your online presence.
2. Reliable Web Hosting: The Home for Your Website
Web hosting is the service that stores all your website’s files – including code, images, videos, and databases – and makes them accessible to users worldwide 24/7. When someone types your domain name into their browser, their computer connects to your web host’s server, which then delivers your website’s content. There are various types of web hosting, each suited for different needs, traffic levels, and budgets:
- Shared Hosting: This is the most affordable and common option for beginners. Your website shares server resources (CPU, RAM, storage) with many other websites. It’s ideal for small blogs, personal portfolios, or low-traffic sites just starting out.
- VPS (Virtual Private Server) Hosting: Offers more dedicated resources and greater control than shared hosting. A physical server is partitioned into several virtual servers, each operating independently. This is a good step up for growing websites or those requiring more customization and consistent performance.
- Dedicated Hosting: With dedicated hosting, you get an entire physical server exclusively for your website(s). This provides maximum performance, security, and control, making it suitable for large, high-traffic websites or enterprise-level applications.
- Managed WordPress Hosting: This specialized hosting environment is optimized specifically for WordPress. It often includes features like automatic WordPress core updates, daily backups, enhanced security measures, and expert WordPress-specific support. While often a bit pricier, it’s an excellent choice for those who want to focus purely on content creation and Brand development rather than technical maintenance, effectively letting the Tech side be handled by experts.
When choosing a host, consider crucial factors such as server uptime guarantees, the quality of customer support, scalability options for future growth, and transparent pricing. Reputable hosts often include convenient one-click WordPress installers, which can significantly simplify the installation process.
3. A Database: Where Your Website’s Data Lives
WordPress stores all your website’s dynamic content in a database. This includes everything from your posts, pages, comments, user information, and site settings to plugin configurations. MySQL and MariaDB are the most common database management systems used with WordPress. Most web hosts provide easy-to-use tools within their control panel (such as cPanel) to create and manage databases. When you install WordPress, it will establish a connection to this database to retrieve and store all the information that makes your website dynamic and interactive.
4. FTP Client (for Manual Installation): Transferring Files
If you opt for the manual installation method, you will need an FTP (File Transfer Protocol) client like FileZilla. This software allows you to securely connect to your web host’s server and transfer files from your local computer to the server. It’s essentially a digital bridge used for moving your WordPress core files to their designated online home, giving you direct control over the Tech infrastructure.
Method 1: The Express Lane with a One-Click WordPress Installer
For the vast majority of users, especially those new to website creation, the one-click WordPress installer offered by most reputable web hosts is the easiest and quickest way to get started. This method automates much of the technical heavy lifting, allowing you to focus on building your content and refining your Brand without getting bogged down in intricate configurations. It leverages sophisticated software integrated into your hosting control panel, simplifying what would otherwise be a multi-step process into just a few clicks. This is the ultimate convenience offered by modern Tech.
Step 1: Log in to Your Hosting Control Panel
Begin by logging into your web hosting account’s control panel. This is most commonly cPanel, which is a widely used web hosting control panel that provides a graphical interface and automation tools. However, some hosts might use their own proprietary dashboard. You’ll typically find the login details (URL, username, and password) in the welcome email you received from your hosting provider after signing up.
Step 2: Locate the WordPress Auto-Installer
Once inside your control panel, navigate through the various sections. Look for an icon or section specifically related to “WordPress,” “Website Builder,” “Auto Installers,” “Softaculous Apps Installer,” or “Fantastico De Luxe.” Softaculous and Fantastico are popular auto-installer applications that facilitate one-click installations for a wide range of web applications, including WordPress. These tools are typically found under a “Software” or “Website” management section within your control panel.
Step 3: Initiate the Installation Process
Click on the WordPress installer icon to launch the application. You’ll be presented with a straightforward screen prompting you for some basic information about your new website:
- Choose Installation URL:
- Protocol: Select
http://orhttps://. If your host offers a free SSL certificate (which most do these days, and is highly recommended for website security, user trust, and SEO), always choosehttps://. - Domain: Select the domain name where you want to install WordPress from the provided dropdown list.
- Directory: Leave this field blank if you want WordPress installed directly on your main domain (e.g.,
yourdomain.com). If you prefer to install it in a subfolder (e.g.,yourdomain.com/blog), type the desired subfolder name here. For most users, installing directly on the main domain is the preferred option for a primary website.
- Protocol: Select
- Site Settings:
- Site Name: Enter the title for your website (e.g., “My Awesome Blog” or “Acme Corp”). You can easily change this later from your WordPress dashboard. This directly impacts your Brand identity.
- Site Description: A short, catchy tagline describing your site’s purpose or focus. This is also changeable later.
- Enable Multi-site (Optional): Unless you specifically know you need to create a network of WordPress sites (like WordPress.com), leave this unchecked.
- Admin Account: This information is crucial for logging into your WordPress administration dashboard.
- Admin Username: Choose a unique and secure username (avoid generic options like “admin” or “root” for security reasons).
- Admin Password: Create a strong, complex password. Use a combination of uppercase and lowercase letters, numbers, and symbols to ensure maximum security.
- Admin Email: Provide an active email address where WordPress can send important notifications, updates, and password reset links.
- Database Settings (Optional): Most auto-installers will automatically create and configure the database for you, so you can usually leave these settings as default unless you have specific, advanced requirements.
- Theme (Optional): Some installers offer the option to choose an initial theme, but you can always browse and install themes later from your WordPress dashboard, giving you flexibility to refine your Brand’s look.
- Email Installation Details: It’s highly recommended to enter an email address here to receive a comprehensive summary of your installation details, including your chosen username, password, and the direct login URL.
Step 4: Click “Install”
Once you’ve carefully reviewed and filled in all the required details, click the “Install” button. The auto-installer will then spring into action, creating the necessary database, uploading all the WordPress core files, and configuring everything in a matter of seconds to a few minutes, depending on your host and connection speed.
Step 5: Access Your New WordPress Site
After the installation process is complete, you’ll see a confirmation message, typically accompanied by links to your new WordPress website (the front-end) and, more importantly, your administrative login page (e.g., yourdomain.com/wp-admin). Click the admin URL, enter your chosen username and password, and congratulations – you’re in! You’ve just taken a significant step in establishing your digital Brand, enabled by accessible and efficient Tech.
Method 2: The Manual Route – Gaining Deeper Control
While the one-click installer offers unparalleled convenience, understanding the manual installation process can be incredibly valuable. It provides a deeper insight into how WordPress works under the hood, offers more granular control over the installation environment, and is essential knowledge if you ever encounter a web host without an auto-installer or need to troubleshoot specific issues. This method requires a bit more technical comfort but is by no means overly complex. It’s a great skill for anyone interested in delving deeper into web Tech and mastering their digital presence.
Step 1: Download the Latest WordPress Core Files
Your very first step is to obtain the WordPress software itself directly from the source.
- Go to the official WordPress website:
wordpress.org. This is the authoritative source for the open-source software. - Look for the “Get WordPress” button, which is usually prominently displayed on the homepage or in the navigation.
- Click it to download the latest stable version of WordPress as a
.zipfile to your computer. Remember where you save this file.
Step 2: Create a MySQL Database and User
WordPress needs a dedicated database to store all its dynamic content and settings. You’ll create this via your web host’s control panel, typically cPanel.
- Log in to your cPanel interface.
- Find the “Databases” section and click on “MySQL Databases.”
- Create a New Database: Under the “Create New Database” heading, enter a descriptive name for your database (e.g.,
yourbrand_wpdb). Make sure it’s unique enough to identify. Click “Create Database.” Immediately make a note of the full database name; it will often be prefixed by your cPanel username (e.g.,cpaneluser_yourbrand_wpdb). - Create a New User: Scroll down to the “MySQL Users” section and click “Add New User.” Enter a strong username (e.g.,
yourbrand_wpuser) and, critically, generate a very strong, complex password using a combination of letters, numbers, and symbols. Click “Create User.” It is imperative to note down this username and password securely. - Add User to Database: Under the “Add User To Database” section, select the database user you just created from the “User” dropdown and the database you just created from the “Database” dropdown. Click “Add.”
- Grant Privileges: On the subsequent screen, check the “ALL PRIVILEGES” box to grant the user full access to the database. This is a requirement for WordPress to function correctly. Click “Make Changes.”
Step 3: Upload WordPress Files to Your Web Server
Now you need to transfer the WordPress files from your local computer to your web host’s server.
- Extract the WordPress Files: Locate the
.zipfile you downloaded in Step 1. Extract its contents. This action will create a folder typically namedwordpresson your computer. - Connect via FTP: Open your chosen FTP client (e.g., FileZilla). Enter your host’s FTP details (Host, Username, Password, Port – usually 21), which you can find in your hosting welcome email or within your cPanel.
- Navigate to the Public HTML Directory: Once successfully connected, navigate to the
public_htmldirectory on the remote site (your server). This is usually the root directory for your primary domain. If you intend to install WordPress in a subfolder (e.g.,yourdomain.com/blog), first create a new folder here (e.g.,blog) and then navigate into it. - Upload Files: Drag all the files and folders from inside the
wordpressfolder on your local computer to your chosen directory on the remote site (public_htmlor your subfolder). Do not upload thewordpressfolder itself, but its contents. This process can take several minutes, depending on your internet connection speed and the number of files.
Step 4: Configure wp-config.php
This critical file tells WordPress how to connect to your newly created database and handles other core settings.
- In the directory where you uploaded your WordPress files on your server (either via FTP or using your host’s File Manager), you’ll find a file named
wp-config-sample.php. - Rename this file to
wp-config.php. - Open
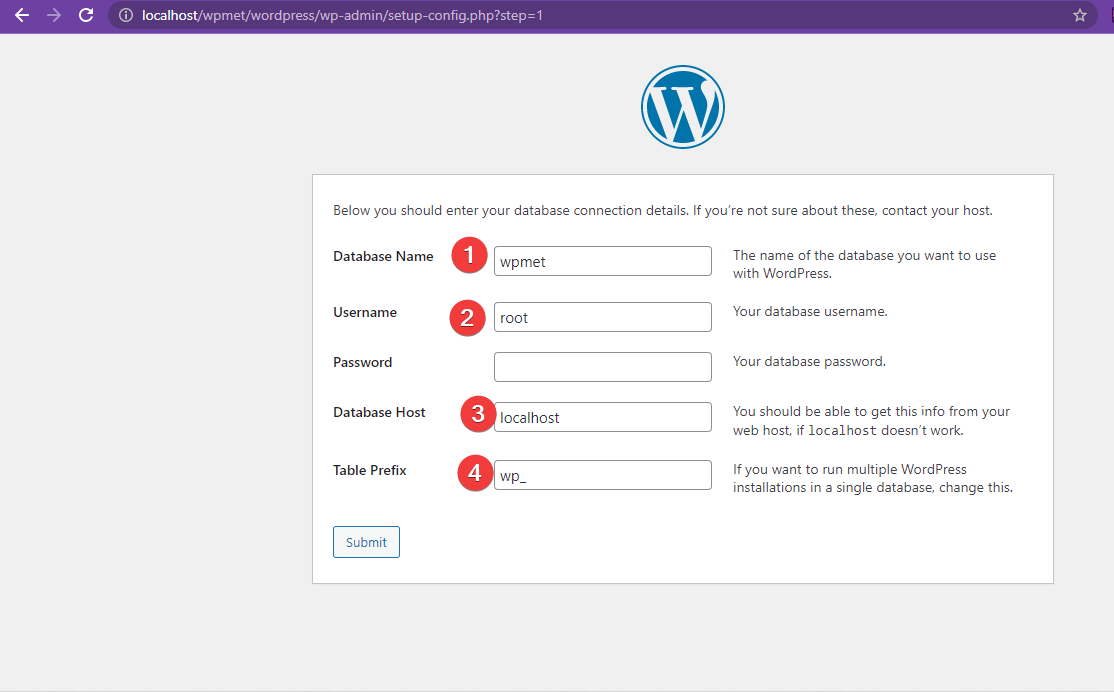
wp-config.phpfor editing. You can download it, edit it with a text editor like Notepad++ or Sublime Text, then re-upload it, or use your host’s File Manager editor directly. - Find the following lines and replace the placeholder values with your actual database details from Step 2:
php

define( 'DB_NAME', 'database_name_here' );    // Your actual database name (e.g., cpaneluser_yourbrand_wpdb)

define( 'DB_USER', 'username_here' );    // Your actual database username (e.g., cpaneluser_yourbrand_wpuser)

define( 'DB_PASSWORD', 'password_here' ); // Your actual database password

define( 'DB_HOST', 'localhost' );         // Usually 'localhost'. If unsure, check with your hosting provider.
- Generate Unique Security Keys (Salts): Scroll down a bit further in
wp-config.phpto the authentication unique keys and salts section. These are essential for improving your site’s security by making passwords harder to crack.- Open your web browser and go to
api.wordpress.org/secret-key/1.1/salt/. This official WordPress tool will generate a unique set of cryptographic keys. - Copy all the generated lines.
- Paste them over the corresponding lines in your
wp-config.phpfile, replacing the placeholder values.
- Open your web browser and go to
- Save the
wp-config.phpfile and re-upload it to your server if you downloaded it to edit.
Step 5: Run the WordPress Installation Script
You are almost there! Now you’ll complete the final setup steps directly through your web browser.
- Open your web browser and navigate to the URL where you installed WordPress.
- If you installed it in the root directory:
http://yourdomain.com(orhttps://yourdomain.com) - If you installed it in a subfolder:
http://yourdomain.com/subfolder/(orhttps://yourdomain.com/subfolder/) - Occasionally, you might need to specifically go to
http://yourdomain.com/wp-admin/install.phpif the redirect doesn’t happen automatically.
- If you installed it in the root directory:
- WordPress will detect that it needs to be installed and will present you with a setup wizard.
- Choose Language: Select your preferred language for the WordPress dashboard and click “Continue.”
- Welcome Screen: This screen reconfirms that you have your database details ready. Click “Let’s go!”
- Information Needed: WordPress will then ask for crucial information for your site:
- Site Title: The main title of your website.
- Username: Choose a secure, unique username for your WordPress admin login (again, avoid “admin”).
- Password: Enter the strong password you created earlier or create a new one here.
- Your Email: Provide an active email address for administrative purposes.
- Search Engine Visibility: It’s generally advisable to leave “Discourage search engines from indexing this site” unchecked unless you are developing a site offline or genuinely do not want it publicly discoverable yet. For a live site, you want search engines to find you, as this directly impacts your Brand visibility and potential for Money through traffic.
- Click “Install WordPress.”
Step 6: Log In to Your Dashboard
Once the installation is successfully completed, you’ll see a success message and a “Log In” button. Click it, enter your chosen username and password, and you’ll be greeted by your brand-new WordPress dashboard! You’ve successfully navigated a more complex technical process, demonstrating a deeper understanding of web Tech infrastructure.
Post-Installation Essentials and Next Steps: Building Your Digital Empire
Congratulations! You’ve successfully installed WordPress. However, the journey doesn’t end there. To ensure your website is secure, functional, and optimized to serve your Brand and Money goals, there are several crucial steps to take immediately after installation. These initial configurations lay the groundwork for a robust, user-friendly, and performant online presence.
1. General Settings Configuration
Start by fine-tuning the foundational settings of your site.
- Navigate to Settings > General in your WordPress dashboard.
- Site Title & Tagline: Reconfirm or adjust these to accurately reflect your Brand.
- WordPress Address (URL) & Site Address (URL): Ensure these are correct (e.g., using
httpsif you have an SSL certificate). Do not change these unless you know exactly what you are doing, as incorrect URLs can break your entire site. - Admin Email Address: Confirm it’s correct and accessible.
- Membership: If you plan to allow users to register on your site (e.g., for comments, forums, or a membership site), check “Anyone can register.” Then, set a default role for new users (e.g., “Subscriber” is usually appropriate).
- Timezone: Set your correct geographical timezone.
- Date Format & Time Format: Choose your preferred display formats for content.
- Week Starts On: Select the first day of your week.
- Click “Save Changes.”
2. Configure Permalinks for SEO and User Experience
Permalinks are the permanent URLs to your individual posts, pages, and other content. Well-structured permalinks are absolutely vital for both Search Engine Optimization (SEO) and user experience.
- Go to Settings > Permalinks.
- The default WordPress permalink structure isn’t ideal for SEO or readability. The most common, user-friendly, and SEO-friendly option is “Post name”. This creates clean, descriptive URLs like
yourdomain.com/sample-post/. - Select “Post name” and click “Save Changes.”
3. Delete Default Content
WordPress comes with some default content (a sample post named “Hello world!”, a sample page, and a sample comment). It’s good practice to delete these to start with a clean slate:
- Go to Posts > All Posts, hover over “Hello world!” and click “Trash.”
- Go to Pages > All Pages, hover over “Sample Page” and click “Trash.”
- Go to Comments, hover over the sample comment and click “Trash.”
4. Install a Theme to Define Your Site’s Look and Feel
Your WordPress theme dictates the visual design, layout, and overall aesthetics of your website. It’s a huge component of your Brand identity and user experience.
- Go to Appearance > Themes.
- Click the “Add New” button.
- You can browse thousands of free themes from the official WordPress Theme Directory, search for specific themes by name or features, or upload a premium (paid) theme you’ve purchased.
- Hover over a theme you like and click “Preview” to see how it might look, then “Install,” and finally “Activate.”
- Many themes also come with extensive customization options, typically found under Appearance > Customize, where you can adjust colors, fonts, headers, footers, and various other design elements to perfectly match your brand’s visual identity.
5. Install Essential Plugins for Functionality and Security
Plugins extend the functionality of your WordPress site, adding features that aren’t included in the core software. Think of them as apps for your website, enhancing its Tech capabilities. While there are tens of thousands of plugins available, some are almost universally recommended for any professional website:
- Security Plugin: Absolutely essential for protecting your site from hacks, malware, brute-force attacks, and other vulnerabilities. Popular options include Wordfence Security, Sucuri Security, or iThemes Security. This is a critical Tech and Brand (reputation) concern.
- SEO Plugin: Helps optimize your content for search engines, making it easier for potential visitors to find your site through Google and other search engines. Yoast SEO and Rank Math are excellent, feature-rich choices. This directly impacts your Money potential by driving organic traffic.
- Caching Plugin: Significantly improves your website’s speed and performance by storing static versions of your pages. W3 Total Cache, WP Super Cache, or WP Rocket (a premium option) are widely used. Site speed is crucial for user experience and SEO.
- Backup Plugin: Automates regular backups of your entire site (files and database), providing a safety net so you can easily restore your site if anything goes wrong. UpdraftPlus and BackupBuddy are reliable options.
- Contact Form Plugin: Allows visitors to easily contact you through a form on your website. WPForms, Contact Form 7, or Ninja Forms are popular, user-friendly choices.
- Image Optimization Plugin: Automatically compresses images to improve page load speed without sacrificing visual quality. Smush or Imagify are good options.
To install a plugin:
- Go to Plugins > Add New.
- Search for the plugin by name in the search bar.
- Click “Install Now,” then “Activate.”
- Always configure the plugin’s settings after activation, as most require some setup.
6. Set Up Regular Backups
Beyond a dedicated backup plugin, ensure your web host also provides regular, automated backups. Having multiple backup points (your host’s and your plugin’s) is the absolute best practice for disaster recovery. This protects your significant investment in your site, which is a key aspect of “Business Finance” for any online venture.
7. Explore and Learn
Finally, dedicate some time to exploring your WordPress dashboard. Experiment with creating a new post or page, uploading images to the media library, and familiarizing yourself with all the settings. The more comfortable you become with the interface and its capabilities, the more confident and efficient you’ll be in managing and growing your website. Remember, WordPress boasts a vast, supportive community and countless resources available online if you ever get stuck or wish to learn more advanced techniques. Embrace the continuous learning that comes with mastering any powerful Tech tool.
Conclusion: Your Digital Journey Begins
Installing WordPress is a foundational and empowering step in building your online presence, but it marks just the beginning of an exciting and potentially rewarding digital journey. By diligently following this comprehensive guide, you’ve successfully set up a powerful, flexible, and scalable platform that can grow seamlessly with your ambitions. Whether you’re a technophile eager to explore new software, an entrepreneur meticulously building a Brand and a business, or an individual looking to monetize content and generate Money online, WordPress provides the robust Tech tools you need.
Embrace the ongoing learning process, experiment with different themes and plugins to find what best suits your vision, and consistently create valuable, engaging content. With WordPress serving as your technological backbone, your brand can truly flourish, your message can reach a wider and more targeted audience, and your potential for online income becomes a tangible reality. Welcome to the dynamic world of WordPress – your digital future starts now!
aViewFromTheCave is a participant in the Amazon Services LLC Associates Program, an affiliate advertising program designed to provide a means for sites to earn advertising fees by advertising and linking to Amazon.com. Amazon, the Amazon logo, AmazonSupply, and the AmazonSupply logo are trademarks of Amazon.com, Inc. or its affiliates. As an Amazon Associate we earn affiliate commissions from qualifying purchases.