In the ever-evolving landscape of technology, the allure of operating systems beyond the mainstream is undeniable. While Windows and macOS dominate the personal computing market, Linux stands as a powerful, flexible, and open-source alternative that appeals to a growing audience of tech enthusiasts, developers, and privacy-conscious individuals. Whether you’re looking to revive an old computer, experiment with a new development environment, or simply explore the depths of computing freedom, understanding “how to install Linux” is the first step into a vibrant and expansive digital ecosystem.
This guide is designed to demystify the Linux installation process, breaking it down into manageable steps and exploring the underlying concepts. We’ll touch upon why you might choose Linux, the different flavors available, and the practicalities of getting it up and running on your hardware, all while keeping in mind the broader context of technology, branding, and even financial considerations that might influence your decision.

Understanding the Linux Ecosystem: More Than Just an Operating System
Before diving into the installation itself, it’s crucial to grasp what makes Linux unique. At its core, Linux is a kernel – the fundamental part of an operating system that manages the computer’s resources. However, when people refer to “Linux,” they are typically talking about a distribution (or “distro”). These distributions bundle the Linux kernel with a wide array of software, including system utilities, libraries, desktop environments, and applications, to create a complete, user-friendly operating system.
The Philosophy of Open Source and Freedom
The defining characteristic of Linux is its open-source nature. This means its source code is freely available for anyone to view, modify, and distribute. This open philosophy fosters collaboration, innovation, and transparency, which are key tenets of the tech world. For users, this translates to:
- Freedom and Control: You have unparalleled control over your system. You can customize nearly every aspect to your liking.
- Security: The open-source community actively scrutinizes the code, leading to rapid identification and patching of vulnerabilities. Many users find Linux to be inherently more secure than other operating systems.
- Cost-Effectiveness: Most Linux distributions are entirely free to download, install, and use, eliminating the often significant licensing fees associated with proprietary operating systems. This aligns with smart personal and business finance principles, allowing resources to be allocated elsewhere.
- Vast Software Repository: A wealth of free and open-source software is readily available, covering everything from office suites and web browsers to professional-grade design and development tools.
Navigating the Linux Distributions Landscape
The sheer number of Linux distributions can be daunting for newcomers. However, this diversity is also a strength, allowing users to select a distro that best suits their needs and technical proficiency. Distributions can be broadly categorized by their target audience and ease of use:
Beginner-Friendly Distributions: Ease of Transition
For those new to Linux, starting with a user-friendly distribution is highly recommended. These distros prioritize ease of use, offering familiar interfaces and straightforward installation processes.
- Ubuntu: Arguably the most popular Linux distribution, Ubuntu is known for its excellent hardware compatibility, extensive documentation, and a large, supportive community. It offers a clean and intuitive desktop experience.
- Linux Mint: Built upon Ubuntu, Linux Mint aims to provide an even more familiar and comfortable experience for users transitioning from Windows. It comes with many codecs and proprietary software pre-installed, making it a great out-of-the-box solution.
- Pop!OS: Developed by System76, Pop!OS is designed with developers and creative professionals in mind. It offers a streamlined workflow, excellent NVIDIA graphics driver support, and a focus on productivity.
Advanced Distributions: Power and Customization
For users who crave ultimate control and are comfortable with more complex configurations, several advanced distributions offer a highly customizable experience.
- Fedora: Known for its cutting-edge software and commitment to free and open-source principles, Fedora is often a testing ground for new technologies that eventually make their way into other distributions like Red Hat Enterprise Linux.
- Debian: One of the oldest and most stable Linux distributions, Debian is the foundation for many other distros, including Ubuntu. It’s renowned for its commitment to free software and its robust package management system.
- Arch Linux: Arch Linux follows a “rolling release” model, meaning it’s constantly updated with the latest software. It’s known for its simplicity (in design, not necessarily ease of use) and its highly customizable nature, requiring users to build their system from the ground up.
The choice of distribution can also impact your personal branding within the tech community. Using a well-regarded distro can signal your technical acumen and commitment to open-source principles.
Preparing for Installation: Essential Steps Before You Begin
Installing any operating system requires careful preparation. For Linux, this involves understanding your hardware, backing up your data, and choosing your installation method. This stage is critical for a smooth and successful setup.
Assessing Your Hardware and System Requirements
Linux generally runs on a wide range of hardware, from aging machines to the latest powerhouses. However, it’s good practice to check the minimum and recommended system requirements for the specific distribution you’ve chosen. Key considerations include:
- Processor: Most modern CPUs are compatible, but older or very low-power processors might limit performance.
- RAM (Memory): More RAM generally leads to a smoother experience, especially with graphical desktop environments. 4GB is often considered a minimum for a comfortable experience, with 8GB or more being ideal.
- Storage Space: Distributions vary in size, but allotting at least 20-30GB for the operating system and applications is a good starting point. More space is always better for data and future software installations.
- Graphics Card: While many Linux distributions have excellent open-source graphics drivers, some proprietary drivers (especially for NVIDIA) might require specific steps during or after installation.
Backing Up Your Data: The Unskippable Step
This is arguably the most critical preparation step, regardless of your technical expertise. Installing a new operating system can, in rare cases, lead to data loss if not performed correctly.
- External Hard Drives and Cloud Storage: Copy all your important documents, photos, videos, and any other valuable data to an external storage device or a reputable cloud storage service.
- Configuration Files: For advanced users, backing up specific configuration files for applications or system settings can save significant time and effort during re-setup.
Choosing Your Installation Method
There are several ways to install Linux, each offering different levels of flexibility and suitability for various scenarios.
Live USB/DVD: Try Before You Install
Most Linux distributions can be booted directly from a USB drive or DVD without installing them onto your hard drive. This “live environment” allows you to:
- Test Compatibility: See if your hardware is recognized and functions correctly (Wi-Fi, audio, graphics, etc.).
- Explore the Desktop: Get a feel for the user interface and pre-installed applications.
- Perform the Installation: The installer is usually launched directly from the live environment.
This method is ideal for most users, especially those new to Linux, as it provides a risk-free way to experience the operating system.
Dual Booting: Sharing Your Hard Drive
Dual booting allows you to install Linux alongside your existing operating system (e.g., Windows). When you start your computer, you’ll be presented with a boot menu allowing you to choose which OS to load. This is a popular option for users who want to experiment with Linux without completely abandoning their current system. However, it requires careful partitioning of your hard drive, and careful attention during the installation process to avoid overwriting your existing OS.
Virtual Machines: Sandbox Your Linux Experience
A virtual machine (VM) is software that emulates a complete computer system within your existing operating system. Popular VM software includes VirtualBox and VMware. Installing Linux in a VM:
- Provides a Safe Environment: You can experiment freely without any risk to your host operating system or data.
- Is Resource Intensive: Performance can be slower compared to a native installation as resources are shared.
- Is Ideal for Testing and Development: It’s excellent for trying out different distributions or testing software in isolation.
The Installation Process: Step-by-Step Guide
While the exact steps can vary slightly between distributions, the general process for installing Linux from a bootable USB drive is remarkably consistent.
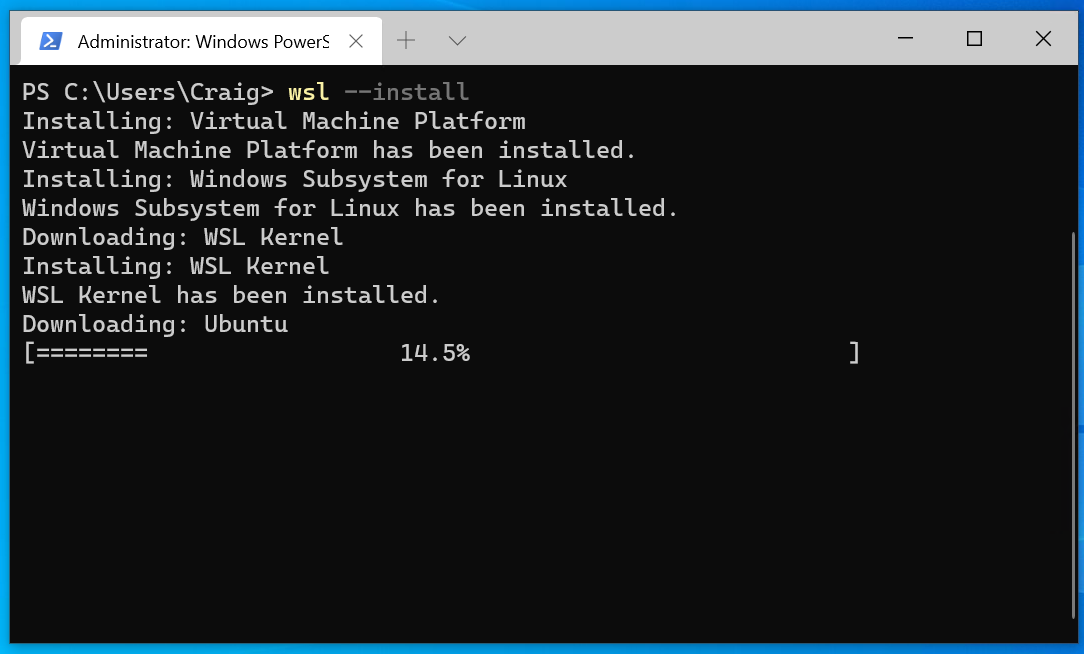
1. Creating a Bootable USB Drive
This is where you’ll transfer the Linux distribution’s installation files to a USB drive, making it bootable.
- Download the ISO Image: Go to the official website of your chosen Linux distribution (e.g., Ubuntu.com, Linuxmint.com) and download the
.isofile. This file is a disk image of the operating system. - Use a USB Creator Tool: You’ll need specialized software to write the ISO image to your USB drive. Popular and user-friendly options include:
- Rufus (Windows): A highly regarded tool for creating bootable USB drives.
- balenaEtcher (Windows, macOS, Linux): A simple, cross-platform tool that makes the process very straightforward.
- UNetbootin (Windows, macOS, Linux): Another popular choice for creating bootable live USB drives.
- Select ISO and USB Drive: Open your chosen tool, select the downloaded ISO file, choose your USB drive (ensure it’s empty or you’re okay with erasing its contents), and start the process.
2. Booting from the USB Drive
Once your bootable USB is ready, you’ll need to tell your computer to boot from it instead of its internal hard drive.
- Restart Your Computer: With the USB drive plugged in, restart your computer.
- Access Boot Menu or BIOS/UEFI Settings: Immediately after powering on, you’ll need to press a specific key to enter the boot menu or your system’s BIOS/UEFI settings. Common keys include
F2,F10,F12,DEL, orESC. The exact key is usually displayed briefly on the screen during startup. - Select the USB Drive: In the boot menu, select your USB drive as the primary boot device. If you’re in BIOS/UEFI settings, navigate to the “Boot” section and change the boot order to prioritize the USB drive.
- Save and Exit: Save your changes in the BIOS/UEFI settings and exit. Your computer will now attempt to boot from the USB drive.
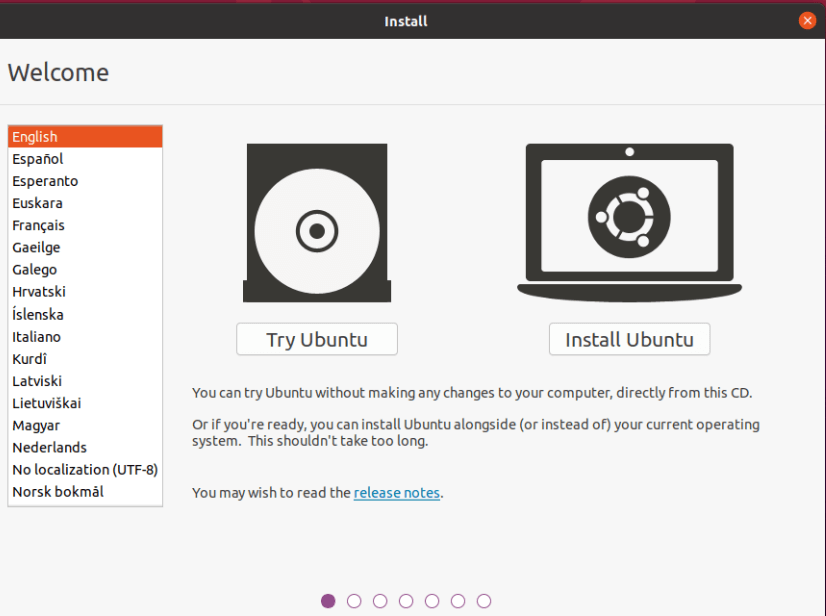
3. The Installation Wizard
Upon successful booting from the USB drive, you’ll typically be greeted with a welcome screen. Here, you’ll have the option to “Try [Distribution Name]” or “Install [Distribution Name]”.
- “Try” Option: Select this to boot into the live environment. You can explore and test your hardware. When you’re ready to install, you’ll usually find an “Install [Distribution Name]” icon on the desktop.
- “Install” Option: This will directly launch the installation wizard.
The installation wizard will guide you through the following key stages:
Language and Keyboard Layout
Select your preferred language for the installation process and your system, and choose your keyboard layout.
Network Connection
Connect to your Wi-Fi or wired network. This is often necessary to download updates and additional software during the installation.
Installation Type: Crucial for Dual Booting
This is one of the most important decisions.
- Install alongside [Existing OS]: If you’re dual-booting, this option will attempt to automatically partition your drive to make space for Linux. It’s convenient but offers less control.
- Erase disk and install [Distribution Name]: This will wipe your entire hard drive and install only Linux. Use with extreme caution!
- Something else: This option provides manual partitioning. It’s recommended for users who want full control over how their disk is organized, especially for dual-booting or setting up specific partition schemes. This is where you’ll create partitions for
/(root),swap(virtual memory), and/home(user data).
User Account and Password
Create your username, choose a computer name (hostname), and set a strong password. This password will be used for logging in and for administrative tasks (using sudo).
Installation Progress
The installer will now copy files to your hard drive. This can take anywhere from 15 minutes to over an hour, depending on your hardware speed and the distribution.
4. Restarting and First Boot
Once the installation is complete, you’ll be prompted to restart your computer.
- Remove USB Drive: Crucially, remove the USB drive when prompted. Otherwise, your computer might boot back into the installer.
- Welcome to Your New OS: Your computer should now boot into your newly installed Linux distribution. You’ll be presented with the login screen, where you can enter the password you created.
Post-Installation: Optimizing Your Linux Experience
Congratulations! You’ve successfully installed Linux. The journey doesn’t end here; there are a few essential steps to optimize your new system.
Updating Your System
The first thing you should always do after installing Linux is to update all your installed software. This ensures you have the latest security patches and feature updates.
- Graphical Update Managers: Most user-friendly distributions have a graphical “Software Updater” or “Update Manager” tool. Simply open it and click to install any available updates.
- Command Line (for advanced users):
- For Debian/Ubuntu-based systems:
sudo apt update && sudo apt upgrade - For Fedora-based systems:
sudo dnf upgrade - For Arch Linux:
sudo pacman -Syu
- For Debian/Ubuntu-based systems:
Installing Additional Software
Linux offers a vast universe of software accessible through its package managers.
- Software Centers: Distributions like Ubuntu and Linux Mint have graphical “Software Centers” or “App Stores” where you can browse and install applications easily.
- Command Line (for power users): Use your distribution’s package manager to install software. For example:
sudo apt install vlc(to install VLC media player on Debian/Ubuntu)sudo dnf install gimp(to install GIMP on Fedora)
Customizing Your Desktop Environment
Linux is renowned for its customization options. Whether you’re using GNOME, KDE Plasma, XFCE, or another desktop environment, you can tailor it to your preferences. This includes changing themes, wallpapers, icons, and panel layouts. This level of personalization can significantly enhance your digital productivity and reflect your personal brand.
Exploring Linux for Tech, Brand, and Money
Your new Linux system opens doors to numerous possibilities aligned with the core topics of this website:
- Tech: Dive into powerful development tools, explore AI frameworks, experiment with digital security tools, and optimize your workflow with productivity apps. The command line offers unparalleled power for system administration and automation.
- Brand: Create and manage professional websites, experiment with design software, and even build your personal brand as a Linux advocate. The transparency and control offered by Linux can be a strong selling point for individuals and businesses.
- Money: Reduce software costs significantly by leveraging free and open-source alternatives. Explore opportunities for online income by developing Linux-based applications or offering technical support. Smart financial planning often involves minimizing recurring expenses, and Linux excels here.
Conclusion
Installing Linux is a gateway to a more empowered and flexible computing experience. By understanding the process, preparing adequately, and embracing the rich ecosystem of distributions and software, you can unlock a world of technological exploration, creative freedom, and efficient resource management. Whether you’re a seasoned tech professional or a curious newcomer, the journey of installing and using Linux is a rewarding one, offering a profound sense of control and a direct connection to the spirit of innovation.
aViewFromTheCave is a participant in the Amazon Services LLC Associates Program, an affiliate advertising program designed to provide a means for sites to earn advertising fees by advertising and linking to Amazon.com. Amazon, the Amazon logo, AmazonSupply, and the AmazonSupply logo are trademarks of Amazon.com, Inc. or its affiliates. As an Amazon Associate we earn affiliate commissions from qualifying purchases.